
Home>Create & Decorate>DIY & Crafts>DIY Sandbox: Create Your Own Backyard Play Area
DIY & Crafts
DIY Sandbox: Create Your Own Backyard Play Area
Published: May 9, 2024

Senior Editor in Create & Decorate, Kathryn combines traditional craftsmanship with contemporary trends. Her background in textile design and commitment to sustainable crafts inspire both content and community.
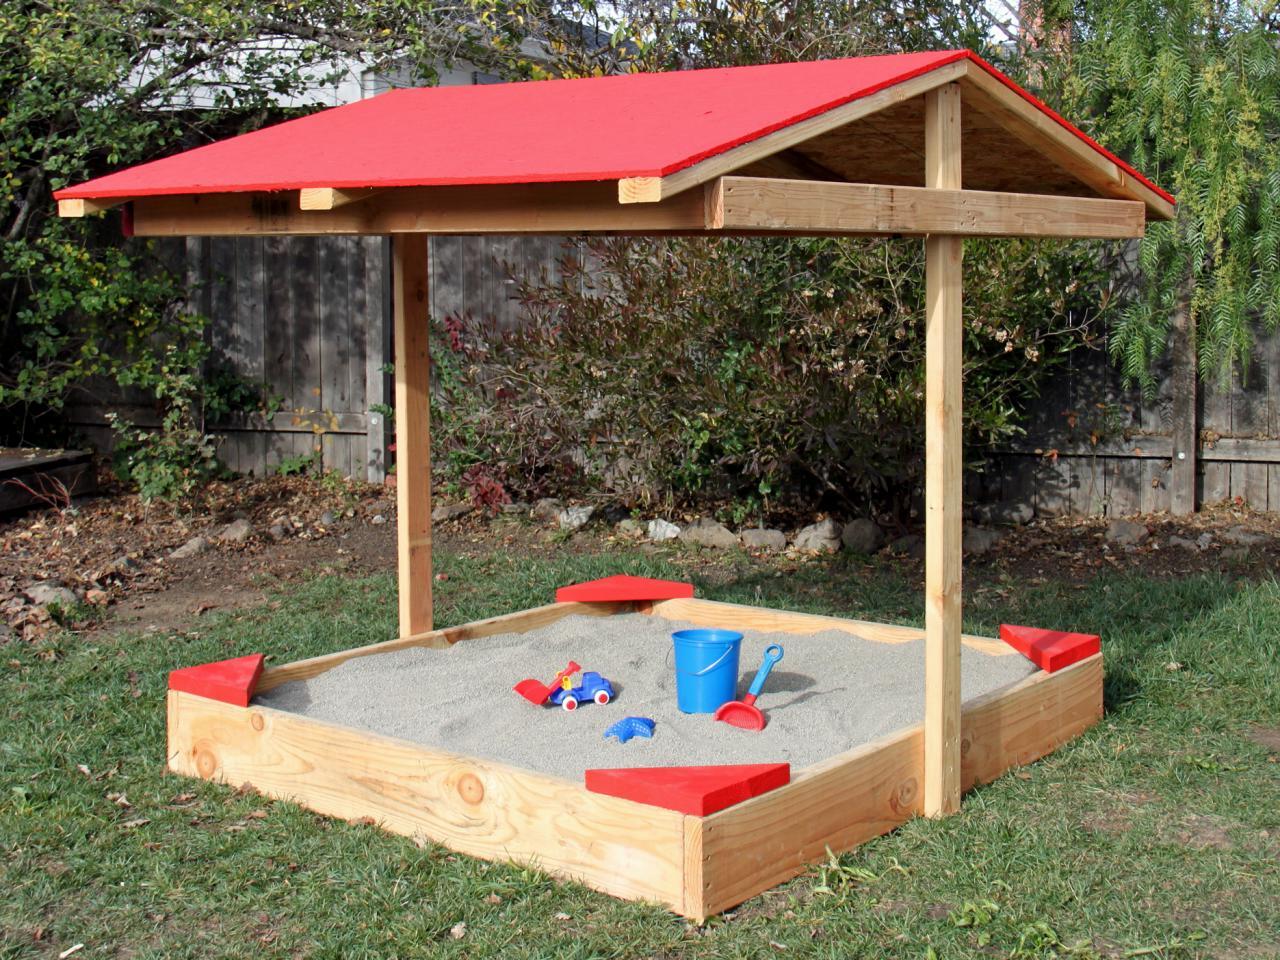
Create a fun and safe backyard play area with our DIY sandbox guide. Get creative with DIY & Crafts to build a custom play space for your kids.
(Many of the links in this article redirect to a specific reviewed product. Your purchase of these products through affiliate links helps to generate commission for Twigandthistle.com, at no extra cost. Learn more)
Introduction
So, you want to create a fun and safe play area for your kids right in your own backyard? Building a DIY sandbox is a fantastic way to provide hours of entertainment for your little ones while also adding a charming feature to your outdoor space. Not only is it a relatively simple project, but it also allows you to customize the size and design to fit your specific needs. In this article, we'll guide you through the process of creating your very own DIY sandbox that will be the envy of the neighborhood. Let's get started!
Choosing the Right Location for Your DIY Sandbox
When selecting the perfect spot for your DIY sandbox, there are a few key factors to consider. Here's how to choose the right location:
-
Level Ground: Look for an area in your yard that is relatively flat and level. This will make the construction process much easier and ensure that the sandbox sits evenly.
-
Sun Exposure: Consider the amount of sun exposure the area receives throughout the day. While some sunlight is beneficial for keeping the sand dry and free of moisture, too much direct sun can make the sandbox too hot for little ones to play in comfortably. Aim for a balance of sun and shade.
-
Proximity to Supervision: It's important to place the sandbox within view of your home or outdoor living space. This allows you to keep an eye on your children while they play and ensures they are within earshot if they need assistance.
-
Accessibility: Choose a location that is easily accessible from your home and other outdoor play areas. This will encourage frequent use and make it convenient for kids to transition between different activities.
-
Away from Hazards: Avoid placing the sandbox near potential hazards such as thorny bushes, overhanging branches, or areas where water tends to pool. This will help create a safe and enjoyable play environment for your children.
By carefully considering these factors, you can select the ideal location for your DIY sandbox, setting the stage for countless hours of imaginative play and outdoor fun for your little ones.
Materials and Tools Needed
Before you begin building your DIY sandbox, it's essential to gather all the necessary materials and tools. Here's what you'll need to get started:
Materials:
- Lumber: Purchase high-quality, untreated lumber for the frame of the sandbox. Opt for durable wood that can withstand outdoor elements.
- Plywood or Bottom Liner: You'll need plywood or a bottom liner to create the base of the sandbox and prevent the sand from spilling onto the ground.
- Hardware Cloth or Landscape Fabric: This material will serve as a barrier to keep out pests and prevent weeds from growing up into the sandbox.
- Screws or Nails: Choose corrosion-resistant screws or nails to assemble the sandbox frame securely.
- Play Sand: Select clean, washed play sand that is specifically designed for use in sandboxes. Avoid using beach sand, as it may contain impurities and debris.
Tools:
- Measuring Tape: Accurate measurements are crucial for ensuring the sandbox is built to the desired dimensions.
- Saw: A saw will be necessary for cutting the lumber to the appropriate lengths.
- Drill with Bits: Use a drill with the appropriate bits for creating pilot holes and driving screws into the wood.
- Hammer: If you're using nails, a hammer will be essential for securing the frame and other components.
- Shovel: A shovel will come in handy for leveling the ground and filling the sandbox with sand.
- Safety Gear: Don't forget to wear safety goggles and gloves when working with tools and materials to protect yourself from potential hazards.
By ensuring you have all the required materials and tools on hand, you'll be well-prepared to tackle the construction of your DIY sandbox with confidence and efficiency.
Step-by-Step Instructions for Building Your DIY Sandbox
Now that you have gathered all the necessary materials and tools, it's time to roll up your sleeves and start building your DIY sandbox. Follow these step-by-step instructions to bring your backyard play area to life:
-
Prepare the Site: Begin by marking the area where the sandbox will be located. Use a measuring tape to outline the dimensions, ensuring it is level and square. Remove any grass, rocks, or debris from the marked area, and use a shovel to level the ground.
-
Assemble the Frame: Cut the lumber to the appropriate lengths based on your desired sandbox dimensions. Assemble the pieces to create a square or rectangular frame, ensuring the corners are square. Use screws or nails to secure the corners and reinforce the structure.
-
Add the Bottom Liner: Place the plywood or bottom liner inside the frame to create a barrier between the sand and the ground. This will prevent the sand from spilling out and help maintain a clean play area.
-
Install the Barrier: If using hardware cloth or landscape fabric, attach it to the bottom of the frame to prevent pests and weeds from entering the sandbox. Trim any excess material and secure it in place.
-
Fill with Play Sand: Once the frame and barrier are in place, fill the sandbox with clean, washed play sand. Use a shovel to distribute the sand evenly and achieve the desired depth, typically around 6-8 inches.
-
Finishing Touches: Smooth the surface of the sand to create an inviting play area for your kids. Consider adding a cover or canopy to protect the sandbox from rain, animals, and debris when not in use.
-
Safety Check: Before allowing your children to play in the sandbox, inspect the construction for any sharp edges, protruding nails, or other potential hazards. Make any necessary adjustments to ensure a safe play environment.
By following these step-by-step instructions, you can build a sturdy and inviting DIY sandbox that will provide endless entertainment for your children right in the comfort of your own backyard. Get ready to watch their imaginations soar as they dig, build, and play in their new outdoor oasis!
Tips for Maintaining and Upkeeping Your DIY Sandbox
Maintaining your DIY sandbox is essential to ensure that it remains a safe and enjoyable play area for your children. Here are some valuable tips for keeping your sandbox in top condition:
Regularly Rake and Level the Sand
To prevent the formation of uneven surfaces and ensure a consistent depth of sand, make it a habit to rake and level the sand in your sandbox regularly. This will also help distribute any moisture and keep the sand dry and inviting for play.
Cover the Sandbox When Not in Use
Using a cover or canopy to protect the sandbox from the elements when it's not in use can help prolong the life of the sand and prevent debris, leaves, and animal droppings from accumulating in the play area. This simple step can save you time and effort in cleaning and maintaining the sandbox.
Check for Pests and Weeds
Regularly inspect the sandbox for signs of pests such as ants, spiders, or other insects. Additionally, keep an eye out for any weeds that may attempt to grow through the barrier. Promptly address any pest or weed issues to maintain a clean and safe play environment for your children.
Address Drainage and Moisture Concerns
If your sandbox is not equipped with a cover, it's important to address any drainage and moisture concerns. Ensure that the sandbox has proper drainage to prevent water from pooling inside. Additionally, consider using a moisture-resistant bottom liner to minimize the impact of rain and humidity on the sand.
Replace Sand Periodically
Over time, the sand in your DIY sandbox may become compacted, soiled, or depleted. Consider replacing the sand periodically to maintain a clean and hygienic play area for your children. This will also help rejuvenate the sandbox and provide a fresh play experience.
Conduct Safety Inspections
Regularly inspect the sandbox for any signs of wear and tear, protruding nails, or splintered wood. Address any safety concerns promptly to ensure that the sandbox remains a secure and hazard-free play space for your kids.
By following these tips for maintaining and upkeeping your DIY sandbox, you can ensure that it continues to be a cherished and safe play area for your children to enjoy for years to come.
Conclusion
In conclusion, creating your own DIY sandbox is a rewarding and enjoyable project that not only adds a delightful play area to your backyard but also provides a space for your children to explore, imagine, and have fun. By carefully selecting the location, gathering the necessary materials and tools, and following the step-by-step instructions, you can build a customized sandbox that meets your family's needs. Additionally, by implementing the tips for maintaining and upkeeping your DIY sandbox, you can ensure that it remains a safe, clean, and inviting space for your children to enjoy outdoor play. So, roll up your sleeves, gather your materials, and get ready to create a backyard oasis that will bring joy and laughter to your little ones for years to come. Happy sandbox building!