
Home>Create & Decorate>DIY & Crafts>How To Build A Fire Pit With Bricks
DIY & Crafts
How To Build A Fire Pit With Bricks
Published: February 28, 2024

Senior Editor in Create & Decorate, Kathryn combines traditional craftsmanship with contemporary trends. Her background in textile design and commitment to sustainable crafts inspire both content and community.
Learn how to build a DIY fire pit with bricks in your backyard. Get creative with these easy-to-follow instructions for a fun and functional outdoor project. Perfect for DIY & Crafts enthusiasts!
(Many of the links in this article redirect to a specific reviewed product. Your purchase of these products through affiliate links helps to generate commission for Twigandthistle.com, at no extra cost. Learn more)
Introduction
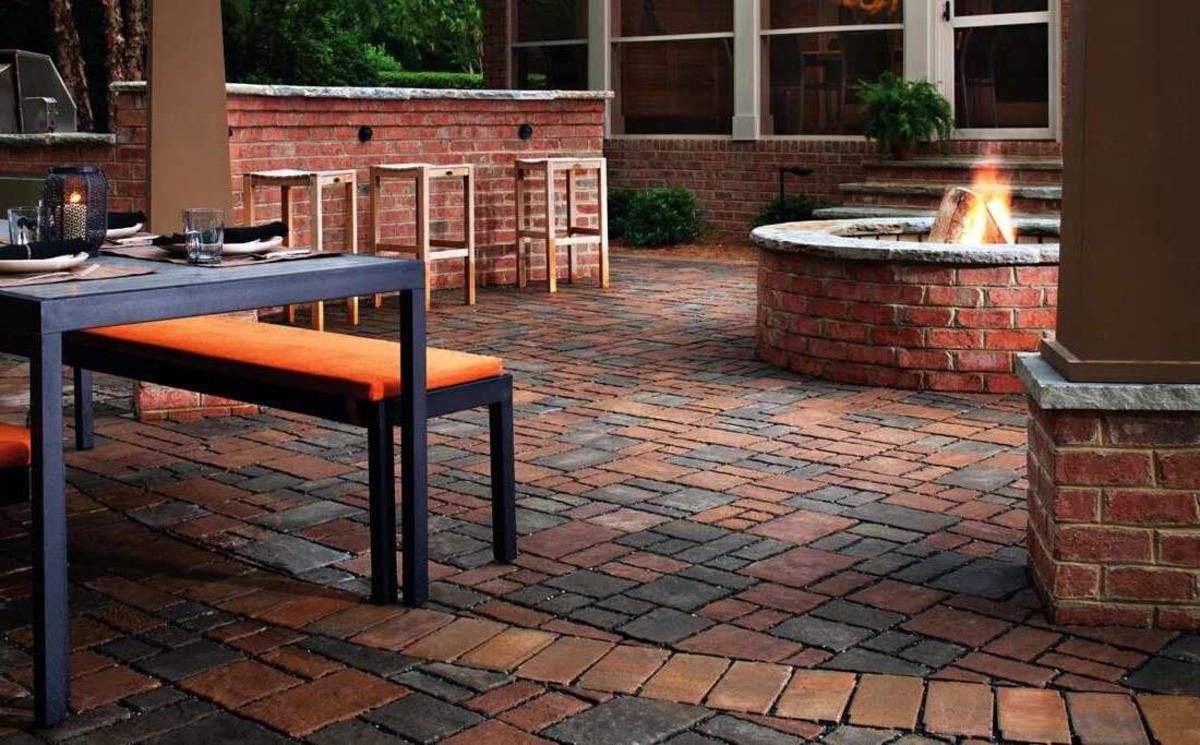
Building a fire pit with bricks is a rewarding and practical DIY project that can transform your outdoor space into a cozy and inviting gathering spot. Whether you're envisioning relaxed evenings by the fire with family and friends or simply seeking a tranquil retreat to unwind, a brick fire pit can add warmth and charm to your backyard. This timeless addition not only serves as a focal point but also provides a functional and aesthetic upgrade to your outdoor living area.
A well-constructed brick fire pit offers a versatile and durable solution for creating a designated area for outdoor fires. It can be used for various purposes, including roasting marshmallows, cooking over an open flame, or simply enjoying the mesmerizing dance of the flames. Additionally, a brick fire pit can enhance the overall ambiance of your outdoor space, making it an ideal setting for gatherings, celebrations, or even solitary moments of relaxation.
By embarking on this DIY project, you have the opportunity to personalize your fire pit to suit your preferences and complement your outdoor decor. Whether you opt for a traditional circular design or a more contemporary square shape, the versatility of brick allows for endless creative possibilities. Furthermore, the process of building a fire pit with bricks can be a fulfilling and enjoyable experience, offering a sense of accomplishment as you witness your vision come to life.
As you embark on this journey to create a brick fire pit, it's essential to approach the project with careful planning and attention to detail. From selecting the right location to choosing the appropriate materials, each step plays a crucial role in ensuring the success and longevity of your fire pit. With the right guidance and a willingness to embrace the DIY spirit, you can embark on this endeavor with confidence, knowing that the end result will be a captivating addition to your outdoor space.
Step 1: Gather Materials
Before diving into the construction of your brick fire pit, it's essential to gather all the necessary materials and tools. By ensuring that you have everything at your disposal, you can streamline the building process and minimize interruptions. Here's a comprehensive list of materials and tools you'll need for this project:
Materials:
- Bricks: Select high-quality, fire-resistant bricks that can withstand high temperatures. Common options include clay bricks or fire bricks, which are specifically designed for use in fire pits.
- Gravel: This will be used as a base for the fire pit, providing stability and aiding in drainage.
- Sand: You'll need sand for leveling the ground and laying the bricks.
- Steel Ring or Grate: Depending on your design preference, you may opt for a steel fire ring or a grate to contain the fire within the pit.
- Masonry Adhesive: Choose a heat-resistant adhesive to secure the bricks in place.
- Safety Gear: This includes work gloves and safety goggles to protect yourself during the construction process.
Tools:
- Shovel: Essential for digging and leveling the ground.
- Tape Measure: To ensure accurate dimensions and alignment of the fire pit.
- Level: To ensure the bricks are laid evenly and the fire pit is balanced.
- Rubber Mallet: Useful for tapping the bricks into place without causing damage.
- Wheelbarrow: For transporting gravel and sand to the construction site.
- Broom: To sweep and clean the work area as needed.
- Bucket: For mixing mortar or carrying small amounts of gravel and sand.
By gathering these materials and tools, you'll be well-prepared to commence the construction of your brick fire pit. With careful planning and attention to detail, you can set the stage for a smooth and successful building process, bringing you one step closer to enjoying memorable moments around the crackling flames of your newly constructed fire pit.
Step 2: Choose a Location
Selecting the ideal location for your brick fire pit is a crucial decision that can significantly impact its functionality and aesthetic appeal. Before breaking ground, take the time to carefully assess your outdoor space and consider the following factors to ensure that the chosen location is well-suited for your fire pit.
Consider Safety and Regulations
First and foremost, prioritize safety when choosing a location for your fire pit. Ensure that it is positioned away from any flammable structures, overhanging branches, or other potential fire hazards. Additionally, familiarize yourself with local regulations and guidelines regarding fire pit placement and clearance distances. Adhering to these regulations not only promotes safety but also prevents potential conflicts with local authorities.
Evaluate Wind Patterns
Take note of prevailing wind patterns in your outdoor space. Position the fire pit in an area where the wind is less likely to blow smoke directly toward your home or seating areas. By strategically considering wind direction, you can minimize smoke exposure and create a more comfortable environment for yourself and your guests.
Assess Proximity to Seating Areas
Consider the proximity of the fire pit to seating areas. Ideally, the location should facilitate easy access and create a cozy ambiance for gatherings. Whether you envision intimate conversations around the fire or larger gatherings, ensuring that the fire pit is conveniently located can enhance the overall experience for everyone.
Survey Ground Stability
Examine the ground where you plan to build the fire pit. Opt for a level area that provides a stable foundation for the structure. Avoid low-lying or uneven ground that may collect water, as this can affect the longevity and safety of the fire pit. Additionally, consider the ease of access for maintenance and cleaning when assessing ground stability.
Embrace the Surroundings
Take into account the natural surroundings and landscape features of your outdoor space. Whether you have a picturesque view, lush greenery, or other landscape elements, leverage these features to enhance the ambiance around the fire pit. By integrating the fire pit harmoniously with its surroundings, you can create a captivating focal point that complements the overall aesthetic of your outdoor area.
By carefully evaluating these considerations, you can confidently select a location that optimizes safety, comfort, and visual appeal for your brick fire pit. Once the ideal location is identified, you can proceed to the next steps of preparing the ground and bringing your vision of a charming outdoor retreat to fruition.
Step 3: Prepare the Ground
Preparing the ground for your brick fire pit is a crucial step that sets the foundation for the structural integrity and longevity of the entire project. By meticulously attending to the ground preparation process, you can ensure that your fire pit is not only visually appealing but also stable and safe for countless fireside gatherings.
Clear the Area
Begin by clearing the designated area of any debris, vegetation, or obstructions. Use a shovel to remove grass, weeds, and any organic matter from the surface. This step is essential for creating a clean and level base for the fire pit.
Mark the Perimeter
Once the area is cleared, use marking paint or stakes and string to outline the perimeter of the fire pit. This will provide a visual guide for the excavation and ensure that the dimensions are accurately defined.
Excavate the Site
With the perimeter marked, begin excavating the site to create a shallow pit. Use a shovel to carefully remove the topsoil and create a level base for the fire pit. Aim for a depth that allows for proper drainage and stability, typically around 6 to 8 inches.
Add a Layer of Gravel
After excavating the site, add a layer of gravel to the bottom of the pit. The gravel serves as a crucial element for drainage, preventing water from accumulating within the fire pit. Additionally, it aids in promoting stability and minimizing the risk of ground shifting over time.
Level the Surface
Once the gravel is in place, use a tamper or the back of a shovel to compact it evenly across the bottom of the pit. This step is essential for creating a solid and level base that will support the weight of the bricks and withstand the heat of the fire.
Verify Alignment and Levelness
Before proceeding to the next phase of construction, use a level to ensure that the base of the fire pit is perfectly level. Additionally, double-check the alignment and dimensions of the excavated area to confirm that it aligns with your intended design.
By meticulously preparing the ground for your brick fire pit, you are laying the groundwork for a sturdy and visually appealing outdoor feature. With the ground meticulously prepared, you are now ready to embark on the exciting phase of laying the bricks and witnessing your fire pit take shape.
Step 4: Lay the Bricks
With the ground meticulously prepared, it's time to embark on the transformative process of laying the bricks to construct the walls of your fire pit. This step is where your vision begins to take tangible form, and the careful arrangement of bricks will define the structure and aesthetic appeal of the fire pit.
Arrange the First Course
Start by laying the first course of bricks along the perimeter of the excavated area. Use a tape measure to ensure that the bricks are positioned uniformly, maintaining the desired dimensions of the fire pit. As you lay each brick, apply a thin layer of masonry adhesive to secure it in place, ensuring a strong bond between the bricks and the prepared ground.
Focus on Alignment and Levelness
As you progress with laying the bricks, pay close attention to alignment and levelness. Utilize a level to ensure that each brick is positioned evenly, maintaining a consistent height and alignment throughout the first course. This meticulous approach will result in a solid foundation for the subsequent courses of bricks.
Employ a Staggered Pattern
Opt for a staggered pattern when laying the bricks to enhance the stability and visual appeal of the fire pit walls. This pattern involves offsetting the bricks in each course, creating interlocking joints that contribute to the structural integrity of the walls. Additionally, the staggered pattern adds a visually dynamic element to the design, elevating the overall aesthetic of the fire pit.
Consider Ventilation Gaps
Incorporate small gaps between the bricks to allow for ventilation within the fire pit walls. These gaps facilitate airflow, promoting efficient combustion and enhancing the overall performance of the fire pit. By strategically integrating ventilation gaps, you can optimize the functionality of the fire pit while maintaining the structural integrity of the brick walls.
Secure the Bricks
As you progress with each course, ensure that the bricks are securely bonded with the masonry adhesive. Apply the adhesive generously, especially at the corners and joints, to reinforce the stability of the walls. Additionally, use a rubber mallet to gently tap the bricks into place, ensuring a snug fit and a uniform appearance throughout the construction process.
By meticulously laying the bricks and adhering to these essential guidelines, you are shaping the physical manifestation of your vision for a captivating brick fire pit. With each brick carefully positioned, the fire pit begins to take on its distinctive form, setting the stage for the next phase of construction and bringing you one step closer to enjoying the warmth and allure of your handcrafted outdoor feature.
Step 5: Build the Fire Pit Walls
Building the fire pit walls marks a pivotal phase in the construction process, where the structure begins to take shape and the distinctive character of the fire pit emerges. This step requires meticulous attention to detail and a focus on precision to ensure that the walls are not only visually appealing but also structurally sound.
Establishing the Desired Height
As you progress with laying the bricks, consider the desired height of the fire pit walls. Whether you envision a modest and intimate design or a more substantial structure, carefully plan the number of courses needed to achieve the desired height. By visualizing the final height and planning the brick arrangement accordingly, you can ensure that the fire pit aligns with your aesthetic preferences and functional requirements.
Incorporating Design Elements
Embrace the opportunity to incorporate design elements into the construction of the fire pit walls. Whether you opt for decorative patterns, contrasting brick colors, or textured surfaces, these design choices can infuse personality and visual interest into the structure. Additionally, consider integrating niches or ledges within the walls to serve as convenient resting spots for fire pit accessories or decorative accents.
Reinforcing Structural Integrity
Prioritize the structural integrity of the fire pit walls by maintaining a consistent thickness and reinforcing the corners and joints with masonry adhesive. This meticulous approach ensures that the walls are robust and capable of withstanding the heat and elements. Additionally, periodically verify the alignment and levelness of the bricks as you progress, making any necessary adjustments to maintain a uniform and stable construction.
Creating a Cohesive Finish
As you near the completion of the fire pit walls, focus on creating a cohesive and polished finish. Pay attention to the alignment of the final course of bricks, ensuring that it seamlessly integrates with the overall design. Additionally, take the time to clean any excess mortar and achieve a uniform appearance throughout the walls, elevating the visual appeal of the fire pit.
Anticipating the Next Steps
As the fire pit walls near completion, anticipate the subsequent steps in the construction process. Consider how the walls will integrate with the chosen method of containing the fire, whether through the installation of a steel ring or the placement of a grate. By envisioning the next phases of construction, you can seamlessly transition to the final steps of bringing your brick fire pit to fruition.
By meticulously building the fire pit walls and adhering to these essential guidelines, you are shaping the physical manifestation of your vision for a captivating outdoor feature. With each brick carefully positioned, the fire pit begins to embody its distinctive form, setting the stage for the next phase of construction and bringing you one step closer to enjoying the warmth and allure of your handcrafted outdoor retreat.
Step 6: Add a Grate or Fire Ring
With the fire pit walls meticulously constructed, the next crucial step in completing your brick fire pit is to add a grate or fire ring, which will serve as the containment and focal point for your outdoor fires. This phase of the construction process not only enhances the functionality of the fire pit but also contributes to its visual appeal, creating a captivating centerpiece for your outdoor space.
Selecting the Appropriate Containment Option
When deciding between a grate and a fire ring, consider your specific preferences and the intended use of the fire pit. A steel fire ring offers a traditional and durable option for containing the fire within the pit, providing a defined boundary for the flames and contributing to a rustic ambiance. On the other hand, a grate can be a versatile choice, allowing for cooking over an open flame and providing a platform for firewood or charcoal. Consider the intended activities around the fire pit to determine which option best aligns with your needs and vision for the space.
Ensuring Proper Fit and Alignment
Once you have selected the appropriate containment option, carefully position it within the fire pit, ensuring a proper fit and alignment with the walls. Whether you opt for a fire ring or a grate, verify that it sits securely and uniformly within the pit, creating a cohesive integration with the surrounding brick walls. This meticulous attention to fit and alignment ensures that the containment option not only enhances the functionality of the fire pit but also contributes to its overall aesthetic appeal.
Securing the Containment Option
To secure the fire ring or grate in place, consider using heat-resistant adhesive or mortar to create a strong bond between the containment option and the brick walls. This additional reinforcement ensures that the containment option remains stable and withstands the heat generated by the fires. By securing the containment option with precision and care, you can guarantee its longevity and reliability, allowing you to enjoy countless fireside gatherings with confidence.
Embracing Versatility and Functionality
With the fire ring or grate in place, embrace the versatility and functionality it brings to your brick fire pit. Whether you envision cozy evenings by the fire, outdoor cooking experiences, or simply the mesmerizing dance of the flames, the addition of a containment option elevates the fire pit into a versatile and inviting space. Embrace the potential for memorable gatherings and experiences around the fire, knowing that your carefully constructed brick fire pit is ready to fulfill a myriad of outdoor activities.
By meticulously adding a grate or fire ring to your brick fire pit, you are infusing the final touches that transform it into a captivating and functional outdoor feature. With the containment option securely in place, the fire pit is poised to become a focal point for relaxation, entertainment, and cherished moments, enriching your outdoor living space with its warmth and allure.
Step 7: Test the Fire Pit
Testing the fire pit is a pivotal step that ensures its functionality, safety, and overall performance. This phase allows you to validate the construction and make any necessary adjustments before fully embracing the warmth and allure of your handcrafted outdoor feature.
Clearing the Surrounding Area
Before igniting the fire pit, clear the surrounding area of any flammable materials, debris, or potential hazards. Ensure that the immediate vicinity is free from overhanging branches, dry leaves, or any combustible items that could pose a fire risk. By creating a clear and safe zone around the fire pit, you can mitigate potential safety concerns and enjoy peace of mind during the testing process.
Igniting the First Fire
With the surroundings cleared, proceed to ignite the first fire within the pit. Use kindling and firewood to establish a modest flame, allowing the fire pit to gradually acclimate to the heat. As the flames take hold, observe the behavior of the fire, paying attention to the airflow, smoke dispersion, and overall performance of the pit. This initial burn serves as an opportunity to assess the functionality and efficiency of the fire pit in a controlled setting.
Monitoring Heat Distribution
During the test burn, monitor the distribution of heat within and around the fire pit. Observe how the brick walls retain and radiate heat, contributing to a comfortable and inviting ambiance. Additionally, assess the dispersion of heat from the fire pit, ensuring that it does not pose any risks to nearby structures or vegetation. By gauging the heat distribution, you can fine-tune the positioning and functionality of the fire pit to optimize its performance.
Evaluating Ventilation and Smoke
As the fire burns, pay attention to the ventilation within the fire pit and the dispersion of smoke. Verify that the ventilation gaps within the brick walls facilitate efficient combustion, promoting a steady and clean-burning fire. Additionally, assess the direction and volume of smoke emitted from the fire pit, ensuring that it does not cause discomfort or pose a nuisance to you or your guests. By evaluating ventilation and smoke dispersion, you can optimize the design and functionality of the fire pit for a pleasant and enjoyable experience.
Making Adjustments
Based on your observations during the test burn, make any necessary adjustments to the fire pit. This may involve fine-tuning the positioning of ventilation gaps, optimizing the airflow, or addressing any issues related to heat distribution or smoke dispersion. By iteratively refining the design and functionality of the fire pit, you can ensure that it meets your expectations in terms of safety, performance, and overall enjoyment.
Embracing the Results
Upon completing the test burn and making any adjustments, take a moment to embrace the results of your efforts. Whether you've achieved optimal heat distribution, efficient ventilation, or a captivating ambiance, the test burn provides valuable insights into the functionality and allure of your brick fire pit. With the necessary adjustments made, you can look forward to countless memorable moments around the crackling flames, knowing that your handcrafted fire pit is ready to enrich your outdoor living space with its warmth and charm.
By meticulously testing the fire pit and making informed adjustments, you are ensuring that it meets the highest standards of functionality, safety, and performance. With the successful completion of the test burn, your brick fire pit is poised to become a cherished centerpiece for gatherings, relaxation, and cherished experiences, enriching your outdoor space with its captivating allure.