
Home>Create & Decorate>DIY & Crafts>How To Build A Subwoofer Box
DIY & Crafts
How To Build A Subwoofer Box
Published: February 28, 2024

Senior Editor in Create & Decorate, Kathryn combines traditional craftsmanship with contemporary trends. Her background in textile design and commitment to sustainable crafts inspire both content and community.
Discover step-by-step instructions for building a custom subwoofer box with our DIY & Crafts guide. Enhance your sound system with this easy project!
(Many of the links in this article redirect to a specific reviewed product. Your purchase of these products through affiliate links helps to generate commission for Twigandthistle.com, at no extra cost. Learn more)
Introduction
Building a subwoofer box is an exciting and rewarding DIY project that allows you to customize your car audio system to achieve the perfect sound. Whether you're a car audio enthusiast or a music lover looking to enhance your listening experience, constructing a subwoofer box can significantly elevate the bass performance of your sound system. By following the step-by-step process outlined in this guide, you'll gain the satisfaction of creating a custom subwoofer box tailored to your specific needs and preferences.
The process of building a subwoofer box involves several key steps, including gathering the necessary materials and tools, measuring and cutting the wood, assembling the box, installing the subwoofer, and sealing and finishing the box. Each step plays a crucial role in ensuring the structural integrity and acoustic performance of the subwoofer box, ultimately contributing to the overall quality of the sound produced.
Whether you're a seasoned DIY enthusiast or a newcomer to woodworking and car audio projects, this guide is designed to provide clear and detailed instructions that will enable you to successfully build a subwoofer box. Throughout the process, attention to detail and precision are essential, as they directly impact the functionality and aesthetics of the final product. With the right approach and a passion for craftsmanship, you can create a subwoofer box that not only complements your car's interior but also delivers powerful and clear bass that enhances your audio experience.
As you embark on this DIY journey, remember that patience and precision are key virtues. The process of building a subwoofer box requires careful planning, accurate measurements, and skillful execution. By dedicating time and effort to each step, you'll have the opportunity to unleash your creativity and craftsmanship, resulting in a custom subwoofer box that reflects your unique style and delivers exceptional audio performance.
Now, let's dive into the step-by-step process of building a subwoofer box and unleash the potential of your car audio system.
Step 1: Gather Materials and Tools
Before diving into the construction of a subwoofer box, it's essential to gather all the necessary materials and tools to ensure a smooth and efficient building process. Here's a comprehensive list of items you'll need:
Materials:
- MDF (Medium-Density Fiberboard): This sturdy and acoustically sound material is ideal for constructing a subwoofer box. Opt for MDF with a thickness of at least 3/4 inch to ensure structural integrity and minimize vibrations.
- Subwoofer Speaker: Select a high-quality subwoofer speaker that suits your audio preferences and fits the dimensions of the box you plan to build.
- Screws and Wood Glue: These are essential for securing the components of the subwoofer box and ensuring a durable and long-lasting construction.
- Speaker Wire: Choose speaker wire of adequate length and gauge to connect the subwoofer to your car audio system.
- Terminal Cup: This component provides a secure connection point for the speaker wire and facilitates easy installation and removal of the subwoofer.
Tools:
- Measuring Tape and Ruler: Accurate measurements are crucial for ensuring the proper fit and alignment of the subwoofer box components.
- Circular Saw or Table Saw: A reliable saw will be needed to cut the MDF to the precise dimensions required for the subwoofer box.
- Power Drill and Drill Bits: These are essential for creating pilot holes and driving screws during the assembly process.
- Screwdriver: Choose a screwdriver that matches the screws you'll be using to secure the MDF components.
- Safety Gear: Prioritize safety by wearing protective goggles and a dust mask while cutting and sanding the MDF to minimize exposure to dust and debris.
By ensuring that you have all the necessary materials and tools at your disposal, you'll be well-prepared to embark on the construction of a high-quality subwoofer box. With these items in hand, you can proceed to the next step of measuring and cutting the MDF to begin shaping the components of the subwoofer box.
Step 2: Measure and Cut the Wood
Accurate measurements and precise cuts are fundamental to the successful construction of a subwoofer box. Before diving into the cutting process, it's crucial to have a clear understanding of the box's design and dimensions. Start by carefully reviewing the specifications provided by the subwoofer manufacturer, as they often include recommendations for the optimal internal volume and dimensions of the enclosure.
Using a measuring tape and ruler, begin by marking the dimensions of the subwoofer box on the MDF panels. It's essential to measure twice and cut once to avoid errors that could compromise the structural integrity and acoustic performance of the box. When marking the measurements, use a pencil or a scoring tool to create precise lines that will guide the cutting process.
Once the dimensions are marked, it's time to cut the MDF panels to the required sizes. A circular saw or table saw is the ideal tool for this task, as it allows for straight and accurate cuts. When cutting the panels, ensure that the saw blade is set to the appropriate depth to achieve clean and precise cuts without damaging the material.
As you proceed with the cutting process, prioritize safety by wearing protective goggles and a dust mask to minimize exposure to airborne particles. Additionally, work in a well-ventilated area to ensure proper air circulation while cutting the MDF.
After cutting the panels to size, it's important to double-check the dimensions to ensure accuracy. Any discrepancies in the measurements can lead to misaligned panels and a suboptimal fit during the assembly process. Take the time to verify the dimensions before proceeding to the next step, as this attention to detail will contribute to the overall quality of the subwoofer box.
By meticulously measuring and cutting the wood according to the specified dimensions, you'll lay the foundation for a well-crafted subwoofer box that meets the requirements of the subwoofer and contributes to an enhanced audio experience. With the wood components prepared, you're now ready to move on to the next step of assembling the box and bringing your custom subwoofer enclosure to life.
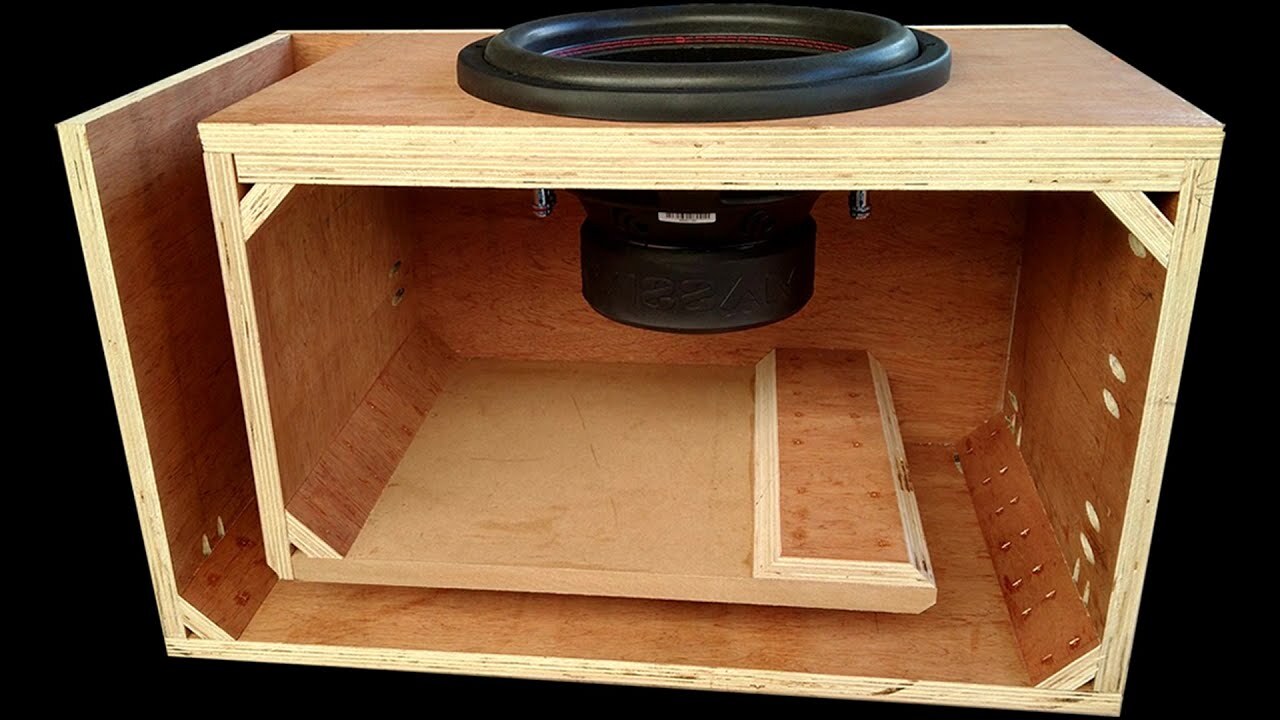
Step 3: Assemble the Box
With the MDF panels cut to the precise dimensions, it's time to begin the assembly process and bring the subwoofer box to life. Assembling the box requires careful attention to detail and a methodical approach to ensure that the components fit together seamlessly, creating a sturdy and acoustically sound enclosure for the subwoofer.
Start by dry-fitting the MDF panels to verify that they align correctly and form the intended shape of the subwoofer box. This step allows you to identify any potential issues with the fit and make adjustments before applying wood glue and securing the panels in place.
Once you're satisfied with the alignment, apply a thin, even layer of wood glue along the edges of the panels that will be joined together. Wood glue creates a strong and durable bond when applied correctly, enhancing the structural integrity of the box. As you apply the glue, ensure that it is spread evenly to prevent excess glue from seeping out when the panels are pressed together.
After applying the wood glue, carefully align the panels and press them together firmly to create a secure bond. To reinforce the joints further, use screws to secure the panels in place. Pre-drilling pilot holes for the screws helps prevent the MDF from splitting and ensures that the screws drive in smoothly, creating a tight and secure connection.
As the assembly progresses, periodically check the squareness of the box using a carpenter's square to ensure that the corners form perfect right angles. This step is crucial for maintaining the box's structural integrity and ensuring that it will accommodate the subwoofer securely.
Once all the panels are assembled and secured, allow the wood glue to dry completely before proceeding to the next step. This typically requires several hours, during which it's important to avoid disturbing the box to allow the glue to cure undisturbed.
With the box assembled and the wood glue fully cured, you've completed a significant milestone in the construction of the subwoofer box. The assembled box provides the foundation for the next crucial step: installing the subwoofer and integrating it into the enclosure to optimize its acoustic performance.
Step 4: Install the Subwoofer
Installing the subwoofer is a pivotal step in the construction of the subwoofer box, as it directly impacts the audio performance and functionality of the enclosure. Before proceeding with the installation, it's essential to carefully review the specifications provided by the subwoofer manufacturer to ensure proper compatibility and alignment within the box.
Begin by determining the ideal location for the subwoofer within the enclosure, taking into account factors such as airspace volume and clearance from the box walls. Positioning the subwoofer correctly is crucial for optimizing its performance and ensuring that it operates within the specified parameters.
Once the installation location is determined, mark the mounting holes on the subwoofer's frame onto the corresponding panel of the subwoofer box. Use a drill to create pilot holes at the marked locations, ensuring that the holes are sized to accommodate the mounting screws provided with the subwoofer.
With the pilot holes in place, carefully position the subwoofer within the enclosure, aligning the mounting holes on the subwoofer's frame with the pilot holes in the box. Secure the subwoofer in place using the appropriate screws, taking care not to overtighten them to avoid damaging the subwoofer or the box.
As you install the subwoofer, pay close attention to the wiring connections. Use high-quality speaker wire to connect the terminals of the subwoofer to the corresponding terminals on the terminal cup mounted on the subwoofer box. Ensure that the connections are secure and that the polarity is correct to prevent any potential audio distortion.
After securing the subwoofer and making the necessary wiring connections, take a moment to inspect the installation to ensure that everything is properly aligned and secured. This step is crucial for verifying that the subwoofer is securely mounted and that the wiring connections are free from any issues that could affect the audio performance.
With the subwoofer successfully installed, you've reached a significant milestone in the construction of the subwoofer box. The integration of the subwoofer into the enclosure sets the stage for the final step: sealing and finishing the box to optimize its acoustic performance and visual appeal.
Step 5: Seal and Finish the Box
Sealing and finishing the subwoofer box is a critical phase that not only enhances the overall aesthetics but also contributes to the acoustic performance and durability of the enclosure. Proper sealing ensures that the box is airtight, preventing air leaks that can compromise the subwoofer's performance and the overall sound quality. Additionally, a well-executed finish adds a touch of refinement to the box, complementing the interior of your vehicle and showcasing your craftsmanship.
To begin the sealing process, carefully inspect the seams and joints of the assembled box to identify any gaps or imperfections. Use a high-quality wood filler to fill in any voids or irregularities, creating a smooth and seamless surface. Once the wood filler is applied, allow it to dry completely before proceeding to the next step.
After the wood filler has dried, use fine-grit sandpaper to sand the entire exterior of the box, ensuring that the surface is smooth and free from any rough patches or imperfections. This step prepares the box for the application of the sealant and finish, creating an ideal surface for optimal adhesion.
Next, apply a layer of sealant to the exterior of the box to create a protective barrier that safeguards the wood from moisture and environmental factors. Choose a high-quality sealant designed for use on MDF or wood surfaces, and apply it evenly using a paintbrush or roller. Ensure that the sealant is applied in a well-ventilated area, and follow the manufacturer's instructions regarding drying times and additional coats if necessary.
Once the sealant has dried, it's time to apply the finish to the box. Whether you opt for paint, stain, or a clear coat, the finish serves to enhance the visual appeal of the box while providing an additional layer of protection. Select a finish that complements the interior of your vehicle and aligns with your aesthetic preferences.
Apply the chosen finish evenly to the exterior of the box, following the manufacturer's guidelines for application and drying times. Multiple coats may be necessary to achieve the desired finish, so exercise patience and attention to detail throughout the process.
Upon completing the sealing and finishing process, allow the box to dry and cure fully before handling or installing it in your vehicle. The sealed and finished subwoofer box not only exudes a professional and polished appearance but also ensures long-term durability and optimal performance, making it a standout component of your car audio system.
Conclusion
In conclusion, the process of building a subwoofer box is a fulfilling journey that combines craftsmanship, precision, and a passion for high-quality audio. From the initial gathering of materials and tools to the final sealing and finishing touches, each step plays a crucial role in shaping a custom subwoofer box that not only enhances the audio experience but also reflects the dedication and skill of the builder.
As you reflect on the completion of your subwoofer box, take pride in the attention to detail and meticulous effort invested in every stage of the construction process. The careful selection of materials, precise measurements, and skillful assembly have culminated in the creation of a tailored enclosure that complements your car's interior and elevates the bass performance of your audio system.
Beyond the tangible outcome, the journey of building a subwoofer box is a testament to the DIY spirit and the pursuit of audio excellence. It represents the fusion of technical knowledge with hands-on creativity, resulting in a tangible product that brings joy and satisfaction with every beat and bass note.
Furthermore, the custom subwoofer box stands as a testament to your ability to transform raw materials into a functional and aesthetically pleasing component of your car audio setup. It embodies the fusion of form and function, where precision engineering meets artistic expression, resulting in a seamless integration of audio technology into your vehicle.
As you integrate the subwoofer box into your car audio system, take a moment to appreciate the craftsmanship and dedication that have gone into its creation. The box not only enhances the audio performance but also serves as a tangible representation of your commitment to achieving the best possible sound quality.
In essence, the completion of a custom subwoofer box marks the culmination of a journey filled with creativity, technical skill, and a relentless pursuit of audio perfection. It stands as a testament to the power of DIY craftsmanship and the ability to shape the audio experience according to your unique preferences and standards. With the subwoofer box in place, you can now revel in the immersive and powerful sound that resonates from a creation born out of passion and dedication.