
Home>Create & Decorate>DIY & Crafts>How To Build A Large Planter Box
DIY & Crafts
How To Build A Large Planter Box
Published: May 5, 2024

Senior Editor in Create & Decorate, Kathryn combines traditional craftsmanship with contemporary trends. Her background in textile design and commitment to sustainable crafts inspire both content and community.
Learn how to create a DIY large planter box with our step-by-step guide. Perfect for your gardening and crafting needs.
(Many of the links in this article redirect to a specific reviewed product. Your purchase of these products through affiliate links helps to generate commission for Twigandthistle.com, at no extra cost. Learn more)
Introduction
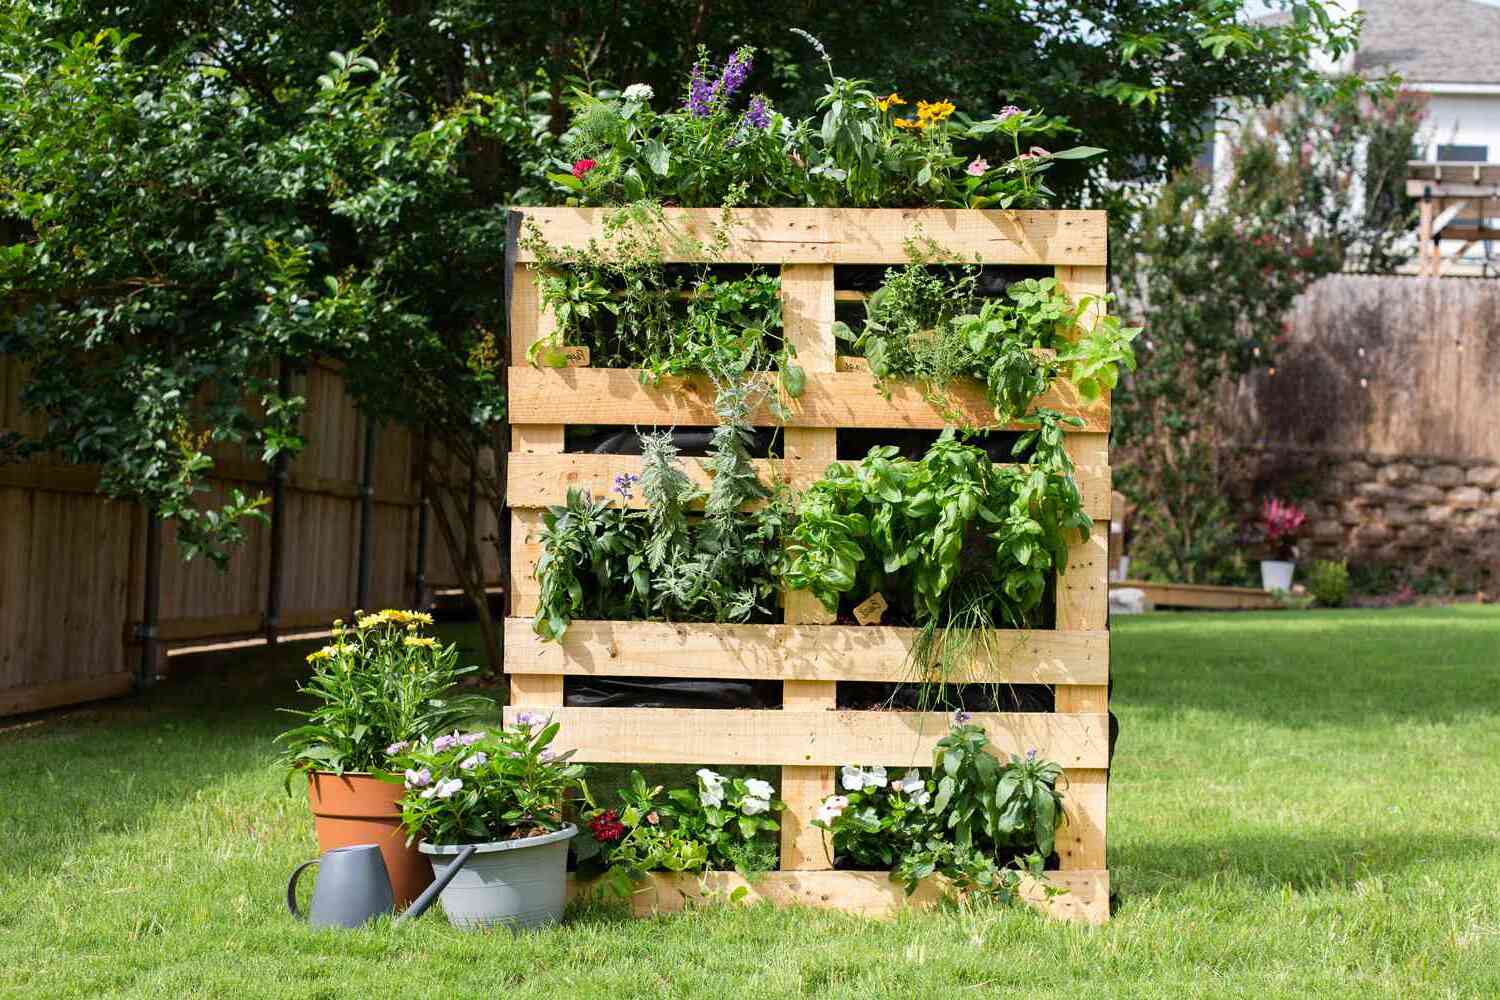
So, you've got a green thumb and want to take your gardening game to the next level by building a large planter box. Whether you're looking to grow vegetables, flowers, or herbs, a planter box can be a fantastic addition to your outdoor space. Not only does it provide a designated area for your plants, but it also adds a touch of charm and personality to your garden or patio. In this guide, we'll walk you through the step-by-step process of building a large planter box that will not only enhance the aesthetics of your outdoor area but also provide a functional space for your plants to thrive. Let's roll up our sleeves and get started!
Materials Needed
To get started on your large planter box project, you'll need to gather the following materials:
- Wood: Opt for a durable and weather-resistant wood such as cedar, redwood, or cypress. You'll need boards for the sides, bottom, and optional decorative trim.
- Screws or Nails: Choose corrosion-resistant screws or nails to assemble the planter box.
- Drill or Hammer: Depending on your preference, you'll need a drill with the appropriate bits or a hammer to secure the pieces together.
- Saw: A saw will be necessary for cutting the wood to the desired dimensions.
- Measuring Tape: Accurate measurements are crucial for a well-built planter box, so a measuring tape is essential.
- Landscape Fabric: This will be used to line the bottom of the planter box to prevent soil from escaping while allowing for proper drainage.
- Potting Soil: Select a high-quality potting mix to provide your plants with the nutrients they need to thrive.
- Plants: Once your planter box is complete, you'll need the plants or seeds of your choice to fill it with greenery.
Gathering these materials will set you on the right path to constructing your very own large planter box.
Choosing the Right Location
Selecting the perfect location for your large planter box is crucial for the success of your plants. Here are some key factors to consider when choosing the right spot:
-
Sunlight: Ensure that the chosen location receives an adequate amount of sunlight based on the plants you intend to grow. Most plants require at least 6-8 hours of sunlight per day, so choose a spot that meets this requirement.
-
Accessibility: Consider the accessibility of the planter box for watering, pruning, and harvesting. It should be conveniently located for regular maintenance without being obstructive to foot traffic or other activities in your outdoor space.
-
Drainage: Look for an area with proper drainage to prevent waterlogging, which can be detrimental to plant health. Avoid low-lying areas that are prone to collecting excess water.
-
Aesthetic Appeal: The location of your planter box should complement the overall aesthetics of your outdoor space. Whether it's on a patio, deck, or in the garden, the planter box should enhance the visual appeal of the area.
-
Space Considerations: Take into account the size of the planter box and ensure that the chosen location provides ample space for the box and allows for proper air circulation around the plants.
By carefully considering these factors, you can choose a location that promotes the healthy growth of your plants and enhances the overall appeal of your outdoor area.
Building the Frame
The first step in constructing your large planter box is to build the frame. Follow these steps to create a sturdy and reliable foundation for your planter box:
-
Cutting the Wood: Begin by cutting the wood to the desired dimensions for the sides of the planter box. Use a saw to make precise cuts, ensuring that the pieces are of equal length for a uniform appearance.
-
Assembling the Sides: Once the wood is cut, assemble the sides of the planter box by positioning the boards vertically and aligning them at the corners. Use screws or nails to secure the corners, ensuring that the pieces are tightly joined for stability.
-
Adding Support: To reinforce the structure, consider adding support beams or braces along the inside of the planter box. This will prevent the sides from bowing out due to the weight of the soil and plants.
-
Optional Decorative Trim: If desired, add decorative trim to the top edge of the planter box for a polished and finished look. This step is purely aesthetic and can be customized to suit your personal style.
-
Pre-drilling Holes: To prevent the wood from splitting, it's advisable to pre-drill holes before inserting screws. This extra step ensures that the wood remains intact during the assembly process.
By following these steps, you can build a sturdy and well-constructed frame for your large planter box. The frame serves as the backbone of the structure, providing the support needed to contain the soil and plants effectively. Once the frame is in place, you can proceed to the next phase of completing your planter box.
Adding the Bottom Panel
After constructing the frame of your large planter box, the next step is to add the bottom panel. This panel serves as a base for the soil and plants while allowing for proper drainage. Here's how to proceed with this essential step:
-
Measuring and Cutting: Begin by measuring the dimensions of the bottom of the planter box frame. Cut a piece of wood or plywood to fit these dimensions accurately. The bottom panel should be sturdy enough to support the weight of the soil and plants.
-
Drainage Holes: To ensure adequate drainage, consider drilling small holes in the bottom panel. These holes will allow excess water to escape, preventing waterlogging and promoting healthy root growth. Space the holes evenly to facilitate uniform drainage.
-
Attaching the Bottom Panel: Once the bottom panel is cut to size and prepared with drainage holes, place it inside the frame of the planter box. Secure the panel in place by screwing or nailing it to the bottom edges of the frame. Ensure that the panel fits snugly and is firmly attached to provide a stable base for the soil.
-
Lining with Landscape Fabric: To further enhance drainage and prevent soil from escaping through the drainage holes, consider lining the bottom of the planter box with landscape fabric. This will allow water to drain freely while holding the soil in place.
By adding the bottom panel to your large planter box, you create a solid foundation for your plants to thrive. This step ensures that the soil is contained while allowing for proper drainage, setting the stage for a successful gardening experience. With the bottom panel securely in place, your planter box is one step closer to being ready for planting.
Filling the Planter Box
Once the frame and bottom panel of your large planter box are in place, it's time to fill it with the necessary components to create an optimal environment for your plants. Follow these steps to ensure that your planter box is ready for planting:
-
Add a Layer of Drainage Material: Before adding the potting soil, it's essential to create a layer of drainage material at the bottom of the planter box. This can be achieved by adding a thin layer of gravel or small rocks. The drainage material helps prevent water from pooling at the bottom of the planter box, promoting healthy root development and preventing waterlogged soil.
-
Fill with High-Quality Potting Soil: Once the drainage layer is in place, fill the planter box with high-quality potting soil. Choose a potting mix that is well-draining and rich in organic matter to provide your plants with the nutrients they need to thrive. Ensure that the soil is evenly distributed and leveled within the planter box.
-
Consider Adding Fertilizer: Depending on the specific needs of the plants you intend to grow, you may consider adding a slow-release fertilizer to the potting soil. This can help provide essential nutrients to the plants over an extended period, promoting healthy growth and vibrant foliage.
-
Create Planting Arrangements: Before planting, consider the layout and arrangement of the plants within the planter box. Take into account the spacing requirements and growth habits of the plants to ensure that they have ample room to flourish. Arrange the plants according to your design preferences, keeping in mind their mature size and sunlight requirements.
-
Planting the Greenery: With the soil prepared and the planting arrangements in place, it's time to plant your greenery. Gently remove the plants from their containers, loosen the roots, and plant them at the appropriate depth in the potting soil. Be mindful of spacing and ensure that each plant is positioned securely in the soil.
-
Water the Plants: After planting, thoroughly water the plants to help them establish their root systems in the new environment. Ensure that the soil is evenly moist but not waterlogged. Proper watering is crucial in the initial stages to support the plants as they acclimate to their new home.
By following these steps, you can effectively fill your planter box with the necessary components to create a welcoming and nurturing environment for your plants. With the soil prepared and the greenery in place, your large planter box is poised to become a flourishing garden oasis.
Maintaining Your Planter Box
Once your large planter box is brimming with vibrant greenery, it's essential to maintain it to ensure the continued health and beauty of your plants. Here are some key maintenance tasks to keep your planter box in top condition:
-
Watering: Regular watering is crucial to sustain the moisture levels in the potting soil. Monitor the moisture content of the soil by inserting your finger into the soil. If it feels dry to the touch, it's time to water. Be mindful of the specific watering needs of the plants you've chosen, as different species may have varying requirements.
-
Fertilizing: Periodically fertilize your plants to replenish essential nutrients in the soil. Choose a fertilizer that is suitable for the types of plants in your planter box and follow the recommended application instructions. Fertilizing can help promote robust growth and vibrant blooms.
-
Pruning and Deadheading: Regularly inspect your plants for any dead or wilted foliage and flowers. Prune away dead or yellowing leaves to encourage new growth and maintain the overall health of the plants. Deadhead spent flowers to promote continuous blooming and a tidy appearance.
-
Pest and Disease Management: Keep an eye out for signs of pests or diseases that may affect your plants. Inspect the foliage for any unusual discoloration, spots, or pest activity. Address any pest or disease issues promptly to prevent them from spreading and causing damage to your plants.
-
Weed Control: Monitor the planter box for any weeds that may emerge. Remove weeds promptly to prevent them from competing with your plants for nutrients and resources. Regular weeding helps maintain a clean and healthy growing environment for your plants.
-
Seasonal Care: Consider the seasonal needs of your plants and adjust your care routine accordingly. In colder months, protect sensitive plants from frost or extreme temperatures. In warmer months, provide adequate shade and hydration to prevent heat stress.
-
Cleaning and Maintenance: Periodically clean the planter box to remove any debris, fallen leaves, or built-up soil. This helps prevent potential pest infestations and maintains a tidy appearance. Additionally, inspect the structural integrity of the planter box and make any necessary repairs to ensure its longevity.
By staying proactive with the maintenance of your planter box, you can create an environment where your plants can thrive and flourish. Regular care and attention will not only enhance the beauty of your outdoor space but also provide a rewarding gardening experience as you witness the growth and vitality of your greenery.
Conclusion
In conclusion, building a large planter box is a rewarding DIY project that allows you to create a beautiful and functional space for your plants to thrive. By carefully selecting the materials, choosing the right location, constructing the frame, adding the bottom panel, filling the planter box, and maintaining it, you can cultivate a flourishing garden oasis right in your outdoor space. Whether you're growing vegetables, flowers, or herbs, a well-built planter box can elevate the aesthetics of your garden or patio while providing a nurturing environment for your greenery. With attention to detail and regular maintenance, your large planter box will be a centerpiece of natural beauty, bringing joy and tranquility to your outdoor living area. So, roll up your sleeves, gather your materials, and embark on the journey of creating your own stunning large planter box – a testament to your gardening passion and DIY prowess.