
Home>Create & Decorate>DIY & Crafts>How To Build A Subwoofer Box For Deep Bass
DIY & Crafts
How To Build A Subwoofer Box For Deep Bass
Published: March 7, 2024

Content Creator specializing in woodworking and interior transformations. Caegan's guides motivate readers to undertake their own projects, while his custom furniture adds a personal touch.
Learn how to build a custom subwoofer box for powerful bass at home with our step-by-step DIY guide. Enhance your car audio system with this fun and practical craft project.
(Many of the links in this article redirect to a specific reviewed product. Your purchase of these products through affiliate links helps to generate commission for Twigandthistle.com, at no extra cost. Learn more)
Introduction
So, you want to take your car audio system to the next level, huh? Well, building your own subwoofer box can be a game-changer when it comes to getting that deep, thumping bass you crave. But where do you start? Don't worry, I've got you covered. In this guide, I'll walk you through the step-by-step process of building a subwoofer box that will not only enhance the sound quality of your car audio system but also give you the satisfaction of creating something with your own hands. Let's dive in and get ready to feel the bass in your bones!
Understanding Subwoofer Box Design
When it comes to building a subwoofer box, understanding the design is crucial for achieving optimal sound quality. The design of the box directly impacts the performance of the subwoofer, affecting factors such as bass response, efficiency, and overall sound clarity. There are two main types of subwoofer box designs: sealed and ported.
Sealed Subwoofer Box Design
A sealed subwoofer box, also known as an acoustic suspension enclosure, is airtight and provides a tight, accurate bass response. This design is ideal for music genres that require precise and controlled bass, such as jazz or classical music. Sealed boxes are also more forgiving when it comes to subwoofer size and power handling, making them a versatile choice for various audio setups.
Ported Subwoofer Box Design
On the other hand, a ported subwoofer box, also referred to as a vented or bass reflex enclosure, utilizes a vent or port to allow the internal air to escape. This design enhances low-frequency output, resulting in a louder and more boomy bass. Ported boxes are well-suited for enthusiasts of genres like hip-hop, rap, and electronic music, where deep, resonant bass is a key component of the listening experience.
Understanding the differences between these two designs is essential for determining the type of bass you want to achieve and the specific requirements of your subwoofer. Each design has its own set of advantages and considerations, so it's important to choose the one that aligns with your musical preferences and the capabilities of your subwoofer.
Choosing the Right Materials
When it comes to building a subwoofer box, selecting the right materials is crucial for ensuring durability, sound quality, and overall performance. Here's a list of materials you'll need to get started:
1. MDF (Medium-Density Fiberboard)
MDF is the go-to choice for constructing subwoofer boxes due to its density, strength, and acoustical properties. It's important to use a high-quality, preferably 3/4-inch thick MDF to minimize resonance and vibrations that can affect sound output.
2. Wood Glue
Invest in a reliable wood glue to ensure strong and secure joints between the MDF panels. Look for a water-resistant formula to protect the box from moisture and humidity.
3. Screws and Brackets
Opt for durable screws and brackets to reinforce the structural integrity of the box. Using the right hardware will prevent the box from coming apart under the pressure of the subwoofer's vibrations.
4. Sealant
A high-quality sealant is essential for creating an airtight enclosure. This prevents air leaks and ensures that the subwoofer operates at its optimal efficiency.
5. Speaker Terminal
Choose a speaker terminal that matches the specifications of your subwoofer. The terminal provides a secure connection point for the subwoofer's wiring, contributing to a clean and professional installation.
6. Insulation Material
Consider adding internal insulation material to dampen internal reflections and absorb standing waves. This can improve the overall sound quality and reduce unwanted resonance within the box.
By selecting the right materials, you can ensure that your subwoofer box is built to last and delivers the deep, powerful bass you desire. Remember, the quality of the materials directly impacts the performance of your subwoofer, so it's worth investing in top-notch components for a superior audio experience.
Calculating the Box Dimensions
Calculating the dimensions of your subwoofer box is a critical step in the construction process, as it directly affects the performance and sound quality of the subwoofer. The size of the box is determined by the specifications of the subwoofer itself, including parameters such as the Vas (equivalent air volume), Fs (resonant frequency), and Qts (total Q factor). These specifications can typically be found in the subwoofer's manual or on the manufacturer's website.
To calculate the internal volume of the box, you can use a variety of online calculators or software specifically designed for subwoofer box design. These tools allow you to input the T/S parameters of your subwoofer and generate the optimal box volume and dimensions based on the desired type of enclosure (sealed or ported).
For a sealed box, the internal volume is typically determined by the Vas of the subwoofer. The Vas represents the volume of air that has the same compliance as the speaker's suspension system. By using the Vas value in the calculation, you can ensure that the box size is suitable for the specific characteristics of the subwoofer, resulting in a well-controlled and accurate bass response.
In the case of a ported box, the calculation involves not only the Vas but also the Fs and Qts of the subwoofer. The resonant frequency (Fs) and total Q factor (Qts) play a crucial role in determining the optimal ported box volume and port dimensions. These parameters influence the tuning frequency of the ported enclosure, which directly impacts the bass output and overall sound characteristics.
It's important to note that the calculated dimensions are for the internal volume of the box, so you'll need to account for the thickness of the MDF panels when cutting the actual pieces. Additionally, consider any internal bracing or insulation material that may occupy space within the box.
By accurately calculating the box dimensions based on the specifications of your subwoofer, you can ensure that the enclosure is perfectly matched to the subwoofer's requirements, resulting in an optimized bass performance and a more enjoyable listening experience.
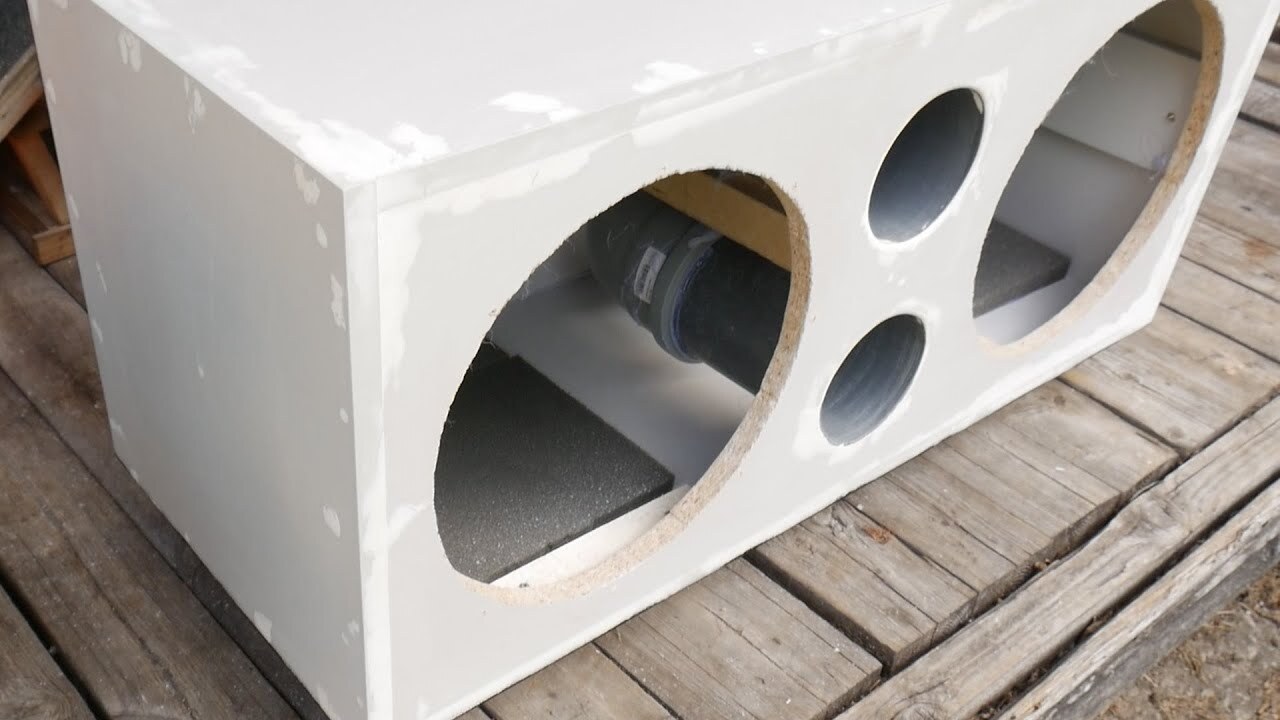
Cutting and Assembling the Box
Now that you have the dimensions and design specifications for your subwoofer box, it's time to roll up your sleeves and get cutting and assembling. Here's a step-by-step guide to help you bring your subwoofer box to life:
-
Gather Your Tools: Before you begin, make sure you have all the necessary tools at your disposal. You'll need a circular saw or table saw for cutting the MDF panels to size, a power drill for creating pilot holes and securing screws, and a reliable measuring tape and pencil for accurate measurements.
-
Cutting the Panels: Using the dimensions calculated earlier, carefully measure and mark the MDF panels for cutting. Remember to account for the thickness of the MDF when marking the dimensions. Once marked, use a saw to cut the panels with precision, ensuring clean and straight edges.
-
Assembling the Box: Begin by assembling the front, back, and side panels of the box. Apply a generous amount of wood glue to the edges of the panels before securing them together with screws. It's important to create a tight and secure bond between the panels to prevent air leaks and ensure the structural integrity of the box.
-
Adding the Bottom Panel: Once the main frame of the box is assembled, add the bottom panel and secure it in place using wood glue and screws. This panel completes the enclosure and forms the base of the subwoofer box.
-
Installing the Speaker Terminal: Depending on the design of your subwoofer box, you may need to install a speaker terminal to provide a connection point for the subwoofer's wiring. Carefully follow the manufacturer's instructions for installing the terminal to ensure a proper and secure connection.
-
Sealing the Joints: After the box is fully assembled, it's crucial to seal all the internal joints and seams with a high-quality sealant. This step is essential for creating an airtight enclosure, preventing air leaks, and maximizing the efficiency of the subwoofer.
-
Applying the Finishing Touches: Once the box is sealed, you can sand down any rough edges and apply a finishing layer of paint or veneer to enhance the aesthetics of the subwoofer box. This not only adds a professional touch but also provides protection against moisture and external elements.
By following these steps, you can effectively cut and assemble the subwoofer box, ensuring a precise and sturdy construction that is ready to deliver powerful bass performance in your car audio system.
Adding Internal Bracing
Internal bracing is a crucial element in the construction of a subwoofer box, as it enhances the structural integrity of the enclosure and minimizes unwanted vibrations that can affect sound quality. Here's how to add internal bracing to your subwoofer box:
-
Determine Bracing Placement: Before adding internal bracing, carefully plan the placement of the braces within the box. The goal is to create a framework that reinforces the panels and prevents them from flexing under the pressure of the subwoofer's movements. Consider positioning braces along the longest unsupported spans of the panels to effectively distribute the load and reduce panel resonance.
-
Cutting Bracing Material: Using the same high-quality MDF used for the box panels, cut the bracing material into strips or blocks of appropriate dimensions. The thickness and width of the bracing material should be chosen to provide sufficient rigidity without occupying excessive internal volume.
-
Securing the Braces: Once the bracing material is cut to size, apply wood glue to the contact points between the braces and the box panels. Carefully position the braces within the box and secure them in place using screws. It's essential to ensure a tight and flush fit to effectively reinforce the box structure.
-
Cross-Bracing for Added Support: Consider incorporating cross-bracing, which involves adding diagonal braces that intersect the main bracing framework. Cross-bracing further strengthens the box and prevents any lateral movement, contributing to a more stable and inert enclosure.
-
Bracing for Ported Boxes: In the case of ported subwoofer boxes, special attention should be given to bracing around the port opening. The additional pressure created by the ported design necessitates robust bracing to maintain the integrity of the box and prevent unwanted resonances.
By adding internal bracing to your subwoofer box, you can significantly improve its overall strength and rigidity, resulting in cleaner and more accurate bass reproduction. The bracing effectively minimizes panel vibrations and resonances, allowing the subwoofer to perform at its best without the interference of structural flexing.
Sealing and Finishing the Box
After the subwoofer box is assembled and the internal bracing is in place, the next crucial step is to seal and finish the box to ensure optimal performance and durability. Here's a detailed guide on sealing and finishing your subwoofer box:
-
Sealing the Joints: Use a high-quality sealant, such as silicone caulk, to seal all the internal joints and seams of the box. Apply a generous amount of sealant along the edges and corners to create an airtight enclosure. This step is essential for preventing air leaks, which can compromise the performance of the subwoofer.
-
Smoothing Rough Edges: After sealing the joints, carefully inspect the box for any rough or uneven edges. Use sandpaper to smooth down the edges and ensure a clean and professional finish. This not only enhances the aesthetics of the box but also prevents any potential snags or imperfections.
-
Applying a Finishing Layer: Consider applying a finishing layer to the exterior of the subwoofer box to protect the MDF from moisture and external elements. You can choose to paint the box with a durable, moisture-resistant paint or apply a wood veneer for a more natural look. The finishing layer adds a layer of protection and enhances the overall appearance of the box.
-
Protecting the Interior: While the focus is often on the exterior finish, it's equally important to protect the interior of the box. Consider applying a layer of polyurethane or similar sealant to the internal surfaces of the box. This provides additional protection against moisture and helps maintain the structural integrity of the MDF.
-
Adding Grille or Cover: If desired, you can add a grille or cover to protect the subwoofer and add a decorative touch to the box. A grille not only safeguards the subwoofer from accidental damage but also complements the overall aesthetics of the car audio system.
By meticulously sealing and finishing the subwoofer box, you can ensure that it not only looks professional but also withstands the rigors of daily use. The sealing process creates an airtight environment for the subwoofer, while the finishing touches add a layer of protection and enhance the visual appeal of the box.
Installing the Subwoofer
Now that the subwoofer box is constructed and ready to rock, it's time to install the star of the show – the subwoofer itself. Follow these steps to ensure a secure and professional installation:
-
Positioning the Subwoofer: Carefully determine the ideal location within the subwoofer box to mount the subwoofer. The positioning should allow for proper clearance and alignment with the speaker terminal.
-
Securing the Subwoofer: Place the subwoofer into the designated position within the box, ensuring that the mounting holes on the subwoofer align with the corresponding points on the box. Use appropriate screws and washers to secure the subwoofer in place, ensuring a snug and stable fit.
-
Connecting the Wiring: Connect the wiring from the subwoofer to the speaker terminal within the box. Ensure that the connections are secure and that the polarity is correct to prevent any phase issues.
-
Testing the Subwoofer: Before sealing the box, conduct a quick test to ensure that the subwoofer is functioning properly. Play a low-frequency audio track and listen for any distortions or abnormalities in the sound output.
-
Adjusting the Subwoofer Settings: If your subwoofer is equipped with adjustable settings such as gain, crossover frequency, and phase control, take the time to fine-tune these settings to achieve the desired bass response. Experiment with different settings to find the optimal configuration for your audio system.
By following these steps, you can effectively install the subwoofer into the box, ensuring a secure and reliable setup that is ready to deliver powerful and precise bass performance.
Testing and Adjusting the Bass
Once the subwoofer is installed and the box is sealed, it's time to put the bass to the test. Here's how to ensure that your subwoofer is delivering the deep, thumping bass you've been craving:
-
Audio Source: Start by playing a variety of music tracks that encompass a wide range of frequencies, from low bass tones to mid-range and high frequencies. This will allow you to evaluate the overall performance of the subwoofer across different types of music.
-
Listening Evaluation: Sit in the listening position within your car and pay close attention to the bass output. Listen for clarity, depth, and impact in the low-frequency range. A well-tuned subwoofer should seamlessly integrate with the rest of the audio system, enhancing the overall listening experience without overpowering the other frequencies.
-
Bass Response: Test the subwoofer's bass response by playing tracks with deep, sustained bass notes. Pay attention to how the subwoofer handles these low frequencies. The bass should be powerful and well-defined, without sounding muddy or distorted.
-
Adjustment Settings: If your subwoofer is equipped with adjustable settings such as gain, crossover frequency, and phase control, take the time to fine-tune these settings. Start by adjusting the gain to achieve the desired level of bass output without overpowering the rest of the audio system. Next, adjust the crossover frequency to ensure a smooth transition between the subwoofer and the main speakers. Finally, experiment with the phase control to optimize the bass response and minimize any phase cancellation effects.
-
Room Acoustics: Keep in mind that the acoustics of your car's interior can significantly impact the bass response. Experiment with the subwoofer's positioning within the car to find the optimal placement that maximizes bass performance. Additionally, consider adding acoustic treatments or bass traps to minimize unwanted resonances and standing waves within the car.
-
Fine-Tuning: Continuously fine-tune the subwoofer settings and listen to a variety of music genres to ensure that the bass response is well-balanced and enjoyable across different types of music. Don't be afraid to make small adjustments and take the time to find the sweet spot that delivers the perfect bass for your listening preferences.
By thoroughly testing and adjusting the bass, you can ensure that your subwoofer is delivering the deep, powerful bass that elevates your car audio system to new heights. Take the time to fine-tune the settings and evaluate the bass response across various music genres to achieve a well-balanced and impactful listening experience.