
Home>Create & Decorate>DIY & Crafts>Bicycle Wheel Building: A DIY Guide To Crafting Your Own Custom Wheels
DIY & Crafts
Bicycle Wheel Building: A DIY Guide To Crafting Your Own Custom Wheels
Published: March 7, 2024

Content Creator specializing in woodworking and interior transformations. Caegan's guides motivate readers to undertake their own projects, while his custom furniture adds a personal touch.
Learn how to craft your own custom bicycle wheels with our comprehensive DIY guide. Perfect for DIY & Crafts enthusiasts looking to build their own wheels.
(Many of the links in this article redirect to a specific reviewed product. Your purchase of these products through affiliate links helps to generate commission for Twigandthistle.com, at no extra cost. Learn more)
Introduction
Are you a cycling enthusiast looking to take your bike customization to the next level? Building your own bicycle wheels can be a rewarding and fulfilling experience. Not only does it allow you to create a set of wheels tailored to your specific riding style and needs, but it also gives you a deeper understanding of how your bike functions. In this DIY guide, we'll walk you through the step-by-step process of crafting your own custom wheels, from understanding the components to the final touches and maintenance tips. So, grab your tools and let's dive into the world of bicycle wheel building!
Understanding Wheel Components
When it comes to bicycle wheel building, having a solid understanding of the various components is crucial. Here are the key elements that make up a bicycle wheel:
Rim
The rim forms the outer circle of the wheel and provides the structure for the tire. It's essential to select a rim that suits your riding style, whether it's for road cycling, mountain biking, or touring.
Hub
The hub is the central part of the wheel that houses the bearings and attaches to the bike's frame. When building custom wheels, you can choose hubs based on factors such as weight, durability, and the type of riding you'll be doing.
Spokes
Spokes are the thin, rod-like components that connect the hub to the rim. They play a crucial role in supporting the wheel's structure and distributing the rider's weight. The number and pattern of spokes can vary, affecting the wheel's strength and flexibility.
Nipples
Nipples are small, often metallic components that thread onto the end of each spoke. They are used to secure the spokes to the rim and are adjustable to help fine-tune the tension of the wheel.
Bearings
Bearings are located within the hub and allow the wheel to spin smoothly. When selecting bearings for custom wheels, consider factors such as sealed or unsealed bearings and the level of maintenance they require.
By familiarizing yourself with these essential components, you'll be better equipped to select the right parts for your custom bicycle wheels and understand how they come together to create a functional and reliable wheelset.
Selecting the Right Components for Your Custom Wheels
When it comes to crafting your own custom bicycle wheels, selecting the right components is a crucial step that directly impacts the performance and durability of your wheelset. Here's a detailed breakdown of the key factors to consider when choosing the components for your custom wheels:
Rim Selection
The rim is a fundamental part of the wheel, and your choice should align with your riding style and preferences. Factors to consider include the material (aluminum, carbon fiber, etc.), rim width, depth, and profile. For example, if you're into off-road adventures, opting for wider and more robust rims can provide better support for wider tires and enhanced stability on rough terrain.
Hub Considerations
The hub is the heart of the wheel, and your selection should be based on factors such as the type of riding you'll be doing, weight preferences, and the level of engagement you desire. Additionally, consider the compatibility of the hub with your bike's frame and the availability of options for different axle standards.
Spoke Choices
Spokes play a critical role in determining the strength, weight, and flexibility of your wheels. Factors to consider when selecting spokes include material (stainless steel, titanium, etc.), gauge (thickness), and lacing pattern. For example, if you're aiming for a lightweight wheelset, opting for butted spokes can help reduce overall weight without compromising strength.
Nipple Options
While often overlooked, nipples are essential for securing the spokes to the rim and adjusting spoke tension. Consider factors such as material (brass, aluminum, etc.), color options for aesthetic preferences, and the ease of maintenance when choosing nipples for your custom wheels.
Bearing Selection
When it comes to bearings, factors such as durability, smoothness, and maintenance requirements should guide your decision. Sealed bearings are often preferred for their ability to keep out contaminants, making them suitable for demanding riding conditions, while unsealed bearings may offer easier serviceability for some riders.
By carefully considering these components and their respective attributes, you can tailor your custom bicycle wheels to meet your specific riding needs, whether it's conquering challenging trails, cruising on smooth roads, or tackling long-distance tours. The right components not only enhance the performance of your wheels but also contribute to a personalized and satisfying riding experience.
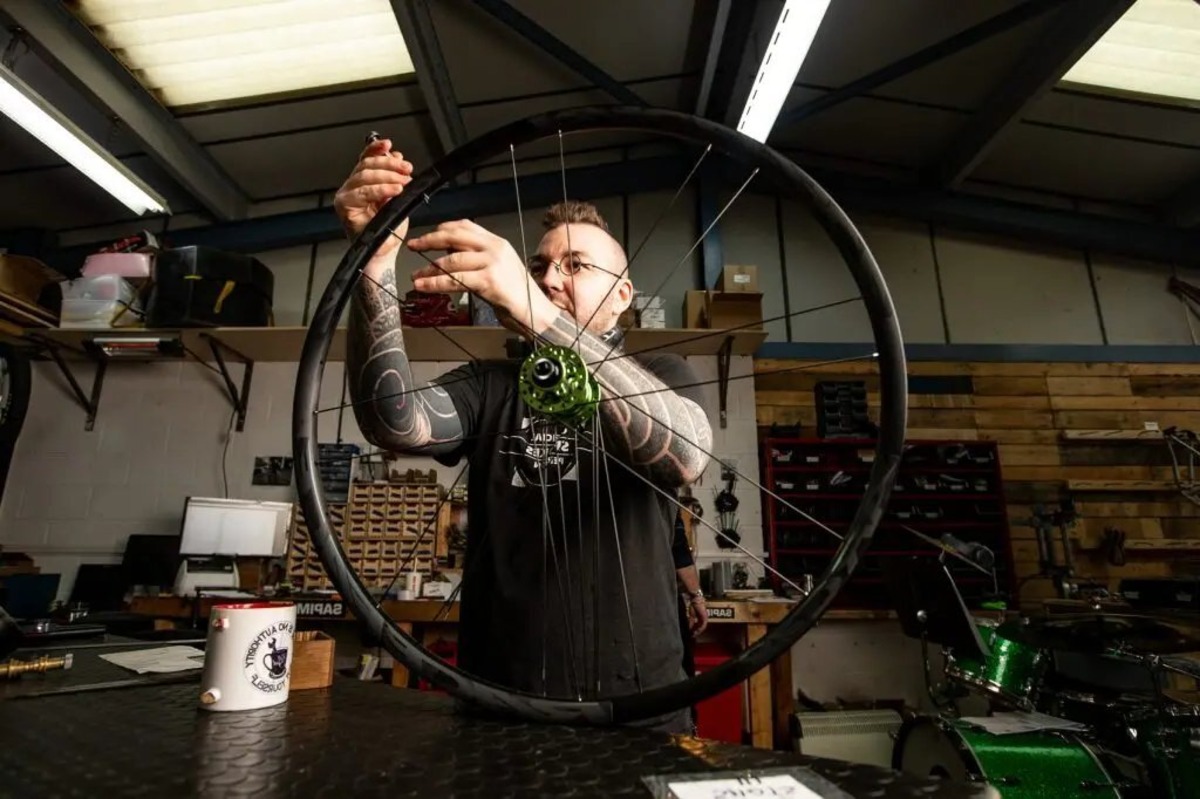
Preparing and Lacing the Spokes
Preparing and lacing the spokes is a critical phase in the process of building custom bicycle wheels. Here's a detailed guide on how to prepare and lace the spokes for your custom wheelset:
Spoke Preparation
Before lacing the spokes, it's essential to prepare them for assembly. This involves determining the correct spoke length for your specific rim and hub combination. Using a spoke calculator, you can input the measurements of your rim, hub, and desired lacing pattern to determine the precise length of spokes required for each wheel. Once you have the correct spoke lengths, it's time to gather the spokes, nipples, and the corresponding tools for the lacing process.
Lacing Pattern
The lacing pattern refers to the way in which the spokes are threaded through the hub and rim to create the wheel's structure. There are various lacing patterns, with the most common being the cross pattern, where the spokes intersect each other as they travel from the hub to the rim. Depending on the number of spokes and the desired strength and flexibility of the wheel, different lacing patterns can be employed. It's important to follow a specific lacing pattern that suits your wheel design and intended use.
Lacing Process
To begin the lacing process, start by placing the hub in a wheel truing stand or secure it in a stable position. Insert the spokes into the hub flanges according to the chosen lacing pattern, ensuring that they are positioned correctly based on their orientation (drive-side or non-drive side). Once the spokes are in place, begin threading the nipples onto the spokes, taking care to align them with the corresponding spoke holes in the rim.
Tensioning the Spokes
After lacing the spokes, the next step is to tension them to achieve the desired level of tightness. Using a spoke wrench, gradually tighten each nipple in a consistent pattern, ensuring that the tension is evenly distributed across the wheel. Proper spoke tension is crucial for the wheel's strength and durability, so take your time to adjust and fine-tune the tension of each spoke.
Checking Alignment
Once the spokes are tensioned, it's important to check the alignment and trueness of the wheel. This involves using a truing stand or a similar tool to identify any lateral or radial deviations in the wheel's structure. By adjusting the tension of specific spokes and ensuring that the rim runs true and straight, you can achieve a well-aligned and reliable wheel.
By following these steps for preparing and lacing the spokes, you can lay the foundation for a sturdy and well-constructed custom bicycle wheel. This phase sets the stage for the subsequent tensioning and truing processes, ultimately leading to the creation of a high-quality and personalized wheelset tailored to your riding preferences.
Tensioning and Truing Your Wheels
Tensioning and truing your wheels are crucial steps in the process of building custom bicycle wheels. These steps ensure that the spokes are properly tensioned and the wheel runs true and straight, contributing to the overall strength, durability, and performance of the wheelset.
Tensioning the Spokes
Proper spoke tension is essential for the structural integrity and longevity of the wheel. To begin the tensioning process, use a spoke tension meter to measure the tension of each spoke. The goal is to achieve uniform tension across all spokes, which helps distribute the rider's weight and external forces evenly throughout the wheel. Gradually adjust the tension of each spoke using a spoke wrench, making small and incremental adjustments to bring the spokes to the desired tension level. It's important to maintain a consistent pattern while tensioning the spokes to ensure that the wheel remains balanced and strong.
Truing the Wheel
Truing the wheel involves adjusting the tension of individual spokes to eliminate any lateral or radial deviations in the rim's alignment. Using a truing stand or a similar tool, spin the wheel and observe the relationship between the rim and the truing stand's indicators. Identify any areas where the rim deviates from its true position and adjust the tension of specific spokes to bring the rim back into alignment. This process requires patience and precision, as small adjustments can have a significant impact on the wheel's overall trueness.
Final Checks
After tensioning and truing the wheel, perform a final check to ensure that the spokes are uniformly tensioned and the wheel runs true. Spin the wheel and visually inspect the rim for any remaining deviations. Additionally, check the overall stability and roundness of the wheel to confirm that it meets the desired specifications. Making any necessary last-minute adjustments at this stage can help fine-tune the wheel's performance and reliability.
By meticulously tensioning and truing your custom bicycle wheels, you can create a set of wheels that not only meets your specific riding needs but also delivers exceptional strength, stability, and responsiveness on the road or trail. These steps are essential for achieving a high-quality and personalized wheelset that reflects your craftsmanship and attention to detail.
Final Touches and Maintenance Tips
After completing the intricate process of building your custom bicycle wheels, there are a few final touches and maintenance tips to consider to ensure that your wheels perform optimally and stand the test of time.
Wheel Sealing
Applying a layer of rim tape to seal the spoke holes on the rim can help prevent air leaks and protect the inner tube from punctures. Additionally, using tubeless rim tape and valves can convert your wheels to a tubeless setup, offering benefits such as reduced rolling resistance and the ability to run lower tire pressures for improved traction.
Lubrication and Inspection
Regularly lubricating the hub bearings and inspecting them for any signs of wear or damage is essential for maintaining smooth and efficient wheel rotation. Additionally, applying a light coat of grease to the spoke nipples can help prevent corrosion and make future truing and maintenance tasks easier.
Wheel Trueness Check
Even after the initial truing process, it's important to periodically check the trueness of your wheels. Factors such as heavy impacts, prolonged use, or changes in riding conditions can affect the wheel's alignment. Using a truing stand or a similar tool, perform routine trueness checks and make any necessary adjustments to keep your wheels running straight and true.
Spoke Tension Maintenance
Over time, the tension of the spokes may change due to factors such as riding conditions, temperature fluctuations, or the natural settling of the components. Periodically checking and adjusting the spoke tension ensures that your wheels maintain their structural integrity and performance. A spoke tension meter can be a valuable tool for monitoring and maintaining the optimal tension of the spokes.
Cleaning and Inspection
Regularly cleaning your wheels and inspecting them for any signs of damage, wear, or fatigue is essential for prolonging their lifespan. Use a mild detergent and a soft brush to clean the rims, spokes, and hubs, and pay close attention to areas where dirt and debris can accumulate. Additionally, inspect the rims for brake track wear, the spokes for signs of fatigue, and the hubs for any play or irregularities.
By incorporating these final touches and maintenance tips into your wheel-building process, you can ensure that your custom bicycle wheels not only deliver exceptional performance but also remain reliable and durable over the long haul. Taking proactive measures to maintain and care for your wheels reflects your commitment to craftsmanship and enhances your overall riding experience.
Conclusion
In conclusion, the art of crafting your own custom bicycle wheels is a deeply rewarding endeavor that allows you to tailor your wheels to your specific riding style and preferences. By understanding the intricacies of wheel components, selecting the right parts, and meticulously following the steps of preparation, lacing, tensioning, and truing, you can create a set of wheels that not only reflect your craftsmanship but also deliver exceptional performance and reliability on the road or trail. Additionally, incorporating final touches and maintenance tips ensures that your custom wheels remain in top condition for the long haul. So, whether you're seeking enhanced performance, personalized aesthetics, or a deeper connection to your bike, embarking on the journey of bicycle wheel building opens up a world of possibilities and a newfound appreciation for the art and science of cycling.