
Home>Create & Decorate>DIY & Crafts>DIY Floating Bed: How To Create Your Own Dreamy Sleep Haven
DIY & Crafts
DIY Floating Bed: How To Create Your Own Dreamy Sleep Haven
Published: March 7, 2024

Senior Editor in Create & Decorate, Kathryn combines traditional craftsmanship with contemporary trends. Her background in textile design and commitment to sustainable crafts inspire both content and community.
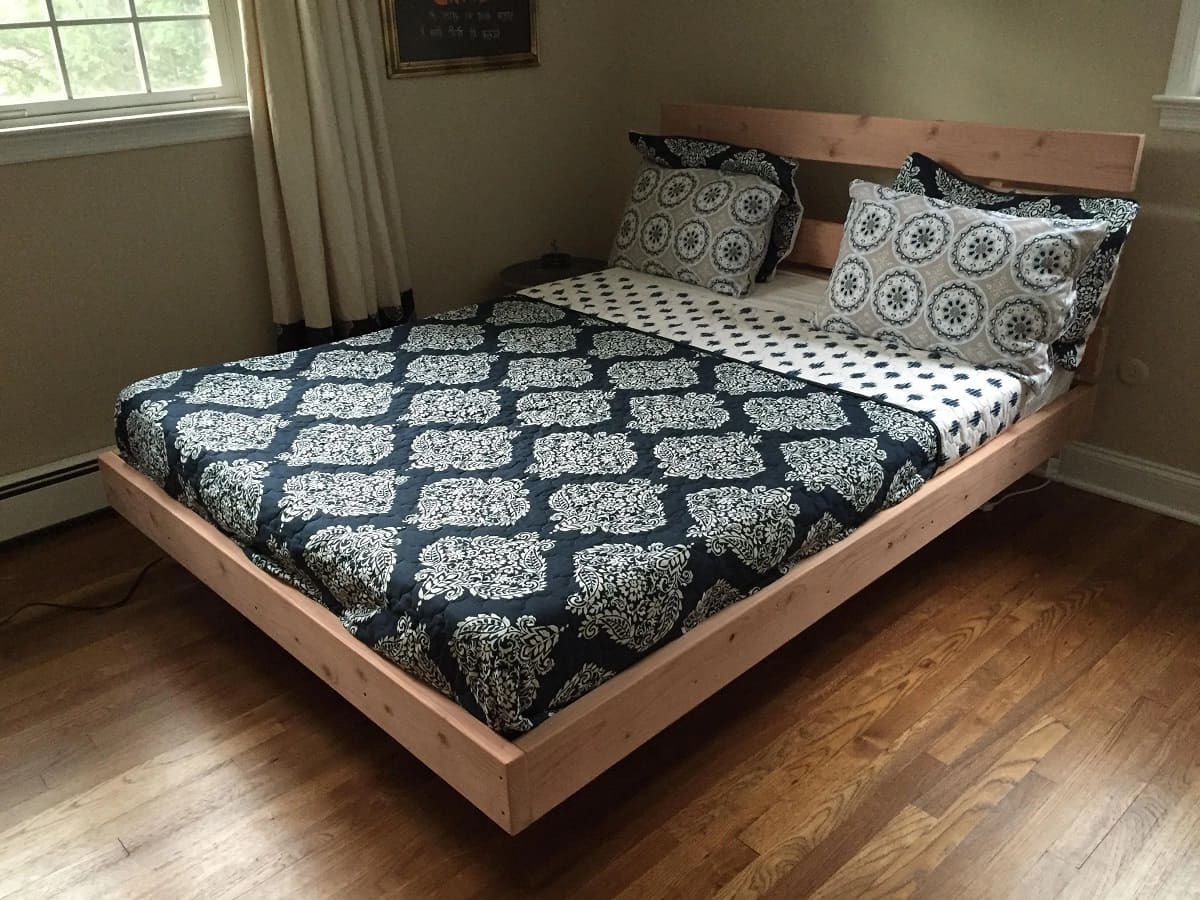
Learn how to build your own DIY floating bed and transform your bedroom into a dreamy sleep haven with this step-by-step guide. Perfect for DIY & Crafts enthusiasts!
(Many of the links in this article redirect to a specific reviewed product. Your purchase of these products through affiliate links helps to generate commission for Twigandthistle.com, at no extra cost. Learn more)
Introduction
Are you looking to add a touch of modern elegance to your bedroom? A DIY floating bed might just be the perfect project for you. Not only does it create a stunning visual effect, but it also maximizes space and gives the illusion of a larger room. In this guide, we will walk you through the steps to create your own dreamy sleep haven with a DIY floating bed. Whether you're a seasoned DIY enthusiast or a beginner looking for a fun and rewarding project, this guide will help you achieve the perfect balance of style and functionality in your bedroom. Let's dive in and get started on this exciting project!
Materials Needed
To get started on your DIY floating bed project, you'll need the following materials:
- 4×4 lumber: This will be used for the main frame of the bed.
- 2×4 lumber: You'll need this for additional support and bracing.
- Plywood: Choose a sturdy plywood to create the platform for the mattress.
- Wood screws: These will be essential for securing the frame and support pieces together.
- L-brackets: These will help reinforce the joints and ensure stability.
- Wood glue: Using wood glue in addition to screws will provide extra strength.
- Floating bed hardware kit: This kit will include the necessary hardware for the floating mechanism.
- Mattress: Select a comfortable mattress that fits the dimensions of your bed frame.
- Sandpaper and paint or stain: For finishing touches, sandpaper will smooth out any rough edges, and paint or stain will give your bed a polished look.
Gathering these materials will set you on the right path to creating your very own DIY floating bed.
Step 1: Building the Frame
The first step in creating your DIY floating bed is to build the frame. Follow these detailed steps to get started:
-
Measure and Cut the Lumber: Begin by measuring and cutting the 4×4 lumber to the desired dimensions for the bed frame. Use a saw to make precise cuts, ensuring that the pieces are all uniform in size.
-
Assemble the Frame: Once the lumber is cut, assemble the pieces to form the rectangular frame of the bed. Use wood screws and wood glue to secure the corners and joints. Reinforce the connections with L-brackets for added stability.
-
Add Support Beams: To provide additional support for the mattress platform, cut and attach 2×4 lumber across the frame. These support beams will help distribute the weight of the mattress evenly.
-
Sand and Finish: After the frame is assembled, use sandpaper to smooth out any rough edges or surfaces. This step will ensure that your bed frame is safe and free from splinters. Once sanded, apply a coat of paint or stain to achieve the desired finish.
By following these steps, you will have a sturdy and well-constructed frame for your DIY floating bed. This sets the foundation for the next steps in creating your dreamy sleep haven.
Step 2: Attaching the Floating Mechanism
Now that the frame of your DIY floating bed is in place, it's time to add the floating mechanism that will give your bed its unique appearance. Follow these steps to attach the floating mechanism:
-
Install the Floating Bed Hardware: Begin by following the manufacturer's instructions to install the floating bed hardware. This will typically involve attaching brackets or other hardware to the frame of the bed. Ensure that the hardware is securely fastened to support the weight of the bed and the sleeper.
-
Attach the Floating Mechanism: Once the hardware is in place, carefully attach the floating mechanism to the bed frame. This may involve suspending the frame from the ceiling or using a wall-mounted system, depending on the type of floating bed hardware kit you have chosen. Be sure to double-check the stability of the attachment to prevent any safety hazards.
-
Test for Stability: After attaching the floating mechanism, perform a stability test to ensure that the bed is secure and level. Apply gentle pressure to different areas of the bed to confirm that it remains steady and balanced. Making any necessary adjustments at this stage will contribute to the overall safety and comfort of the bed.
By successfully attaching the floating mechanism to your DIY floating bed, you are one step closer to creating a stunning and functional piece of furniture for your bedroom. This unique feature will elevate the aesthetic appeal of your sleeping space and provide a one-of-a-kind experience for rest and relaxation.
Step 3: Adding the Mattress Support
With the frame and floating mechanism in place, the next crucial step in creating your DIY floating bed is adding the mattress support. Follow these detailed steps to ensure a stable and comfortable foundation for your mattress:
-
Cut and Position the Plywood: Measure and cut the plywood to fit the dimensions of the bed frame. Once cut, carefully position the plywood on top of the frame, ensuring that it sits securely and evenly.
-
Secure the Plywood: Use wood screws to secure the plywood to the frame, ensuring that it is firmly attached and does not shift. Place screws at regular intervals along the edges and across the center to provide consistent support.
-
Reinforce the Edges: To further strengthen the mattress support, consider adding additional 2×4 lumber around the edges of the plywood. This will prevent any potential sagging and ensure that the mattress remains well-supported.
-
Test the Support: Before proceeding, perform a test to ensure that the mattress support can bear the weight of the mattress and sleeper. Apply gentle pressure to different areas of the plywood to confirm its stability and durability.
-
Add Finishing Touches: Once the mattress support is secure, sand any rough edges and apply a coat of paint or stain to the plywood. This step will not only enhance the visual appeal of the bed but also protect the wood from wear and tear.
By following these steps, you will have successfully added the mattress support to your DIY floating bed, creating a solid and reliable base for your mattress. This essential component ensures that your bed is not only visually striking but also functional and comfortable for a restful night's sleep.
Step 4: Finishing Touches
After completing the structural elements of your DIY floating bed, it's time to add the finishing touches that will elevate its visual appeal and ensure a polished final product. Follow these steps to give your bed the perfect finishing touches:
-
Sand and Smooth: Use sandpaper to smooth out any remaining rough edges on the bed frame, floating mechanism, and mattress support. This step is essential for safety and comfort, ensuring that there are no sharp or uneven surfaces.
-
Apply Paint or Stain: Choose a paint or stain that complements the overall aesthetic of your bedroom. Apply a coat of paint or stain to the entire bed, ensuring even coverage. This step not only enhances the appearance of the bed but also provides protection against wear and tear.
-
Add Decorative Elements: Consider adding decorative elements such as LED strip lights along the underside of the bed frame for a modern and ambient touch. You can also incorporate a fabric or wooden headboard to further customize the look of your DIY floating bed.
-
Install Bedding and Accessories: Once the finishing touches are complete, dress your bed with comfortable bedding, pillows, and throws. Choose bedding that complements the style and color scheme of your bedroom, creating a cohesive and inviting sleep space.
-
Personalize with Decor: Add personal touches to the surrounding area of the bed, such as wall art, plants, or decorative accents. These elements will contribute to the overall ambiance of your bedroom and create a relaxing environment for rest and relaxation.
By adding these finishing touches, you will transform your DIY floating bed into a stunning centerpiece for your bedroom. The attention to detail in the finishing touches will not only enhance the visual appeal of the bed but also create a cozy and inviting atmosphere for a restful night's sleep.
Conclusion
In conclusion, creating your own DIY floating bed is a rewarding and achievable project that can bring a touch of modern elegance to your bedroom. By following the steps outlined in this guide and using the recommended materials, you can craft a dreamy sleep haven that maximizes space and creates a visually stunning focal point. From building the sturdy frame to adding the floating mechanism and mattress support, each step contributes to the overall functionality and aesthetic appeal of the bed. By adding the perfect finishing touches, such as paint or stain, decorative elements, and comfortable bedding, you can personalize your DIY floating bed to suit your style and create a cozy retreat for relaxation. Embrace the creativity and satisfaction that come with completing this project, and enjoy the unique and stylish addition to your bedroom.