
Home>Create & Decorate>DIY & Crafts>DIY Loft Bed: Create Your Own Space-Saving Sleeping Solution
DIY & Crafts
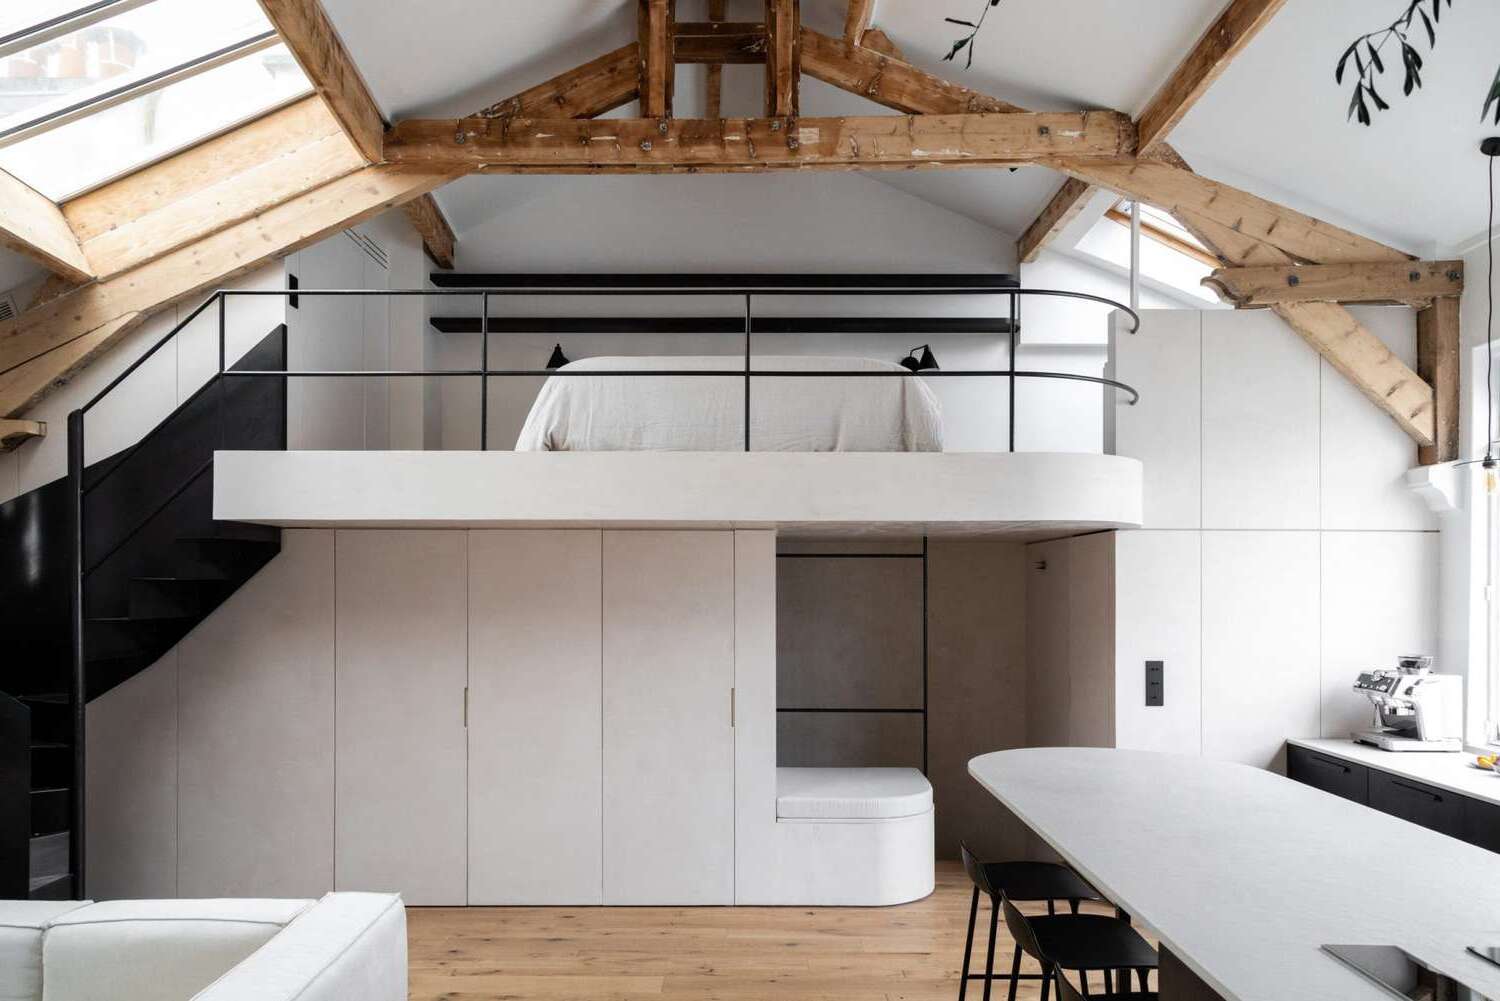
DIY Loft Bed: Create Your Own Space-Saving Sleeping Solution
Published: February 23, 2024

Senior Editor in Create & Decorate, Kathryn combines traditional craftsmanship with contemporary trends. Her background in textile design and commitment to sustainable crafts inspire both content and community.
Create your own space-saving sleeping solution with our DIY loft bed plans. Perfect for small spaces and DIY enthusiasts. Get started today!
(Many of the links in this article redirect to a specific reviewed product. Your purchase of these products through affiliate links helps to generate commission for Twigandthistle.com, at no extra cost. Learn more)
Introduction
Are you looking to maximize space in a bedroom or create a cozy sleeping nook? A DIY loft bed might be the perfect solution for you. This innovative and space-saving design not only provides a comfortable sleeping area but also opens up valuable floor space for other activities. Whether you're living in a small apartment, a dorm room, or simply want to optimize the layout of a bedroom, building your own loft bed can be a rewarding and practical project.
By crafting a loft bed from scratch, you have the freedom to customize it to your specific needs and style preferences. Additionally, the sense of accomplishment that comes with creating a functional piece of furniture with your own hands is truly satisfying. With the right materials, tools, and a bit of creativity, you can embark on this DIY adventure and transform your living space.
In this comprehensive guide, we will walk you through the step-by-step process of building a sturdy and stylish loft bed. From measuring and planning to adding personalized touches, you'll learn how to construct a space-saving sleeping solution that suits your individual requirements. So, roll up your sleeves, gather your tools, and let's dive into the exciting world of DIY loft beds.
Materials and Tools Needed
Before diving into the construction process, it's essential to gather all the necessary materials and tools. Here's a comprehensive list to ensure you're well-prepared for this DIY project:
Materials:
-
Lumber: Select high-quality lumber for the bed frame, including sturdy boards for the main supports, guardrails, and ladder if applicable. The type and quantity of lumber will depend on the bed size and design.
-
Plywood or MDF: You'll need this material for the bed platform, providing a stable and even surface for the mattress. Ensure the thickness is adequate to support the weight of the sleeper.
-
Wood Screws and Nails: Invest in a variety of screws and nails to secure the frame and other components. Different lengths and types will be necessary for various parts of the construction.
-
Wood Glue: Opt for a strong wood glue to reinforce the joints and enhance the bed's overall stability.
-
Finishing Materials: If you plan to stain or paint the bed, gather the appropriate finishing materials such as wood stain, paint, primer, and sealant.
-
Safety Rails and Ladder (Optional): If the loft bed will be used by children or individuals who may require assistance climbing, safety rails and a sturdy ladder are essential for added security and accessibility.
-
Decorative Elements (Optional): Depending on your design preferences, consider any decorative elements such as trim, molding, or other embellishments to personalize the bed's appearance.
Tools:
-
Measuring Tape: Accurate measurements are crucial for ensuring the bed fits the designated space and aligns with your requirements.
-
Circular Saw or Miter Saw: A reliable saw will be indispensable for cutting the lumber and plywood to the precise dimensions required for the bed frame and platform.
-
Drill and Bits: A power drill with assorted drill bits is essential for creating pilot holes and driving screws into the wood.
-
Screwdriver: Both manual and electric screwdrivers will be handy for assembling the bed components.
-
Clamps: These will aid in securing the wood pieces during assembly and glue application.
-
Sanding Tools: To achieve a smooth and splinter-free finish, have sandpaper, a sanding block, or an electric sander on hand.
-
Safety Gear: Prioritize safety by using protective gear such as goggles, gloves, and a dust mask when working with wood and power tools.
By ensuring you have all the required materials and tools at your disposal, you'll be well-equipped to embark on the construction of your DIY loft bed. With everything in place, you're ready to move on to the next step: measuring and planning.
Step 1: Measure and Plan
Before diving into the construction process, meticulous measurement and thoughtful planning are crucial for the success of your DIY loft bed project. Here's a detailed breakdown of the essential steps involved in this initial phase:
Assess the Space:
Begin by evaluating the designated area where the loft bed will be situated. Measure the dimensions of the room, considering the ceiling height, floor space, and any potential obstructions such as ceiling fans or light fixtures. This assessment will guide the overall size and configuration of the loft bed, ensuring it harmonizes with the available space.
Determine Bed Size:
Based on your assessment, decide on the size of the loft bed. Whether it's a twin, full, queen, or custom dimensions, ensure the chosen size aligns with your comfort needs and spatial constraints. Take into account the mattress dimensions as well, as they will dictate the platform size.
Sketch the Design:
With the space and bed size in mind, sketch a rough design of the loft bed. Consider the structural elements such as the frame, support beams, and ladder if applicable. Visualizing the design on paper will help you conceptualize the construction process and identify any potential challenges early on.
Create a Material List:
Based on the design sketch, compile a comprehensive list of materials required for the construction. This includes lumber for the frame, plywood for the platform, fasteners, and any additional components such as safety rails or decorative elements. Accurate measurements and design specifications will aid in determining the precise quantity of materials needed.
Plan for Safety:
If the loft bed will be used by children or individuals with specific safety considerations, factor in the inclusion of safety rails and a secure ladder in the design. Ensure that the bed adheres to safety standards and guidelines, prioritizing stability and structural integrity.
Consider Customization:
Think about any personalized features or modifications you'd like to incorporate into the design. Whether it's a built-in desk, storage compartments, or decorative accents, planning for customization at this stage will allow for seamless integration into the construction process.
By meticulously measuring the space, determining the bed size, sketching the design, creating a material list, prioritizing safety, and considering customization, you'll lay a solid foundation for the subsequent phases of constructing your DIY loft bed. With the planning phase complete, you're now ready to move on to the exciting process of building the frame.
Step 2: Build the Frame
Building the frame is a pivotal phase in constructing a sturdy and reliable loft bed. This step involves assembling the structural foundation that will support the mattress and ensure the bed's stability. Here's a comprehensive guide to help you navigate through this crucial stage of the DIY loft bed project.
Gather the Lumber:
Begin by gathering the lumber required for the frame construction. Ensure that the wood is of high quality and suitable for bearing the weight of the sleeper. The main support beams, side rails, and cross beams are integral components of the frame, and their dimensions should align with the design specifications.
Cut the Lumber:
Using a circular saw or miter saw, carefully cut the lumber to the precise dimensions needed for the frame components. Accurate measurements are essential to ensure the pieces fit together seamlessly and form a robust structure. Be mindful of safety precautions when operating power tools.
Assemble the Frame:
With the cut lumber at hand, begin assembling the frame according to the design plan. Utilize wood screws, wood glue, and clamps to secure the joints and reinforce the connections. Pay close attention to the alignment and levelness of the frame to guarantee a stable and balanced structure.
Install the Support Beams:
Position the support beams at strategic intervals within the frame to provide adequate support for the mattress platform. These beams play a critical role in distributing the weight evenly and preventing sagging or instability.
Reinforce the Joints:
To enhance the frame's durability, reinforce the joints with additional screws and wood glue. This step is crucial for fortifying the connections and ensuring the frame can withstand the weight and movement of the sleeper.
Sand and Finish:
Once the frame is assembled, sand the surfaces to achieve a smooth and splinter-free finish. This not only enhances the bed's appearance but also minimizes the risk of snagging or splinters. If desired, apply a wood finish such as stain or paint to protect the wood and complement the overall aesthetic.
By meticulously following these steps, you'll successfully build a robust and well-constructed frame for your DIY loft bed. With the frame in place, you're now ready to proceed to the next phase of the project: assembling the bed components and creating a safe and inviting sleeping space.
Step 3: Assemble the Bed
With the sturdy frame in place, the next phase of constructing your DIY loft bed involves assembling the bed components to create a secure and comfortable sleeping area. This step is crucial for ensuring that the mattress platform is properly installed, safety features are integrated, and the overall structure is ready for use. Here's a detailed guide to help you navigate through the assembly process and transform the frame into a functional loft bed.
Install the Mattress Platform:
Begin by positioning the plywood or MDF platform onto the support beams within the frame. Ensure that the platform fits snugly and aligns with the dimensions of the frame. Secure the platform to the support beams using wood screws, ensuring a stable and even surface for the mattress. This step is essential for creating a reliable foundation for the sleeping area.
Add Safety Rails:
If your design includes safety rails, carefully install them along the sides of the bed. Safety rails are crucial for preventing accidental falls and providing a sense of security, particularly for loft beds used by children or individuals who may require assistance. Secure the safety rails to the frame using appropriate fasteners, ensuring they are firmly anchored and capable of withstanding pressure.
Attach the Ladder (If Applicable):
For loft beds requiring a ladder for access, securely attach the ladder to the frame. Position the ladder at a convenient and accessible location, ensuring it provides stable and safe access to the sleeping area. Whether it's a built-in ladder or a detachable one, prioritize the ladder's stability and weight-bearing capacity to guarantee safe usage.
Test for Stability:
Once the bed components are assembled, carefully test the stability and structural integrity of the loft bed. Apply gentle pressure to various points of the frame and mattress platform to ensure they can support weight without shifting or wobbling. This step is crucial for identifying any potential issues and making necessary adjustments before the bed is put into regular use.
Make Final Adjustments:
Inspect the assembled bed for any loose fasteners, uneven surfaces, or sharp edges. Make any final adjustments or refinements to ensure the bed is safe and comfortable for use. Address any protruding screws or rough edges by sanding and smoothing the surfaces, prioritizing the overall safety and comfort of the sleeping area.
By meticulously following these steps, you'll successfully assemble the bed components and transform the frame into a secure and inviting loft bed. With the mattress platform, safety features, and ladder (if applicable) in place, the DIY loft bed is now ready for the final touches and personalization.
Step 4: Add Safety Features
Safety is paramount when it comes to constructing a loft bed, especially if it will be used by children or individuals who may require assistance. Adding safety features not only provides peace of mind but also ensures a secure and comfortable sleeping environment. Here's a detailed exploration of the essential safety features to incorporate into your DIY loft bed:
Safety Rails:
Safety rails are fundamental components of a loft bed, serving as protective barriers to prevent accidental falls during sleep. When adding safety rails, it's crucial to ensure they are securely attached along the sides of the bed, forming a reliable boundary that minimizes the risk of rolling off the elevated sleeping area. The height and sturdiness of the safety rails should be carefully considered to accommodate different age groups and provide adequate support.
Sturdy Ladder or Stairs:
If the loft bed requires a means of access, whether it's a ladder or stairs, prioritizing stability and weight-bearing capacity is essential. The ladder or stairs should be securely attached to the frame, providing safe and convenient access to the sleeping area. For ladders, rung spacing and anti-slip features should be taken into account to ensure safe and easy climbing. Additionally, the ladder or stairs should be designed to withstand regular use and support the weight of the individual using them.
Rounded Edges and Smooth Surfaces:
To minimize the risk of injuries, particularly in a compact sleeping space, it's important to ensure that all edges and surfaces are smooth and free from sharp corners. Sanding down any rough edges and rounding off the corners of the bed frame and safety features can significantly reduce the likelihood of accidental bumps or scrapes.
Weight Capacity Considerations:
When designing and building a loft bed, it's crucial to consider the weight capacity of the structure. This includes factoring in the weight of the mattress, bedding, and the individuals who will be using the bed. Ensuring that the materials and construction can support the anticipated weight load is vital for maintaining the bed's stability and safety over time.
By incorporating these safety features into the design and construction of your DIY loft bed, you can create a secure and reliable sleeping space that prioritizes the well-being of its users. With safety at the forefront, the loft bed becomes a welcoming and worry-free addition to any living space.
Step 5: Customize and Decorate
After completing the structural aspects of your DIY loft bed, it's time to infuse your personal style and creativity into the design. Customizing and decorating the loft bed allows you to transform it from a functional piece of furniture into a personalized and visually appealing element of your living space.
Personalization Options:
Consider incorporating personalized elements that reflect your individual taste and preferences. Whether it's adding decorative trim, painting the bed frame in your favorite color, or integrating unique design features, personalization allows you to make the loft bed truly your own.
Functional Additions:
Think about incorporating functional elements that enhance the utility of the loft bed. This could include integrating storage solutions such as built-in shelves, drawers, or a desk underneath the bed. By maximizing the bed's functionality, you can optimize space and create a multifunctional area within your living space.
Expressive Accents:
Incorporate expressive accents such as decorative lighting, fabric canopies, or themed decals to infuse character and charm into the design. These accents not only add visual interest but also contribute to creating a cozy and inviting atmosphere within the sleeping nook.
Personal Touches:
Consider adding personal touches such as photo displays, inspirational quotes, or artwork to the bed frame or surrounding area. These elements can serve as reminders of cherished memories or sources of motivation, adding a meaningful dimension to the space.
Safety and Practicality:
While customizing and decorating the loft bed, it's essential to prioritize safety and practicality. Ensure that any decorative elements or additions do not compromise the structural integrity or safety features of the bed. Additionally, consider the ease of maintenance and cleaning when selecting decorative components.
By customizing and decorating your DIY loft bed, you can create a unique and personalized sleeping space that not only serves a practical function but also reflects your individual style and personality. Whether it's through functional additions, expressive accents, or personal touches, infusing creativity into the design allows you to craft a truly distinctive and inviting sleeping nook.
Conclusion
Embarking on the journey of building a DIY loft bed is not just about creating a functional sleeping space; it's a testament to your creativity, craftsmanship, and dedication to optimizing your living environment. As you reach the conclusion of this transformative project, it's essential to reflect on the rewarding aspects of the process and the significance of the final outcome.
Through meticulous planning, precise construction, and thoughtful customization, you've not only crafted a space-saving sleeping solution but also imbued it with your unique style and personality. The loft bed now stands as a symbol of your ingenuity and resourcefulness, showcasing your ability to transform raw materials into a practical and visually appealing piece of furniture.
Moreover, the DIY loft bed represents a harmonious blend of functionality and individuality. By integrating safety features, personalized touches, and practical elements, you've created a multifaceted space that caters to both the practical needs and aesthetic preferences of its users. This fusion of utility and personal expression is a testament to the versatility and ingenuity inherent in DIY projects.
As you admire the completed loft bed, take pride in the craftsmanship and attention to detail that have gone into its construction. The sense of accomplishment derived from overcoming challenges, honing your woodworking skills, and witnessing your vision come to life is truly unparalleled. This achievement serves as a reminder of your ability to turn ideas into tangible, impactful creations.
Furthermore, the DIY loft bed embodies adaptability and efficiency, making it an ideal solution for various living spaces. Whether it's a compact apartment, a shared dorm room, or a cozy home, the versatility of the loft bed allows it to seamlessly integrate into diverse environments, maximizing space and functionality.
In conclusion, the DIY loft bed represents more than just a practical sleeping solution; it embodies creativity, craftsmanship, and the fulfillment of a vision. As you revel in the completion of this project, take pride in the transformative journey you've undertaken and the tangible, lasting impact it has had on your living space. The loft bed stands as a testament to your resourcefulness, individuality, and commitment to creating a home environment that is both functional and uniquely yours.