
Home>Create & Decorate>DIY & Crafts>How To Build Round Steps For A Deck
DIY & Crafts
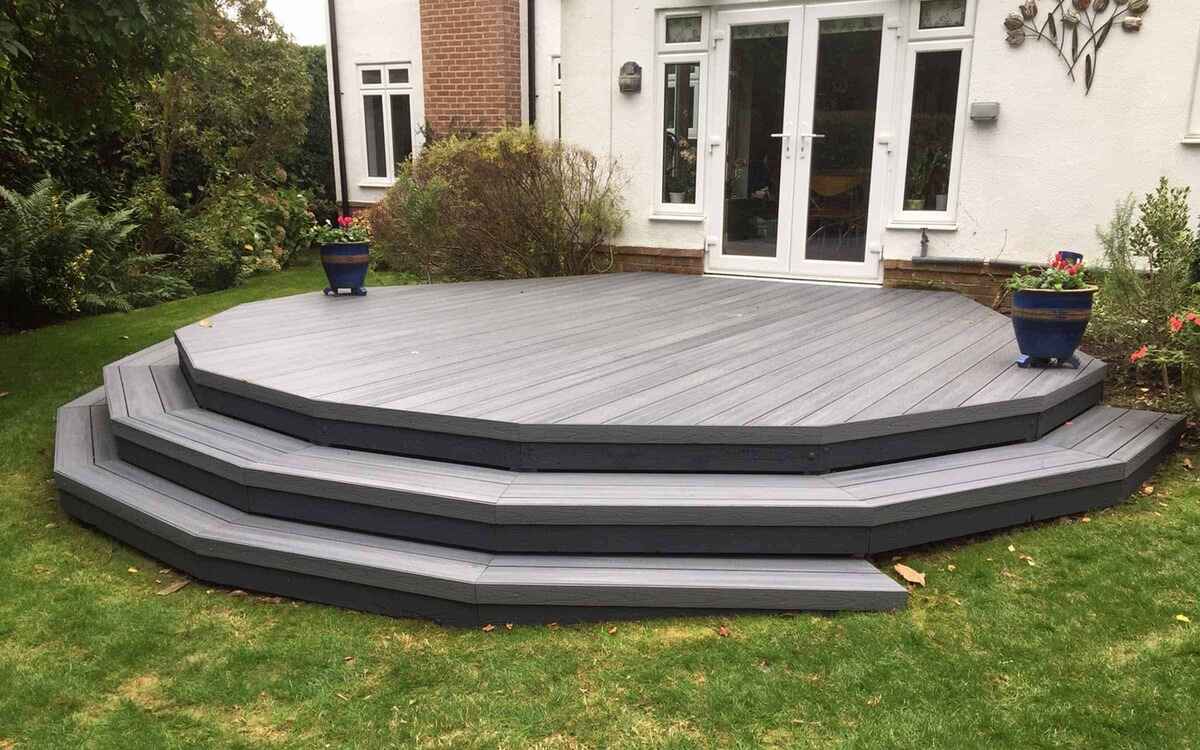
How To Build Round Steps For A Deck
Published: February 24, 2024

Senior Editor in Create & Decorate, Kathryn combines traditional craftsmanship with contemporary trends. Her background in textile design and commitment to sustainable crafts inspire both content and community.
Learn how to build round steps for your deck with this DIY & Crafts guide. Create a unique and stylish entrance to your outdoor space. Step-by-step instructions included!
(Many of the links in this article redirect to a specific reviewed product. Your purchase of these products through affiliate links helps to generate commission for Twigandthistle.com, at no extra cost. Learn more)
Introduction
Building round steps for a deck can add a touch of elegance and functionality to your outdoor space. Whether you're constructing a new deck or looking to enhance an existing one, round steps can create a unique focal point and improve accessibility. By following a few simple steps and using the right tools and materials, you can successfully tackle this DIY project.
In this comprehensive guide, we will walk you through the process of building round steps for your deck, providing detailed instructions and valuable tips to help you achieve professional-looking results. From gathering the necessary materials and tools to installing the stringers and adding finishing touches, you'll learn the essential techniques required to complete this project with confidence.
By the end of this guide, you'll have the knowledge and skills to embark on this rewarding endeavor, elevating the aesthetic appeal and functionality of your deck. So, roll up your sleeves, gather your tools, and let's dive into the exciting world of building round steps for your deck!
Step 1: Gather Materials and Tools
Before diving into the construction of round steps for your deck, it's crucial to gather all the necessary materials and tools. This step sets the foundation for a smooth and efficient building process, ensuring that you have everything at your disposal to bring your vision to life.
Materials
- Pressure-Treated Lumber: This will serve as the primary material for constructing the steps, providing durability and resistance to outdoor elements.
- Galvanized Nails or Deck Screws: These fasteners will secure the various components of the steps, ensuring structural integrity.
- Concrete Mix: If you're building the steps on a concrete pad, you'll need concrete mix to secure the base of the steps.
- Gravel: For creating a stable and level foundation for the steps.
- Treads: Depending on your design preference, you can choose from a variety of tread materials such as wood, composite, or metal.
- Stringers: These are the diagonal supports that will hold the treads in place, providing the structural framework for the steps.
- Leveling Tools: A level and a framing square will help ensure that the steps are installed evenly and securely.
Tools
- Circular Saw: Essential for cutting the lumber to the required dimensions, allowing for precise and clean cuts.
- Hammer or Drill: Depending on your preference, you can use a hammer and nails or a drill with deck screws for fastening the components together.
- Tape Measure: Accurate measurements are crucial for ensuring the steps fit seamlessly into your deck layout.
- Safety Gear: This includes gloves, safety glasses, and hearing protection to prioritize safety during the construction process.
- Shovel: If you're building the steps on a soil surface, a shovel will be necessary for excavating and leveling the ground.
By ensuring that you have all the materials and tools listed above, you'll be well-equipped to proceed with confidence to the next step of measuring and marking the deck for the installation of the round steps. This preparation phase sets the stage for a successful and rewarding construction journey, allowing you to focus on the craftsmanship and creativity involved in bringing your deck steps to fruition.
Step 2: Measure and Mark the Deck
Before diving into the construction of round steps for your deck, it's crucial to measure and mark the deck accurately. This step sets the foundation for a smooth and efficient building process, ensuring that the steps are positioned correctly and seamlessly integrated into the existing deck layout.
Start by assessing the area where you plan to install the round steps. Use a tape measure to determine the available space and consider the desired width and depth of the steps. Take into account the overall design of your deck and visualize how the round steps will complement the aesthetic appeal of the outdoor space.
Once you have a clear understanding of the dimensions and placement of the steps, it's time to mark the deck accordingly. Use chalk or masking tape to outline the area where the steps will be installed. Ensure that the markings are precise and align with your measurements, allowing for a clear visual guide as you proceed with the construction process.
In addition to marking the deck surface, it's essential to consider the elevation and slope of the ground. Use a level to assess the evenness of the surface where the steps will be positioned. If the ground is uneven, you may need to make adjustments by adding gravel or compacting the soil to create a stable and level foundation for the steps.
As you mark the deck and prepare the ground for the installation of the steps, take a moment to step back and visualize the overall layout. Consider how the round steps will enhance the accessibility and visual appeal of your deck, creating a seamless transition between different levels of the outdoor space.
By meticulously measuring and marking the deck, you'll lay the groundwork for a successful and visually appealing installation of round steps. This preparatory phase sets the stage for the subsequent steps of cutting the stringers and installing the structural framework for the steps, allowing you to proceed with confidence and precision as you bring your vision to life.
With the deck accurately measured and marked, you're now ready to move on to the next phase of the construction process, where you'll cut the stringers to create the foundational support for the round steps.
Step 3: Cut the Stringers
Cutting the stringers is a critical step in the construction of round steps for your deck. The stringers serve as the diagonal supports that will hold the treads in place, providing the structural framework for the steps. By carefully measuring and cutting the stringers, you'll ensure that the steps are not only secure but also visually appealing, contributing to the overall aesthetic of your deck.
To begin, select high-quality pressure-treated lumber for the stringers, as it offers durability and resistance to outdoor elements. Use a tape measure to determine the required length of the stringers, taking into account the dimensions and layout of the steps. It's essential to be precise in your measurements, as any inaccuracies can impact the stability and alignment of the steps.
Once you have the measurements in place, use a pencil and framing square to mark the cut lines on the lumber. The framing square will help ensure that the angles are precise and that the stringers will fit seamlessly into the design of the steps. Double-check your measurements and markings before proceeding to the cutting phase.
When it comes to cutting the stringers, a circular saw is the ideal tool for the job. Ensure that the saw blade is sharp and set to the appropriate depth to achieve clean and accurate cuts. Take your time and follow the marked cut lines carefully, maintaining a steady hand to produce smooth and uniform cuts across the lumber.
As you complete the cutting process, inspect each stringer to ensure that the dimensions and angles are consistent and accurate. Any discrepancies can affect the overall stability and alignment of the steps, so it's crucial to prioritize precision during this phase of the construction.
With the stringers accurately cut and prepared, you're now ready to move on to the next step of installing the stringers, where you'll secure the structural framework for the round steps. This phase marks a significant milestone in the construction process, bringing you one step closer to realizing your vision of elegant and functional round steps for your deck.
Step 4: Install the Stringers
With the stringers accurately cut and prepared, it's time to proceed with the installation phase, a pivotal step in the construction of round steps for your deck. The stringers serve as the foundational support for the steps, providing the structural framework that will ensure stability and durability.
Begin by positioning the stringers in place, aligning them with the markings on the deck that indicate the intended placement of the steps. Use a level to ensure that the stringers are positioned evenly and securely, making any necessary adjustments to achieve a precise fit. It's crucial to prioritize accuracy during this phase, as the proper installation of the stringers forms the basis for the entire step structure.
Once the stringers are positioned correctly, secure them in place using galvanized nails or deck screws. Ensure that the fasteners penetrate the stringers and anchor securely into the deck, creating a strong and stable connection. Pay close attention to the alignment and spacing of the fasteners, as they play a critical role in maintaining the integrity of the steps.
As you progress through the installation process, periodically check the levelness and alignment of the stringers to confirm that they remain in the desired position. Making adjustments as needed will contribute to the overall stability and aesthetic appeal of the steps, ensuring a seamless integration with the existing deck structure.
With the stringers securely installed, take a moment to step back and admire the progress made in bringing your vision to life. The installation of the stringers marks a significant milestone in the construction process, setting the stage for the next phase of attaching the treads and finalizing the round steps for your deck.
By meticulously installing the stringers with precision and attention to detail, you're one step closer to achieving elegant and functional round steps that will enhance the accessibility and visual appeal of your outdoor space. With the foundational support in place, you're now ready to proceed to the exciting phase of attaching the treads, bringing you closer to the completion of this rewarding DIY project.
Step 5: Attach the Treads
As you progress in the construction of round steps for your deck, the installation of the treads plays a pivotal role in bringing the project to fruition. The treads not only contribute to the functionality of the steps but also serve as a defining visual element, adding character and charm to your outdoor space. By carefully attaching the treads, you'll elevate the aesthetic appeal and ensure the structural integrity of the steps.
Begin by selecting high-quality treads that complement the design and material of your deck. Whether you opt for traditional wooden treads, low-maintenance composite materials, or sleek metal options, ensure that the treads are well-suited to withstand outdoor conditions while aligning with your aesthetic preferences.
Position the treads on the installed stringers, ensuring a snug and secure fit. Use a level to confirm that the treads are aligned evenly and sit flush against the stringers. This step is crucial in maintaining the stability and safety of the steps, as any misalignment can compromise the overall functionality and visual appeal.
Once the treads are positioned correctly, secure them in place using galvanized nails or deck screws. Ensure that the fasteners penetrate the treads and anchor securely into the stringers, creating a strong and stable connection. Pay close attention to the spacing and placement of the fasteners, distributing them evenly to reinforce the attachment of the treads.
As you progress through the attachment process, periodically check the levelness and alignment of the treads to confirm that they remain in the desired position. Making any necessary adjustments will contribute to the overall stability and visual appeal of the steps, ensuring a seamless integration with the existing deck structure.
With the treads securely attached, take a moment to appreciate the significant progress made in bringing your vision to life. The installation of the treads marks a crucial milestone in the construction process, setting the stage for the final phase of adding finishing touches and completing the round steps for your deck.
By meticulously attaching the treads with precision and attention to detail, you're one step closer to achieving elegant and functional round steps that will enhance the accessibility and visual appeal of your outdoor space. With the treads in place, you're now ready to proceed to the exciting phase of adding finishing touches, bringing you closer to the completion of this rewarding DIY project.
Step 6: Add Finishing Touches
As you approach the final phase of building round steps for your deck, adding finishing touches will elevate the overall aesthetic appeal and ensure that the steps seamlessly integrate with the existing outdoor space. This crucial step allows you to refine the visual presentation of the steps while addressing any remaining details to achieve a polished and professional outcome.
One essential aspect of adding finishing touches is to inspect the entire structure for any protruding nails, rough edges, or imperfections. Use a sander or sandpaper to smooth out any rough surfaces and ensure that the edges of the steps are uniform and free from splinters. This attention to detail not only enhances the safety of the steps but also contributes to a refined and visually appealing finish.
Consider applying a protective finish to the steps to safeguard the wood from outdoor elements and prolong its lifespan. Whether you opt for a clear sealant to showcase the natural beauty of the wood or a colored stain to complement your deck's aesthetic, a protective finish will enhance the durability and resilience of the steps while adding a touch of sophistication to the overall design.
Incorporating decorative elements such as post caps, railings, or lighting can further enhance the visual impact of the round steps. Post caps provide a decorative accent while protecting the exposed ends of the stringers, adding a refined and cohesive look to the steps. Additionally, installing railings or handrails can enhance the safety and accessibility of the steps, especially if they lead to a significant elevation change.
Furthermore, integrating lighting features along the steps can create a captivating ambiance and improve visibility during evening hours. Whether you choose to install subtle recessed lighting or decorative solar-powered fixtures, thoughtful lighting design can transform the steps into a striking focal point, enhancing the overall allure of your deck.
Finally, take a moment to step back and admire the completed round steps, appreciating the craftsmanship and attention to detail that have culminated in a functional and visually captivating addition to your outdoor space. By adding these finishing touches, you've not only enhanced the aesthetic appeal and functionality of the steps but also personalized them to reflect your unique style and preferences.
With the finishing touches in place, you've successfully completed the construction of round steps for your deck, achieving a gratifying and transformative DIY project that will be enjoyed for years to come.
Conclusion
In conclusion, the construction of round steps for your deck represents a fulfilling journey that combines craftsmanship, creativity, and practicality. By following the comprehensive steps outlined in this guide, you've gained the knowledge and skills to embark on this rewarding DIY project with confidence and precision.
From the initial phase of gathering materials and tools to the final touches that elevate the aesthetic appeal and functionality of the steps, you've navigated through each step with dedication and attention to detail. The careful measurement and marking of the deck, the precise cutting and installation of the stringers, and the meticulous attachment of the treads have collectively contributed to the creation of elegant and functional round steps that seamlessly integrate with your outdoor space.
As you add finishing touches such as protective finishes, decorative elements, and thoughtful lighting, you've personalized the steps to reflect your unique style and preferences, transforming them into a captivating focal point that enhances the overall allure of your deck.
The completion of this project marks not only the physical addition of round steps to your deck but also the fulfillment of a vision and the embodiment of your creativity. The steps you've constructed are not merely functional; they are a testament to your dedication to enhancing your outdoor living space and creating a welcoming environment for yourself, your family, and your guests.
As you admire the completed round steps, take pride in the craftsmanship and effort you've invested in this project. Whether you've chosen a classic wood finish, a modern composite material, or a sleek metal design, the steps stand as a testament to your ability to transform a vision into a tangible and enduring feature of your home.
With the completion of this project, you've not only expanded your DIY skills but also enriched your living space with a distinctive and practical addition. The round steps you've built are a testament to your creativity, resourcefulness, and commitment to enhancing your home, and they will undoubtedly be enjoyed for years to come.