
Home>Create & Decorate>DIY & Crafts>DIY Shed House: A Step-by-Step Guide To Building Your Own
DIY & Crafts
DIY Shed House: A Step-by-Step Guide To Building Your Own
Published: February 24, 2024

Senior Editor in Create & Decorate, Kathryn combines traditional craftsmanship with contemporary trends. Her background in textile design and commitment to sustainable crafts inspire both content and community.
Learn how to build your own DIY shed house with our step-by-step guide. Get expert tips and ideas for your next DIY & Crafts project.
(Many of the links in this article redirect to a specific reviewed product. Your purchase of these products through affiliate links helps to generate commission for Twigandthistle.com, at no extra cost. Learn more)
Introduction
Welcome to the world of DIY shed houses! If you've ever dreamed of creating your own cozy retreat or a functional workspace right in your backyard, then you're in the right place. Building a shed house from scratch can be an incredibly rewarding and fulfilling project, allowing you to unleash your creativity and craftsmanship while adding value to your property.
Whether you're a seasoned DIY enthusiast or a novice looking to embark on your first major construction project, this comprehensive guide will walk you through the step-by-step process of bringing your vision to life. From planning and designing to the final finishing touches, you'll gain valuable insights and practical tips to make your DIY shed house a resounding success.
Throughout this guide, you'll discover the essential considerations for selecting the perfect location, designing a functional layout, and choosing the right materials and tools. We'll delve into the intricacies of preparing the site, building a sturdy foundation, framing the structure, and adding windows, doors, roofing, and siding. You'll also learn about the exciting phase of interior finishing, including insulation, flooring, and wall treatments, as well as the installation of utilities for a comfortable and convenient space.
Moreover, we'll explore the creative aspects of adding personal touches and landscaping around your shed house, transforming it into a charming and inviting retreat that reflects your unique style and preferences. Whether you envision a quaint garden shed, a versatile workshop, a peaceful studio, or a guest cottage, the possibilities are endless, and this guide will equip you with the knowledge and inspiration to make it a reality.
So, roll up your sleeves, gather your tools, and get ready to embark on an enriching journey of craftsmanship and creativity. With dedication, patience, and a sprinkle of DIY magic, you'll soon be enjoying the fruits of your labor in your very own DIY shed house. Let's dive in and bring your vision to life, one step at a time!
Planning and Designing Your Shed House
Planning and designing your shed house is the crucial first step in bringing your vision to life. This phase sets the foundation for the entire project, guiding the layout, functionality, and aesthetic appeal of your future space. Here's a detailed look at the essential aspects to consider during the planning and design stage:
-
Purpose and Functionality: Begin by defining the purpose of your shed house. Will it serve as a storage space, a workshop, an art studio, a home office, or a cozy retreat? Understanding its primary function will shape the design and layout to accommodate your specific needs.
-
Location and Orientation: Selecting the ideal location for your shed house is paramount. Consider factors such as sunlight exposure, proximity to utilities, and integration with the existing landscape. Additionally, think about the orientation of the structure to maximize natural light and ventilation.
-
Size and Layout: Determine the size and layout of your shed house based on its intended use and available space. Sketch out a rough floor plan to visualize the interior layout, including designated areas for storage, workstations, seating, or any other specific requirements.
-
Building Codes and Permits: Research local building codes and regulations to ensure compliance with zoning laws, setback requirements, and permit procedures. Understanding these guidelines from the outset will prevent potential setbacks during the construction phase.
-
Aesthetic and Design Elements: Explore design elements that resonate with your personal style and complement the existing architecture of your property. Consider the roof pitch, window styles, exterior finishes, and any decorative features that will enhance the visual appeal of your shed house.
-
Budget and Timeline: Establish a realistic budget for your project, factoring in material costs, tools, and any professional assistance required. Create a timeline that outlines the various stages of construction, allowing for flexibility and unforeseen delays.
-
Customization and Personalization: Embrace the opportunity to customize your shed house to reflect your unique preferences. Whether it's adding a charming porch, incorporating eco-friendly features, or integrating smart storage solutions, infuse your personality into the design.
By meticulously planning and designing your shed house, you'll lay a solid groundwork for a successful construction journey. This phase sets the stage for a seamless transition into gathering materials, preparing the site, and ultimately bringing your dream shed house to fruition.
Gathering Materials and Tools
Gathering the necessary materials and tools is a pivotal step in the journey of building your DIY shed house. This phase requires careful planning and organization to ensure that you have everything needed to proceed with the construction process smoothly. Here's a comprehensive breakdown of the essential materials and tools you'll need to gather:
Materials
-
Lumber: Select high-quality lumber for framing, siding, and interior finishing. Consider pressure-treated or weather-resistant wood for longevity and durability.
-
Fasteners: Stock up on nails, screws, and bolts of various sizes to secure the structural components and fasten the siding and roofing materials.
-
Foundation Materials: Depending on your chosen foundation type, gather concrete blocks, gravel, or concrete mix to establish a stable base for your shed house.
-
Roofing and Siding: Choose suitable roofing materials such as shingles, metal panels, or roofing sheets. For siding, opt for materials like wood, vinyl, or fiber cement siding for weather protection and aesthetic appeal.
-
Windows and Doors: Select energy-efficient windows and durable exterior doors that complement the design of your shed house while providing security and natural light.
-
Insulation and Interior Finishes: Acquire insulation materials to regulate temperature and enhance energy efficiency. Plan for interior finishes such as drywall, paint, flooring, and trim to create a comfortable and inviting interior space.
-
Utilities: If your shed house will include electrical wiring, plumbing, or HVAC systems, gather the necessary components and fixtures to accommodate these utilities.
Tools
-
Basic Hand Tools: Ensure you have a comprehensive set of hand tools including hammers, screwdrivers, wrenches, levels, tape measures, and utility knives for general construction tasks.
-
Power Tools: Invest in power tools such as a circular saw, drill/driver, nail gun, and jigsaw to expedite cutting, drilling, and fastening processes.
-
Foundation and Framing Tools: Depending on your foundation type, you may need tools for excavation, leveling, and concrete work. For framing, have a framing square, a chalk line, and a carpenter's level on hand.
-
Safety Gear: Prioritize safety by obtaining personal protective equipment including gloves, safety glasses, ear protection, and dust masks to safeguard yourself during construction.
-
Specialized Equipment: If your project involves specific tasks such as roofing or siding installation, consider renting or purchasing specialized equipment like a roofing nailer or a siding brake for efficient and precise work.
By meticulously gathering the required materials and tools, you'll set the stage for a successful and efficient construction process. With everything in place, you'll be well-prepared to move on to the next phases of preparing the site, building the foundation, and framing the structure of your DIY shed house.
Preparing the Site
Preparing the site for your DIY shed house is a critical phase that sets the groundwork for the entire construction process. This stage involves a series of essential tasks aimed at ensuring a level, stable, and well-drained foundation for your structure. Here's a detailed breakdown of the key steps involved in preparing the site for your shed house:
-
Site Clearing: Begin by clearing the designated area of any vegetation, debris, or obstacles that may impede the construction process. This includes removing rocks, tree roots, and any existing structures or obstructions that could interfere with the foundation and framing.
-
Marking and Excavation: Use stakes and string to mark the perimeter of the shed house footprint, outlining the exact dimensions of the structure. With the area marked, proceed to excavate the site to the required depth, accounting for the foundation type and local building codes.
-
Grading and Leveling: Once the site is excavated, focus on grading and leveling the ground to ensure a uniform and stable base for the foundation. Use a transit or a laser level to achieve the desired slope and elevation, promoting proper drainage away from the shed house.
-
Foundation Preparation: Depending on your chosen foundation type, whether it's a concrete slab, piers, or a skid foundation, prepare the ground accordingly. This may involve compacting the soil, adding a layer of gravel for drainage, or setting up formwork for a concrete pour.
-
Utility Considerations: If your shed house will require access to utilities such as electricity, water, or sewer lines, take this opportunity to plan for their installation. Coordinate with relevant professionals to ensure that utility connections are strategically positioned before the foundation is established.
-
Site Accessibility: Evaluate the accessibility of the site for construction equipment, material delivery, and future use of the shed house. Ensure that there is sufficient space for maneuvering and that the site can accommodate the transportation of heavy materials and tools.
By meticulously preparing the site for your shed house, you'll create a solid foundation for the subsequent phases of construction. This initial groundwork sets the stage for building a structurally sound and resilient DIY shed house that will stand the test of time.
With the site prepared, you'll be ready to move on to the next exciting stages of building the foundation, framing the structure, and bringing your vision of a personalized and functional shed house to fruition.
Building the Foundation
Building a solid foundation is a critical step in the construction of your DIY shed house. The foundation provides essential support and stability, ensuring that your structure withstands the test of time and environmental factors. Here's a detailed overview of the key considerations and steps involved in building the foundation for your shed house:
-
Foundation Type Selection: Depending on your site conditions, local building codes, and personal preferences, choose the most suitable foundation type for your shed house. Common options include concrete slab, concrete piers, skids, or concrete blocks. Each type offers distinct advantages in terms of cost, durability, and ease of construction.
-
Site Preparation: Clear the area where the foundation will be laid, ensuring that the site is level and free from any debris or obstructions. If necessary, conduct additional grading and leveling to create a uniform base for the foundation.
-
Formwork and Reinforcement: For concrete foundations, set up formwork to define the shape and dimensions of the foundation. Reinforce the formwork with steel rebar or mesh to enhance the structural integrity and load-bearing capacity of the foundation.
-
Concrete Pouring: Once the formwork is in place, it's time to pour the concrete. Ensure that the concrete mix meets the required strength and consistency for the foundation. Use a concrete mixer or hire a concrete truck to deliver the material, and pour it evenly into the formwork.
-
Curing and Drying: Allow the poured concrete to cure and dry according to the manufacturer's recommendations. This process is crucial for achieving the desired strength and stability of the foundation. Protect the curing concrete from excessive moisture loss and temperature fluctuations during this phase.
-
Anchor Bolt Installation: If your shed house will be secured to the foundation, install anchor bolts or embed plates into the concrete before it sets. These will provide a secure connection point for the framing of the structure.
-
Inspection and Approval: Once the foundation is in place, schedule an inspection by local building authorities to ensure compliance with relevant codes and regulations. Obtain the necessary approvals before proceeding to the next phase of construction.
By meticulously following these steps and considerations, you'll establish a robust and reliable foundation for your DIY shed house. A well-built foundation forms the backbone of your structure, setting the stage for the exciting phases of framing, installing windows and doors, and adding the finishing touches to your personalized and functional shed house.
Framing the Structure
Framing the structure of your DIY shed house marks a pivotal phase in the construction process, where the vision begins to take tangible form. The framing stage involves assembling the skeletal framework that defines the shape, strength, and structural integrity of your shed house. Here's a detailed overview of the key steps and considerations involved in framing the structure:
-
Laying the Groundwork: Start by laying out the bottom plates of the walls according to the precise dimensions of your shed house. Use a tape measure and a chalk line to ensure accuracy, and mark the locations for wall studs, door and window openings, and any other structural elements.
-
Wall Framing: With the bottom plates in place, proceed to erect the wall frames by securing vertical studs between the top and bottom plates. Depending on your design, you may incorporate additional framing elements such as headers, cripple studs, and corner bracing to reinforce the structure.
-
Roof Trusses or Rafters: If your shed house features a pitched roof, assemble and install roof trusses or rafters to create the framework for the roof structure. Ensure that the trusses are securely anchored to the top plates of the walls, providing essential support for the roof load.
-
Floor and Ceiling Joists: For shed houses with a raised floor or a loft area, install floor joists to create a stable and level platform. Similarly, position ceiling joists to support the ceiling and provide attachment points for insulation and interior finishes.
-
Bracing and Sheathing: Incorporate diagonal bracing within the wall frames to enhance stability and resist lateral forces. Once the framing is in place, apply sheathing material such as plywood or oriented strand board (OSB) to enclose the walls and roof, further strengthening the structure.
-
Window and Door Openings: Frame the openings for windows and doors, ensuring that they align with your design specifications and accommodate the chosen fixtures. Proper framing around these openings is crucial for seamless installation and weatherproofing.
-
Structural Integrity and Code Compliance: Throughout the framing process, prioritize structural integrity and adherence to building codes. Verify that the framing components are plumb, level, and properly aligned, and conduct periodic checks to ensure compliance with relevant regulations.
By meticulously following these steps and considerations, you'll establish a robust and reliable framework for your shed house. The framing stage sets the stage for the subsequent phases of installing windows and doors, roofing and siding, and adding the finishing touches to transform your vision into a fully realized DIY shed house.
Installing Windows and Doors
Installing windows and doors is a pivotal phase in the construction of your DIY shed house, as it not only enhances the aesthetic appeal but also contributes to the functionality, natural light, and ventilation of the space. Here's a detailed overview of the key steps and considerations involved in installing windows and doors:
-
Window Installation: Begin by carefully measuring and marking the locations for the windows based on your design and layout. Ensure that the openings are sized to accommodate the chosen window units, allowing for a proper fit. Prior to installation, apply a waterproof membrane or flashing tape around the window openings to prevent moisture infiltration.
-
Weatherproofing: Proper weatherproofing is essential to safeguard the interior of your shed house from the elements. Install sill pans or flashing beneath the windows to direct water away from the structure. Seal the perimeter of the window frames with high-quality caulking to create a watertight seal, preventing air and water infiltration.
-
Door Placement and Alignment: Position the exterior doors according to your design, ensuring that they align with the framing and provide smooth operation. Verify that the door frames are plumb, level, and square before securing them in place. Pay attention to the threshold placement to ensure a seamless transition between the interior and exterior spaces.
-
Hardware Installation: Once the windows and doors are in place, proceed to install the necessary hardware including hinges, handles, locks, and latches. Choose hardware that complements the overall design of your shed house while providing security and ease of use. Verify that all hardware is securely fastened and functions as intended.
-
Interior and Exterior Trim: Complete the window and door installations by adding interior and exterior trim. Trim not only enhances the visual appeal but also conceals the gaps between the frames and the walls, providing a polished and finished look. Use trim pieces that complement the architectural style of your shed house, and ensure that they are securely attached.
-
Sealing and Insulation: After the installations are complete, apply additional caulking and weatherstripping as needed to seal any gaps around the windows and doors. This step is crucial for improving energy efficiency and maintaining a comfortable interior environment. Consider adding insulation around the window and door frames to further enhance thermal performance.
By meticulously following these steps and considerations, you'll ensure that the windows and doors of your DIY shed house are installed with precision, durability, and weather resistance. This phase sets the stage for the subsequent steps of roofing and siding, interior finishing, and adding utilities, bringing you closer to the realization of your personalized and functional shed house.
Roofing and Siding
The roofing and siding phase of constructing your DIY shed house is a critical step that not only provides protection from the elements but also contributes significantly to the overall aesthetic appeal of the structure. Here's a detailed overview of the key considerations and steps involved in the roofing and siding process:
Roofing
-
Material Selection: Choose roofing materials that align with the architectural style of your shed house and provide durability and weather resistance. Options include asphalt shingles, metal roofing panels, cedar shakes, or corrugated roofing sheets. Consider factors such as longevity, maintenance requirements, and energy efficiency when making your selection.
-
Underlayment Installation: Prior to installing the roofing material, apply an appropriate underlayment to create a secondary barrier against moisture infiltration. This underlayment serves as a protective layer, enhancing the weatherproofing of the roof and safeguarding the underlying structure.
-
Roofing Material Installation: Whether you opt for shingles, metal panels, or another roofing material, follow manufacturer guidelines and best practices for installation. Ensure that the roofing material is securely fastened, properly aligned, and overlapped according to specifications to create a watertight seal.
-
Flashing and Ventilation: Incorporate flashing around roof penetrations, such as chimneys, vents, and skylights, to prevent water intrusion at these vulnerable points. Additionally, prioritize proper ventilation to promote air circulation in the attic space, reducing moisture buildup and enhancing energy efficiency.
Siding
-
Siding Selection: Choose siding materials that complement the architectural style of your shed house while providing durability and visual appeal. Common options include wood siding, vinyl siding, fiber cement siding, or engineered wood panels. Consider factors such as maintenance requirements, resistance to rot and pests, and color options when making your selection.
-
Moisture Barrier Installation: Before installing the siding, apply a moisture barrier or house wrap to create a protective layer against water infiltration. This barrier enhances the weather resistance of the structure and prevents moisture-related issues within the walls.
-
Siding Installation: Follow manufacturer guidelines and best practices for installing the chosen siding material. Ensure that the siding is properly aligned, securely fastened, and incorporates appropriate expansion and contraction allowances to accommodate temperature variations.
-
Trim and Detailing: Complete the siding installation by adding trim pieces, corner boards, and other architectural details to enhance the visual appeal and weatherproofing of the exterior. Pay attention to proper flashing and caulking around windows, doors, and other openings to prevent water intrusion.
By meticulously following these steps and considerations, you'll ensure that the roofing and siding of your DIY shed house are installed with precision, durability, and weather resistance. This phase brings you closer to the completion of the exterior envelope, setting the stage for the subsequent steps of interior finishing, adding utilities, and adding the final touches to transform your vision into a fully realized and functional shed house.
Interior Finishing
The interior finishing phase of constructing your DIY shed house marks the transition from structural elements to the creation of a comfortable and inviting living or working space. This phase focuses on adding the essential elements that transform the interior into a functional and aesthetically pleasing environment. Here's a detailed overview of the key considerations and steps involved in the interior finishing process:
Insulation and Vapor Barrier
Begin by addressing the insulation needs of your shed house to regulate temperature and enhance energy efficiency. Install insulation material within the walls, ceiling, and floor, choosing options that align with your climate and intended use of the space. Additionally, apply a vapor barrier to control moisture and prevent condensation within the insulated cavities, ensuring a comfortable and healthy interior environment.
Wall Treatments
Once the insulation and vapor barrier are in place, proceed to add wall treatments that reflect your desired aesthetic and functional requirements. This may involve installing drywall for a smooth and paintable surface, applying wood paneling for a rustic charm, or incorporating other wall coverings that suit your design vision. Ensure that the wall treatments are securely attached and seamlessly integrated to create a cohesive and visually appealing backdrop for the interior space.
Flooring Installation
Select and install flooring materials that align with the purpose and style of your shed house. Options range from durable and easy-to-clean laminate or vinyl flooring to the warmth and natural beauty of hardwood or engineered wood. Consider factors such as durability, maintenance, and visual appeal when choosing the flooring, and ensure that the installation is precise and level to create a solid foundation for the interior space.
Trim and Molding
Incorporate trim and molding elements to add architectural detail and refinement to the interior. Install baseboards, crown molding, and door casings to frame and accentuate the architectural features of the space. Pay attention to precise measurements and seamless joints to achieve a polished and professional finish that elevates the overall aesthetic of your shed house.
Interior Finishes
Complete the interior finishing by applying paint or other finishes to the walls, ceiling, and trim. Choose colors and finishes that align with your design vision and create the desired ambiance within the space. Additionally, consider adding decorative elements such as wainscoting, chair rails, or accent walls to infuse personality and character into the interior.
By meticulously following these steps and considerations, you'll transform the interior of your DIY shed house into a functional, comfortable, and visually appealing space that reflects your unique style and serves your specific needs. This phase sets the stage for the final steps of adding utilities, incorporating personalized touches, and bringing your vision of a fully realized and personalized shed house to fruition.
Adding Utilities
Adding utilities to your DIY shed house is a crucial step that enhances the functionality, comfort, and convenience of the space. Whether you envision a fully-equipped workshop, a cozy studio, or a versatile retreat, incorporating essential utilities ensures that your shed house meets your practical needs. Here's a detailed overview of the key considerations and steps involved in adding utilities to your shed house:
Electrical Wiring and Lighting
Begin by planning the electrical layout to accommodate lighting, power outlets, and any specialized equipment or appliances you intend to use. Consult with a licensed electrician to ensure compliance with electrical codes and safety standards. Install a breaker panel to distribute power throughout the shed house, and strategically position light fixtures to provide adequate illumination for various activities. Consider energy-efficient LED lighting options to minimize power consumption and enhance the ambiance of the interior space.
Heating, Ventilation, and Cooling
Depending on your climate and intended use of the shed house, consider incorporating heating, ventilation, and cooling systems to maintain a comfortable environment year-round. Options range from portable space heaters and fans to mini-split air conditioning units or radiant heating solutions. Evaluate the insulation and airtightness of the structure to optimize energy efficiency and thermal comfort, and consult with HVAC professionals to select the most suitable heating and cooling solutions for your shed house.
Plumbing and Water Access
If your shed house will include a bathroom, kitchenette, or utility sink, plan for the installation of plumbing fixtures and water access. Coordinate with licensed plumbers to design and install the necessary plumbing infrastructure, including supply lines, drainage, and fixtures. Consider the use of water-saving fixtures and efficient hot water systems to minimize water consumption and enhance sustainability. Additionally, if your shed house will be connected to a municipal water supply or a well, ensure that the water lines are properly installed and insulated to prevent freezing in cold climates.
Internet and Communication
Incorporate internet connectivity and communication infrastructure to ensure that your shed house is equipped for modern connectivity needs. Install network cabling, Wi-Fi routers, and communication outlets to facilitate seamless internet access and communication within the space. Consider the placement of technology devices, such as printers or smart home systems, and plan for the integration of security and surveillance systems if desired.
By meticulously addressing these considerations and collaborating with qualified professionals, you'll successfully integrate essential utilities into your shed house, creating a versatile and fully functional space that meets your specific requirements. This phase sets the stage for the final touches and landscaping, bringing you closer to the realization of your personalized and functional DIY shed house.
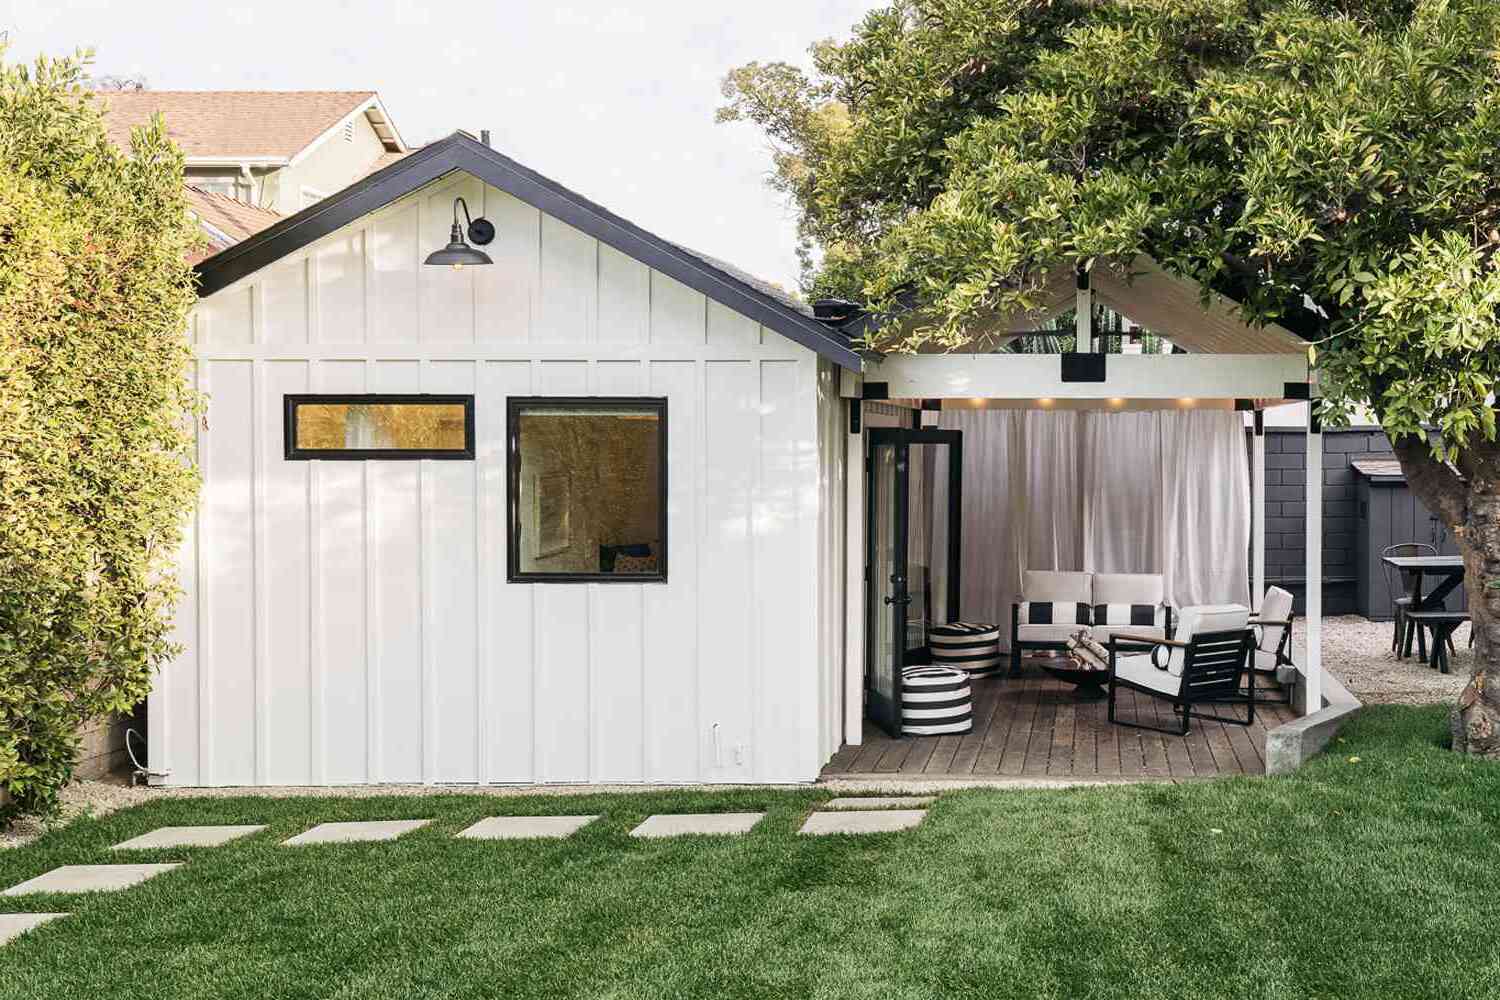
Final Touches and Landscaping
As the construction of your DIY shed house nears completion, the final touches and landscaping phase presents an exciting opportunity to add personal flair and enhance the exterior surroundings. This phase focuses on refining the aesthetic appeal of the shed house and integrating it harmoniously with the outdoor environment. Here's a detailed overview of the key considerations and steps involved in the final touches and landscaping process:
Exterior Finishes
Apply exterior finishes such as paint or stain to the siding and trim to protect the wood from the elements and infuse the shed house with your preferred color scheme. Choose finishes that complement the natural surroundings or align with the architectural style of your property. Additionally, consider adding decorative elements such as shutters, flower boxes, or architectural details to elevate the visual appeal of the exterior.
Landscaping
Enhance the surroundings of your shed house by incorporating landscaping elements that blend seamlessly with the natural landscape. Consider planting native trees, shrubs, and flowering plants to create a vibrant and inviting outdoor environment. Define pathways and outdoor living areas using gravel, pavers, or natural stone to establish functional and visually appealing spaces around the shed house.
Outdoor Furnishings
Complete the exterior setting by adding outdoor furnishings such as seating, tables, and decorative accents. Choose durable and weather-resistant furniture that complements the style of your shed house and provides a comfortable outdoor retreat. Consider incorporating elements such as pergolas, arbors, or trellises to add architectural interest and create inviting outdoor spaces.
Functional Additions
Evaluate the practical needs of the outdoor area and consider adding functional elements such as storage sheds, compost bins, or rainwater collection systems. These additions not only enhance the functionality of the outdoor space but also contribute to the sustainability and self-sufficiency of your property.
Lighting and Security
Incorporate outdoor lighting to illuminate pathways, highlight landscaping features, and enhance the safety and security of the shed house. Choose energy-efficient and low-maintenance lighting fixtures to create a welcoming ambiance while providing essential illumination during evening hours. Additionally, consider integrating security lighting and surveillance systems to enhance the safety and protection of the property.
By meticulously attending to these final touches and landscaping considerations, you'll transform your DIY shed house into a captivating and fully realized retreat that reflects your personal style and practical needs. This phase marks the culmination of your construction journey, bringing to life a functional, inviting, and aesthetically pleasing space that enriches your property and lifestyle.
Conclusion
Congratulations on reaching the culmination of your DIY shed house construction journey! As you put the finishing touches on your personalized retreat or functional workspace, it's a moment to celebrate the dedication, creativity, and craftsmanship that have gone into bringing your vision to life. The journey from planning and designing to the final landscaping touches has been a testament to your passion for creating a space that reflects your unique style and meets your practical needs.
Throughout this comprehensive guide, you've embarked on a step-by-step exploration of the intricate process of building a DIY shed house. From laying the groundwork and framing the structure to adding utilities and incorporating personalized touches, each phase has been a testament to your commitment to craftsmanship and attention to detail.
As you stand back and admire the completed shed house, take pride in the resilience and functionality of the structure, knowing that it has been built to stand the test of time. The thoughtful integration of utilities, the meticulous interior finishing, and the harmonious landscaping have transformed the shed house into a versatile and inviting space that enriches your property and lifestyle.
Beyond the tangible results, the journey of constructing a DIY shed house has been a source of personal growth and fulfillment. It has provided an opportunity to hone your skills, unleash your creativity, and immerse yourself in a hands-on project that embodies your vision and aspirations.
As you envision the moments and experiences that await within your newly constructed shed house – whether it's a tranquil retreat for relaxation, a productive haven for creative pursuits, or a versatile space for hosting gatherings – take pride in the fact that every nail driven, every wall framed, and every detail added has contributed to the realization of a space that is uniquely yours.
As you embark on the next chapter of enjoying and utilizing your DIY shed house, may it serve as a constant reminder of the dedication, ingenuity, and passion that have shaped its creation. Whether it's basking in the natural light that filters through the carefully installed windows, finding inspiration within the thoughtfully finished interior, or savoring the tranquility of the landscaped surroundings, may your shed house become a cherished sanctuary that reflects your individuality and enriches your daily life.
With the completion of your DIY shed house, you've not only added a valuable asset to your property but also created a space that embodies your vision, creativity, and practicality. As you open the doors to new possibilities within this personalized retreat, may it continue to inspire and uplift you for years to come.