
Home>Create & Decorate>DIY & Crafts>How To Build Raised Planter Boxes
DIY & Crafts
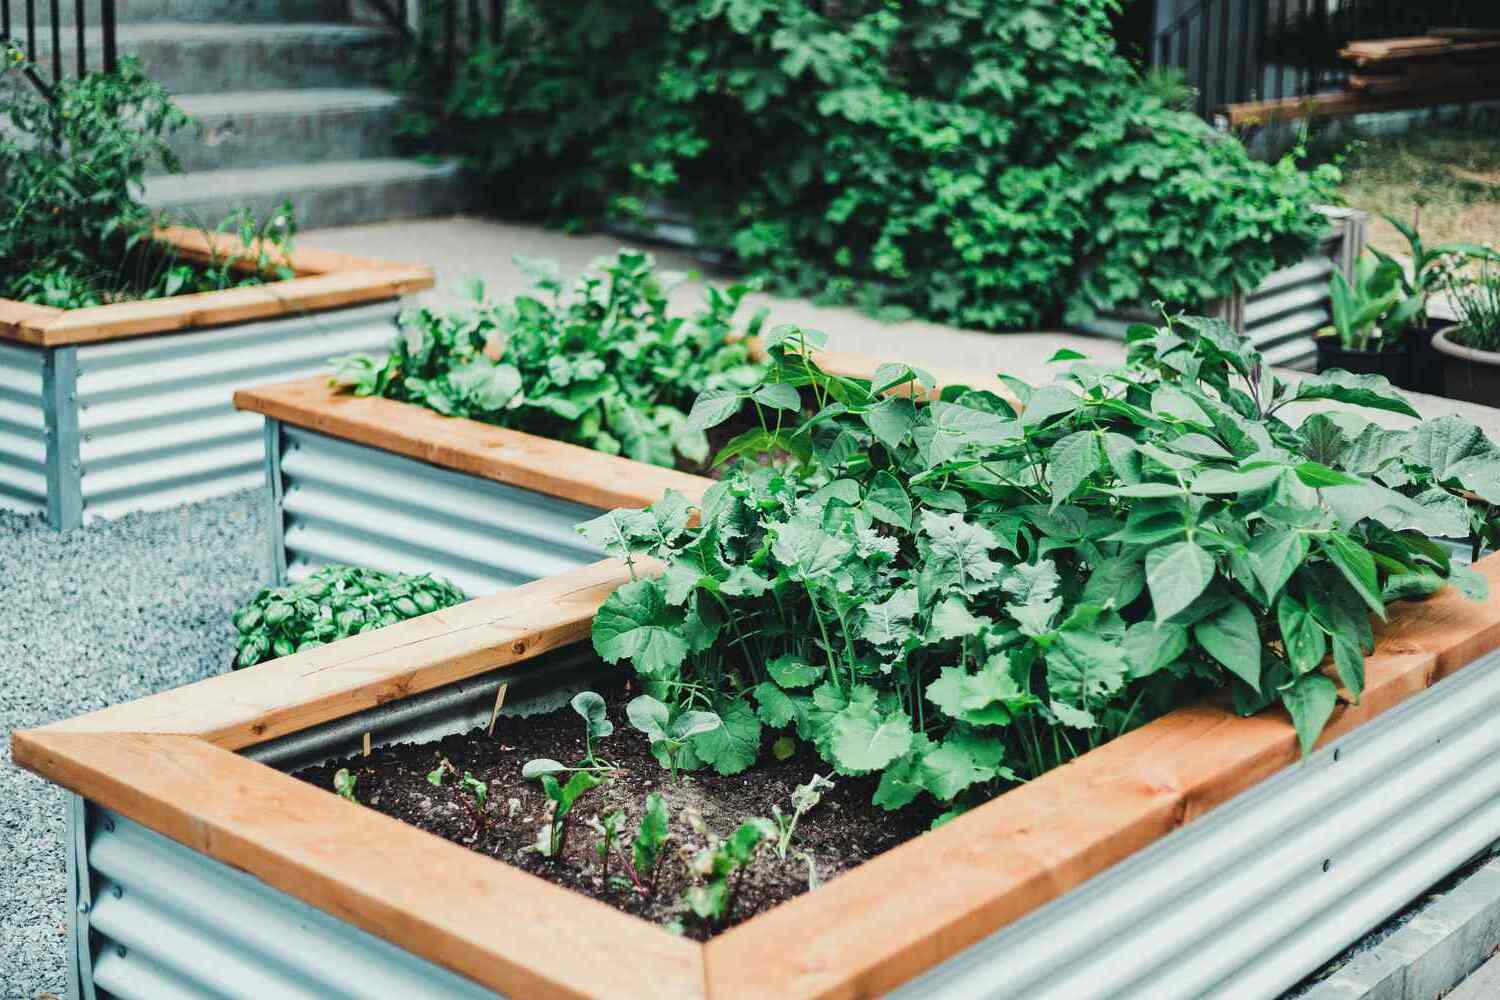
How To Build Raised Planter Boxes
Published: May 21, 2024

Senior Editor in Create & Decorate, Kathryn combines traditional craftsmanship with contemporary trends. Her background in textile design and commitment to sustainable crafts inspire both content and community.
Learn how to create your own raised planter boxes with our step-by-step DIY guide. Perfect for gardening and crafting enthusiasts. Start your project today!
(Many of the links in this article redirect to a specific reviewed product. Your purchase of these products through affiliate links helps to generate commission for Twigandthistle.com, at no extra cost. Learn more)
Introduction
Are you looking to add a touch of greenery to your outdoor space? Building raised planter boxes is a fantastic way to create a beautiful garden and grow your favorite plants, flowers, or vegetables. Whether you're a seasoned DIY enthusiast or a novice looking for a fun project, constructing your own raised planter boxes can be a rewarding and enjoyable experience. In this guide, we'll walk you through the step-by-step process of building raised planter boxes, from planning and design to adding soil and plants. Let's get started on creating a stunning and functional addition to your outdoor living space!
Benefits of Raised Planter Boxes
-
Improved Drainage: Raised planter boxes provide excellent drainage for plants, preventing waterlogging and root rot, which can be detrimental to plant health.
-
Better Soil Quality: By using a raised planter box, you have more control over the soil quality, ensuring that it is nutrient-rich and well-draining, which is essential for healthy plant growth.
-
Ergonomic Design: The raised height of the planter boxes reduces the need for bending or kneeling, making it easier to tend to your plants without straining your back or knees.
-
Pest and Weed Control: Raised planter boxes can help deter pests and weeds, keeping your plants safe from unwanted intruders and minimizing the effort required for maintenance.
-
Aesthetic Appeal: These boxes add a visually appealing element to your outdoor space, creating a defined area for gardening and enhancing the overall look of your garden or patio.
-
Accessibility: The elevated design of raised planter boxes makes gardening more accessible for individuals with mobility issues or disabilities, allowing them to enjoy the benefits of gardening without physical limitations.
-
Extended Growing Season: The elevated design of raised planter boxes can help to warm the soil more quickly in the spring, extending the growing season for your plants.
-
Space Optimization: Raised planter boxes are an excellent solution for gardening in small or limited spaces, such as balconies, patios, or urban settings, where traditional gardening may not be feasible.
-
Protection from Contaminants: Elevated planters can provide a barrier against contaminated soil, making them an ideal choice for urban environments or areas with potential soil pollution.
-
Versatility: These planter boxes can be customized to fit your specific gardening needs, allowing you to grow a wide variety of plants, flowers, or vegetables in a single, convenient space.
Materials Needed
To get started on building your raised planter boxes, you'll need the following materials:
- Wood: Select high-quality, rot-resistant wood such as cedar, redwood, or cypress for durability and longevity.
- Screws: Opt for weather-resistant screws to ensure the structural integrity of your planter boxes.
- Landscape Fabric: This will help prevent soil erosion and maintain the shape of the planter box.
- Corner Braces: These will provide additional support and stability to the corners of the planter boxes.
- Wood Sealer or Stain: Choose a sealant or stain to protect the wood from moisture and prolong its lifespan.
- Soil: Depending on the types of plants you intend to grow, select a high-quality, well-draining soil mix.
- Plants: Decide on the plants, flowers, or vegetables you want to cultivate in your raised planter boxes.
- Gravel or Drainage Material: This will aid in proper drainage within the planter boxes.
- Optional: Caster Wheels (if you want to make your planter boxes movable)
Gathering these materials will ensure that you have everything you need to construct sturdy and long-lasting raised planter boxes for your garden or outdoor space.
Tools Required
When embarking on the construction of raised planter boxes, having the right tools at your disposal is essential for a smooth and efficient building process. Here are the tools you'll need to bring your DIY planter box project to life:
-
Measuring Tape: Accurate measurements are crucial for ensuring the proper dimensions and fit of your planter boxes.
-
Saw: A reliable saw, such as a circular saw or a handsaw, will be necessary for cutting the wood to the desired lengths.
-
Drill and Bits: A power drill with a set of drill bits will be used for creating pilot holes and driving screws into the wood.
-
Screwdriver: While a power drill can be used for driving screws, having a manual screwdriver on hand can be helpful for certain tasks.
-
Level: To ensure that your planter boxes are straight and even, a level will be indispensable for checking the alignment during assembly.
-
Clamps: Clamps are useful for holding the wood pieces together securely while you drill or fasten them.
-
Work Gloves: Protect your hands with a sturdy pair of work gloves, especially when handling wood and using tools.
-
Safety Goggles: Safeguard your eyes from wood dust and debris by wearing safety goggles throughout the construction process.
-
Paintbrush or Roller: If you plan to apply a wood sealer or stain, a paintbrush or roller will be necessary for the finishing touches.
-
Square: A carpenter's square will aid in ensuring that the corners of your planter boxes are perfectly angled and aligned.
-
Sandpaper: Smooth out rough edges and surfaces of the wood with sandpaper for a polished and professional finish.
Equipping yourself with these essential tools will set you up for success as you embark on the construction of your raised planter boxes.
Step 1: Planning and Design
Before diving into the construction of your raised planter boxes, it's crucial to start with a well-thought-out plan and design. Here's a detailed breakdown of the planning and design process:
-
Determine the Location: Choose the ideal location for your raised planter boxes, considering factors such as sunlight exposure, accessibility, and the overall aesthetic of your outdoor space.
-
Measure and Sketch: Take accurate measurements of the chosen area and sketch out the dimensions of the planter boxes. Consider the desired height, width, and length of each box, ensuring that they fit seamlessly into the designated space.
-
Select the Wood: Decide on the type of wood to be used for the planter boxes. Cedar, redwood, and cypress are popular choices due to their durability and resistance to rot. Consider the aesthetic appeal and longevity of the wood when making your selection.
-
Design Features: Determine any additional design features, such as decorative trim, lattice panels, or custom shapes, to enhance the visual appeal of the planter boxes. Incorporating these elements into your design will add a personalized touch to your project.
-
Consider Drainage: Plan for adequate drainage by incorporating drainage holes or a layer of gravel at the bottom of the planter boxes. Proper drainage is essential for the health of your plants and the longevity of the planter boxes.
-
Account for Soil Depth: Depending on the types of plants you intend to grow, consider the necessary soil depth within the planter boxes. Different plants have varying root depths, so plan accordingly to provide ample space for healthy root development.
-
Accessibility and Maintenance: Factor in accessibility for maintenance and care. Consider the ease of watering, weeding, and plant care when determining the height and design of the planter boxes.
-
Safety Precautions: If children or pets have access to the area, ensure that the planter boxes are securely constructed and free from any sharp edges or potential hazards.
By carefully planning and designing your raised planter boxes, you'll set the stage for a successful and visually appealing addition to your outdoor space. Taking the time to consider these key elements will contribute to the functionality, aesthetics, and longevity of your DIY project.
Step 2: Cutting and Preparing the Wood
Once you have finalized the design and dimensions of your raised planter boxes, it's time to move on to the crucial step of cutting and preparing the wood for construction. Follow these detailed steps to ensure precision and accuracy in this phase of the project:
-
Measure Twice, Cut Once: Begin by measuring and marking the wood according to your predetermined dimensions. Use a measuring tape and a pencil to make clear and accurate markings on the wood. Remember the old adage, "measure twice, cut once," to avoid errors and ensure the pieces fit together seamlessly.
-
Safety First: Prioritize safety by wearing protective gear, including safety goggles and work gloves, to shield yourself from wood dust and potential splinters. Additionally, ensure that the work area is well-ventilated and free from any obstructions.
-
Cutting the Wood: Utilize a reliable saw, such as a circular saw or handsaw, to cut the wood pieces to the specified lengths. Take your time and exercise caution while cutting to achieve clean and precise edges. If you're using a power saw, ensure that the wood is securely clamped in place to prevent any movement during cutting.
-
Smooth the Edges: After cutting the wood, use sandpaper to smooth out any rough edges or surfaces. This step is essential for creating a professional and polished finish while also minimizing the risk of splinters.
-
Drill Pilot Holes: If your design requires the use of screws for assembly, drill pilot holes in the wood pieces to prevent splitting and ensure accurate alignment during the assembly process. Use a drill bit that matches the size of the screws you'll be using.
-
Apply Wood Sealer or Stain: Before assembling the planter boxes, consider applying a wood sealer or stain to protect the wood from moisture and enhance its longevity. Follow the manufacturer's instructions for the application of the sealer or stain, and allow sufficient time for drying before proceeding to the next step.
By meticulously cutting and preparing the wood for your raised planter boxes, you'll lay the foundation for a sturdy and visually appealing structure. Attention to detail and precision in this phase will contribute to the overall quality and durability of your DIY project.
Step 3: Assembling the Planter Box
Assembling the planter box is a pivotal phase in bringing your raised planter boxes to life. Follow these detailed steps to ensure a seamless and sturdy assembly process:
-
Lay Out the Pieces: Begin by laying out all the cut wood pieces in the designated assembly area. Organize the pieces according to their respective positions in the planter box to streamline the assembly process.
-
Align and Position: Carefully align the pieces according to your design and ensure that they are positioned accurately. Use a level to check for straightness and adjust the pieces as needed to achieve a uniform and balanced structure.
-
Secure the Corners: If your design includes corner braces for additional support, attach them to the corners of the planter box using screws. This step will reinforce the structural integrity of the planter box and prevent warping or shifting over time.
-
Fasten the Pieces: Utilize weather-resistant screws to fasten the wood pieces together securely. Begin by creating pilot holes with a drill to prevent splitting, then drive the screws into place using a power drill or a screwdriver. Ensure that the screws are driven in flush with the wood surface for a clean and professional finish.
-
Add Bottom Support (Optional): Depending on your design, you may choose to add additional support to the bottom of the planter box. This can be achieved by attaching slats or a solid piece of wood across the bottom to provide reinforcement and prevent the wood from bowing under the weight of the soil.
-
Apply Landscape Fabric: Line the interior of the planter box with landscape fabric to prevent soil erosion and maintain the shape of the box. Trim the excess fabric and secure it in place using staples or tacks.
-
Drainage Considerations: If your design incorporates drainage holes, ensure that they are strategically positioned to allow excess water to escape. Additionally, consider adding a layer of gravel at the bottom of the planter box to aid in proper drainage.
-
Finishing Touches: Once the assembly is complete, inspect the planter box for any protruding screws or rough edges. Use sandpaper to smooth out any imperfections and ensure a safe and polished finish.
By following these meticulous steps for assembling your raised planter box, you'll create a durable and visually appealing structure that provides an ideal environment for your plants to thrive. Attention to detail and precision during the assembly process will contribute to the overall quality and longevity of your DIY project.
Step 4: Adding Soil and Plants
Once the raised planter box is assembled, it's time to fill it with nutrient-rich soil and plant the greenery that will bring life to your outdoor space. Follow these detailed steps to ensure a successful and thriving garden in your raised planter boxes:
-
Select High-Quality Soil: Choose a high-quality soil mix that is well-draining and rich in nutrients. Depending on the types of plants you intend to grow, consider a specialized soil mix tailored to their specific needs, such as potting mix for flowers or a vegetable garden soil blend for vegetables.
-
Fill the Planter Box: Begin by filling the planter box with the selected soil, ensuring an even distribution throughout the box. Use a trowel or gardening shovel to carefully spread the soil and create a level surface, allowing ample space for the roots of the plants.
-
Planting: Once the soil is in place, it's time to plant your chosen greenery. Whether you're cultivating vibrant flowers, aromatic herbs, or fresh vegetables, carefully arrange the plants according to your desired layout. Dig individual holes for each plant, ensuring that they are positioned at the appropriate depth and spacing for optimal growth.
-
Watering: After planting, thoroughly water the soil to provide essential moisture for the newly introduced plants. Ensure that the soil is evenly moist but not waterlogged, as proper hydration is crucial for the initial establishment of the plants.
-
Mulching (Optional): Consider applying a layer of organic mulch, such as wood chips or straw, to the surface of the soil. Mulch helps retain moisture, suppresses weed growth, and regulates soil temperature, contributing to the overall health of the plants.
-
Maintenance: Once the plants are in place, monitor their growth and health regularly. Be attentive to watering needs, fertilization requirements, and any signs of pests or diseases. Prune and trim the plants as needed to promote healthy growth and maintain the aesthetic appeal of your garden.
-
Enjoy Your Garden: With the soil and plants in place, take the time to appreciate the beauty and vitality of your raised planter box garden. Whether you're admiring colorful blooms, harvesting fresh produce, or simply enjoying the greenery, your DIY project has transformed your outdoor space into a flourishing oasis.
By following these steps for adding soil and plants to your raised planter boxes, you'll create a vibrant and thriving garden that enhances the beauty of your outdoor environment. With proper care and attention, your raised planter boxes will become a focal point of natural beauty and a source of joy for years to come.
Maintenance and Care Tips
Maintaining and caring for your raised planter boxes is essential to ensure the longevity and health of your garden. By following these maintenance and care tips, you can preserve the beauty and functionality of your planter boxes while nurturing a thriving garden:
-
Regular Watering: Monitor the moisture levels in the soil and water your plants as needed. Be mindful of environmental factors such as temperature and sunlight, as they can influence the frequency of watering. Ensure that the soil remains consistently moist but not waterlogged to support healthy plant growth.
-
Weeding: Keep an eye out for weeds that may sprout in the soil of your planter boxes. Regularly remove any unwanted weeds to prevent them from competing with your plants for essential nutrients and resources.
-
Fertilization: Depending on the types of plants you're growing, consider incorporating a regular fertilization schedule to provide essential nutrients for optimal growth. Choose a fertilizer that aligns with the specific needs of your plants and apply it according to the manufacturer's recommendations.
-
Pruning and Deadheading: Trim and prune your plants as needed to maintain their shape, encourage new growth, and remove any dead or decaying foliage. Deadhead flowers to promote continuous blooming and maintain the aesthetic appeal of your garden.
-
Pest and Disease Management: Keep a watchful eye for signs of pests or diseases that may affect your plants. Implement appropriate pest control measures and, if necessary, seek guidance on addressing any plant diseases to prevent them from spreading.
-
Seasonal Care: Adjust your gardening practices according to the changing seasons. In colder months, consider protecting your plants from frost or extreme temperatures, while in warmer months, provide adequate shade and hydration to prevent heat stress.
-
Soil Maintenance: Periodically assess the condition of the soil in your planter boxes. Consider amending the soil with organic matter or compost to replenish nutrients and maintain its structure over time.
-
Inspect and Repair: Regularly inspect the structural integrity of your planter boxes. Check for any signs of wear, warping, or damage, and promptly address any issues to prevent further deterioration.
By incorporating these maintenance and care tips into your gardening routine, you can ensure that your raised planter boxes remain a flourishing and vibrant feature of your outdoor space. With proper attention and care, your garden will continue to thrive, providing beauty and enjoyment for years to come.
Conclusion
In conclusion, building raised planter boxes is a gratifying endeavor that allows you to create a stunning garden space while reaping the numerous benefits they offer. From improved drainage and soil quality to enhanced accessibility and aesthetic appeal, raised planter boxes provide a versatile and practical solution for gardening in various outdoor settings. By carefully planning, selecting high-quality materials, and following the step-by-step construction process, you can bring your vision of a flourishing garden to life. With proper maintenance and care, your raised planter boxes will continue to be a source of natural beauty and enjoyment, enriching your outdoor environment for years to come. Whether you're cultivating vibrant flowers, fresh vegetables, or aromatic herbs, the addition of raised planter boxes will undoubtedly elevate the charm and functionality of your outdoor living space.