
Home>Create & Decorate>DIY & Crafts>Cold Frame DIY: How To Build Your Own Garden Protection
DIY & Crafts
Cold Frame DIY: How To Build Your Own Garden Protection
Published: May 5, 2024

Senior Editor in Create & Decorate, Kathryn combines traditional craftsmanship with contemporary trends. Her background in textile design and commitment to sustainable crafts inspire both content and community.
Learn how to build your own garden protection with this DIY guide for a cold frame. Perfect for DIY & Crafts enthusiasts looking to protect their plants.
(Many of the links in this article redirect to a specific reviewed product. Your purchase of these products through affiliate links helps to generate commission for Twigandthistle.com, at no extra cost. Learn more)
Introduction
So, you're looking to extend your growing season and protect your delicate plants from the harsh elements? Well, building your own cold frame might just be the solution you're looking for! In this article, we'll guide you through the process of constructing your very own garden protection. Whether you're a seasoned gardener or just starting out, a DIY cold frame can be a game-changer for your plants. Let's dive in and explore the world of cold frame gardening!
Benefits of Using a Cold Frame
-
Extended Growing Season: With a cold frame, you can start planting earlier in the spring and continue growing well into the fall, giving you a longer growing season to enjoy fresh produce from your garden.
-
Protection from Harsh Weather: A cold frame provides a shield against frost, wind, and heavy rain, creating a microclimate that helps your plants thrive even when the weather outside is less than ideal.
-
Versatile Plant Protection: Whether you're growing delicate seedlings, herbs, or vegetables, a cold frame offers a protective environment that promotes healthy growth and shields your plants from pests and wildlife.
-
Cost-Effective Solution: Building your own cold frame can be a budget-friendly alternative to purchasing expensive greenhouse structures, allowing you to achieve similar benefits without breaking the bank.
-
Space Optimization: Cold frames are ideal for small gardens or limited outdoor space, as they can be easily customized to fit your available area, making them a practical choice for urban and suburban gardeners.
-
DIY Satisfaction: Constructing your own cold frame can be a rewarding DIY project, giving you a sense of accomplishment and pride as you witness the positive impact it has on your garden.
-
Energy-Efficient Gardening: By harnessing the natural warmth of the sun, a cold frame reduces the need for artificial heating, making it an eco-friendly option for environmentally conscious gardeners.
Incorporating a cold frame into your gardening routine can offer a multitude of benefits, making it a valuable addition to any home garden or allotment.
Choosing the Right Location for Your Cold Frame
When selecting the perfect spot for your cold frame, consider the following factors to ensure optimal growing conditions for your plants:
-
Sunlight Exposure: Choose a location that receives ample sunlight throughout the day, especially during the cooler months. South-facing areas are ideal as they capture the maximum amount of sunlight, providing the necessary warmth for your plants.
-
Protection from Strong Winds: Position your cold frame in a sheltered area to shield it from strong winds that can potentially damage or uproot your plants. Placing it near a fence, building, or natural windbreak can offer the protection your garden needs.
-
Accessibility: Ensure that the cold frame is easily accessible for maintenance and harvesting. Placing it within reach of your garden tools and watering source can make tending to your plants more convenient.
-
Drainage: Select a level area with good drainage to prevent water from pooling inside the cold frame. Proper drainage is essential to avoid waterlogged soil, which can lead to root rot and other plant diseases.
-
Proximity to Water Source: Consider the proximity to a water source when choosing the location for your cold frame. Easy access to water will simplify the task of watering your plants, ensuring they receive the moisture they need to thrive.
-
Space Availability: Evaluate the available space and ensure that the chosen location can accommodate the size of the cold frame. Allow sufficient room for the lid to open fully and for unrestricted plant growth within the frame.
By carefully selecting the right location for your cold frame, you can create an environment that promotes healthy plant growth and maximizes the benefits of this valuable garden protection structure.
Materials and Tools Needed
Before embarking on your cold frame construction journey, it's essential to gather all the necessary materials and tools to ensure a smooth and efficient building process. Here's a comprehensive list of what you'll need:
Materials:
- Lumber: Select high-quality, rot-resistant lumber such as cedar or redwood for the frame. You'll need boards for the sides, ends, and lid of the cold frame.
- Hinges and Screws: Choose durable hinges and corrosion-resistant screws to assemble the lid and ensure smooth opening and closing.
- Clear Plastic or Glass Panels: Opt for strong, transparent panels to cover the lid and allow sunlight to penetrate while protecting your plants from the elements.
- Weather Stripping: Use weather stripping to seal any gaps between the lid and the frame, providing insulation and preventing heat loss.
- Brackets or Corner Braces: These will reinforce the corners of the frame, adding stability and strength to the structure.
- Latches or Fasteners: Select secure latches or fasteners to keep the lid closed and secure, especially during windy conditions.
Tools:
- Measuring Tape: Accurate measurements are crucial for ensuring the proper fit and alignment of the frame components.
- Saw: A handsaw or power saw will be necessary for cutting the lumber to the required dimensions.
- Drill and Bits: A drill with appropriate drill bits is essential for creating pilot holes and securing screws during assembly.
- Screwdriver: Both manual and electric screwdrivers will be needed for driving screws into the lumber.
- Hammer: A hammer will come in handy for tasks such as attaching brackets and securing panels.
- Caulking Gun: If using weather stripping or sealant, a caulking gun will facilitate the application of these materials.
- Work Gloves and Safety Glasses: Protect your hands and eyes with gloves and safety glasses while handling lumber and using power tools.
By ensuring you have all the required materials and tools on hand, you'll be well-prepared to tackle the construction of your DIY cold frame with confidence and efficiency.
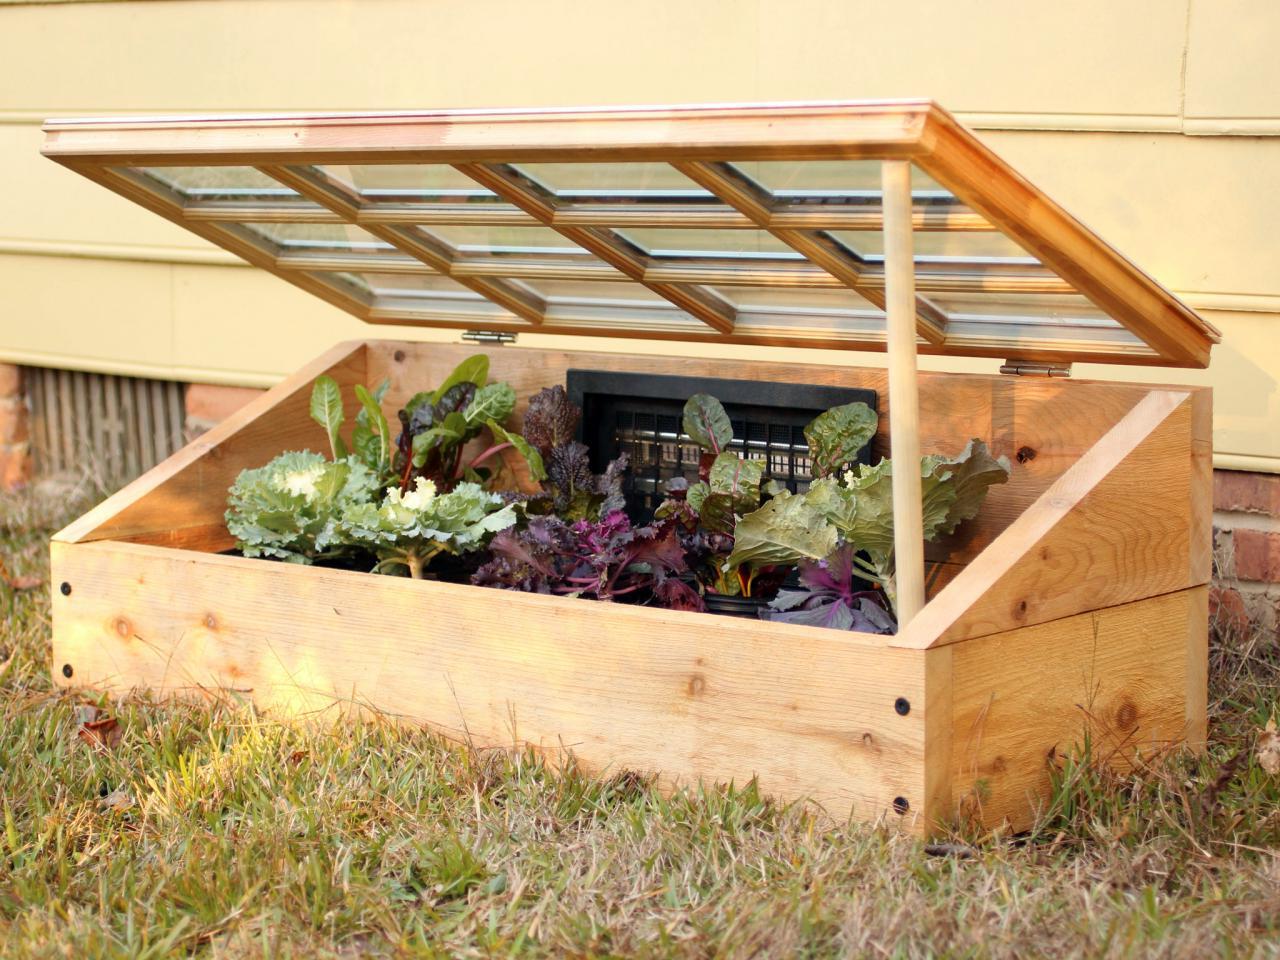
Step-by-Step Instructions for Building Your Cold Frame
-
Prepare the Lumber: Begin by cutting the lumber to the required dimensions using a saw. You'll need to create pieces for the sides, ends, and lid of the cold frame. Ensure that the cuts are precise to achieve a snug and secure fit during assembly.
-
Assemble the Frame: Lay out the cut lumber to form the rectangular frame of the cold frame. Use screws and corner braces to secure the corners, ensuring the frame is sturdy and well-supported. Double-check the measurements and angles to guarantee a square and even structure.
-
Attach the Lid: Once the frame is assembled, attach the clear plastic or glass panels to create the lid. Secure the panels using hinges, allowing for easy opening and closing. Ensure the lid fits snugly onto the frame and can be propped open for ventilation when needed.
-
Add Weather Stripping: Apply weather stripping along the edges of the frame where the lid will rest. This will create a seal, preventing heat loss and providing insulation for your plants during colder temperatures.
-
Install Latches or Fasteners: Attach latches or fasteners to the lid and frame to keep the cold frame securely closed. This will prevent the lid from being blown open by strong winds and will maintain a consistent environment for your plants.
-
Position the Cold Frame: Once the construction is complete, carefully position the cold frame in the chosen location within your garden. Ensure it is level and stable, providing easy access for maintenance and harvesting.
-
Monitor and Adjust: Regularly monitor the temperature and moisture levels inside the cold frame, adjusting the lid as needed to regulate airflow and maintain optimal growing conditions for your plants.
-
Harvest and Enjoy: As your plants thrive within the protective environment of the cold frame, enjoy the extended growing season and the abundance of fresh produce that it provides. With proper care and maintenance, your DIY cold frame will continue to support your gardening endeavors for seasons to come.
By following these step-by-step instructions, you can successfully build and utilize a cold frame to enhance your gardening experience and cultivate a thriving, protected garden space.
Tips for Maintaining and Using Your Cold Frame
-
Monitor Temperature and Ventilation: Regularly check the temperature inside the cold frame, especially during sunny days. If the temperature rises too high, prop open the lid to allow for ventilation and prevent overheating. Conversely, close the lid during colder nights to retain warmth and protect your plants from frost.
-
Watering and Moisture Control: Keep a close eye on the moisture levels within the cold frame. Water your plants as needed, ensuring that the soil remains consistently moist but not waterlogged. Avoid overwatering, as excess moisture can lead to fungal diseases and root rot.
-
Seasonal Adjustments: As the seasons change, adapt the use of your cold frame accordingly. In the spring, use it to start seedlings and protect young plants from late frosts. During the summer, utilize the cold frame for heat-loving crops or as a shelter for delicate herbs. In the fall, extend the growing season by providing warmth and protection for cool-weather vegetables.
-
Pest and Disease Management: Inspect your plants for signs of pests and diseases, as the enclosed environment of the cold frame can sometimes attract unwanted visitors. Implement organic pest control methods and promptly address any signs of disease to maintain the health of your plants.
-
Soil Maintenance: Regularly check the quality of the soil within the cold frame. Amend the soil with organic matter and nutrients as needed to ensure that your plants have access to the essential elements for healthy growth. Consider rotating crops to prevent depletion of soil nutrients.
-
Harvesting and Pruning: Harvest ripe produce from your plants in a timely manner to encourage continuous growth. Prune and trim your plants as necessary to maintain optimal airflow and prevent overcrowding within the limited space of the cold frame.
-
Off-Season Storage: When the cold frame is not in use, consider utilizing it for off-season storage of gardening tools, pots, or other supplies. This maximizes the utility of the structure and keeps your gardening essentials organized and easily accessible.
-
Regular Cleaning and Maintenance: Periodically clean the clear panels of the cold frame to ensure maximum sunlight penetration. Check for any signs of wear or damage, and promptly repair or replace any worn-out components to maintain the integrity of the structure.
By implementing these maintenance tips, you can effectively utilize your cold frame to create an optimal growing environment for your plants while extending the gardening season and reaping the rewards of a flourishing garden.
Conclusion
In conclusion, constructing your own cold frame offers a multitude of benefits for gardeners of all levels. By extending the growing season, providing protection from harsh weather, and offering a cost-effective and space-efficient solution, a DIY cold frame becomes an invaluable asset in any garden. With careful consideration of the location, proper materials and tools, and diligent maintenance, your cold frame can support the healthy growth of a variety of plants while enhancing your gardening experience. Embrace the satisfaction of building and utilizing a cold frame, and enjoy the bountiful harvests and thriving garden that it facilitates. Whether you're a seasoned gardener or a novice enthusiast, the addition of a cold frame can elevate your gardening endeavors and bring forth a flourishing and resilient garden space.