
Home>Create & Decorate>DIY & Crafts>How To Make A Homemade Motorized Bicycle
DIY & Crafts
How To Make A Homemade Motorized Bicycle
Published: April 8, 2024

Content Creator specializing in woodworking and interior transformations. Caegan's guides motivate readers to undertake their own projects, while his custom furniture adds a personal touch.
Learn how to create your own motorized bicycle with our DIY guide. Get step-by-step instructions and tips for building your custom ride. Perfect for DIY & Crafts enthusiasts!
(Many of the links in this article redirect to a specific reviewed product. Your purchase of these products through affiliate links helps to generate commission for Twigandthistle.com, at no extra cost. Learn more)
Introduction
So, you want to add some oomph to your bicycle and turn it into a motorized marvel? Well, you've come to the right place! In this guide, we'll walk you through the process of creating your very own homemade motorized bicycle. Whether you're looking to cruise around town with ease or just enjoy the thrill of building something with your own two hands, this project is sure to rev up your excitement. Let's dive in and get those wheels turning!
Materials Needed
To bring your motorized bicycle to life, you'll need a variety of materials and tools. Here's a rundown of what you'll require:
- Bicycle: Start with a sturdy bicycle frame that can accommodate the motor and additional components.
- Motor: Look for a reliable bicycle engine kit that suits your needs, whether it's a 2-stroke or 4-stroke engine.
- Mounting Kit: Ensure you have the necessary hardware to securely attach the motor to the bicycle frame.
- Fuel Tank: You'll need a fuel tank to store the gasoline for the motor.
- Exhaust System: Invest in an exhaust system designed for your specific motor to ensure proper ventilation.
- Chain and Sprocket: These components are essential for transferring power from the motor to the bicycle's rear wheel.
- Throttle and Cable: Acquire a throttle mechanism and cable to control the motor's speed.
- Brake Lever with Kill Switch: This safety feature allows you to cut off the engine by applying the brakes.
- Basic Tools: Gather a set of tools including wrenches, screwdrivers, pliers, and a socket set for assembly and adjustments.
With these materials in hand, you'll be well-equipped to embark on your motorized bicycle project.
Building the Frame
When it comes to building the frame for your homemade motorized bicycle, you have a few options. If you're a skilled welder and have access to the necessary equipment, you can fabricate a custom frame from steel tubing. However, for those without welding expertise, modifying an existing bicycle frame is a more practical approach.
-
Assess Your Bicycle Frame: Start by selecting a bicycle with a strong and durable frame. Ensure that the frame is in good condition and free from any structural damage. A mountain bike or cruiser-style bicycle often provides a solid foundation for a motorized conversion.
-
Prepare the Frame: Remove the bicycle's wheels, pedals, and chain. This will make it easier to work on the frame and provide better access for mounting the motor and other components.
-
Evaluate Mounting Points: Identify suitable mounting points for the motor. The rear triangle of the frame, where the seat stays and chainstays meet, is a common location for mounting the motor. Ensure that the mounting area is flat and wide enough to accommodate the motor's mounting plate.
-
Strengthening the Frame: Depending on the design of your bicycle frame, you may need to reinforce certain areas to handle the additional stress from the motor. This can involve adding steel plates or gussets to key areas of the frame to enhance its strength and rigidity.
-
Considerations for Suspension: If your bicycle has rear suspension, take into account how the motor installation may affect its functionality. You may need to make adjustments to the suspension system or consider a rigid frame if the motor's weight compromises the suspension's performance.
By following these steps, you can effectively prepare the bicycle frame for the motorized conversion, setting the stage for the next phase of the project.
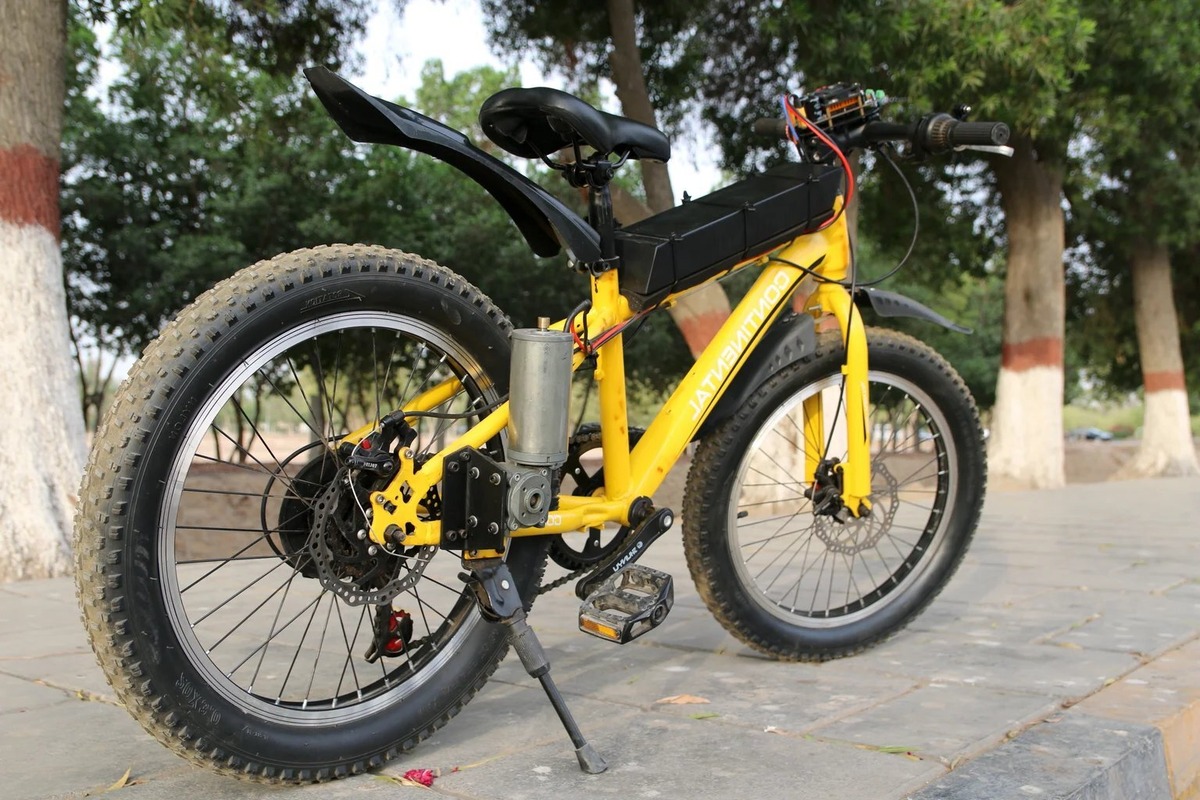
Installing the Motor
Now that you have the frame ready, it's time to install the motor and bring your motorized bicycle one step closer to reality. Follow these steps to ensure a smooth and secure installation:
-
Positioning the Motor: Carefully place the motor in the predetermined mounting area on the bicycle frame. Ensure that it is aligned properly and sits securely against the frame.
-
Attaching the Mounting Plate: If your motor kit includes a mounting plate, affix it to the frame using the provided hardware. This plate serves as a stable base for the motor and helps distribute its weight across the frame.
-
Securing the Motor: Once the motor is in place, use the appropriate fasteners to secure it to the mounting plate. Double-check the tightness of the bolts to prevent any movement or vibration during operation.
-
Connecting the Exhaust: If your motor comes with an exhaust system, connect it to the engine following the manufacturer's instructions. Proper installation of the exhaust ensures efficient ventilation and noise reduction.
-
Mounting the Fuel Tank: Find a suitable location for the fuel tank, ensuring that it is securely mounted and positioned to supply fuel to the engine without impeding the bicycle's functionality.
-
Routing the Fuel Line: Connect the fuel line from the tank to the engine, making sure it is properly routed and free from any kinks or obstructions.
-
Securing the Throttle Cable: Install the throttle mechanism on the handlebars and connect the throttle cable to the engine. This allows you to control the motor's speed conveniently while riding.
By following these steps, you can successfully install the motor and its associated components, bringing your homemade motorized bicycle one step closer to completion.
Attaching the Drive System
After installing the motor, the next crucial step in creating your homemade motorized bicycle is attaching the drive system. This system transfers power from the motor to the bicycle's rear wheel, propelling the bike forward. Here's a detailed guide on how to effectively attach the drive system:
-
Selecting the Sprocket: Begin by selecting a suitable sprocket that matches the size and pitch of the motor's sprocket. The chosen sprocket should also align with the rear wheel's sprocket or freewheel to ensure smooth power transmission.
-
Mounting the Drive Sprocket: Attach the drive sprocket to the rear wheel hub. Depending on the type of bicycle, this may involve removing the existing freewheel and securing the drive sprocket in its place using the appropriate tools.
-
Aligning the Sprockets: Achieving proper alignment between the motor sprocket and the drive sprocket is crucial for efficient power transfer. Use alignment tools or methods to ensure that the sprockets are perfectly parallel and at the correct distance from each other.
-
Installing the Chain: Carefully loop the drive chain over the motor sprocket and the drive sprocket on the rear wheel. Adjust the length of the chain as needed to achieve proper tension, ensuring that it is neither too loose nor too tight.
-
Tensioning the Chain: Depending on the design of your bicycle, you may need to install a tensioner to maintain the appropriate tension in the drive chain. This is essential for preventing slippage and ensuring smooth operation.
-
Testing the Drive System: Rotate the pedals or engage the motor to test the drive system. Observe the movement of the chain and sprockets to ensure that they operate smoothly without binding or skipping.
By following these steps, you can effectively attach the drive system to your motorized bicycle, bringing you closer to the exhilarating experience of cruising on your very own creation.
Adding the Controls
When it comes to adding the controls to your homemade motorized bicycle, precision and functionality are key. Here's a step-by-step guide to seamlessly integrate the essential controls for operating the motor and ensuring a safe riding experience:
-
Throttle Installation: Begin by mounting the throttle mechanism on the handlebars in a convenient and accessible position for the rider. Ensure that the throttle is securely fastened and aligned for comfortable operation during the ride.
-
Connecting the Throttle Cable: Attach the throttle cable to the designated connection point on the motor. Adjust the cable tension to achieve smooth and responsive throttle control, allowing the rider to modulate the motor's speed with ease.
-
Brake Lever with Kill Switch: Install a brake lever equipped with a kill switch, which is a safety feature that automatically cuts off the motor's power when the brakes are applied. This critical safety mechanism enhances control and promotes safe riding practices.
-
Wiring and Routing: Carefully route the throttle cable and kill switch wiring along the handlebars and frame, securing them in place to prevent interference with steering or other components. Ensure that the wiring is neatly organized and free from potential snags or damage.
-
Control Panel Integration (Optional): For added convenience, consider integrating a control panel to monitor the motor's performance and vital metrics. This can include features such as engine temperature gauges, fuel level indicators, and ignition switches, providing valuable insights for the rider.
-
Testing the Controls: Before finalizing the installation, thoroughly test the functionality of the controls. Verify that the throttle responds smoothly, the kill switch effectively halts the motor, and all wiring connections are secure and reliable.
By following these steps, you can seamlessly add the essential controls to your motorized bicycle, empowering you to operate the motor with confidence and ensuring a safe and enjoyable riding experience.
Testing and Troubleshooting
Once you've completed the assembly of your homemade motorized bicycle, it's time to put it to the test and address any potential issues that may arise. Thorough testing and troubleshooting are essential to ensure the optimal performance and safety of your creation. Here's a comprehensive guide to testing and troubleshooting your motorized bicycle:
-
Initial Inspection: Before conducting any tests, perform a comprehensive visual inspection of the entire assembly. Check for loose fasteners, proper alignment of components, secure wiring connections, and any signs of potential issues such as leaks or unusual wear.
-
Functional Checks: Test each individual component for proper functionality. This includes the throttle control, brake lever with kill switch, ignition system, and any additional features such as a control panel or lighting. Verify that all controls respond as intended and that the motor engages and disengages smoothly.
-
Engine Start-Up: With the necessary safety precautions in place, start the engine and allow it to idle. Listen for any unusual noises, excessive vibrations, or irregular exhaust emissions. Monitor the engine's temperature to ensure it remains within a safe operating range.
-
Road Test: Take your motorized bicycle for a test ride in a controlled environment. Pay close attention to the motor's performance, including acceleration, cruising speed, and responsiveness to throttle input. Test the braking system to ensure it effectively halts the motor when engaged.
-
Handling and Stability: Evaluate the overall handling and stability of the motorized bicycle during the test ride. Note any instances of wobbling, instability, or unusual handling characteristics that may indicate issues with the frame, suspension, or drive system.
-
Troubleshooting: If you encounter any issues during testing, systematically diagnose and address the root cause. Common troubleshooting steps may include checking fuel and oil levels, inspecting the ignition system, adjusting the drive chain tension, and verifying the functionality of safety features.
-
Performance Optimization: Fine-tune the motorized bicycle's performance based on your test ride observations. This may involve adjusting the carburetor for optimal fuel-air mixture, optimizing the drive chain tension, and making minor modifications to enhance overall performance and efficiency.
-
Safety Review: Conduct a comprehensive safety review to ensure that all critical safety features are functioning as intended. This includes the kill switch, braking system, lighting, and any additional safety enhancements you've integrated into the design.
By diligently testing and troubleshooting your homemade motorized bicycle, you can identify and address any potential issues, fine-tune its performance, and ultimately enjoy the exhilarating experience of riding your unique creation with confidence and peace of mind.
Conclusion
Congratulations on successfully creating your very own homemade motorized bicycle! By following the steps outlined in this guide, you've transformed a standard bicycle into a thrilling mode of transportation that combines the joy of cycling with the power of a motorized engine. As you take to the streets and explore new horizons on your custom creation, remember the dedication and craftsmanship that went into every step of the build. Embrace the freedom and excitement that comes with riding a one-of-a-kind motorized bicycle, and revel in the satisfaction of bringing your DIY vision to life. Whether it's for practical commuting or pure enjoyment, your homemade motorized bicycle is a testament to your ingenuity and passion for innovation. So, gear up, hit the road, and let the adventure begin!