
Home>Outdoors & Camping>BBQ & Grill>How To Build A Brick Bbq With Chimney
BBQ & Grill
How To Build A Brick Bbq With Chimney
Published: March 6, 2024

Content Creator for Outdoors & Camping, Sophie turns any yard into a sustainable paradise. Her dedication to DIY outdoor projects and volunteer work in community gardens shares joy and knowledge.
Learn how to build a brick BBQ with a chimney for your outdoor cooking needs. Get expert tips and step-by-step instructions. Perfect for BBQ & Grill enthusiasts!
(Many of the links in this article redirect to a specific reviewed product. Your purchase of these products through affiliate links helps to generate commission for Twigandthistle.com, at no extra cost. Learn more)
Introduction
So, you're thinking about adding a brick BBQ with a chimney to your backyard? That's a fantastic idea! Not only will it provide a focal point for outdoor gatherings, but it will also give you the perfect excuse to show off your DIY skills. In this article, we'll guide you through the step-by-step process of building your very own brick BBQ with a chimney. Whether you're a seasoned DIY enthusiast or a novice looking for a new project, we've got you covered. Let's dive in and get started on creating the ultimate outdoor cooking space!
Choosing the Right Location
When it comes to building a brick BBQ with a chimney, the first step is to choose the perfect location in your backyard. Here are some key factors to consider:
-
Accessibility: Ensure that the location is easily accessible from your kitchen or dining area. You don't want to be trekking across the entire yard with a platter of sizzling burgers.
-
Safety: Keep the BBQ away from overhanging trees, wooden structures, or anything else that could potentially catch fire. Safety should always be a top priority.
-
Ventilation: Select an area with good ventilation to allow smoke to dissipate easily. This will prevent the smoke from blowing into your home or neighboring properties.
-
Aesthetic Appeal: Consider how the BBQ will fit into the overall design of your outdoor space. You want it to be a focal point, so choose a location that enhances the visual appeal of your backyard.
-
Utility Connections: If you plan to have a gas-powered grill, ensure that the location is close to a gas line. For a charcoal grill, proximity to a storage area for charcoal and wood is essential.
Once you've taken these factors into account, you'll be ready to move on to the next steps in building your brick BBQ with a chimney.
Gathering Materials and Tools
Before you roll up your sleeves and dive into the construction process, it's crucial to gather all the necessary materials and tools. Here's a comprehensive list to ensure you have everything you need to build your brick BBQ with a chimney:
Materials
- Bricks: Choose high-quality, heat-resistant bricks that can withstand the intense heat of the grill.
- Concrete: You'll need this for the foundation and base of the BBQ.
- Grill Grate: Select a durable, rust-resistant grill grate that fits the dimensions of your BBQ.
- Metal Grilling Plate: This will serve as the cooking surface and should be able to withstand high temperatures.
- Reinforcing Bar (Rebar): Used to reinforce the concrete foundation for added strength.
- Firebricks: These specialized bricks are designed to withstand high temperatures and are ideal for lining the inside of the BBQ.
- Chimney Pipe: Choose a high-quality, heat-resistant chimney pipe that is suitable for outdoor use.
- Mortar: Select mortar specifically designed for outdoor brickwork to ensure a strong and durable bond.
- Sand: You'll need sand for mixing mortar and leveling the foundation.
- Gravel: Use gravel for drainage and as a base for the concrete foundation.
Tools
- Trowel: Essential for applying mortar and leveling bricks.
- Spirit Level: Ensure your BBQ is perfectly level and plumb during construction.
- Masonry Saw: Use this to cut bricks to the required dimensions.
- Shovel: For mixing concrete and moving materials during construction.
- Rubber Mallet: Handy for tapping bricks into place without damaging them.
- Work Gloves: Protect your hands during heavy lifting and handling of materials.
- Safety Goggles: Essential for eye protection when cutting bricks or mixing concrete.
- Measuring Tape: Accurate measurements are crucial for a precise build.
- Wheelbarrow: Use it for mixing concrete and transporting materials around the construction site.
- Broom: Keep the work area clean and tidy as you progress with the construction.
By ensuring you have all the necessary materials and tools at the outset, you'll be well-prepared to tackle each phase of the construction process without unnecessary interruptions.
Building the Foundation
The foundation is the backbone of your brick BBQ with a chimney, providing stability and support for the entire structure. Here's a step-by-step guide to building a solid foundation:
-
Site Preparation: Begin by marking the area where the foundation will be laid out. Use a shovel to excavate the marked area to a depth of around 6 inches. Ensure that the ground is level and compacted.
-
Adding Gravel: Once the excavation is complete, spread a layer of gravel evenly across the entire area. The gravel will provide drainage and create a stable base for the concrete foundation.
-
Building Formwork: Construct a wooden formwork around the excavated area to contain the concrete. Use sturdy boards and ensure that the formwork is perfectly level and square.
-
Mixing and Pouring Concrete: Prepare a concrete mix by combining cement, sand, and gravel in the correct proportions. Add water and mix thoroughly until you achieve a workable consistency. Pour the concrete into the formwork, ensuring it is evenly distributed and leveled.
-
Reinforcement: To reinforce the foundation, insert reinforcing bars (rebar) into the wet concrete. This will add strength and prevent cracking over time. Position the rebar in a grid pattern within the concrete.
-
Curing: Allow the concrete to cure and harden for at least 48 hours before proceeding with the next phase of construction. Keep the concrete moist during the curing process to ensure optimal strength.
By following these steps, you'll establish a sturdy and durable foundation that will provide the necessary support for the rest of the brick BBQ structure.
Constructing the Brick Base
Once the foundation is in place, it's time to move on to constructing the brick base of your BBQ. This is where the structure starts to take shape, and attention to detail is crucial for a professional finish. Here's a detailed guide to constructing the brick base:
-
Laying the First Course: Begin by applying a generous layer of mortar on top of the cured foundation. Place the first layer of bricks on the mortar, ensuring they are level and evenly spaced. Use a spirit level to check for uniformity.
-
Building the Sides: As you progress with each course of bricks, stagger the joints to create a strong and stable structure. Apply mortar between each layer of bricks, pressing them firmly into place. Use a trowel to remove any excess mortar that squeezes out from the joints.
-
Creating Openings: If your design includes openings for storage or access to the interior of the BBQ, plan for these as you build the brick base. Use precise measurements to ensure the openings align perfectly with the overall design.
-
Incorporating Design Elements: Get creative with the design of the brick base. You can incorporate decorative patterns or use different colored bricks to add visual interest. Just ensure that the structural integrity is not compromised by any design elements.
-
Installing Firebricks: For the interior of the BBQ, consider lining the base with firebricks. These specialized bricks are designed to withstand high temperatures and will enhance the longevity of your BBQ.
-
Checking for Level: Throughout the construction of the brick base, regularly check for level and plumb. This will ensure that the subsequent layers of the BBQ are built on a solid and stable foundation.
By following these steps, you'll be well on your way to constructing a sturdy and visually appealing brick base for your BBQ. Once the brick base is in place, you can move on to the next phase of the construction process.
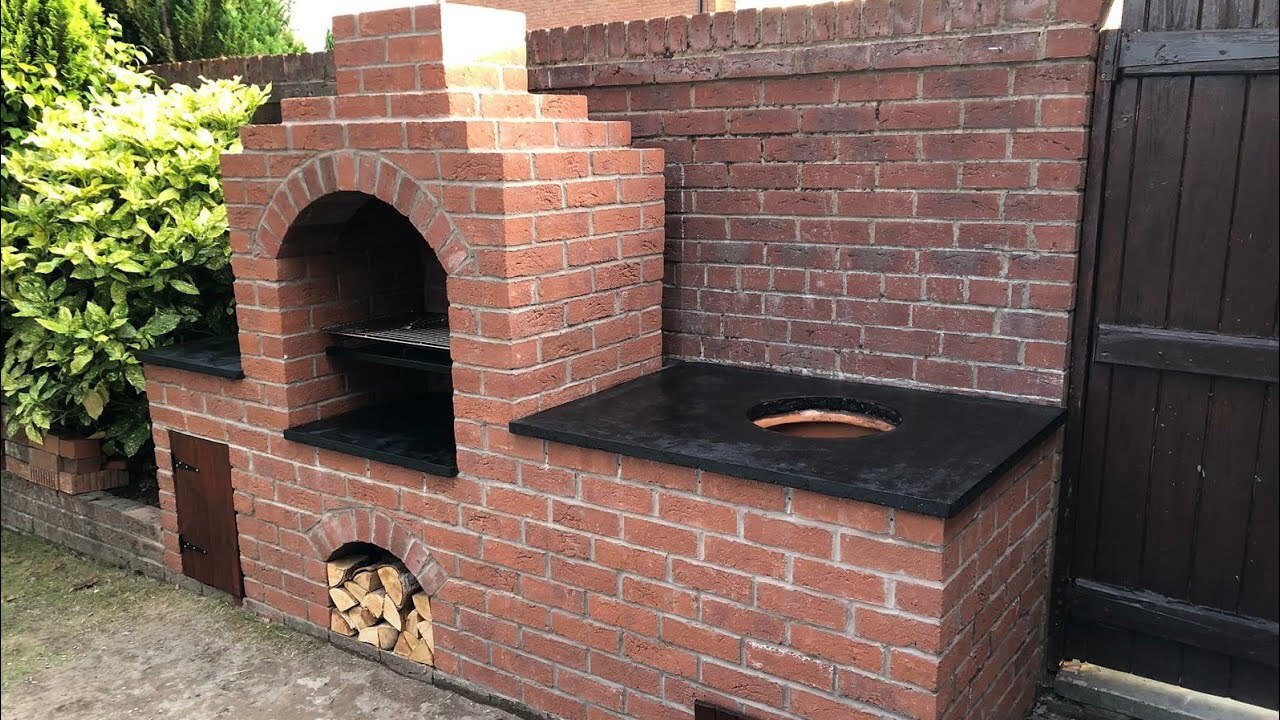
Installing the Grill and Chimney
With the brick base of your BBQ in place, it's time to focus on installing the grill and chimney, essential components that will bring your outdoor cooking space to life. Here's a detailed guide to completing this crucial phase of the construction process:
-
Grill Placement: Begin by determining the ideal placement for the grill within the brick base. Ensure that the grill grate fits securely and aligns with any openings or access points designed into the base. The grill should be positioned at a comfortable cooking height and centered within the BBQ structure.
-
Securing the Grill: Once the placement is finalized, secure the grill in position using appropriate hardware. Depending on the design of your grill, this may involve attaching brackets or supports to ensure stability. Test the grill to ensure it is securely anchored and level.
-
Chimney Installation: Next, it's time to focus on installing the chimney. If your BBQ design includes a chimney, carefully position the chimney pipe to extend above the brick base. Ensure that the chimney is securely anchored and that it provides adequate ventilation for smoke to dissipate.
-
Sealing Joints: As you install the chimney, pay close attention to sealing any gaps or joints between the chimney pipe and the surrounding brickwork. Use heat-resistant mortar or sealant to create a tight seal, preventing smoke from escaping through any gaps.
-
Safety Considerations: When installing the chimney, prioritize safety by ensuring that the chimney pipe is positioned at a safe distance from any flammable materials. Additionally, consider adding a protective cap to the top of the chimney to prevent debris or animals from entering.
-
Testing and Adjustments: Once the grill and chimney are in place, conduct a thorough inspection to ensure that everything is securely installed and functioning as intended. Test the grill to ensure it heats evenly and that the chimney effectively draws smoke away from the cooking area.
By following these steps, you'll successfully install the grill and chimney, bringing your brick BBQ to completion and creating a functional and visually striking outdoor cooking space. With the grill and chimney in place, you're one step closer to enjoying delicious meals prepared in your custom-built outdoor kitchen.
Adding Finishing Touches
With the main structure of your brick BBQ and chimney in place, it's time to add the finishing touches that will elevate the functionality and visual appeal of your outdoor cooking space. Here's a detailed guide to adding those final elements:
-
Shelving and Storage: Consider adding shelves or storage compartments to the sides or back of the brick BBQ. These can be used to store cooking utensils, condiments, and other essentials, keeping everything within easy reach while you're grilling.
-
Preparation Area: If space allows, incorporate a dedicated preparation area into your BBQ design. This could be a simple countertop adjacent to the grill, providing a convenient space for food prep and plating.
-
Decorative Accents: Add decorative elements such as ceramic tiles, natural stone, or decorative bricks to enhance the visual appeal of your BBQ. These accents can be incorporated into the design to add a personalized touch and complement the overall aesthetic of your outdoor space.
-
Lighting: Consider installing outdoor lighting near your brick BBQ to extend its functionality into the evening hours. Whether it's overhead lighting, wall-mounted fixtures, or decorative lanterns, proper lighting will create a welcoming ambiance and ensure safe cooking after dark.
-
Seating Area: If space permits, create a designated seating area near the BBQ where family and guests can relax and enjoy the outdoor cooking experience. This could be a simple arrangement of outdoor furniture or a built-in seating area integrated into the design.
-
Weather Protection: Depending on your climate, consider adding a canopy, pergola, or other form of weather protection to shield the BBQ area from the elements. This will allow you to enjoy outdoor cooking year-round, regardless of the weather.
-
Landscaping and Greenery: Surround your brick BBQ with landscaping and greenery to integrate it seamlessly into your outdoor space. Consider planting shrubs, flowers, or herbs nearby to create a lush and inviting environment.
By attending to these finishing touches, you'll transform your brick BBQ with a chimney into a fully functional and inviting outdoor cooking oasis. These details will not only enhance the practicality of your BBQ but also elevate its visual appeal, creating a space that you'll be proud to showcase to family and friends.
Tips for Maintenance and Care
Maintaining your brick BBQ with a chimney is essential to ensure its longevity and optimal performance. Here are some valuable tips for keeping your outdoor cooking space in top condition:
-
Regular Cleaning: After each use, clean the grill grates and interior surfaces of the BBQ to remove grease, food residue, and ash. Use a wire brush and mild detergent to scrub the grates, and a brush or vacuum to remove ash and debris from the interior.
-
Inspect for Wear and Tear: Periodically inspect the brickwork, mortar joints, and chimney for any signs of wear, cracking, or deterioration. Address any issues promptly to prevent further damage and maintain the structural integrity of the BBQ.
-
Repointing Mortar Joints: Over time, the mortar joints between the bricks may degrade due to exposure to heat and weather. Repoint any deteriorating mortar joints to ensure a strong and secure bond between the bricks.
-
Sealing and Waterproofing: Consider applying a suitable sealant or waterproofing product to the exterior brickwork to protect it from moisture and the elements. This will help prevent water damage and prolong the life of the BBQ.
-
Chimney Maintenance: Regularly inspect the chimney for any obstructions, such as bird nests or debris. Ensure that the chimney cap is in good condition and that the flue is clear to allow for proper ventilation.
-
Covering and Protection: When not in use, cover the BBQ with a weather-resistant cover to protect it from rain, snow, and UV exposure. Additionally, consider installing a canopy or pergola to provide long-term protection from the elements.
-
Grill Maintenance: If your BBQ includes a gas or charcoal grill, follow the manufacturer's guidelines for regular maintenance. This may include cleaning burners, checking gas connections, and replacing charcoal grates as needed.
-
Fire Safety: Always prioritize fire safety when using your brick BBQ. Keep a fire extinguisher nearby, and ensure that the area around the BBQ is clear of flammable materials. Regularly check that the grill and chimney are functioning safely.
-
Seasonal Inspections: Perform thorough seasonal inspections of the entire BBQ structure, including the foundation, brickwork, and grill components. Address any issues before the start of the grilling season to ensure everything is in optimal condition.
-
Professional Maintenance: If you're unsure about any aspect of maintenance or notice significant damage, consider consulting a professional mason or BBQ specialist for a thorough inspection and any necessary repairs.
By following these maintenance tips, you'll ensure that your brick BBQ with a chimney remains in excellent condition, providing years of enjoyable outdoor cooking experiences for you and your guests.
Conclusion
In conclusion, building a brick BBQ with a chimney is a rewarding and practical addition to any outdoor space. By carefully selecting the location, gathering the necessary materials and tools, and following a systematic construction process, you can create a custom outdoor cooking area that will be the envy of your friends and neighbors. From laying the foundation to adding the finishing touches, each step contributes to the creation of a functional and visually appealing BBQ. Additionally, prioritizing maintenance and care will ensure that your brick BBQ with a chimney remains in top condition for years to come, providing countless opportunities for delicious meals and enjoyable gatherings in your outdoor oasis. So, roll up your sleeves, gather your materials, and get ready to enjoy the satisfaction of cooking up a storm in your very own DIY brick BBQ with a chimney!