
Home>Knowledge & Skills>Masonry & Tilework>How To Build A Brick Mailbox
Masonry & Tilework
How To Build A Brick Mailbox
Published: March 6, 2024

Our Editor-in-Chief brings a fresh perspective with his expertise in modern home technologies and eco-friendly solutions. Philip bridges tradition with innovation across a wide range of DIY topics.
Learn how to build a sturdy brick mailbox with our expert masonry and tilework guide. Enhance your curb appeal and add value to your home.
(Many of the links in this article redirect to a specific reviewed product. Your purchase of these products through affiliate links helps to generate commission for Twigandthistle.com, at no extra cost. Learn more)
Introduction
So, you've decided to upgrade your curb appeal and add a touch of classic charm to your home by building a brick mailbox. A brick mailbox not only enhances the aesthetic appeal of your property but also provides a durable and long-lasting solution for your mailbox needs. In this guide, we'll take you through the step-by-step process of building your very own brick mailbox, from choosing the right location to adding the finishing touches. Whether you're a seasoned DIY enthusiast or a beginner looking for a rewarding project, this guide will equip you with the knowledge and confidence to tackle this home improvement project. Let's get started!
Choosing the Right Location
When it comes to building a brick mailbox, selecting the right location is crucial. Here are some key factors to consider:
-
Visibility: Choose a location that is easily visible and accessible from the road. This not only makes it convenient for mail delivery but also ensures that your mailbox is easily identifiable for visitors and postal workers.
-
Distance from the Road: Ensure that your mailbox is positioned at the appropriate distance from the edge of the road, following local regulations and guidelines. This will help prevent any interference with road maintenance or snow plowing activities.
-
Aesthetics: Consider the overall aesthetic of your property. The mailbox should complement the architectural style of your home and add to its visual appeal.
-
Safety: Prioritize safety by placing the mailbox in a location that allows for safe and easy access for both you and the mail carrier. Avoid placing it in areas with poor visibility or obstructed access.
-
Legal Regulations: Familiarize yourself with any local regulations or homeowner association guidelines regarding mailbox placement. Ensure that your chosen location complies with these regulations to avoid any potential issues in the future.
By carefully considering these factors, you can select the perfect spot for your brick mailbox, ensuring both functionality and visual appeal.
Gathering Materials and Tools
Before diving into the construction of your brick mailbox, it's essential to gather all the necessary materials and tools. Here's a comprehensive list to ensure you have everything you need to get started:
Materials:
- Bricks: Choose high-quality bricks that are suitable for outdoor use and can withstand the elements.
- Concrete: You'll need concrete mix to create a solid foundation for your mailbox.
- Rebar: Reinforcing bar or rebar will provide structural support for the foundation and mailbox structure.
- Mailbox Insert: Select a durable mailbox insert that fits the design and dimensions of your brick mailbox.
- Mortar: High-quality mortar is essential for securing the bricks in place and creating a sturdy structure.
- Sand: Use sand for leveling and filling gaps between the bricks.
- Wood or Metal Form: Depending on your design, you may need a form to shape the concrete foundation.
- Gravel: Gravel will be used as a base for the concrete foundation, aiding in drainage and stability.
Tools:
- Shovel: A sturdy shovel will be essential for digging and moving materials during the foundation preparation.
- Level: Ensure your mailbox stands straight and level by using a reliable spirit level.
- Trowel: A trowel is necessary for applying mortar and achieving a clean finish between the bricks.
- Masonry Saw: If you need to cut bricks to fit specific dimensions, a masonry saw will be indispensable.
- Work Gloves and Safety Glasses: Protect your hands and eyes while working with bricks, concrete, and mortar.
- Measuring Tape: Accurate measurements are crucial for ensuring the proper alignment and dimensions of your mailbox.
- Mixing Tools: Depending on the type of concrete and mortar you use, you may need a mixing tub, hoe, or mixer.
- Brush: A stiff brush will help clean excess mortar and maintain the neat appearance of your brickwork.
By gathering these materials and tools, you'll be well-prepared to embark on the construction of your brick mailbox, setting the stage for a successful and satisfying DIY project.
Preparing the Foundation
The foundation serves as the backbone of your brick mailbox, providing stability and support for the entire structure. Here's a detailed breakdown of the steps involved in preparing the foundation:
-
Excavation: Begin by marking the area where the mailbox will be located and then proceed to excavate the ground to the required depth. Typically, a depth of around 18-24 inches is suitable for the foundation. Use a shovel to remove the soil, ensuring that the area is level and free from any debris or obstructions.
-
Form Installation: Once the excavation is complete, install a wooden or metal form to define the shape and dimensions of the foundation. The form will contain the concrete mix and help create a clean and uniform base for the mailbox. Ensure that the form is securely in place and level.
-
Adding Gravel: To enhance drainage and stability, add a layer of gravel to the bottom of the excavated area. The gravel will facilitate proper water drainage and prevent the accumulation of moisture, which can compromise the integrity of the foundation over time.
-
Reinforcement: Insert rebar into the gravel layer, ensuring that it is positioned to provide structural support for the foundation. The rebar should be securely anchored and spaced appropriately to reinforce the concrete.
-
Mixing and Pouring Concrete: Prepare the concrete mix according to the manufacturer's instructions, ensuring the proper water-to-concrete ratio. Carefully pour the concrete into the form, ensuring that it fills the entire space and is leveled off to create a smooth and even surface.
-
Curing: Allow the concrete to cure and set for the recommended period, typically around 24-48 hours, depending on the specific type of concrete used. During this time, protect the curing concrete from excessive moisture and temperature fluctuations to ensure optimal strength and durability.
By meticulously following these steps, you'll establish a solid and reliable foundation for your brick mailbox, laying the groundwork for the subsequent stages of construction.
Laying the Bricks
Laying the bricks is a critical phase in the construction of your brick mailbox, as it determines the structural integrity and visual appeal of the final product. Here's a comprehensive guide to effectively laying the bricks for your mailbox:
-
Preparation: Before laying the bricks, ensure that the concrete foundation is fully cured and ready for the next phase. Gather the necessary materials, including bricks, mortar, sand, and a trowel, and prepare a clean and organized workspace.
-
Mortar Preparation: Mix the mortar according to the manufacturer's instructions, achieving a consistency that allows for easy application and strong adhesion. A workable mortar mix is essential for securing the bricks in place and creating a durable bond.
-
Laying the First Course: Start by applying a generous layer of mortar along the bottom of the mailbox foundation. Carefully place the first row of bricks on the mortar, ensuring that they are aligned and level. Use a spirit level to verify the horizontal and vertical positioning of the bricks, making adjustments as needed.
-
Applying Mortar Joints: Once the first course of bricks is in place, apply mortar to the vertical joints between the bricks, using a trowel to achieve a consistent and clean finish. Ensure that the mortar is evenly distributed and free from excess buildup, maintaining a professional and polished appearance.
-
Stacking Additional Courses: Continue stacking additional courses of bricks, applying mortar to the top surface of each brick before placing the next one. Maintain uniform joint spacing and consistently check for level and alignment as you progress upward. Use a masonry saw to cut bricks to fit the desired dimensions if necessary.
-
Creating Openings: If your mailbox design includes openings for newspapers or small parcels, carefully plan and construct these openings within the brick structure. Use precision and attention to detail to ensure that the openings are functional and aesthetically integrated into the overall design.
-
Finishing the Top Course: As you approach the top of the mailbox structure, pay special attention to the final course of bricks. Ensure that the top course is level and securely anchored, providing a stable platform for the mailbox insert and roof structure.
-
Cleaning and Finishing: Once all the bricks are in place, use a stiff brush to remove any excess mortar and achieve a clean and polished appearance. Check for any loose or uneven bricks, making adjustments as needed to ensure a professional and cohesive finish.
By following these steps and exercising precision and care, you'll successfully lay the bricks for your brick mailbox, bringing you one step closer to completing this rewarding DIY project.
Building the Mailbox Structure
With the foundation laid and the bricks in place, it's time to focus on building the structure of the mailbox itself. This phase involves creating the enclosure that will house the mailbox insert and provide the functional and aesthetic elements of the brick mailbox. Here's a detailed breakdown of the steps involved in building the mailbox structure:
-
Measuring and Planning: Before proceeding, carefully measure the dimensions of the mailbox insert you'll be using. This will guide the construction of the enclosure to ensure a precise fit. Plan the layout of the structure, considering the placement of the mailbox door, any decorative elements, and the overall symmetry of the design.
-
Creating the Enclosure: Using the same high-quality bricks and mortar, begin constructing the enclosure around the mailbox insert. Build up the walls, ensuring that the structure is sturdy and well-aligned with the existing brickwork. Pay attention to the spacing and alignment of the bricks to maintain a consistent and professional appearance.
-
Integrating the Mailbox Insert: As the enclosure takes shape, periodically test-fit the mailbox insert to verify that it will fit securely within the structure. Make any necessary adjustments to accommodate the insert, ensuring that it sits flush and level within the enclosure.
-
Adding Decorative Elements: If desired, incorporate decorative elements into the design of the mailbox structure. This could include brick patterns, arches, or other embellishments that enhance the visual appeal of the mailbox. Exercise creativity and attention to detail to achieve a custom look that complements your home's aesthetic.
-
Ensuring Stability and Durability: As you build the structure, prioritize stability and durability. The mailbox enclosure should be able to withstand the elements and provide long-term functionality. Use mortar to secure the bricks and reinforce the joints, creating a solid and reliable structure.
-
Securing the Roof: If your design includes a roof structure, carefully install it atop the mailbox enclosure. The roof should provide protection from the elements and contribute to the overall charm of the brick mailbox. Ensure that the roof is securely anchored and complements the design of the structure.
-
Checking for Alignment and Level: Throughout the construction of the mailbox structure, consistently check for alignment and level. Use a spirit level to verify that the walls and roof are straight and even, making adjustments as needed to achieve a professional finish.
By following these steps, you'll successfully build the structure of the brick mailbox, creating a functional and visually appealing enclosure for the mailbox insert. This phase brings you closer to completing the construction of your brick mailbox and enjoying the timeless elegance it adds to your home's exterior.
Adding the Mailbox Door
After constructing the enclosure for the mailbox insert, the next crucial step is adding the mailbox door. This component not only provides access to the mailbox but also contributes to the overall functionality and visual appeal of the brick mailbox. Here's a detailed guide on adding the mailbox door to complete your brick mailbox:
-
Selecting the Door: Begin by selecting a mailbox door that complements the design of your brick mailbox and meets your functional requirements. Choose a durable and weather-resistant door that aligns with the aesthetic of your home's exterior. Consider options such as metal or sturdy plastic doors that can withstand outdoor conditions.
-
Measuring and Marking: Carefully measure the dimensions of the mailbox opening within the brick structure. Use these measurements to mark the precise location where the mailbox door will be installed. Ensure that the markings are level and aligned with the surrounding brickwork for a professional and polished appearance.
-
Preparing the Opening: If the mailbox opening requires any adjustments to accommodate the door, carefully use a chisel or appropriate tools to create a clean and precise opening. Take care to remove any excess mortar or debris to ensure a smooth and even surface for the door installation.
-
Installing the Door: Following the manufacturer's instructions, install the mailbox door securely within the designated opening. Use the provided hardware to affix the door in place, ensuring that it is level and properly aligned. Test the functionality of the door to ensure smooth opening and closing, making any necessary adjustments for a perfect fit.
-
Securing the Door: Once the door is in place, use the recommended fasteners or screws to secure it within the opening. Ensure that the door is firmly anchored and provides a secure closure for the mailbox insert. Verify that the door operates smoothly and securely, addressing any issues promptly.
-
Adding Finishing Touches: To enhance the visual appeal of the mailbox door, consider adding decorative elements such as a handle, latch, or personalized accents. These details can elevate the overall look of the brick mailbox and add a custom touch that reflects your personal style.
-
Ensuring Functionality: Test the functionality of the mailbox door to ensure that it opens and closes smoothly, providing easy access to the mailbox insert. Verify that the door securely seals the mailbox to protect the contents from the elements and unauthorized access.
By following these steps, you'll successfully add the mailbox door to your brick mailbox, completing the functional and aesthetic elements of this DIY project. The addition of the mailbox door brings you one step closer to enjoying the timeless appeal and practicality of your newly constructed brick mailbox.
Finishing Touches and Maintenance
After completing the construction of your brick mailbox, it's essential to add the finishing touches that enhance its overall appearance and functionality. Additionally, proper maintenance is crucial to ensure that your brick mailbox remains in top condition for years to come. Here's a detailed guide on the finishing touches and maintenance of your brick mailbox:
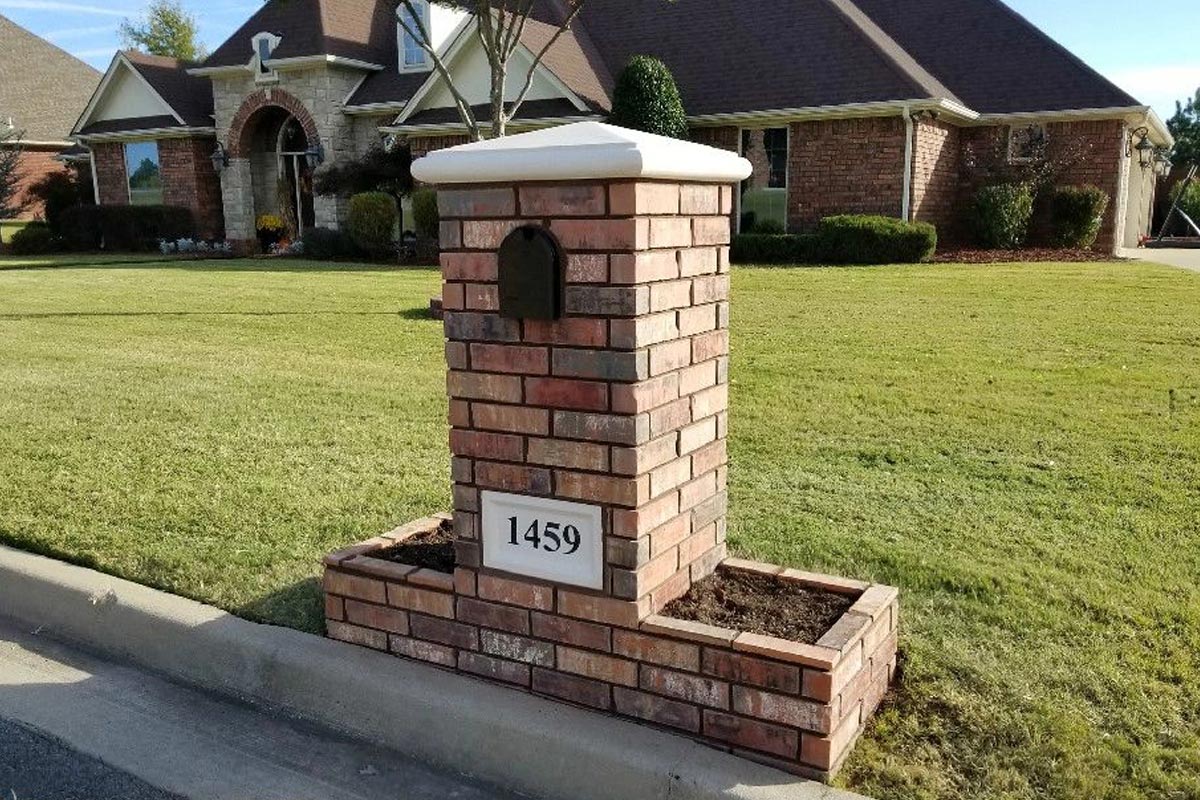
Adding Decorative Elements
- Consider adding decorative elements such as address numbers, a nameplate, or ornamental accents to personalize your brick mailbox and make it stand out. These details can add a touch of charm and individuality to your mailbox while also making it easier for visitors and mail carriers to locate your home.
Sealing and Waterproofing
- Apply a high-quality masonry sealer to the exterior of your brick mailbox to protect it from moisture, UV exposure, and the effects of weathering. This will help preserve the appearance of the bricks and mortar, preventing deterioration and discoloration over time.
Landscaping and Lighting
- Enhance the visual impact of your brick mailbox by incorporating landscaping elements such as flowers, shrubs, or decorative stones around its base. Additionally, consider adding outdoor lighting to illuminate the mailbox area, improving visibility and adding a welcoming touch to your home's exterior.
Regular Maintenance
-
Schedule regular inspections of your brick mailbox to check for any signs of damage, wear, or mortar deterioration. Address any issues promptly to prevent further damage and maintain the structural integrity of the mailbox.
-
Clean the exterior of the brick mailbox periodically to remove dirt, debris, and organic growth. Use a gentle detergent and a soft brush to scrub the surface, avoiding harsh chemicals that could damage the bricks or mortar.
-
Inspect the mailbox door, hinges, and latch for smooth operation and secure closure. Lubricate moving parts as needed to ensure that the door functions properly and provides reliable access to the mailbox insert.
-
Monitor the condition of the mailbox insert and replace it if signs of wear or damage are present. A well-maintained mailbox insert ensures the security and protection of your mail and parcels.
By attending to these finishing touches and implementing a proactive maintenance routine, you can preserve the beauty and functionality of your brick mailbox, ensuring that it continues to enhance your home's curb appeal for years to come.