
Home>Create & Decorate>DIY & Crafts>How To Build A Trebuchet
DIY & Crafts
How To Build A Trebuchet
Published: February 22, 2024

Content Creator specializing in woodworking and interior transformations. Caegan's guides motivate readers to undertake their own projects, while his custom furniture adds a personal touch.
Learn how to build a trebuchet with our step-by-step DIY guide. Explore fun and creative crafts with our easy-to-follow instructions. Start your trebuchet project today!
(Many of the links in this article redirect to a specific reviewed product. Your purchase of these products through affiliate links helps to generate commission for Twigandthistle.com, at no extra cost. Learn more)
Introduction
Building a trebuchet is an exciting and rewarding DIY project that combines history, engineering, and craftsmanship. Originating in medieval times, the trebuchet is a formidable siege engine that uses a swinging arm to launch projectiles with incredible force and accuracy. Whether you're a history enthusiast, a hands-on learner, or simply someone who enjoys building and experimenting with mechanical devices, constructing a trebuchet can be a fascinating and educational endeavor.
In this comprehensive guide, we will walk through the step-by-step process of building a functional trebuchet from scratch. From gathering the necessary materials and tools to fine-tuning the finished product, you'll gain valuable insights into the mechanics and principles behind this ancient war machine. By the end of this journey, you'll not only have a fully operational trebuchet but also a deeper understanding of physics, mechanics, and the ingenuity of our ancestors.
As we embark on this endeavor, it's important to approach the project with a curious and open mind. Building a trebuchet is not only about following instructions but also about embracing the spirit of experimentation and problem-solving. Throughout the process, you'll have the opportunity to exercise your creativity, adapt to challenges, and witness the transformation of raw materials into a functional and awe-inspiring device.
Whether you plan to use your trebuchet for educational purposes, as a display piece, or for launching projectiles in a safe and controlled environment, the skills and knowledge you'll gain from this project are invaluable. So, let's roll up our sleeves, gather our materials, and delve into the fascinating world of trebuchet construction. Get ready to experience the thrill of bringing history to life through hands-on craftsmanship and engineering ingenuity.
Materials and Tools
Before diving into the construction process, it's essential to gather all the necessary materials and tools for building a trebuchet. This project requires a combination of basic woodworking supplies, hardware, and specific components to ensure the trebuchet operates smoothly and effectively. Here's a detailed list of the materials and tools you'll need:
Materials:
- Wood: Select sturdy and durable wood for constructing the frame, base, and various components of the trebuchet. Oak, maple, or birch are excellent choices due to their strength and resistance to warping.
- PVC Pipe: This will be used for creating the sling release mechanism, providing a lightweight and flexible solution for the trebuchet's functionality.
- Rope or Cordage: High-quality rope or cordage is essential for constructing the sling, attaching the counterweight, and ensuring the overall stability of the trebuchet.
- Metal Fasteners: Bolts, nuts, washers, and screws are necessary for securing the wooden components and assembling the moving parts of the trebuchet.
- Projectiles: While safety is paramount, small soft projectiles such as foam balls or fabric pouches filled with soft material can be used for testing and demonstrating the trebuchet's capabilities.
Tools:
- Saw: A reliable handsaw or power saw for cutting the wooden components to the required dimensions.
- Drill and Bits: Essential for creating holes for the fasteners and ensuring precise assembly of the trebuchet.
- Woodworking Clamps: These are indispensable for holding pieces together during assembly and ensuring accurate alignment.
- Sandpaper and Wood Finish: For smoothing rough edges and applying a protective finish to the wooden parts, enhancing their durability and appearance.
- Measuring Tape and Marking Tools: Accurate measurements and markings are crucial for ensuring the trebuchet's components fit together seamlessly and operate effectively.
By gathering these materials and tools, you'll be well-prepared to embark on the construction of your trebuchet. With a clear understanding of what's needed, you can proceed with confidence, knowing that you have everything required to bring this ancient war machine to life in your own workshop or backyard.
Building the Base
The base of the trebuchet serves as the foundation for the entire structure, providing stability and support for the moving parts. To begin constructing the base, start by selecting a sturdy and robust wood material, such as oak or maple, that can withstand the forces exerted during operation. The dimensions of the base will depend on the size of the trebuchet you intend to build, but a typical base might measure around 3 to 4 feet in length and 2 feet in width.
Using a saw, carefully cut the wooden pieces to the required dimensions, ensuring precise and straight edges. Once the pieces are cut, it's essential to create a solid framework for the base. This can be achieved by assembling the wooden components in a rectangular or trapezoidal shape, depending on the design preference. Secure the joints using wood screws or bolts, ensuring that the structure is sturdy and well-aligned.
Next, it's crucial to reinforce the base to handle the tension and forces generated during the trebuchet's operation. Adding diagonal bracing within the base structure can significantly enhance its strength and rigidity. By attaching diagonal wooden braces from the corners to the center of the base, you can effectively distribute the load and minimize any potential twisting or warping.
Once the base framework is assembled and reinforced, it's important to ensure that the surface is level and stable. Using a spirit level, check for any unevenness and make adjustments as needed to achieve a perfectly balanced base. This step is critical for the overall functionality and accuracy of the trebuchet.
Finally, sand the edges and surfaces of the base to remove any roughness and splinters, creating a smooth and polished finish. Applying a protective wood finish will not only enhance the appearance of the base but also provide added durability, making it more resistant to environmental elements.
By meticulously constructing a sturdy and well-balanced base, you lay the groundwork for the successful assembly and operation of the trebuchet. With the base in place, you can proceed to the next phase of building the trebuchet, bringing you one step closer to experiencing the thrill of launching projectiles with this remarkable medieval siege engine.
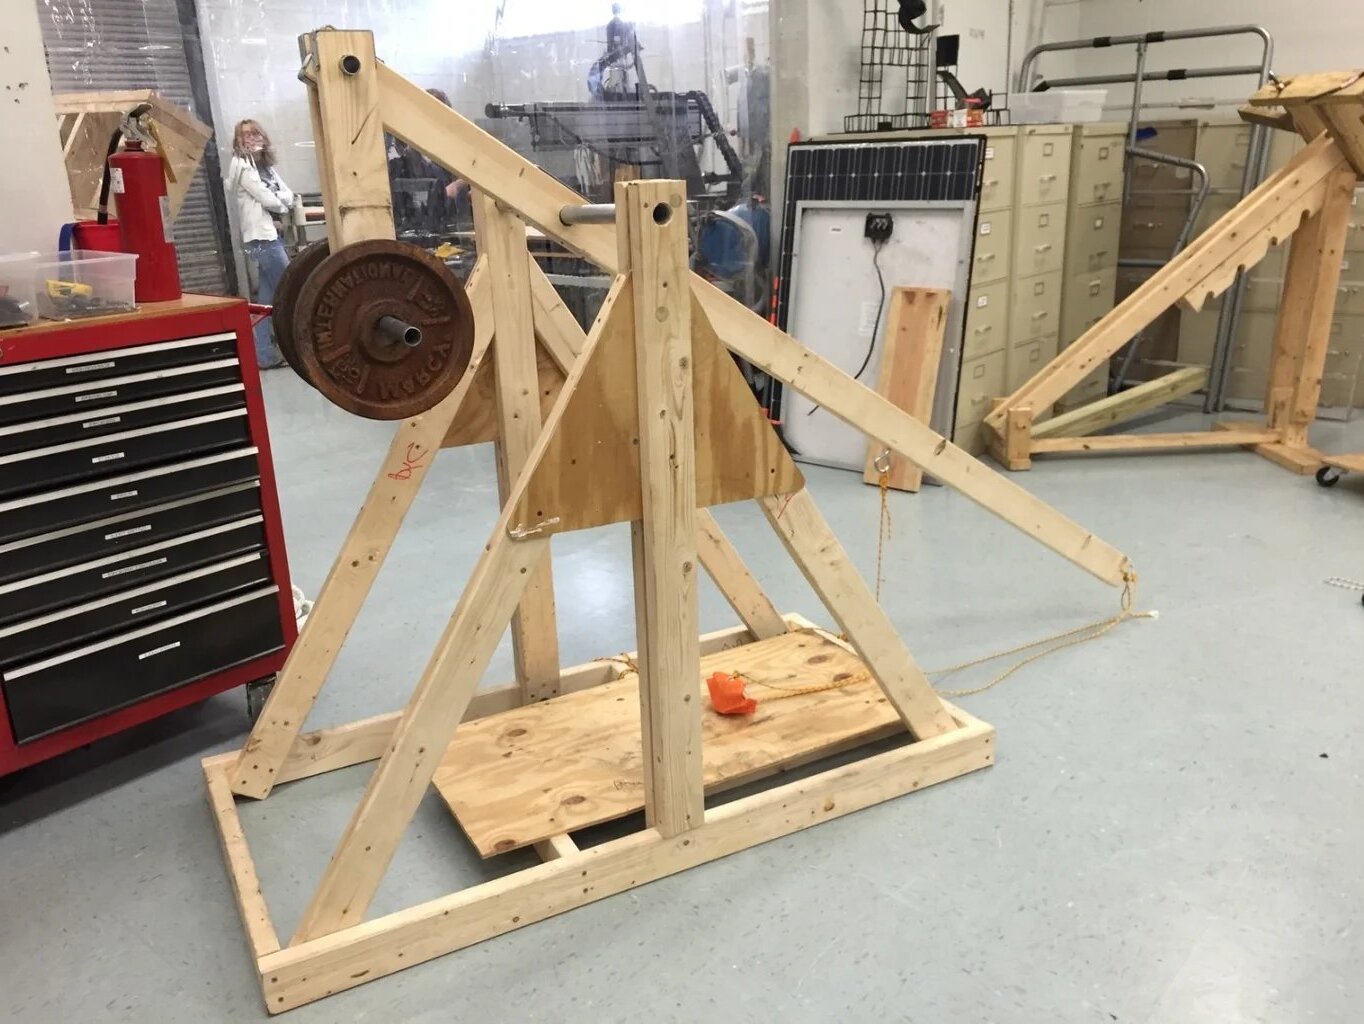
Constructing the Arm
The arm of the trebuchet is a pivotal component that harnesses the potential energy stored in the counterweight and transfers it to the projectile, propelling it with remarkable force and precision. Constructing the arm requires careful attention to detail and precision to ensure its functionality and reliability during operation.
Begin by selecting a suitable wood material for the arm, such as a dense and resilient hardwood that can withstand the stress and forces exerted during the trebuchet's operation. Oak or hickory are excellent choices due to their strength and durability. The dimensions of the arm will depend on the overall size of the trebuchet, but a typical arm might measure around 6 to 8 feet in length, providing ample leverage for launching projectiles.
Using a saw, carefully cut the wooden beam to the required dimensions, ensuring straight and smooth edges. The shape of the arm typically resembles a long, slender beam with a thicker section at one end to accommodate the attachment of the sling and the counterweight. Precision is crucial during this stage to ensure that the arm is balanced and symmetrical, allowing for smooth and consistent movement during operation.
Once the arm is cut to size, it's essential to carve out a groove or notch at the thicker end to securely hold the sling. This notch should be carefully crafted to accommodate the sling release mechanism, ensuring a snug and reliable fit. Additionally, reinforcing the attachment point with metal brackets or fasteners can provide added strength and stability, preventing any potential slippage or movement during the trebuchet's operation.
After preparing the arm for the sling attachment, it's important to address the pivot point where the arm connects to the base. This pivotal joint should allow for smooth and unhindered movement, facilitating the trebuchet's swinging motion. Installing a sturdy metal axle or pivot point at the base connection ensures that the arm can pivot freely while maintaining structural integrity.
Finally, sand the surfaces of the arm to remove any roughness and apply a protective wood finish to enhance its durability and resistance to wear. By meticulously constructing the arm with precision and attention to detail, you ensure that it functions seamlessly as the driving force behind the trebuchet's projectile launches.
With the arm constructed and prepared for assembly, you are one step closer to witnessing the impressive capabilities of the trebuchet as it comes to life. The careful craftsmanship and engineering involved in constructing the arm set the stage for the trebuchet's remarkable performance, bringing history and ingenuity together in a captivating display of mechanical prowess.
Assembling the Sling
The sling is a critical component of the trebuchet, serving as the mechanism that propels the projectile forward with precision and force. Assembling the sling requires meticulous attention to detail and a focus on functionality to ensure that it operates seamlessly during the trebuchet's launches.
To begin assembling the sling, start by selecting a durable and flexible material for the sling pouch. Heavy-duty fabric or leather is commonly used for this purpose, providing the necessary strength and resilience to withstand the forces exerted during the trebuchet's operation. Cut the material into a rectangular shape, ensuring that it is large enough to hold the projectiles securely.
Next, attach the sling pouch to the arm of the trebuchet, positioning it at the designated notch or groove that was prepared during the construction of the arm. Secure the sling pouch firmly in place, ensuring that it is aligned with the trajectory of the projectile and can release it smoothly during the trebuchet's operation.
Once the sling pouch is securely attached, it's essential to connect the sling cords or ropes to the ends of the arm. These cords will extend from the arm to a central point where the projectile will be placed. The length and tension of the sling cords play a crucial role in determining the trajectory and velocity of the projectile, making precise adjustments essential for achieving optimal performance.
After attaching the sling cords, carefully adjust their length and tension to ensure that the sling operates smoothly and consistently. Fine-tuning the sling cords allows for precise control over the trebuchet's launches, enabling you to adjust the range and accuracy of the projectiles based on the desired target.
Finally, conduct thorough testing and adjustments to ensure that the sling functions as intended. By launching test projectiles and observing their trajectory and distance, you can make necessary refinements to the sling's configuration, ensuring that it delivers reliable and impressive performance during the trebuchet's operation.
Assembling the sling is a pivotal step in the construction of the trebuchet, as it directly influences the machine's ability to launch projectiles with accuracy and force. With careful attention to detail and precise adjustments, the assembled sling becomes a key element in unlocking the trebuchet's remarkable capabilities, bringing history to life through the art of mechanical engineering.
Adding the Counterweight
The counterweight is a fundamental element of the trebuchet, playing a crucial role in storing and releasing potential energy to propel projectiles with remarkable force and accuracy. Adding the counterweight requires careful consideration of weight, balance, and attachment to ensure that it effectively powers the trebuchet's launches.
To begin, select a dense and heavy material for the counterweight, such as iron or lead, to provide the necessary mass for generating significant kinetic energy. The weight of the counterweight will depend on the size and intended use of the trebuchet, with larger trebuchets requiring heavier counterweights to achieve optimal performance.
Once the counterweight material is chosen, securely attach it to the short end of the trebuchet's arm, opposite the sling attachment point. This attachment should be robust and reliable, capable of withstanding the forces exerted during the trebuchet's operation. Metal brackets, bolts, and reinforcement plates can be used to ensure a secure connection between the counterweight and the arm.
Balancing the counterweight is essential for achieving consistent and powerful launches. Adjust the position and amount of the counterweight to achieve the desired balance, taking into account the weight of the projectiles and the distance of the intended targets. Fine-tuning the counterweight allows for precise control over the trebuchet's launches, enabling adjustments to the range and trajectory of the projectiles.
Once the counterweight is securely attached and balanced, conduct thorough testing to ensure that it functions effectively. By releasing the trebuchet with various counterweight configurations, you can observe the trajectory and distance of the projectiles, making necessary refinements to achieve optimal performance.
The addition of the counterweight marks a significant milestone in the construction of the trebuchet, as it transforms the machine into a formidable siege engine capable of launching projectiles with impressive force and precision. With careful attention to weight, balance, and functionality, the counterweight becomes the driving force behind the trebuchet's remarkable capabilities, embodying the ingenuity and engineering prowess of this ancient war machine.
Testing and Adjusting
Testing and adjusting the trebuchet is a crucial phase that allows you to fine-tune its performance and ensure optimal functionality. This process involves a series of systematic tests and refinements to achieve consistent and impressive projectile launches. By meticulously observing the trebuchet's behavior and making necessary adjustments, you can unlock its full potential and experience the thrill of witnessing history come to life through hands-on experimentation.
To begin the testing phase, carefully load the trebuchet with test projectiles, ensuring that they are securely positioned within the sling pouch. The weight and size of the projectiles should be consistent to provide reliable data for adjustments. With the trebuchet loaded and the counterweight in place, prepare for the initial test launch, keeping a safe distance and ensuring that the surrounding area is clear of obstructions.
As the trebuchet is released, observe the trajectory and distance of the projectile, noting any deviations or irregularities in its flight path. Pay close attention to the trebuchet's stability and the smoothness of its swinging motion, as these factors directly impact the accuracy and force of the launches. By analyzing the initial test launches, you can identify areas that require adjustment and refinement.
One of the key aspects to assess during testing is the tension and release of the sling. Observe how the sling operates during each launch, noting any inconsistencies or variations in its performance. Adjust the tension of the sling cords and the positioning of the release mechanism to achieve a smooth and reliable release of the projectiles. Fine-tuning the sling's operation is essential for achieving consistent and accurate launches.
Additionally, closely monitor the trebuchet's balance and stability during the testing phase. Any signs of imbalance or instability can affect the trajectory and force of the launches. Make necessary adjustments to the base, arm, and counterweight to ensure that the trebuchet operates with precision and reliability. By addressing any stability issues, you can enhance the trebuchet's overall performance.
Throughout the testing and adjusting process, maintain a meticulous and methodical approach, making incremental refinements based on the observations and data gathered from each test launch. By iteratively testing and adjusting the trebuchet, you can gradually optimize its performance, achieving consistent and impressive projectile launches.
As you refine the trebuchet's operation through testing and adjustments, you'll gain valuable insights into its mechanics and behavior, deepening your understanding of this remarkable siege engine. The iterative process of testing and refining the trebuchet's performance not only enhances its functionality but also provides a hands-on learning experience that brings history and engineering together in a captivating and tangible way.
Conclusion
In conclusion, the journey of building a trebuchet from scratch is a testament to the fusion of history, engineering, and hands-on craftsmanship. As we reflect on the intricate process of constructing this ancient war machine, we are reminded of the ingenuity and resourcefulness of our ancestors who designed and utilized such remarkable siege engines.
Throughout this comprehensive guide, we have delved into the step-by-step construction of a trebuchet, from gathering materials and tools to fine-tuning its performance through testing and adjustments. The experience of building a trebuchet goes beyond the mere assembly of wooden components and hardware; it embodies a deep dive into the principles of physics, mechanics, and historical warfare.
The trebuchet, with its swinging arm, meticulously assembled sling, and powerful counterweight, represents a convergence of art and science. The careful craftsmanship and attention to detail required in each phase of construction underscore the significance of precision and ingenuity in creating a functional and awe-inspiring machine.
As we stand in awe of the trebuchet's capabilities, we also recognize the educational value inherent in this project. Building a trebuchet serves as a hands-on lesson in history, engineering, and problem-solving. It provides a tangible connection to the past while fostering a deeper understanding of the scientific principles that govern projectile motion and mechanical advantage.
Moreover, the process of testing and adjusting the trebuchet offers a practical exploration of iterative refinement and the pursuit of optimal performance. This iterative approach not only enhances the trebuchet's functionality but also instills a sense of curiosity and experimentation, essential traits in the fields of engineering and innovation.
Ultimately, the completion of a fully operational trebuchet represents more than just a DIY accomplishment; it symbolizes the embodiment of history, craftsmanship, and scientific exploration. Whether used for educational demonstrations, historical reenactments, or simply as a display of mechanical prowess, the trebuchet stands as a testament to the enduring legacy of human creativity and innovation.
In embracing the challenge of building a trebuchet, we have embarked on a journey that transcends time, bridging the past with the present and inspiring a new generation of enthusiasts to explore the intersection of history, engineering, and hands-on learning.