
Home>Create & Decorate>DIY & Crafts>DIY Putting Green: Create Your Own Backyard Golf Oasis
DIY & Crafts
DIY Putting Green: Create Your Own Backyard Golf Oasis
Published: February 24, 2024

Content Creator specializing in woodworking and interior transformations. Caegan's guides motivate readers to undertake their own projects, while his custom furniture adds a personal touch.
Transform your backyard into a golfer's paradise with our DIY putting green guide. Discover creative crafts and step-by-step instructions for your own golf oasis. Start your project today!
(Many of the links in this article redirect to a specific reviewed product. Your purchase of these products through affiliate links helps to generate commission for Twigandthistle.com, at no extra cost. Learn more)
Introduction
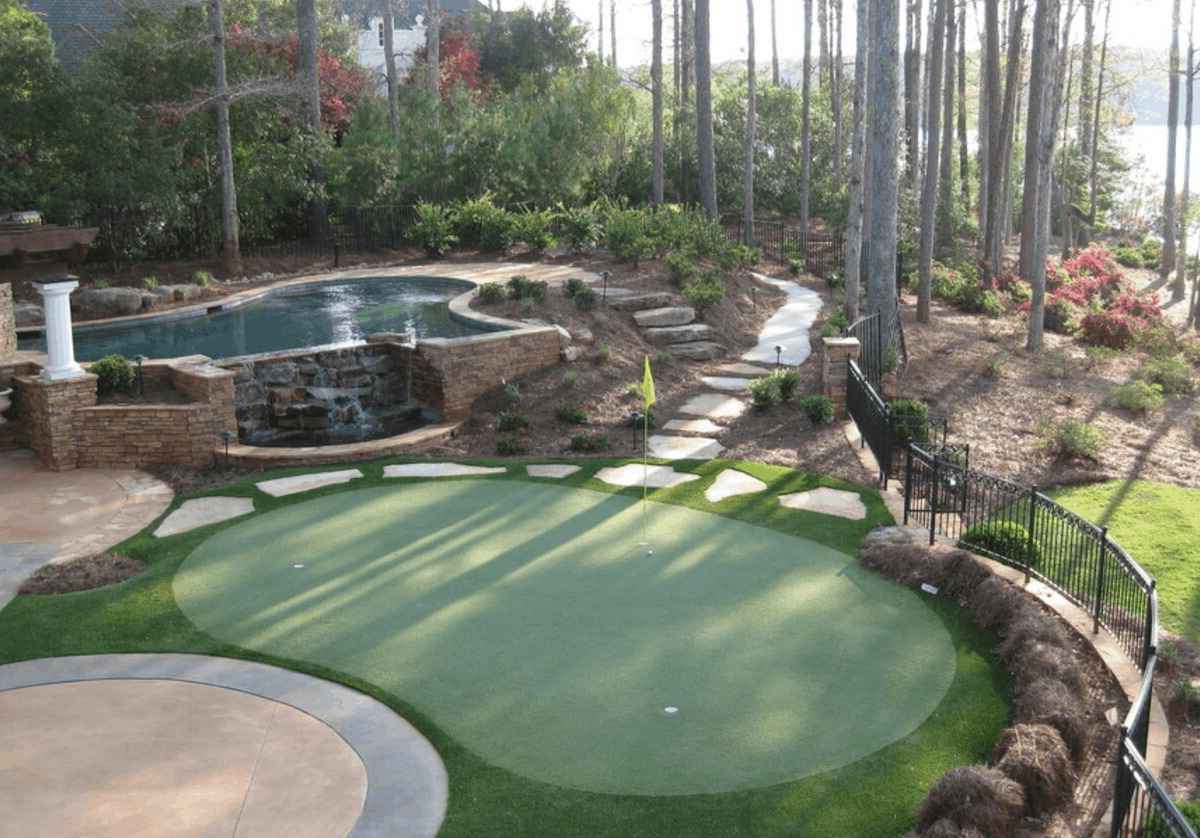
Welcome to the world of DIY putting greens, where you can turn your backyard into a golfer's paradise. Whether you're a golf enthusiast looking to practice your putting skills or someone who simply enjoys the idea of having a mini-golf course at home, creating your own putting green is a rewarding and enjoyable project.
Imagine stepping out into your backyard on a sunny afternoon, surrounded by lush greenery and the gentle sound of a bubbling fountain, ready to practice your putting game. With a DIY putting green, this vision can become a reality. Not only does it provide a convenient space to work on your golf skills, but it also adds a touch of elegance and luxury to your outdoor living area.
In this comprehensive guide, we will walk you through the step-by-step process of planning, designing, and building your very own putting green. From selecting the ideal location to choosing the right materials and tools, we'll cover everything you need to know to bring your backyard golf oasis to life.
Whether you're a seasoned DIY enthusiast or a newcomer to the world of home improvement projects, creating a putting green is a manageable and rewarding endeavor. Not only will you have the satisfaction of building something with your own hands, but you'll also have a beautiful and functional addition to your outdoor space that can be enjoyed for years to come.
So, roll up your sleeves, grab your putter, and get ready to embark on an exciting journey to transform your backyard into a golfer's paradise. Let's dive into the planning and design phase to set the stage for your DIY putting green project.
Step 1: Planning and Designing Your Putting Green
Before you start digging up your backyard, it's crucial to carefully plan and design your DIY putting green. This initial phase sets the foundation for a successful and visually appealing project. Here's how to get started:
Assess Your Space
Begin by evaluating your backyard to determine the ideal location for your putting green. Look for a relatively flat area with sufficient space to accommodate the green and surrounding features. Consider factors such as sunlight exposure, drainage, and existing landscaping to ensure that your putting green will thrive in its chosen spot.
Define Your Vision
Think about the overall look and feel you want to achieve with your putting green. Are you aiming for a professional-grade green with challenging contours, or do you prefer a simpler design for casual putting practice? Visualizing the end result will guide your decisions as you move through the planning and construction process.
Create a Layout
Using stakes, ropes, or spray paint, outline the shape and size of your putting green directly on the ground. This step allows you to visualize the placement of the green within your outdoor space and make adjustments as needed. Consider incorporating curves, slopes, and strategic positioning to add interest and challenge to your design.
Research Putting Green Designs
Explore different putting green designs and layouts to gather inspiration for your project. Look for ideas that align with your vision and consider how various elements, such as fringe areas, bunkers, and landscaping, can enhance the overall aesthetic and functionality of your putting green.
Set a Budget
Determine how much you're willing to invest in your DIY putting green. Research the costs of materials, tools, and optional features, and establish a budget that aligns with your financial resources. Setting a clear budget from the outset will help you make informed decisions as you progress through the project.
Seek Professional Advice
If you're unsure about certain aspects of the planning and design phase, consider consulting with a landscaping professional or golf course designer. Their expertise can provide valuable insights and ensure that your putting green aligns with industry standards and best practices.
By dedicating time to thorough planning and design, you'll set the stage for a successful and enjoyable DIY putting green project. With a clear vision, a well-defined layout, and a realistic budget, you'll be ready to move on to the next steps of gathering materials and tools to bring your putting green to life.
Step 2: Gathering Materials and Tools
Gathering the right materials and tools is a crucial step in bringing your DIY putting green to fruition. By ensuring that you have everything you need before starting the construction process, you can streamline the project and avoid unnecessary delays. Here's a detailed look at the essential materials and tools required for building your backyard golf oasis:
Materials
-
Artificial Putting Surface: Invest in high-quality artificial turf specifically designed for putting greens. Look for turf with a realistic look and feel, as well as a smooth and consistent ball roll. Measure the dimensions of your outlined putting green to determine the amount of turf needed.
-
Base Materials: You'll need materials to create a stable and well-draining base for your putting green. This may include crushed stone, decomposed granite, or compacted gravel. The quantity will depend on the size of your putting green and the desired base depth.
-
Edging Material: Select durable and flexible edging material to define the boundaries of your putting green. This can be in the form of heavy-duty plastic or metal landscape edging that provides a clean and professional finish.
-
Putting Green Cups and Flags: Purchase putting green cups and flags to mark the holes on your green. These can be installed flush with the surface or slightly raised, depending on your preference.
-
Adhesive and Seam Tape: To secure the artificial turf and create seamless joins, you'll need specialized adhesive and seam tape designed for synthetic grass installations.
-
Optional Features: Depending on your design preferences, you may want to incorporate additional features such as fringe turf for a realistic look around the green, bunker materials for creating sand traps, and landscaping elements to enhance the overall aesthetic.
Tools
-
Shovel and Rake: Essential for excavating the area and shaping the base before installing the putting surface.
-
Plate Compactor: A plate compactor is used to compact the base materials, ensuring a stable and level foundation for the putting green.
-
Utility Knife: A sharp utility knife is necessary for cutting and trimming the artificial turf to fit the shape of your putting green.
-
Tape Measure and Level: Accurate measurements and a level surface are critical for achieving a professional-looking putting green, making these tools indispensable.
-
Broom and Watering Can: These basic tools are used for final grooming and maintenance of the artificial turf once it's in place.
-
Optional Power Tools: Depending on the scale of your project, you may benefit from using power tools such as a circular saw or angle grinder for cutting edging materials and turf.
By ensuring that you have all the necessary materials and tools on hand, you'll be well-prepared to move on to the next steps of preparing the area and building the base of your DIY putting green. With careful planning and the right resources at your disposal, you're one step closer to creating a backyard haven for honing your putting skills and enjoying leisurely rounds of golf right at home.
Step 3: Preparing the Area
Preparing the area for your DIY putting green is a critical step that sets the stage for a professional and long-lasting result. By meticulously attending to the groundwork, you'll ensure that your putting green not only looks impressive but also performs optimally. Here's a detailed breakdown of the essential tasks involved in preparing the area:
Clearing and Excavation
Begin by clearing the designated area of any existing vegetation, rocks, or debris. Use a shovel and a rake to remove surface-level obstacles and create a clean canvas for your putting green. Depending on the condition of the site, you may need to perform additional excavation to achieve the desired depth for the base materials.
Establishing the Base Depth
Determine the appropriate depth for the base of your putting green, taking into account factors such as drainage, stability, and the desired height of the finished surface. Typically, a depth of 4 to 6 inches is recommended for the base, but this may vary based on specific project requirements.
Adding Base Materials
Once the excavation is complete, it's time to add the base materials that will provide a solid foundation for your putting green. Spread a layer of crushed stone, decomposed granite, or compacted gravel across the excavated area, ensuring even coverage and consistent compaction. Use a plate compactor to firmly compact the base materials, creating a stable and level surface.
Shaping the Base
Using a rake and a level, carefully shape the compacted base to match the desired contours and slopes of your putting green. Pay close attention to achieving a smooth and uniform surface, as this will directly impact the performance and aesthetics of the finished green.
Establishing Drainage
Proper drainage is essential for maintaining the integrity of your putting green, especially during periods of heavy rainfall. Ensure that the base is graded to allow for efficient water runoff and consider incorporating drainage solutions such as perforated pipes or strategic grading to direct water away from the green.
Final Inspection
Before proceeding to the next phase of construction, thoroughly inspect the prepared area to confirm that the base meets the necessary specifications. Check for any unevenness, low spots, or drainage issues, and make adjustments as needed to ensure a flawless foundation for your DIY putting green.
By meticulously preparing the area according to these guidelines, you'll lay the groundwork for a putting green that not only looks stunning but also delivers a true-to-life putting experience. With the foundation in place, you're ready to move on to the exciting phase of building the base and bringing your putting green to life.
Step 4: Building the Base
With the area meticulously prepared, it's time to focus on building the base of your DIY putting green. This foundational layer plays a crucial role in providing stability, proper ball roll, and overall performance. Here's a detailed overview of the essential steps involved in constructing the base:
Adding Putting Green Sub-Base
Begin by adding a layer of putting green sub-base material, such as finely crushed stone or decomposed granite, over the compacted base. This sub-base layer typically ranges from 1 to 2 inches in depth and serves as a crucial component for achieving the desired ball roll characteristics and surface smoothness.
Compacting and Smoothing
Using a plate compactor, firmly compact the putting green sub-base to create a solid and level foundation. This step is essential for ensuring uniformity and stability across the entire surface. After compaction, use a rake and a level to meticulously smooth out the sub-base, addressing any irregularities and achieving a consistent level throughout the area.
Installing Putting Green Cups and Flags
Prior to laying the artificial turf, install the putting green cups and flags at designated hole locations. These components are set flush with the sub-base, providing precise markers for the holes on your putting green. Ensure that the cups are securely positioned and aligned to the desired orientation for a professional and polished appearance.
Positioning Edging Material
Next, position the chosen edging material around the perimeter of the putting green. This edging serves to contain the artificial turf, provide a clean boundary, and prevent shifting or spreading of the turf over time. Carefully secure the edging in place, ensuring that it follows the outlined shape of your putting green and complements the overall design.
Final Inspection and Adjustments
Once the base construction is complete, conduct a thorough inspection of the entire area. Check for any remaining unevenness, ensure that the cups and flags are securely in place, and verify that the edging is properly positioned. Make any necessary adjustments to guarantee that the base is impeccably prepared for the next phase of installing the putting surface.
By meticulously executing these steps, you'll establish a solid and reliable base for your DIY putting green, setting the stage for the exciting phase of installing the putting surface. With the base construction completed, you're one step closer to bringing your backyard golf oasis to life.
Step 5: Installing the Putting Surface
With the meticulously prepared base in place, it's time to embark on the exciting phase of installing the putting surface for your DIY putting green. This pivotal step will bring your vision to life, transforming the prepared area into a professional-grade green that promises hours of enjoyment and practice. Here's a detailed breakdown of the essential tasks involved in installing the putting surface:
Unrolling and Positioning the Artificial Turf
Carefully unroll the artificial putting green turf over the prepared base, ensuring that it aligns with the outlined shape of your green. Take time to position the turf accurately, allowing for any necessary adjustments to achieve a precise fit. As you work, pay attention to the alignment of seams and ensure that the turf lays smoothly and evenly across the entire surface.
Trimming and Seam Joining
Using a sharp utility knife, carefully trim the turf to match the exact contours of your putting green. Take care to create clean and seamless edges, maintaining the integrity of the turf's appearance and performance. If your putting green requires multiple sections of turf, use specialized adhesive and seam tape to join the seams securely, creating a cohesive and flawless surface.
Securing the Turf and Final Adjustments
Once the turf is positioned and trimmed, secure it in place using the recommended adhesive and fastening methods. Pay attention to the manufacturer's guidelines for proper installation, ensuring that the turf is firmly anchored without any wrinkles or creases. Conduct a final inspection of the installed turf, making any necessary adjustments to guarantee a pristine and professional-looking putting surface.
Installing Fringe and Bunkers (Optional)
If your design includes fringe areas or bunkers around the putting green, this is the ideal time to install these additional features. Utilize specialized fringe turf to create a realistic border around the green, adding visual appeal and a touch of authenticity to the overall design. For bunkers, carefully position and fill designated areas with sand or bunker materials, shaping them to align with your desired layout.
Grooming and Final Touches
Once the putting surface, fringe, and bunkers are in place, take the time to groom the turf and ensure that it presents a flawless appearance. Use a broom to gently brush the turf fibers, promoting an even and natural look. Additionally, consider adding landscaping elements such as decorative rocks or plants to enhance the aesthetic appeal of your DIY putting green.
By meticulously executing these steps, you'll bring your DIY putting green one step closer to completion, with a professionally installed putting surface that sets the stage for an exceptional golfing experience right in your backyard. With the putting surface in place, you're ready to add the finishing touches and move on to the next steps of maintaining your backyard golf oasis.
Step 6: Adding Fringe and Bunkers
Adding fringe and bunkers to your DIY putting green can elevate its visual appeal and provide a more authentic golfing experience. The fringe serves as a transition area between the putting surface and the surrounding landscape, while bunkers add an element of challenge and strategic play. Here's a detailed guide on incorporating these features into your backyard golf oasis:
Installing Fringe
-
Selecting Fringe Turf: Choose high-quality fringe turf that complements the putting surface and enhances the overall aesthetic of the green. Opt for turf with a natural appearance and texture, creating a seamless transition from the green to the surrounding landscape.
-
Positioning and Securing: Carefully position the fringe turf around the perimeter of the putting green, ensuring a smooth and natural transition. Secure the turf in place using the recommended adhesive or fastening methods, paying attention to seamless integration with the putting surface.
-
Trimming and Shaping: Use a sharp utility knife to trim the fringe turf to the desired contours, creating clean and precise edges. Shape the fringe to follow the natural flow of the landscape, incorporating gentle curves and undulations for a realistic and visually appealing border.
-
Grooming and Blending: After installation, groom the fringe turf to achieve a uniform and natural appearance. Use a broom to gently brush the turf fibers, blending them with the surrounding landscaping elements for a cohesive and polished look.
Creating Bunkers
-
Designing Bunker Areas: Determine the locations and sizes of the bunkers within your putting green design. Bunkers can be strategically positioned to add challenge and variety to the green, requiring skillful play and precise shot-making.
-
Excavation and Shaping: Excavate the designated bunker areas to the desired depth, carefully shaping the contours to create natural-looking sand trap features. Consider incorporating slopes and undulations to mimic the characteristics of professional golf course bunkers.
-
Lining and Filling: Line the excavated bunker areas with durable bunker liners to prevent contamination and maintain the integrity of the sand. Fill the bunkers with high-quality bunker sand, ensuring an even and consistent layer that provides the desired playability and visual appeal.
-
Final Touches: Once the bunkers are filled, shape the sand to achieve the desired appearance and texture. Consider adding decorative elements such as stacked sod walls or native grasses around the bunkers to enhance their visual impact and seamlessly integrate them into the overall design.
By incorporating carefully crafted fringe areas and strategically designed bunkers, you can transform your DIY putting green into a captivating and challenging golfing environment. These features not only enhance the visual allure of the green but also provide opportunities for creative shot-making and skill development, making your backyard oasis a true golfer's delight.
Step 7: Maintaining Your DIY Putting Green
Maintaining your DIY putting green is essential for preserving its beauty, playability, and longevity. By implementing a regular maintenance routine, you can ensure that your backyard golf oasis remains in top condition, providing a reliable space for honing your putting skills and enjoying leisurely rounds of golf. Here's a comprehensive guide to maintaining your DIY putting green:
Regular Cleaning and Debris Removal
Frequent cleaning is crucial for keeping your putting green free of debris, leaves, and other organic matter that can affect its appearance and performance. Use a leaf blower or a gentle rake to remove debris, taking care not to disturb the turf fibers or the surrounding landscaping.
Brushing and Grooming
Periodically brushing and grooming the turf fibers helps maintain their upright position and uniform appearance. Use a specialized turf brush or a stiff broom to gently brush the turf in different directions, promoting an even and natural look across the entire putting surface.
Weed Control
Monitor the perimeter and surrounding areas of your putting green for any signs of weed growth. Promptly remove any weeds or unwanted vegetation to prevent them from encroaching onto the green. Consider using environmentally friendly weed control products to manage weed growth effectively.
Inspecting and Repairing Turf
Regularly inspect the putting surface for signs of wear, tear, or damage. Look for areas where the turf may be compacted, flattened, or showing signs of discoloration. Address any issues promptly by fluffing the turf, addressing seams, or replacing damaged sections as needed.
Managing Drainage
Maintain proper drainage around the putting green to prevent water accumulation and ensure efficient runoff during rainy periods. Clear any debris or obstructions from drainage channels and inspect the base for optimal grading to facilitate effective water dispersal.
Seasonal Maintenance
Adjust your maintenance routine based on seasonal changes. In colder climates, prepare the putting green for winter by removing snow and minimizing foot traffic to prevent compaction. In warmer seasons, focus on hydration and managing turf temperature to promote healthy growth.
Professional Maintenance Services
Consider engaging professional turf maintenance services for in-depth care and periodic assessments of your putting green. Professional maintenance can include tasks such as aerating the turf, applying specialized treatments, and conducting comprehensive inspections to ensure optimal performance.
By incorporating these maintenance practices into your routine, you can uphold the pristine condition and functionality of your DIY putting green, ensuring that it continues to serve as a captivating and enjoyable space for golf enthusiasts of all levels. With consistent care and attention, your backyard golf oasis will remain a source of pride and relaxation for years to come.
Conclusion
Congratulations on completing the journey of creating your very own DIY putting green! From the initial planning and design phase to the meticulous installation of the putting surface and optional features, you've embarked on a fulfilling and rewarding project that has transformed your backyard into a golfer's paradise. As you stand back and admire the lush green expanse, it's evident that your dedication and effort have culminated in a stunning addition to your outdoor living space.
Your DIY putting green represents more than just a place to practice your putting skills; it embodies the spirit of creativity, craftsmanship, and the joy of bringing a vision to life. The carefully selected materials, the precise shaping of the base, and the artful installation of the putting surface have all contributed to the creation of a space that invites leisurely rounds of golf and moments of relaxation amidst the beauty of nature.
As you look ahead to the future, it's essential to recognize that the journey doesn't end with the completion of the project. Your DIY putting green will continue to evolve and thrive with regular maintenance and care. By implementing a consistent maintenance routine and staying attuned to the changing seasons, you'll ensure that your backyard golf oasis remains a vibrant and inviting space for years to come.
Moreover, your DIY putting green is more than just a personal haven for golf enthusiasts; it's a testament to the power of creativity and the fulfillment that comes from transforming ideas into tangible, real-world creations. Whether you're perfecting your putting technique, hosting friendly putting competitions with family and friends, or simply basking in the tranquility of your outdoor retreat, your putting green stands as a testament to your ingenuity and passion for crafting a space that enriches your life.
As you take your first putts on the smooth surface, surrounded by the meticulously groomed fringe and the strategically placed bunkers, take a moment to savor the sense of accomplishment and the joy of having brought your vision to fruition. Your DIY putting green is not just a physical space; it's a reflection of your dedication, creativity, and the boundless possibilities that come to life through DIY endeavors.
So, as you embark on this new chapter of enjoying and maintaining your DIY putting green, remember that it's not just a backyard feature; it's a testament to your ability to turn dreams into reality and create a space that brings joy, relaxation, and a touch of luxury to your everyday life. Cheers to your DIY putting green and the countless memorable moments it will inspire in the years to come!