
Home>Create & Decorate>DIY & Crafts>DIY Jon Boat Casting Deck: How To Build A Spacious And Functional Fishing Platform
DIY & Crafts
DIY Jon Boat Casting Deck: How To Build A Spacious And Functional Fishing Platform
Published: February 24, 2024

Content Creator specializing in woodworking and interior transformations. Caegan's guides motivate readers to undertake their own projects, while his custom furniture adds a personal touch.
Learn how to create a spacious and functional fishing platform with our DIY Jon Boat Casting Deck guide. Perfect for fishing enthusiasts!
(Many of the links in this article redirect to a specific reviewed product. Your purchase of these products through affiliate links helps to generate commission for Twigandthistle.com, at no extra cost. Learn more)
Introduction
Are you an avid angler looking to enhance your fishing experience on a Jon boat? Building a casting deck can be a game-changer, providing a spacious and functional platform for casting lines and reeling in the big catch. Whether you're a seasoned DIY enthusiast or a newcomer to boat modifications, creating a custom casting deck for your Jon boat is a rewarding project that can elevate your fishing adventures.
In this comprehensive guide, we'll walk you through the step-by-step process of constructing a sturdy and practical casting deck for your Jon boat. From measuring and planning to adding the finishing touches, you'll gain valuable insights and expert tips to help you tackle this project with confidence. By the end of this guide, you'll be well-equipped to transform your Jon boat into a fishing haven that meets your specific needs and preferences.
Embarking on a DIY casting deck project not only allows you to customize your boat to suit your fishing style but also presents an opportunity to unleash your creativity and craftsmanship. Whether you prefer solitary fishing escapades or enjoy sharing the angling experience with friends and family, a well-designed casting deck can significantly enhance the functionality and comfort of your Jon boat.
With the right materials, tools, and a clear plan in place, you can embark on this DIY endeavor with enthusiasm and determination. By investing your time and effort into building a casting deck, you'll not only create a practical fishing platform but also cultivate a sense of pride in knowing that you've personalized your Jon boat to align with your fishing aspirations.
So, roll up your sleeves, gather your supplies, and get ready to embark on a fulfilling journey of crafting a custom casting deck for your Jon boat. Let's dive into the details and bring your vision of the perfect fishing setup to life!
Materials and Tools Needed
Before diving into the construction of your Jon boat casting deck, it's essential to gather all the necessary materials and tools to ensure a smooth and efficient building process. Here's a comprehensive list of items you'll need to bring your DIY project to fruition:
Materials:
- Marine-Grade Plywood: Opt for high-quality, marine-grade plywood to ensure durability and resistance to water damage. The thickness of the plywood will depend on the size of your casting deck, but 3/4-inch plywood is commonly used for this purpose.
- Pressure-Treated Lumber: This will be used for constructing the frame and support beams of the casting deck. Ensure that the lumber is suitable for outdoor use and can withstand exposure to the elements.
- Stainless Steel Screws and Nails: Invest in corrosion-resistant stainless steel screws and nails to secure the various components of the casting deck. These fasteners are essential for maintaining the structural integrity of the deck in a marine environment.
- Non-Skid Deck Coating: To enhance safety and traction, consider applying a non-skid deck coating to the surface of the casting deck. This will minimize the risk of slipping, especially when the deck is wet.
- Sealant or Marine-Grade Polyurethane: Applying a sealant or marine-grade polyurethane to the plywood and lumber will provide protection against moisture and prolong the lifespan of the casting deck.
Tools:
- Measuring Tape and Carpenter's Square: Accurate measurements and precise angles are crucial for constructing a sturdy and well-fitted casting deck. A measuring tape and carpenter's square will aid in achieving precision during the planning and building stages.
- Circular Saw or Jigsaw: A reliable circular saw or jigsaw will be indispensable for cutting the plywood and lumber to the required dimensions. These tools will enable you to achieve clean and accurate cuts, ensuring a professional finish.
- Drill and Bits: A power drill equipped with appropriate drill bits is essential for driving screws and creating pilot holes. Additionally, a countersink bit will facilitate the recessing of screw heads for a flush surface.
- Screwdriver and Hammer: While a power drill is essential for efficiency, having a screwdriver and hammer on hand for manual fastening and adjustments is advisable.
- Safety Gear: Prioritize safety by wearing protective gear, including safety goggles, ear protection, and work gloves, throughout the construction process.
By assembling these materials and tools, you'll be well-prepared to embark on the construction of your Jon boat casting deck. With careful planning and attention to detail, you'll soon be on your way to enjoying a customized and functional fishing platform that enhances your on-the-water experiences.
Step 1: Measuring and Planning
Before diving into the physical construction of your Jon boat casting deck, it's crucial to lay a solid foundation through meticulous measuring and strategic planning. This initial step sets the stage for a successful and well-executed project, ensuring that the casting deck fits seamlessly onto your boat and meets your specific requirements.
Begin by carefully measuring the available space on your Jon boat where the casting deck will be installed. Use a measuring tape to record the precise dimensions, taking into account any existing features or obstacles that may impact the layout of the deck. It's essential to factor in the boat's contours, seating arrangements, and any other components that will influence the design and placement of the casting deck.
Once you have accurate measurements, transfer them onto graph paper or a digital design tool to create a scaled layout of the casting deck. This visual representation will serve as a blueprint for the construction process, allowing you to experiment with different configurations and make informed decisions about the deck's size and shape.
During the planning phase, consider the functionality and practicality of the casting deck. Think about how you intend to use the space for fishing activities, seating arrangements, and storage options. Visualize the placement of fishing equipment, seating, and any additional features you wish to incorporate, ensuring that the design optimizes both utility and comfort.
Furthermore, take into account the weight distribution and balance of the boat to ensure that the addition of the casting deck does not compromise the vessel's stability. Balancing the weight of the deck and its occupants is crucial for maintaining safe and efficient maneuverability on the water.
As you refine the design, consider the materials you'll be using and how they will integrate with the boat's structure. Assess the load-bearing capacity of the boat and ensure that the materials chosen for the casting deck align with safety standards and regulatory guidelines.
By meticulously measuring and planning the layout of your Jon boat casting deck, you'll lay the groundwork for a successful construction phase. This preparatory stage not only fosters a clear vision for the project but also minimizes the likelihood of errors and adjustments during the actual building process. With a well-thought-out plan in place, you'll be ready to move on to the next phase of constructing the frame, bringing you one step closer to realizing your custom fishing platform.
Step 2: Building the Frame
With the meticulous planning and measurements in place, it's time to transition from the conceptual stage to the physical construction of the casting deck. Building a sturdy frame forms the backbone of the deck, providing structural support and ensuring its stability on the Jon boat.
Frame Design and Material Selection
Begin by selecting the appropriate pressure-treated lumber for constructing the frame. Opt for lumber with the dimensions that align with your design plan, considering the length, width, and height of the casting deck. The frame should be designed to distribute weight evenly and integrate seamlessly with the boat's existing structure.
Cutting and Assembling the Frame Components
Using a circular saw or jigsaw, carefully cut the lumber to the required dimensions based on your design specifications. Ensure precise and accurate cuts to facilitate a seamless assembly process. The frame components typically include longitudinal beams, cross beams, and support posts, all of which are essential for creating a robust and well-balanced foundation for the casting deck.
Assemble the cut lumber pieces according to the layout outlined in your design plan. Utilize stainless steel screws and appropriate fastening techniques to securely join the frame components, ensuring structural integrity and longevity. Pay close attention to the alignment and angles of the frame elements to achieve a level and uniform structure.
Securing the Frame to the Boat
Once the frame is assembled, carefully position it on the Jon boat, ensuring that it fits snugly within the designated space. Secure the frame to the boat's existing structure using stainless steel screws and brackets, ensuring a firm and stable attachment. This step is crucial for integrating the casting deck with the boat's framework, creating a seamless and cohesive unit.
Reinforcement and Finishing Touches
Inspect the assembled frame for any potential areas that may require additional reinforcement. Strengthen weak points and add support where necessary to enhance the overall stability of the frame. Additionally, consider applying a sealant or marine-grade polyurethane to the frame to protect it from moisture and environmental elements, prolonging its lifespan and durability.
By meticulously crafting a robust frame for your casting deck, you lay the groundwork for a secure and functional fishing platform. The frame serves as the essential foundation upon which the subsequent steps of the construction process will build. With the frame in place, you're ready to progress to the next phase of adding support beams, bringing you closer to the realization of your custom Jon boat casting deck.
Step 3: Adding Support Beams
With the sturdy frame in place, the next critical step in constructing your Jon boat casting deck involves adding support beams to reinforce the structure and ensure its resilience in a marine environment. Support beams play a pivotal role in distributing weight evenly across the deck, enhancing its load-bearing capacity, and fortifying its overall stability.
Selecting the Support Beam Material
When selecting the material for the support beams, opt for pressure-treated lumber that complements the frame's construction. The dimensions of the support beams should align with the design specifications, considering the length, width, and spacing required to uphold the decking material and accommodate anticipated loads. Ensure that the lumber chosen is suitable for outdoor use and capable of withstanding exposure to moisture and varying weather conditions.
Cutting and Positioning the Support Beams
Using precise measurements and a reliable cutting tool, carefully cut the lumber into individual support beams according to the predetermined dimensions. Position the support beams perpendicular to the frame, ensuring uniform spacing and alignment to create a grid-like framework that will provide comprehensive support for the decking material. Secure the support beams to the frame using stainless steel screws, ensuring a secure and stable connection.
Enhancing Structural Integrity
To reinforce the support beams and fortify the overall structure, consider adding diagonal bracing or additional cross beams where necessary. These reinforcements serve to minimize flexing and sway, contributing to the deck's rigidity and resilience. By strategically reinforcing the support beams, you'll create a robust foundation that can withstand the demands of fishing activities and the dynamic forces encountered on the water.
Preparing for Decking Installation
Upon completing the installation of the support beams, thoroughly inspect the framework for any potential areas that may require additional reinforcement or adjustments. Ensure that the support beams are securely fastened and aligned to accommodate the subsequent installation of the decking material. Additionally, consider applying a sealant or marine-grade polyurethane to the support beams to protect them from moisture and environmental elements, prolonging their longevity and durability.
By methodically adding support beams to the frame, you're bolstering the structural integrity of your Jon boat casting deck, setting the stage for the final phases of decking installation and finishing touches. With the support beams in place, your custom fishing platform is one step closer to realization, poised to elevate your on-the-water angling experiences with its stability and functionality.
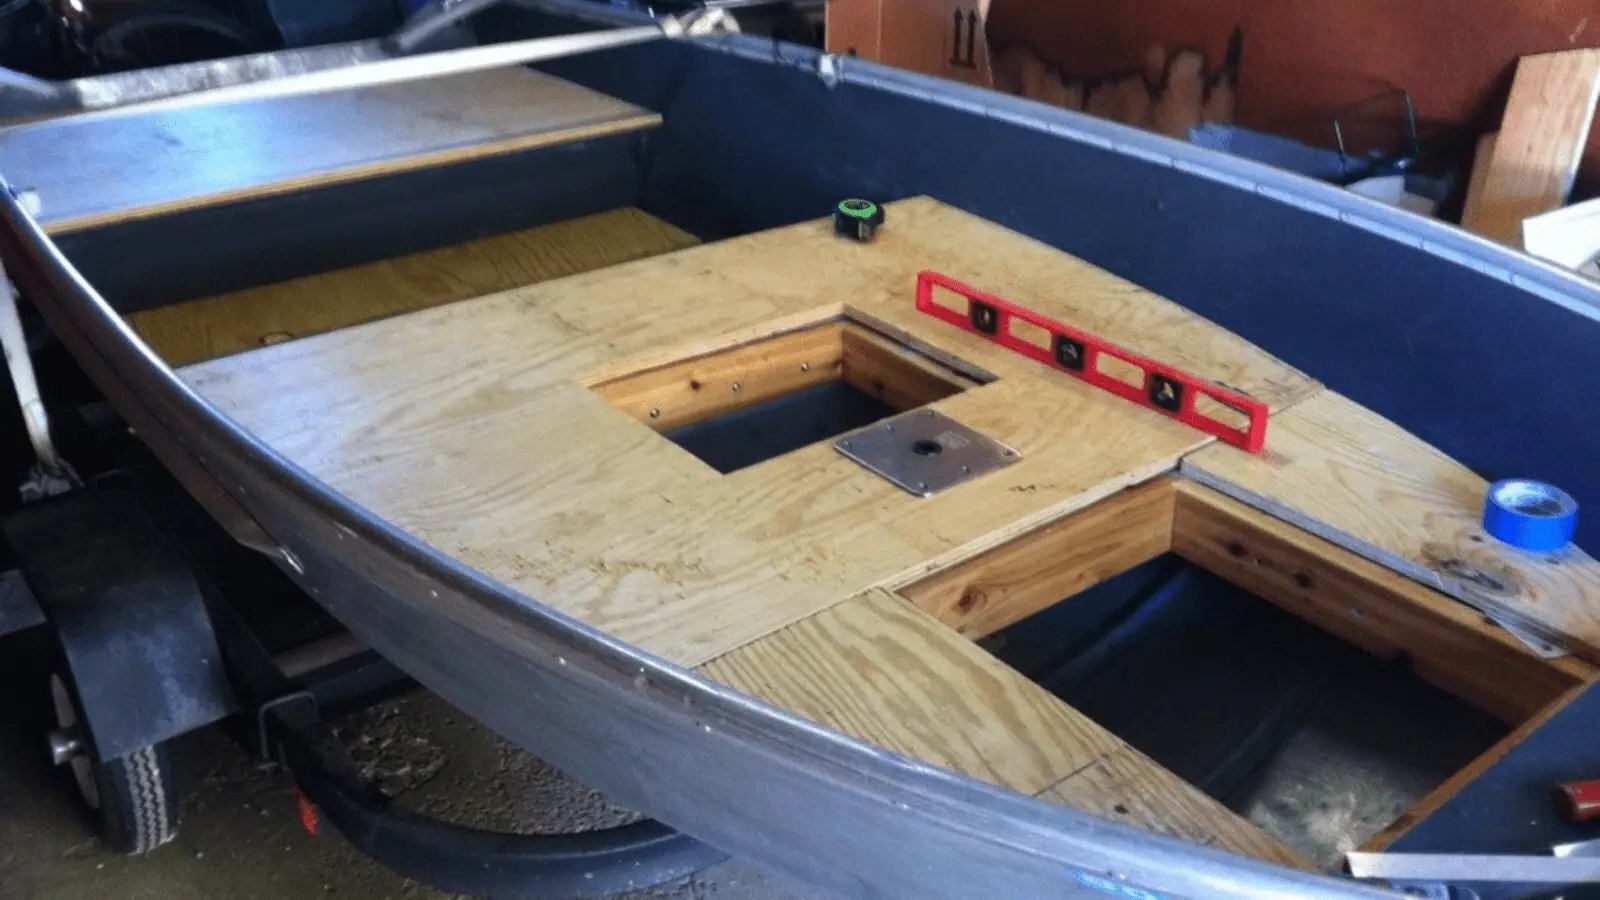
Step 4: Installing the Decking
With the foundational elements of the casting deck in place, the focus now shifts to the pivotal task of installing the decking material. The choice of decking material plays a crucial role in determining the overall aesthetics, durability, and functionality of the casting deck. Whether opting for marine-grade plywood or composite decking, the installation process demands precision and attention to detail to ensure a seamless and secure fit.
Selecting the Decking Material
Prior to installation, carefully select the appropriate decking material based on your preferences, budget, and intended use. Marine-grade plywood is a popular choice due to its durability and suitability for marine environments. Alternatively, composite decking offers low-maintenance benefits and enhanced resistance to moisture and UV exposure. Whichever material you choose, ensure that it aligns with your design plan and meets the necessary safety and quality standards.
Cutting and Fitting the Decking
Using precise measurements and a reliable cutting tool, carefully cut the decking material to the dimensions outlined in your design plan. Ensure that the cuts are clean and accurate to facilitate a seamless fit onto the support beams and frame. Position the cut decking pieces onto the framework, ensuring a snug and uniform alignment that maximizes coverage and stability.
Securing the Decking in Place
Once the decking pieces are positioned correctly, use stainless steel screws to secure them to the support beams and frame. Employ a consistent spacing pattern to ensure uniform attachment and minimize the risk of warping or shifting over time. Pay close attention to the edges and corners, ensuring that the decking material is flush with the frame and support beams to create a smooth and level surface.
Finishing Touches and Surface Treatment
Upon completing the installation, inspect the decking for any protruding screws or imperfections that may require attention. Consider applying a sealant or marine-grade polyurethane to the decking surface to enhance its resistance to moisture, UV exposure, and general wear and tear. Additionally, if using marine-grade plywood, applying a non-skid deck coating can enhance traction and safety, especially when the deck is wet.
By meticulously installing the decking material, you're bringing the vision of your custom Jon boat casting deck to life. The installation process marks a significant milestone in the construction journey, setting the stage for the final phase of adding non-skid surface and securing the casting deck. With the decking in place, your fishing platform is poised to deliver both functionality and visual appeal, elevating your on-the-water experiences to new heights.
Step 5: Adding Non-Skid Surface
Ensuring safety and stability on the casting deck is paramount, especially in a marine environment where surfaces can become slippery due to water and other environmental factors. Adding a non-skid surface to the decking material is a crucial step in enhancing traction and minimizing the risk of slips and falls during fishing activities.
Non-Skid Coating Application
To apply a non-skid surface to the decking, consider using a specialized non-skid deck coating designed for marine applications. This coating is formulated to provide a textured surface that offers enhanced grip, even when the deck is wet. Before applying the non-skid coating, thoroughly clean the decking surface to remove any dust, debris, or contaminants that may affect adhesion.
Once the surface is clean and dry, carefully apply the non-skid coating using a roller or brush, ensuring even coverage across the entire deck. Pay particular attention to high-traffic areas and areas prone to water exposure, such as near the edges and around seating areas. The goal is to create a uniform non-skid surface that maximizes traction without compromising the visual appeal of the deck.
Customizing Traction Patterns
Depending on personal preferences and the specific requirements of your fishing activities, you may have the opportunity to customize the traction pattern of the non-skid surface. Some non-skid coatings offer flexibility in creating custom patterns or textures, allowing you to tailor the surface to your liking. Consider incorporating strategic patterns that optimize grip and comfort, taking into account the placement of fishing equipment, seating, and other functional elements on the deck.
Ensuring Long-Term Durability
After applying the non-skid coating, allow sufficient time for it to cure and adhere to the decking material effectively. Once cured, the non-skid surface should exhibit robust adhesion and resistance to wear, ensuring long-term durability and performance. Regular maintenance, such as periodic cleaning and inspection, will help preserve the effectiveness of the non-skid surface and extend its lifespan, contributing to a safe and enjoyable fishing environment.
By adding a non-skid surface to the casting deck, you're prioritizing safety and comfort, creating an environment where you and your fellow anglers can move about with confidence and stability. This final touch not only enhances the functionality of the deck but also underscores your commitment to crafting a custom fishing platform that excels in both practicality and safety.
Step 6: Securing the Casting Deck
Securing the casting deck to your Jon boat is the final crucial step in the construction process, ensuring that the entire structure is firmly anchored and integrated with the boat's framework. This phase focuses on fortifying the connections, optimizing weight distribution, and addressing any potential areas of movement or instability. By meticulously securing the casting deck, you'll enhance its resilience and longevity, setting the stage for countless fishing adventures on the water.
Fastening the Deck to the Frame
To secure the casting deck to the frame and support beams, utilize stainless steel screws and fastening techniques that promote a robust and enduring connection. Position the deck onto the frame, ensuring precise alignment and a flush fit. Proceed to drive stainless steel screws through the decking material into the support beams, maintaining consistent spacing and ensuring that the deck is uniformly secured. Pay particular attention to the perimeter of the deck, reinforcing the edges and corners to minimize any potential movement or flexing.
Reinforcement and Stability
Inspect the entire deck for any signs of movement or instability, addressing any areas that may require additional reinforcement. Consider adding supplementary support brackets or braces where necessary to fortify the connections and minimize any potential shifting or swaying. By reinforcing weak points and optimizing weight distribution, you'll enhance the overall stability of the casting deck, ensuring that it can withstand the dynamic forces encountered during fishing activities.
Integration with the Boat's Structure
Verify that the casting deck is seamlessly integrated with the boat's existing structure, creating a unified and cohesive assembly. Secure the deck to the boat's framework using appropriate fasteners and brackets, ensuring that the entire structure is harmoniously aligned and firmly affixed. This integration is essential for maintaining the boat's balance and maneuverability, ensuring that the addition of the casting deck does not compromise its performance on the water.
Final Inspections and Adjustments
Upon completing the securing process, conduct thorough inspections to identify any potential areas that may require adjustments or fine-tuning. Address any protruding screws, sharp edges, or imperfections that could detract from the deck's functionality and safety. Ensure that all connections are secure and that the deck exhibits minimal flexing or movement when subjected to weight and pressure.
By meticulously securing the casting deck to your Jon boat, you're cementing the culmination of your DIY endeavor, creating a custom fishing platform that embodies durability, functionality, and craftsmanship. With the deck firmly anchored and seamlessly integrated, you're poised to embark on countless fishing escapades, confident in the stability and reliability of your personalized angling haven.
Conclusion
Congratulations on successfully completing the construction of your custom Jon boat casting deck! This transformative DIY project has not only elevated the functionality and comfort of your fishing expeditions but also showcased your ingenuity and craftsmanship. As you reflect on the journey from conceptualization to realization, it's evident that your dedication and attention to detail have culminated in the creation of a personalized fishing platform that aligns perfectly with your angling aspirations.
By meticulously measuring and planning the layout, you set the stage for a well-executed construction process, ensuring that the casting deck seamlessly integrates with your Jon boat's structure. The careful selection of materials and tools, coupled with the precision in building the frame and adding support beams, has resulted in a robust and resilient foundation that promises enduring performance on the water.
The installation of the decking material, coupled with the application of a non-skid surface, has not only enhanced the visual appeal of the deck but also prioritized safety and stability. The incorporation of a non-skid surface underscores your commitment to creating a secure environment where you and your fellow anglers can navigate with confidence, even in challenging conditions.
Securing the casting deck to your Jon boat represents the final touch that solidifies the culmination of your efforts. By fortifying the connections and integrating the deck with the boat's framework, you've ensured a harmonious and stable assembly that is poised to withstand the rigors of fishing activities and provide countless memorable moments on the water.
As you admire the completed casting deck, take pride in the fact that you've not only personalized your Jon boat but also crafted a space where your passion for angling can thrive. The casting deck stands as a testament to your creativity and determination, embodying the perfect fusion of functionality, safety, and visual appeal.
With the casting deck now ready to enhance your fishing adventures, you're poised to embark on a new chapter of on-the-water experiences. Whether you're casting lines solo or sharing the angling excitement with friends and family, your custom fishing platform promises to be the centerpiece of unforgettable moments and successful catches.
As you set sail with your newly constructed casting deck, may it serve as a constant reminder of your ability to turn vision into reality and your unwavering commitment to creating a fishing environment that exceeds expectations. Here's to many rewarding fishing expeditions and the enduring satisfaction of having crafted a custom Jon boat casting deck that truly reflects your angling passion.