
Home>Home & Furniture>Bathroom>DIY Tile Shower: Step-by-Step Guide To Creating A Stunning Bathroom Feature
Bathroom
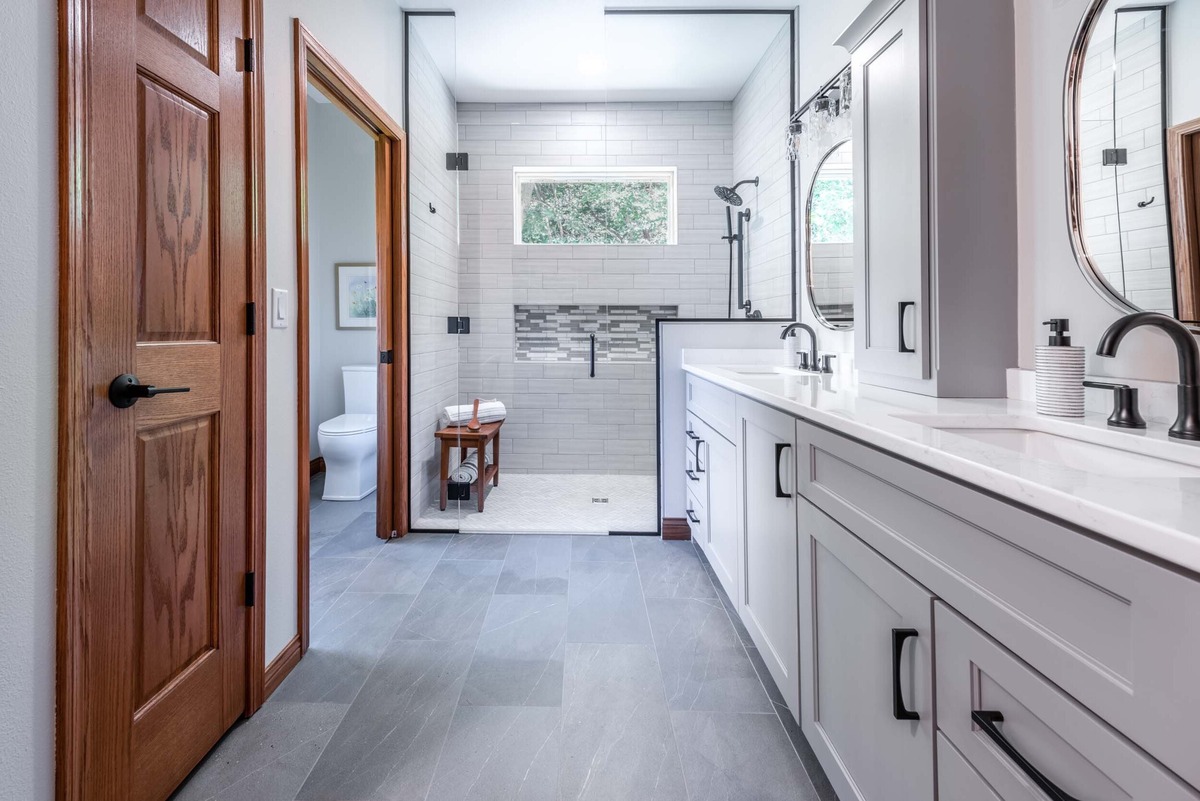
DIY Tile Shower: Step-by-Step Guide To Creating A Stunning Bathroom Feature
Published: March 7, 2024
Editor-in-Chief with a decade in home renovation and a passion for vintage furniture. Diane is known for her weekend treasure hunts at flea markets, enriching our content with unique style insights.
Transform your bathroom with our step-by-step DIY tile shower guide. Create a stunning and functional bathroom feature with our expert tips and advice.
(Many of the links in this article redirect to a specific reviewed product. Your purchase of these products through affiliate links helps to generate commission for Twigandthistle.com, at no extra cost. Learn more)
Introduction
Are you ready to transform your bathroom into a luxurious oasis? A DIY tile shower can be a stunning and rewarding project that adds value and beauty to your home. Whether you're a seasoned DIY enthusiast or a novice looking to take on a new challenge, creating a tile shower can be a gratifying endeavor. In this step-by-step guide, we'll walk you through the process of planning, gathering materials, preparing the shower area, installing the shower pan, waterproofing the walls, setting the tile, grouting, sealing, and adding those finishing touches that will make your DIY tile shower a showstopper. Let's dive in and get started on this exciting home improvement project!
Planning Your DIY Tile Shower
Before you dive into the nitty-gritty of tiling, it's crucial to start with a well-thought-out plan. Here's how to get started:
-
Determine the Design: Consider the style and aesthetic you want for your shower. Do you prefer a sleek, modern look or a more traditional feel? Look for inspiration in home improvement magazines, websites, and social media platforms like Pinterest and Instagram.
-
Measure the Space: Accurate measurements are essential for purchasing the right amount of tile and materials. Measure the shower walls and floor, taking into account any niches, benches, or other features you want to include.
-
Select Your Tile: With countless options available, from ceramic and porcelain to natural stone, glass, and mosaic, choosing the right tile is crucial. Consider factors such as durability, maintenance, and slip resistance when making your selection.
-
Create a Budget: Tiling a shower can be a significant investment, so it's essential to establish a budget that includes not only the cost of the tile but also tools, adhesives, grout, and any professional assistance you may need.
-
Plan the Layout: Decide on the tile layout, considering factors such as tile size, pattern, and orientation. Sketch out the design and layout to visualize how the tiles will fit together.
-
Consider Maintenance: Think about the long-term maintenance of your tile choice. Some tiles may require more upkeep than others, so factor this into your decision-making process.
By taking the time to plan your DIY tile shower thoroughly, you'll set the stage for a successful and visually stunning project.
Gathering Materials and Tools
Once you have a solid plan in place, it's time to gather the necessary materials and tools for your DIY tile shower project. Here's a comprehensive list to ensure you have everything you need:
Materials:
- Tile: Purchase enough tile to cover the shower walls and floor, factoring in extra for cuts and potential breakage.
- Backer Board: Choose a waterproof backer board specifically designed for wet areas like showers.
- Shower Pan: Whether you opt for a prefabricated shower pan or plan to create a custom shower base, ensure you have the necessary materials for installation.
- Waterproofing Membrane: Invest in a high-quality waterproofing membrane to protect the shower walls and ensure longevity.
- Grout and Adhesive: Select grout and adhesive suitable for your chosen tile and the shower environment.
- Sealer: If you're using natural stone or porous tiles, a quality sealer will help protect the tile from water damage and staining.
- Caulk: Choose a mold-resistant caulk for sealing joints and corners.
Tools:
- Tile Cutter: A tile cutter or wet saw will be essential for cutting tiles to fit around fixtures and along edges.
- Notched Trowel: Select the appropriate size notched trowel for spreading adhesive on the backer board.
- Grout Float: This tool is used to apply and pack grout into the joints between tiles.
- Spacers: Tile spacers help ensure even spacing between tiles for a professional finish.
- Level: A level is crucial for ensuring that your tile installation is straight and plumb.
- Sponge and Bucket: Keep a sponge and bucket of water on hand for cleaning excess grout and adhesive.
- Safety Gear: Don't forget safety goggles, gloves, and a dust mask to protect yourself during the tile cutting and installation process.
By gathering all the necessary materials and tools before you begin, you'll set yourself up for a smooth and efficient DIY tile shower project.
Preparing the Shower Area
Before you can start laying tile, it's crucial to ensure that the shower area is properly prepared for the installation process. Here's a detailed breakdown of the steps involved in preparing the shower area for your DIY tile project:
-
Remove Existing Fixtures: If you're renovating an existing shower, start by removing any fixtures, such as showerheads, handles, and shelves. This will provide you with a clean slate to work with and make the tiling process more manageable.
-
Inspect the Substrate: Check the condition of the substrate, which is the surface on which the tile will be installed. Ensure that it is structurally sound and free of any damage, mold, or mildew. If there are any issues, address them before proceeding with the tiling.
-
Install Backer Board: In wet areas like showers, it's essential to use a waterproof backer board to create a suitable surface for tile installation. Cut the backer board to size and secure it to the walls using the appropriate screws and adhesive, following the manufacturer's guidelines.
-
Address Waterproofing: Apply a waterproofing membrane to the walls and floor of the shower area. This crucial step helps prevent water from seeping behind the tile and causing damage to the substrate. Follow the manufacturer's instructions for proper application and drying times.
-
Plan for Niches and Benches: If you plan to incorporate niches, benches, or other custom features in your shower, now is the time to frame and waterproof these areas. Pay close attention to waterproofing these elements to ensure they are fully protected.
-
Check for Level and Plumb: Use a level to ensure that the walls and floor of the shower area are level and plumb. Any discrepancies at this stage can lead to issues with the tile installation, so it's essential to address them before moving forward.
-
Allow for Proper Ventilation: Ensure that the shower area has adequate ventilation to prevent moisture buildup, which can lead to mold and mildew. Consider installing a vent fan if necessary to promote air circulation and keep the space dry.
By thoroughly preparing the shower area before tiling, you'll create a solid foundation for a successful and long-lasting DIY tile shower. Taking the time to address these essential steps will ultimately contribute to the overall quality and durability of your finished project.
Installing the Shower Pan
Installing the shower pan is a critical step in the construction of a DIY tile shower. The shower pan, also known as the shower base, serves as the waterproof foundation that supports the shower floor and ensures proper drainage. Here's a detailed guide to help you navigate the process of installing the shower pan for your DIY tile shower:
-
Select the Right Shower Pan: When choosing a shower pan, consider whether you want a prefabricated option or if you plan to create a custom shower base. Prefabricated shower pans are available in various materials, such as acrylic, fiberglass, and solid surface, and come in standard sizes. If you opt for a custom shower base, you'll need to build a sloped mortar bed to create the proper pitch for drainage.
-
Prepare the Subfloor: Before installing the shower pan, ensure that the subfloor is clean, level, and structurally sound. Any debris, unevenness, or instability in the subfloor can affect the stability and integrity of the shower pan.
-
Position the Shower Pan: Carefully position the shower pan in the designated area, ensuring that it fits snugly and aligns with the drain opening. Use a level to confirm that the shower pan is sitting evenly on the subfloor.
-
Connect the Drain: If you're using a prefabricated shower pan, follow the manufacturer's instructions for connecting the drain. This typically involves attaching the drain assembly to the shower pan and securing it in place. For a custom shower base, ensure that the drain opening is properly positioned within the sloped mortar bed to facilitate efficient drainage.
-
Secure the Shower Pan: Once the shower pan is correctly positioned, secure it to the subfloor according to the manufacturer's guidelines. This may involve using screws or adhesive to anchor the shower pan in place and prevent any movement or shifting.
-
Test for Stability and Drainage: Before proceeding with the tiling process, test the stability of the installed shower pan by applying pressure to various areas and checking for any signs of flexing or movement. Additionally, pour water into the shower pan to verify that it drains properly and that there are no leaks around the drain assembly.
By following these steps, you'll establish a solid foundation for your DIY tile shower and ensure that the shower pan is properly installed and ready for the next phase of the project. A well-installed shower pan is essential for the overall functionality and longevity of your finished tile shower.
Waterproofing the Shower Walls
Waterproofing the shower walls is a crucial step in the process of creating a durable and long-lasting DIY tile shower. Proper waterproofing helps prevent water damage, mold, and mildew, ensuring that your shower remains structurally sound and visually appealing for years to come. Here's a detailed guide to effectively waterproofing the shower walls:
-
Select the Waterproofing Membrane: Choose a high-quality waterproofing membrane designed specifically for wet areas such as showers. There are various options available, including liquid-applied membranes and sheet membranes. Ensure that the membrane you select is suitable for the type of tile you'll be installing and compatible with the backer board or substrate.
-
Prepare the Surface: Before applying the waterproofing membrane, it's essential to prepare the shower walls properly. Fill any gaps, voids, or imperfections in the backer board or substrate to create a smooth and even surface. Additionally, ensure that the walls are clean and free of any debris, dust, or contaminants that could compromise the adhesion of the waterproofing membrane.
-
Apply the Waterproofing Membrane: Follow the manufacturer's instructions for applying the waterproofing membrane to the shower walls. Use a paintbrush or roller to evenly coat the walls with the membrane, ensuring complete coverage from floor to ceiling. Pay special attention to seams, corners, and any penetrations such as shower fixtures and niches, applying additional layers or reinforcement as needed to create a watertight barrier.
-
Seal Joints and Corners: Use a waterproofing seam tape or fabric to reinforce joints, corners, and changes of plane in the shower walls. Apply the tape over seams and corners, pressing it firmly into the waterproofing membrane to create a secure and watertight seal. This step is crucial for preventing water intrusion in areas prone to movement and stress.
-
Allow for Proper Drying Time: After applying the waterproofing membrane and reinforcing the seams and corners, allow sufficient time for the membrane to dry and cure according to the manufacturer's recommendations. Proper drying time is essential to ensure that the membrane forms a solid, impermeable barrier that effectively protects the shower walls from moisture.
-
Perform a Water Test: Once the waterproofing membrane has dried, conduct a water test to verify its effectiveness. Use a hose or bucket to pour water over the shower walls, paying close attention to seams, corners, and areas around fixtures. Check for any signs of water penetration or leakage, and address any issues promptly before proceeding with the tile installation.
By following these steps, you'll effectively waterproof the shower walls, creating a secure and protective barrier that safeguards the underlying structure and ensures the integrity of your DIY tile shower. Proper waterproofing is a critical component of a successful tile installation and contributes to the overall performance and longevity of your finished shower.
Setting the Tile
Setting the tile is where the transformation of your DIY tile shower truly begins. This step requires precision, patience, and attention to detail to ensure a professional-looking result. Here's a comprehensive guide to help you navigate the process of setting the tile for your stunning DIY tile shower:
-
Prepare the Adhesive: Start by mixing the tile adhesive or thin-set mortar according to the manufacturer's instructions. Use a drill with a mixing attachment to achieve a smooth, lump-free consistency. Allow the adhesive to set for the specified time to reach the ideal tackiness for tile installation.
-
Begin with the Back Wall: It's often best to start tiling from the back wall of the shower. Apply a generous amount of adhesive to a small section of the wall using a notched trowel, ensuring even coverage. Work in manageable sections to prevent the adhesive from drying out before you can set the tile.
-
Set the First Tile: Carefully press the first tile into the adhesive, using a slight twisting motion to ensure a secure bond. Insert tile spacers between the tiles to maintain consistent spacing and create straight grout lines. Use a level to confirm that the tile is plumb and level before proceeding.
-
Continue Tiling: Working outward from the first tile, continue setting additional tiles, applying adhesive, and using spacers to maintain uniform spacing. Periodically check the alignment, level, and plumb of the tiles to ensure a professional finish. If necessary, use a tile cutter or wet saw to make precise cuts for edges, corners, and fixtures.
-
Address Niche and Bench Areas: When tiling around niches, benches, or other custom features, carefully measure and cut the tiles to fit the designated areas. Pay close attention to detail to ensure a seamless and professional-looking transition between the main shower walls and these specialized areas.
-
Allow for Adhesive Setting Time: After setting the tiles, allow the adhesive to set and cure according to the manufacturer's recommendations. This typically involves waiting for the adhesive to dry and achieve a firm bond with the tiles before proceeding to the grouting stage.
By following these steps, you'll effectively set the tile for your DIY tile shower, laying the foundation for a visually stunning and professionally finished project. The setting of the tile is a pivotal stage in the process, setting the stage for the final steps that will bring your DIY tile shower to life.
Grouting and Sealing
Once the tile setting process is complete, the next crucial step in creating a stunning DIY tile shower is grouting and sealing. Grout not only fills the spaces between the tiles but also plays a vital role in providing structural support and preventing moisture from seeping into the substrate. Additionally, sealing the grout and tile surfaces helps protect them from staining, water damage, and mold growth. Here's a detailed guide to effectively grouting and sealing your DIY tile shower:
-
Select the Right Grout: Choose a grout color and type that complements your tile and suits the environment of the shower. Opt for sanded grout for wider grout joints and unsanded grout for narrower joints or delicate tile materials. Consider using epoxy grout for its superior stain resistance and durability.
-
Prepare the Grout Mixture: Mix the grout according to the manufacturer's instructions, ensuring a smooth and lump-free consistency. Use a grout float to pack the grout into the joints, holding the float at a 45-degree angle to ensure thorough coverage.
-
Apply the Grout: Working in small sections, spread the grout over the tile surface, holding the float at a 45-degree angle to the tile. Use a sweeping motion to force the grout into the joints, ensuring they are completely filled. Remove excess grout from the tile surface by holding the float at a 90-degree angle and scraping diagonally across the tiles.
-
Clean the Grout: After allowing the grout to set for a specific period, typically 15-30 minutes, use a damp sponge to clean the excess grout from the tile surface. Rinse the sponge frequently and avoid using too much water, as this can weaken the grout. Once the initial cleaning is complete, allow the grout to dry for the recommended time before performing a final cleaning to remove any haze from the tile surface.
-
Seal the Grout and Tile: Once the grout has fully cured, apply a quality grout sealer to protect the grout from staining and moisture penetration. Use a small brush or roller to evenly apply the sealer to the grout lines, ensuring complete coverage. Additionally, if you're using natural stone or porous tiles, apply a suitable sealer to the tile surfaces to protect them from water damage and staining.
-
Allow for Proper Drying Time: After sealing the grout and tile, allow sufficient time for the sealer to dry and cure. This typically involves waiting 24-48 hours before exposing the shower to water or moisture. Proper drying time is essential to ensure that the grout and tile surfaces are fully protected and ready for use.
By following these steps, you'll effectively grout and seal your DIY tile shower, ensuring that the grout lines are secure, the tile surfaces are protected, and the overall project is visually stunning and long-lasting. Grouting and sealing are essential final touches that contribute to the functionality, durability, and aesthetic appeal of your finished DIY tile shower.
Finishing Touches and Maintenance
After completing the tiling, grouting, and sealing process, it's time to add the finishing touches that will elevate the visual appeal and functionality of your DIY tile shower. Additionally, understanding the essential maintenance practices will help preserve the beauty and integrity of your newly installed tile shower. Here's a detailed guide to the finishing touches and maintenance of your DIY tile shower:
Finishing Touches
-
Install Fixtures and Accessories: Once the tile and grout have fully set and cured, install the shower fixtures, such as the showerhead, handles, and any additional accessories. Choose fixtures and accessories that complement the style and design of your tile shower, adding both functionality and aesthetic appeal.
-
Apply Caulk: Use a high-quality, mold-resistant caulk to seal the joints and corners where the shower walls meet the floor and each other. Caulking these areas helps prevent water intrusion and ensures a watertight seal, contributing to the overall waterproofing of the shower.
-
Add a Shower Door or Curtain: Depending on your preference and the design of your shower, consider installing a glass shower door or a stylish shower curtain. Both options provide privacy and help contain water within the shower area, enhancing the functionality and visual appeal of the space.
-
Clean and Polish: Once all the components are in place, thoroughly clean the tile surfaces, grout lines, and fixtures to remove any residual grout haze, adhesive, or construction debris. Polish the tile to achieve a sparkling finish, ensuring that your DIY tile shower shines with beauty and cleanliness.
Maintenance
-
Regular Cleaning: Establish a routine for cleaning and maintaining your tile shower. Use a mild, non-abrasive cleaner to remove soap scum, mineral deposits, and grime from the tile and grout. Regular cleaning helps preserve the appearance of the tile and prevents the buildup of mold and mildew.
-
Inspect and Repair Grout: Periodically inspect the grout lines for any signs of damage, cracking, or discoloration. Address any issues promptly by repairing or regrouting the affected areas to prevent water infiltration and maintain the structural integrity of the tile installation.
-
Sealant Maintenance: If your grout and tile surfaces are sealed, monitor the condition of the sealant and reapply it as needed. Over time, the sealant may wear off, especially in high-traffic areas, requiring reapplication to ensure continued protection against staining and moisture.
-
Address Leaks and Damage: Keep an eye out for any signs of leaks, water damage, or deterioration in the shower area. Address any issues immediately to prevent further damage and maintain the structural integrity of the shower.
By attending to these finishing touches and implementing a proactive maintenance plan, you'll ensure that your DIY tile shower remains a stunning and functional feature of your home for years to come. Regular care and attention will preserve the beauty and longevity of your tile installation, allowing you to enjoy the luxurious oasis you've created in your bathroom.
Conclusion
Embarking on a DIY tile shower project is a rewarding endeavor that allows you to create a stunning and personalized feature in your home. By following the step-by-step guide outlined in this article, you can confidently plan, prepare, and execute the installation of a beautiful tile shower. From the initial planning and material gathering to the meticulous process of setting the tile, grouting, and sealing, each stage contributes to the creation of a visually striking and functional shower space.
The finishing touches, including the installation of fixtures, application of caulk, and regular cleaning, add the final polish to your DIY tile shower, ensuring that it not only looks exquisite but also functions seamlessly. Additionally, understanding the importance of ongoing maintenance and care will help preserve the beauty and integrity of your newly installed tile shower for years to come.
As you revel in the satisfaction of completing your DIY tile shower project, take pride in the fact that you've not only enhanced the aesthetics of your home but also added value and personalization to your living space. Whether you're a seasoned DIY enthusiast or a first-time tiler, the creation of a stunning tile shower is a testament to your creativity, dedication, and craftsmanship. With the right guidance and a commitment to quality, your DIY tile shower can become a standout feature that elevates the overall appeal of your home.