
Home>Create & Decorate>DIY & Crafts>How To Build A Casting Deck On A Fiberglass Boat
DIY & Crafts
How To Build A Casting Deck On A Fiberglass Boat
Published: February 29, 2024

Content Creator specializing in woodworking and interior transformations. Caegan's guides motivate readers to undertake their own projects, while his custom furniture adds a personal touch.
Learn how to build a casting deck on a fiberglass boat with this step-by-step DIY guide. Enhance your boat with these easy DIY & Crafts tips!
(Many of the links in this article redirect to a specific reviewed product. Your purchase of these products through affiliate links helps to generate commission for Twigandthistle.com, at no extra cost. Learn more)
Introduction
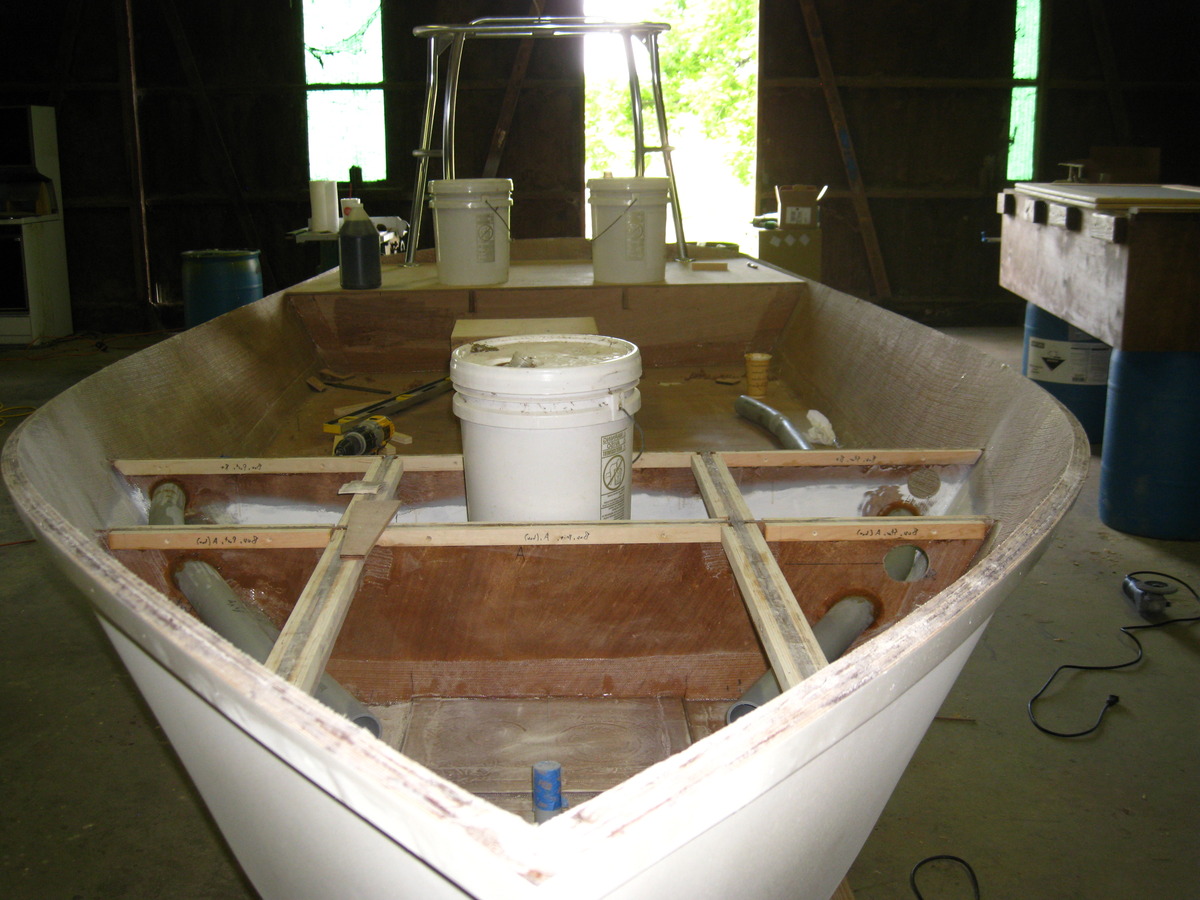
Building a casting deck on a fiberglass boat can significantly enhance your fishing experience by providing a stable platform for casting and reeling in your prized catch. Whether you're an avid angler or a recreational fisherman, having a well-constructed casting deck can make a world of difference in your on-the-water pursuits. In this comprehensive guide, we will walk you through the step-by-step process of creating a sturdy and functional casting deck on your fiberglass boat. From gathering the necessary materials and tools to the final installation of railing and accessories, we've got you covered.
A casting deck not only offers a dedicated space for fishing but also provides a vantage point for spotting fish and navigating through various water bodies. By following the instructions outlined in this guide, you'll be able to customize the casting deck to suit your specific needs and preferences. Whether you're aiming to create a compact deck for solo fishing trips or a more expansive one for accommodating multiple anglers, the process remains fundamentally the same.
With a focus on safety, durability, and practicality, this guide will equip you with the knowledge and skills needed to undertake this DIY project with confidence. By the end of this journey, you'll have transformed your fiberglass boat into a versatile and efficient fishing vessel, ready to tackle the waters with a professionally crafted casting deck. So, roll up your sleeves, gather your tools, and let's dive into the exciting world of building a casting deck on a fiberglass boat.
Step 1: Gather Materials and Tools
Before embarking on the construction of a casting deck on your fiberglass boat, it's crucial to gather all the necessary materials and tools. This step sets the foundation for a smooth and efficient building process, ensuring that you have everything at your disposal to bring your vision to life. Here's a comprehensive list of materials and tools you'll need for this project:
Materials:
- Marine-grade plywood or aluminum sheeting: This will serve as the primary decking material, providing a sturdy and durable surface for the casting deck.
- Pressure-treated lumber: Used for constructing support beams and framing the deck structure.
- Stainless steel or galvanized screws and bolts: These corrosion-resistant fasteners are essential for securing the deck and ensuring long-term structural integrity.
- Sealant or marine-grade adhesive: To weatherproof and secure the decking material to the boat's surface, preventing water intrusion and enhancing overall durability.
- Non-skid deck paint or traction pads: These materials add traction and prevent slippage on the deck, promoting safety during fishing activities.
Tools:
- Measuring tape and marking tools: Essential for accurately measuring and marking the deck area, ensuring precise cuts and installations.
- Circular saw or jigsaw: Used for cutting the plywood or aluminum sheeting to the desired dimensions, customizing the deck size according to your boat's layout.
- Drill and driver set: For drilling pilot holes, driving screws, and securing the deck components in place.
- Level and square: These tools are indispensable for ensuring that the deck structure is level, square, and aligned with the boat's contours.
- Safety gear: Personal protective equipment such as gloves, safety goggles, and a dust mask to safeguard yourself during the construction process.
By gathering these materials and tools, you'll be well-equipped to proceed with confidence to the next steps of measuring, cutting, and installing the support beams for your casting deck. With careful planning and attention to detail in this initial phase, you'll set the stage for a successful and rewarding DIY project that will elevate your fishing adventures on the water.
Step 2: Measure and Mark the Deck Area
The precision and accuracy of measuring and marking the deck area are pivotal to the successful construction of a casting deck on a fiberglass boat. This step sets the stage for the entire project, ensuring that the deck dimensions align seamlessly with the boat's contours and layout. Here's a detailed breakdown of the essential tasks involved in this critical phase:
Assess the Available Space:
Begin by carefully surveying the available space on your fiberglass boat where the casting deck will be installed. Take into account any existing features such as seating, storage compartments, or other structural elements that may impact the layout and size of the deck. By visualizing the placement of the deck within the boat's interior, you can determine the optimal dimensions and configuration for the casting platform.
Take Accurate Measurements:
Using a measuring tape, meticulously measure the length, width, and any irregularities in the designated deck area. It's crucial to account for any protrusions, curves, or obstructions that may influence the shape and size of the deck. By capturing precise measurements, you'll be able to tailor the casting deck to fit seamlessly within the available space, maximizing its functionality and aesthetic appeal.
Mark the Deck Layout:
Once the measurements are obtained, use marking tools such as chalk or painter's tape to outline the exact dimensions of the casting deck on the boat's surface. Pay close attention to the placement of support beams, access points, and any additional features that will be integrated into the deck structure. By clearly demarcating the deck layout, you'll establish a visual guide for the subsequent steps of cutting and installing the support framework.
Consider Ergonomics and Accessibility:
In addition to the basic measurements, consider the ergonomic aspects of the casting deck, ensuring that it provides ample space for angling activities while maintaining ease of movement within the boat. Factor in the placement of fishing chairs, rod holders, and storage compartments to optimize the functionality of the deck. Moreover, assess the accessibility of key areas such as hatches, compartments, and navigation controls to guarantee unimpeded operation and convenience on the water.
By meticulously measuring and marking the deck area with a keen eye for detail and functionality, you'll lay the groundwork for a well-designed and seamlessly integrated casting deck on your fiberglass boat. This meticulous approach sets the stage for the subsequent steps of cutting and installing support beams, bringing you one step closer to realizing your vision of an enhanced fishing experience on the water.
Step 3: Cut and Install Support Beams
With the deck area meticulously measured and marked, the next crucial phase involves cutting and installing the support beams to establish the foundational framework for the casting deck. This step is instrumental in ensuring the structural integrity and stability of the deck, providing a solid base for the decking material and accommodating the weight and movement of anglers during fishing activities.
Cutting the Support Beams
Using pressure-treated lumber selected for its durability and resistance to moisture, begin by measuring and cutting the beams to the specified lengths based on the deck layout. Employ a circular saw or a similar cutting tool to achieve precise and clean cuts, taking care to adhere to the designated measurements. It's essential to cut the beams with accuracy, accounting for any angles or contours in the boat's interior to facilitate a seamless fit and alignment.
Installing the Support Framework
Once the beams are cut to size, position them within the marked deck area, aligning them according to the layout plan. Secure the beams to the boat's structure using stainless steel or galvanized screws, ensuring a firm and stable attachment. It's imperative to verify that the support framework is level, square, and securely fastened to the boat, as this forms the backbone of the casting deck's structural integrity.
Reinforcing Load-Bearing Points
Pay special attention to reinforcing load-bearing points where the support beams intersect with the boat's hull or existing framework. By adding additional bracing or support brackets at these critical junctions, you can enhance the overall strength and load-bearing capacity of the deck structure, mitigating the risk of flexing or instability during use.
Ensuring Alignment and Stability
Throughout the installation process, use a level and square to verify the alignment and stability of the support beams, making any necessary adjustments to achieve a uniform and secure framework. By meticulously attending to these details, you'll create a solid foundation for the casting deck, setting the stage for the subsequent steps of laying down the decking material and finalizing the installation.
By meticulously executing the cutting and installation of support beams, you'll establish a robust and reliable framework for the casting deck, laying the groundwork for the next phases of the construction process. With the support structure in place, the project advances toward the exciting stages of laying down the decking material and adding the finishing touches to bring your vision of a functional and aesthetically pleasing casting deck to fruition.
Step 4: Lay Down the Decking Material
With the support framework securely in place, the focus now shifts to laying down the decking material, a pivotal step that defines the surface of the casting deck. Whether opting for marine-grade plywood or aluminum sheeting, the choice of decking material plays a crucial role in determining the deck's durability, aesthetics, and overall performance on the water.
Preparing the Decking Material
Before proceeding with the installation, ensure that the chosen decking material is cut to the precise dimensions required to fit the designated deck area. If using marine-grade plywood, consider applying a coat of sealant or marine-grade adhesive to the underside of the material to enhance its resistance to moisture and weathering. For aluminum sheeting, verify that the edges are smooth and free from any sharp protrusions that could pose a safety hazard.
Positioning and Securing the Decking
Carefully position the prepared decking material onto the support framework, aligning it with the marked layout and ensuring a snug fit within the deck area. Utilize stainless steel or galvanized screws to secure the decking material to the support beams, driving the fasteners at regular intervals to create a secure and uniform attachment. It's essential to maintain consistent spacing between the screws to promote even weight distribution and prevent warping or buckling of the decking material.
Enhancing Traction and Safety
To augment the safety and functionality of the casting deck, consider applying a non-skid deck paint or installing traction pads onto the surface of the decking material. These additions provide enhanced grip and stability, reducing the risk of slips and falls during fishing activities. By incorporating non-skid elements, you create a safer and more user-friendly environment for anglers, especially in wet or slippery conditions.
Customizing the Deck Layout
As the decking material is secured in place, take the opportunity to customize the deck layout to accommodate additional features such as integrated storage compartments, access hatches, or specialized mounting points for fishing equipment. By tailoring the deck layout to suit your specific fishing needs, you can optimize the functionality and convenience of the casting deck, creating a personalized space that enhances your on-the-water experiences.
Verifying Structural Integrity
Upon completing the installation of the decking material, conduct a thorough inspection to ensure that the surface is securely fastened, free from any protruding screws or sharp edges, and exhibits uniform stability. Verify that the decking material aligns seamlessly with the boat's contours and integrates harmoniously with the support framework, signifying a well-executed installation that forms the foundation for the final phase of the casting deck construction.
By meticulously laying down the decking material with precision and attention to detail, you establish a solid and functional surface for the casting deck, bringing you one step closer to realizing your vision of a versatile and reliable fishing platform on your fiberglass boat. With the decking material securely in place, the project advances toward the final steps of installing railing and accessories, culminating in the transformation of your boat into a purpose-built vessel tailored to your angling pursuits.
Step 5: Secure the Decking Material
Once the decking material is positioned onto the support framework, the next critical task is to secure it in place to ensure a stable and reliable casting deck. This step involves the meticulous fastening of the decking material to the support beams, creating a solid and uniform surface that can withstand the rigors of fishing activities on the water.
Using stainless steel or galvanized screws, carefully drive the fasteners through the decking material and into the support beams at regular intervals. It's essential to maintain consistent spacing between the screws to promote even weight distribution and prevent any potential warping or buckling of the decking material over time. By securing the decking material with precision and attention to detail, you establish a robust and dependable surface that forms the foundation of the casting deck.
As you drive the screws into place, ensure that they are flush with the surface of the decking material, minimizing any protrusions that could pose a safety hazard or detract from the deck's aesthetics. Additionally, verify that the screws penetrate the support beams securely, creating a firm and reliable attachment that withstands the forces exerted during fishing activities.
Throughout the fastening process, maintain a keen eye for consistency and uniformity, striving to create a seamless and level surface that enhances the overall functionality and visual appeal of the casting deck. By adhering to best practices in fastening the decking material, you contribute to the structural integrity and longevity of the deck, ensuring that it remains a steadfast platform for countless fishing adventures.
As the final screws are driven into place, conduct a comprehensive inspection of the secured decking material, verifying that it exhibits uniform stability and a secure attachment to the support framework. Address any potential issues such as loose fasteners or uneven surfaces, rectifying them to achieve a flawless and dependable casting deck surface.
By meticulously securing the decking material with precision and care, you solidify the foundation of the casting deck, bringing you one step closer to the completion of this rewarding DIY project. With the decking material firmly in place, the project advances toward the final phase of installing railing and accessories, marking the culmination of your efforts in creating a purpose-built fishing platform on your fiberglass boat.
Step 6: Install Railing and Accessories
With the decking material securely in place, the installation of railing and accessories represents the final phase in transforming your fiberglass boat into a fully functional and customized fishing vessel. This step involves the strategic placement of railing systems, fishing rod holders, and other accessories that enhance the safety, convenience, and utility of the casting deck.
Installing Railing Systems
Begin by selecting marine-grade railing components designed to withstand the harsh marine environment while providing essential safety features for the casting deck. Position the railing sections along the perimeter of the deck, ensuring that they align with the boat's contours and layout. Secure the railing posts to the support framework using corrosion-resistant fasteners, creating a sturdy and reliable boundary that enhances the safety of anglers while on the deck. Verify that the railing system complies with relevant safety standards and regulations, providing a secure enclosure without obstructing access to key areas of the boat.
Mounting Fishing Rod Holders
Strategically mount fishing rod holders at designated locations on the casting deck, optimizing accessibility and convenience for anglers. Whether opting for flush-mounted rod holders or adjustable clamp-on varieties, ensure that they are positioned to accommodate different fishing techniques and rod lengths. By integrating rod holders into the deck layout, you create a dedicated space for securely storing fishing rods, promoting an organized and efficient angling experience. Verify that the rod holders are securely fastened and aligned to facilitate easy access and retrieval of fishing equipment during active fishing sessions.
Customizing Storage Compartments
Consider integrating specialized storage compartments or tackle organizers into the casting deck, providing a practical solution for stowing fishing gear, bait, and other essentials. Custom-built storage units can be tailored to fit within the deck layout, maximizing available space while maintaining a streamlined and clutter-free environment. By incorporating storage solutions into the deck design, you optimize the functionality and convenience of the casting deck, ensuring that essential fishing equipment is readily accessible without impeding the fishing experience.
Enhancing Lighting and Accessibility
To further elevate the functionality of the casting deck, consider installing marine-grade LED lighting fixtures to illuminate the deck area during low-light conditions. Additionally, assess the accessibility of key areas such as access hatches, anchor storage, and navigation controls, ensuring unobstructed operation and convenience for the boat's occupants. By enhancing the lighting and accessibility features, you create a versatile and user-friendly environment that accommodates a range of fishing scenarios and environmental conditions.
By meticulously installing railing systems, fishing rod holders, and other accessories, you culminate the construction of a purpose-built casting deck that caters to the diverse needs of anglers. With a focus on safety, convenience, and practicality, the installation of these components adds the finishing touches to your fiberglass boat, transforming it into a well-equipped and customized fishing platform ready to embark on countless memorable fishing expeditions.
Conclusion
In conclusion, the process of building a casting deck on a fiberglass boat represents a transformative journey that culminates in the creation of a versatile, purpose-built fishing platform. From the initial stages of gathering materials and tools to the final installation of railing systems and accessories, every step in this DIY project contributes to the enhancement of the boat's functionality and the angler's overall fishing experience.
By meticulously measuring and marking the deck area, cutting and installing support beams, and laying down the decking material, the foundation of the casting deck is established with precision and attention to detail. The secure fastening of the decking material ensures a stable and reliable surface, setting the stage for the integration of essential features that elevate the deck's safety and convenience.
The installation of railing systems not only enhances safety but also defines the boundaries of the casting deck, providing a secure enclosure without compromising accessibility. The strategic placement of fishing rod holders and customized storage compartments optimizes the organization and accessibility of fishing gear, contributing to a streamlined and efficient angling environment. Additionally, the incorporation of marine-grade LED lighting and considerations for accessibility further enhance the functionality and versatility of the casting deck, catering to a diverse range of fishing scenarios and environmental conditions.
Ultimately, the completion of a well-crafted casting deck on a fiberglass boat represents the realization of a vision—a vision of a purpose-built fishing vessel tailored to the unique preferences and requirements of the angler. Whether embarking on solo fishing expeditions or accommodating fellow anglers, the casting deck serves as a reliable and adaptable platform that enhances the joy and satisfaction of fishing on the water.
As the final screws are driven into place and the last accessories are meticulously installed, the fiberglass boat undergoes a remarkable transformation, emerging as a fully equipped and customized fishing vessel ready to navigate diverse water bodies and facilitate memorable angling experiences. The casting deck stands as a testament to the ingenuity and dedication of the DIY enthusiast, embodying the fusion of craftsmanship, functionality, and the pursuit of angling excellence.