
Home>Create & Decorate>DIY & Crafts>Pondless Waterfall: A DIY Guide To Creating A Serene Oasis In Your Backyard
DIY & Crafts
Pondless Waterfall: A DIY Guide To Creating A Serene Oasis In Your Backyard
Published: April 23, 2024

Senior Editor in Create & Decorate, Kathryn combines traditional craftsmanship with contemporary trends. Her background in textile design and commitment to sustainable crafts inspire both content and community.
Transform your backyard into a tranquil retreat with our DIY guide to building a stunning pondless waterfall. Discover expert tips and step-by-step instructions for creating your serene oasis. Ideal for DIY & Crafts enthusiasts.
(Many of the links in this article redirect to a specific reviewed product. Your purchase of these products through affiliate links helps to generate commission for Twigandthistle.com, at no extra cost. Learn more)
Introduction
Are you looking to add a touch of tranquility and beauty to your backyard? A pondless waterfall might just be the perfect addition to create a serene oasis right in your own outdoor space. In this DIY guide, we will walk you through the steps to create your very own pondless waterfall, allowing you to enjoy the soothing sounds of flowing water without the maintenance and safety concerns of a traditional pond. Whether you're a seasoned DIY enthusiast or a beginner looking for a rewarding project, building a pondless waterfall can be a fulfilling and enjoyable endeavor. So, let's dive in and discover how to bring the peaceful ambiance of a waterfall to your backyard!
Benefits of a Pondless Waterfall
-
Low Maintenance: Unlike traditional ponds, pondless waterfalls require minimal maintenance, making them an ideal choice for homeowners looking to add a water feature without the hassle of constant upkeep.
-
Safety: With no open body of water, pondless waterfalls are a safer option, especially for families with young children or pets. You can enjoy the beauty of a waterfall without worrying about potential safety hazards.
-
Space-Saving: Pondless waterfalls are perfect for smaller yards or outdoor spaces where a full-sized pond might not be feasible. Their compact design allows you to enjoy the sights and sounds of a waterfall without taking up a large area.
-
Aesthetic Appeal: Adding a pondless waterfall can enhance the visual appeal of your backyard, creating a focal point that adds a touch of natural beauty and tranquility to your outdoor environment.
-
Soothing Sounds: The gentle, relaxing sound of flowing water can provide a calming atmosphere, helping to reduce stress and create a peaceful ambiance in your backyard.
-
Wildlife Attraction: While pondless waterfalls don't support fish or other aquatic life, they can still attract birds and other wildlife, adding an extra element of nature to your outdoor space.
-
Property Value: A well-designed pondless waterfall can increase the overall value of your property, making it an attractive feature for potential buyers if you ever decide to sell your home.
Incorporating a pondless waterfall into your backyard offers a range of benefits, from low maintenance and safety to aesthetic appeal and property value. Now that you understand the advantages, let's move on to planning and creating your own DIY pondless waterfall.
Planning Your DIY Pondless Waterfall
Before you start digging or gathering materials, it's crucial to plan out your pondless waterfall project. Here are the key steps to consider as you embark on this exciting DIY endeavor:
-
Design and Layout: Begin by envisioning the overall design and layout of your pondless waterfall. Consider the natural flow of water and how it will fit into your existing landscape. Sketch out a rough design or use design software to visualize the placement and size of the waterfall.
-
Budget and Materials: Determine your budget for the project and make a list of materials you'll need. This may include rocks, gravel, pond liner, a submersible pump, tubing, and landscaping materials. Research the cost of these items and create a budget that aligns with your financial resources.
-
Permits and Regulations: Check with your local municipality or homeowner's association to see if there are any permits or regulations regarding the installation of a pondless waterfall. Some areas may have specific guidelines for water features, so it's essential to be aware of any requirements before you begin.
-
Time and Labor: Assess the amount of time and labor you can dedicate to the project. Building a pondless waterfall can be a rewarding but labor-intensive task, so it's important to realistically evaluate your availability and enlist help if needed.
-
Water Source and Drainage: Consider the water source for your waterfall and how you'll manage drainage. You'll need access to a water supply for the pump, and proper drainage is essential to prevent water from pooling in unwanted areas.
-
Safety Considerations: Think about safety aspects such as the depth of the reservoir, the stability of rocks, and the placement of electrical components. Ensuring that your pondless waterfall is safe for both humans and wildlife is paramount.
By carefully planning each aspect of your pondless waterfall project, you'll set the stage for a successful and enjoyable DIY experience. Once you've thoroughly planned and prepared, you can move on to the exciting phase of bringing your vision to life in your backyard oasis.
Choosing the Right Location
Selecting the ideal location for your pondless waterfall is a crucial step in the planning process. Here's how to choose the right spot for your serene oasis:
-
Natural Slope: Look for a natural slope in your yard where the water can flow downhill, creating a more natural-looking waterfall. Utilizing the existing topography can save time and effort in excavation and landscaping.
-
Visibility: Consider the visibility of the waterfall from your home and outdoor living spaces. You'll want to position it where you can enjoy the sight and sound of the waterfall, whether you're relaxing on your patio or looking out from inside your home.
-
Proximity to Utilities: Ensure that the chosen location is within reach of a power source for the pump. It's also essential to consider the proximity to a water source for filling the reservoir and topping up the water level as needed.
-
Landscaping Integration: Think about how the waterfall will integrate with your existing landscaping. The surrounding plants, trees, and hardscape features should complement the waterfall, creating a harmonious and natural-looking environment.
-
Sunlight Exposure: Take note of the sunlight exposure in the chosen area. Some plants and aquatic features may require specific light conditions, so consider how the sunlight patterns will affect the overall ecosystem around the waterfall.
-
Accessibility: Ensure that the location is easily accessible for maintenance and care. You'll need to access the pump, reservoir, and other components for occasional cleaning and upkeep, so choose a spot that allows for convenient maintenance.
By carefully considering these factors, you can select a location that not only enhances the beauty of your outdoor space but also ensures the practicality and functionality of your pondless waterfall. Once you've chosen the perfect spot, you can move on to the next steps of gathering materials and tools for your DIY project.
Gathering Materials and Tools
When it comes to creating your own pondless waterfall, having the right materials and tools is essential for a successful and efficient DIY project. Here's a comprehensive list of what you'll need to gather before you start building your serene oasis:
Materials
- Pond Liner: Choose a durable, fish-safe pond liner that is large enough to accommodate the size of your waterfall structure.
- Rocks and Boulders: Select a variety of rocks and boulders in different shapes and sizes to create a natural-looking waterfall. Consider using a mix of flat stones for the waterfall spillway and larger rocks for the surrounding landscape.
- Pond Underlayment: This protective layer goes under the pond liner to cushion and protect it from sharp objects and roots.
- Reservoir Basin: A sturdy reservoir basin will hold the water and house the pump. Ensure that it is large enough to accommodate the water volume needed for your waterfall.
- Submersible Pump: Choose a pump that is suitable for the size and flow rate of your waterfall. Consider a pump with a built-in flow control feature for easy adjustment.
- Flexible Tubing: You'll need tubing to connect the pump to the waterfall spillway, allowing water to flow from the reservoir to the top of the waterfall.
- Gravel and Aquatic Plants: Use gravel to cover the reservoir basin and create a natural-looking bed for aquatic plants. Select a variety of water-loving plants to enhance the beauty of your waterfall and provide habitat for wildlife.
Tools
- Shovel and Digging Tools: Prepare for excavation by having a sturdy shovel, spade, and digging tools to create the reservoir and waterfall structure.
- Level: A level will help ensure that the waterfall structure is built on a stable and even surface, preventing water from cascading unevenly.
- Utility Knife: Use a sharp utility knife for cutting and trimming the pond liner and underlayment to fit the dimensions of your waterfall.
- Gloves and Safety Gear: Protect your hands with gloves and wear appropriate safety gear, especially when handling heavy rocks and working with the pump and electrical components.
- Measuring Tape: Accurate measurements are crucial for ensuring the proper fit of the pond liner, reservoir basin, and other components.
- Landscape Fabric: Use landscape fabric to line the reservoir basin and prevent soil and debris from entering the water, helping to maintain water clarity.
By gathering these materials and tools, you'll be well-equipped to begin the construction of your pondless waterfall. With everything in place, you can move on to the exciting phase of building the waterfall structure and bringing your backyard oasis to life.
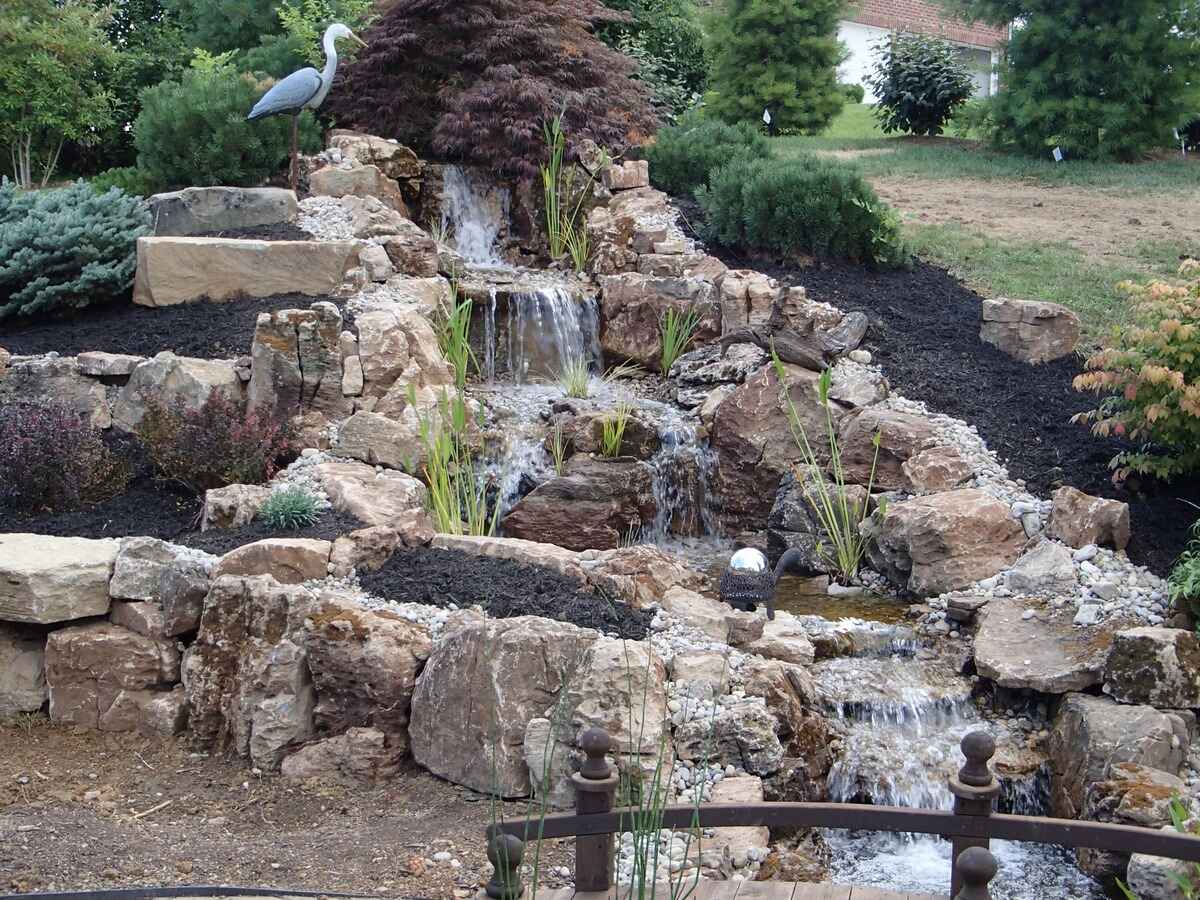
Building the Waterfall Structure
Building the waterfall structure is a pivotal phase in creating your pondless waterfall. This is where the visual and auditory centerpiece of your serene oasis takes shape. Here's a step-by-step guide to constructing the waterfall structure:
-
Excavation: Begin by excavating the area where the waterfall will be located. Dig a hole for the reservoir basin, ensuring that it is deep enough to accommodate the pump and provide sufficient water storage. Create a shallow trench for the tubing that will connect the pump to the waterfall spillway.
-
Positioning Rocks: Place the larger rocks and boulders around the perimeter of the reservoir basin, creating a natural-looking landscape for the waterfall. These rocks will also serve as the foundation for the waterfall spillway.
-
Creating the Spillway: Arrange flat stones or a pre-formed spillway unit at the top of the rock formation to create the spillway where the water will flow over. Ensure that the spillway is level and securely positioned to direct the water flow effectively.
-
Stacking Rocks: Stack additional rocks and boulders behind the spillway to create the cascading effect of the waterfall. Gradually build up the height and stagger the rocks to create a visually appealing and natural-looking waterfall structure.
-
Securing the Rocks: As you stack the rocks, use a combination of smaller stones and gravel to fill in gaps and secure the larger rocks in place. This will help maintain the stability of the waterfall structure and ensure that water flows smoothly over the rocks.
-
Testing the Flow: Before finalizing the positioning of the rocks, test the flow of water through the pump and tubing to ensure that it cascades over the spillway in the desired manner. Make any necessary adjustments to the rock placement to optimize the visual and auditory impact of the waterfall.
-
Finishing Touches: Once the waterfall structure is in place, add decorative gravel and natural elements to enhance the overall aesthetic. Consider incorporating aquatic plants, such as water lilies or ferns, to soften the edges of the reservoir basin and add a touch of greenery to the waterfall environment.
By following these steps, you can create a stunning and natural-looking waterfall structure that serves as the focal point of your pondless oasis. With the waterfall structure completed, you're one step closer to enjoying the soothing sights and sounds of your backyard retreat.
Installing the Pump and Water Reservoir
Installing the pump and water reservoir is a critical step in bringing your pondless waterfall to life. Here's a detailed guide on how to properly install these essential components:
-
Positioning the Reservoir: Place the reservoir basin in the excavated hole, ensuring that it sits level and stable. The reservoir should be positioned to receive the water pumped from the bottom and distribute it to the top of the waterfall structure.
-
Adding the Submersible Pump: Lower the submersible pump into the bottom of the reservoir, making sure it is securely positioned and level. Connect the flexible tubing to the outlet of the pump, which will carry the water from the reservoir to the top of the waterfall.
-
Securing the Pump and Tubing: Use rocks or bricks to secure the pump in place at the bottom of the reservoir, preventing it from shifting or moving during operation. Lay the tubing in the trench previously created, ensuring it is free from kinks or bends that could impede water flow.
-
Concealing the Components: Once the pump and tubing are in place, cover them with a layer of gravel to conceal the components and create a natural-looking bed for the water feature. This also helps to protect the pump and tubing from debris and sunlight exposure.
-
Filling the Reservoir: Fill the reservoir with water, ensuring that the pump is fully submerged. Test the pump to ensure that water is being circulated effectively from the reservoir to the top of the waterfall structure.
-
Adjusting the Flow: Most submersible pumps have a flow control feature that allows you to adjust the rate of water flow. Fine-tune the flow to achieve the desired cascading effect, ensuring that the water moves smoothly over the spillway and creates the soothing sounds of a natural waterfall.
-
Electrical Connections: If the pump requires an electrical connection, ensure that it is safely and securely connected to a power source. Use outdoor-rated extension cords or electrical outlets equipped with ground fault circuit interrupters (GFCIs) for added safety.
By following these steps, you can effectively install the pump and water reservoir, ensuring that your pondless waterfall operates seamlessly and provides the tranquil ambiance you desire in your backyard oasis. With the pump and reservoir in place, your DIY pondless waterfall is well on its way to becoming a captivating focal point in your outdoor space.
Adding Natural Elements and Landscaping
Once the foundational elements of your pondless waterfall are in place, it's time to enhance the natural beauty of the environment with carefully selected natural elements and thoughtful landscaping. Here's how to elevate the visual appeal and ecological balance of your backyard oasis:
Aquatic Plants
Introducing a variety of aquatic plants can soften the edges of the reservoir basin and contribute to the overall aesthetic of the waterfall environment. Consider incorporating water lilies, lotus, water irises, or floating plants to add texture, color, and vibrancy to the water feature. These plants not only enhance the visual appeal but also provide habitat and food sources for wildlife, contributing to the ecological balance of the ecosystem.
Surrounding Vegetation
Incorporating native plants and shrubs around the pondless waterfall can seamlessly integrate the water feature into the existing landscape. Choose plants that thrive in moist conditions and complement the natural surroundings. Utilize a mix of foliage, flowering plants, and ground cover to create a lush and inviting backdrop for the waterfall, enhancing the overall ambiance of your outdoor space.
Natural Rock Accents
Enhance the visual impact of the waterfall by strategically placing natural rock accents around the surrounding area. Use smaller rocks and boulders to create a naturalistic transition from the waterfall to the adjacent landscape. This not only adds visual interest but also helps to anchor the waterfall within the broader context of your outdoor environment, creating a cohesive and harmonious natural setting.
Mulch and Ground Cover
Applying a layer of mulch or ground cover around the base of the waterfall structure can help retain moisture, suppress weed growth, and provide a polished finish to the landscaping. Choose a natural mulch material or ground cover that complements the overall design and color scheme of your outdoor space, creating a cohesive and well-maintained appearance.
Wildlife Habitat
Incorporating natural elements that attract and support wildlife can further enrich the ecological diversity of your pondless waterfall. Consider adding bird feeders, nesting boxes, or butterfly-attracting plants to encourage the presence of wildlife in your outdoor environment. Creating a welcoming habitat for birds, butterflies, and other beneficial creatures adds an extra dimension of natural beauty and vitality to your backyard oasis.
By thoughtfully adding these natural elements and landscaping features, you can elevate the visual appeal, ecological balance, and overall charm of your pondless waterfall. The careful integration of natural elements enhances the authenticity and allure of your outdoor space, creating a captivating and harmonious environment for you to enjoy and appreciate.
Maintenance and Care Tips
Maintaining your pondless waterfall is essential to ensure its longevity, functionality, and visual appeal. Here are some key maintenance and care tips to keep your serene oasis in optimal condition:
-
Regular Cleaning: Schedule routine cleaning sessions to remove debris, leaves, and algae that may accumulate in the reservoir and on the rocks. Use a pond net or skimmer to gently remove any surface debris, and consider using a pond vacuum to clean the reservoir basin and remove sediment buildup.
-
Water Quality Management: Monitor the water quality of your pondless waterfall to prevent the buildup of algae and maintain clear, clean water. Consider using natural water treatments or beneficial bacteria to help balance the ecosystem and keep the water free from excessive algae growth.
-
Pump Maintenance: Inspect the submersible pump regularly to ensure it is functioning properly. Clean the pump intake to remove any debris that may obstruct water flow, and check the pump's impeller and housing for any signs of wear or damage.
-
Seasonal Adjustments: Make seasonal adjustments to your pondless waterfall, such as reducing water flow during colder months to prevent freezing or adjusting the flow rate to accommodate changes in plant growth and water evaporation during warmer seasons.
-
Plant Care: If you have incorporated aquatic plants into your waterfall environment, maintain their health by trimming dead foliage, fertilizing as needed, and dividing overgrown plants to promote healthy growth and vibrant blooms.
-
Rock and Landscape Maintenance: Inspect the rocks and boulders of your waterfall structure for stability and reposition any displaced stones as needed. Additionally, refresh the surrounding landscaping by replenishing mulch, pruning vegetation, and maintaining a tidy and well-groomed appearance.
-
Inspect Electrical Components: Regularly inspect the electrical connections, especially if your submersible pump requires an electrical power source. Ensure that all connections are secure, and look for any signs of wear or damage to cords and outlets.
-
Winter Preparations: If you experience freezing temperatures in your region, take precautions to winterize your pondless waterfall. This may include draining the reservoir, removing the pump for storage, and protecting vulnerable plants from frost damage.
-
Professional Maintenance: Consider scheduling periodic professional maintenance and inspection of your pondless waterfall, especially for tasks such as pump servicing, water quality testing, and overall system evaluation.
By implementing these maintenance and care tips, you can preserve the beauty and functionality of your pondless waterfall, ensuring that it continues to provide a serene and captivating oasis in your backyard for years to come. Regular attention and thoughtful care will help you enjoy the soothing sights and sounds of your waterfall while maintaining a healthy and balanced ecosystem within your outdoor space.
Enjoying Your Serene Oasis
Now that your DIY pondless waterfall is complete and thriving, it's time to bask in the tranquil ambiance and reap the rewards of your labor. Here's how you can fully embrace and enjoy the serene oasis you've created in your backyard:
-
Relaxation and Meditation: Find moments of peace and relaxation by sitting near your pondless waterfall. The gentle sounds of flowing water can provide a soothing backdrop for meditation, reading, or simply unwinding after a long day.
-
Outdoor Entertaining: Your pondless waterfall serves as a captivating focal point for outdoor gatherings. Whether hosting a small gathering or a festive celebration, the waterfall adds a touch of natural beauty and serenity to your outdoor entertainment space.
-
Wildlife Observation: Observe the wildlife that your pondless waterfall attracts. From birds taking a refreshing dip to butterflies fluttering around the aquatic plants, your waterfall can become a hub of natural activity, offering a delightful opportunity for wildlife watching.
-
Therapeutic Benefits: The calming effects of a pondless waterfall can have therapeutic benefits. The soothing sounds of flowing water can help reduce stress, promote relaxation, and create a peaceful atmosphere, providing a natural form of stress relief.
-
Visual Enjoyment: Take time to appreciate the visual allure of your pondless waterfall. The interplay of light and water, the vibrant colors of aquatic plants, and the natural rock formations all contribute to a visually captivating and dynamic outdoor feature.
-
Educational Opportunities: If you have children, your pondless waterfall can serve as an educational tool. Teach them about the water cycle, the importance of conservation, and the diverse ecosystem that can thrive around a water feature.
-
Photography and Artistry: Capture the beauty of your pondless waterfall through photography or artistic expression. The ever-changing play of light, water, and nature provides endless inspiration for creative endeavors.
-
Year-Round Enjoyment: With proper maintenance and care, your pondless waterfall can be enjoyed throughout the year. Whether it's the vibrant blooms of spring, the lush greenery of summer, the fiery foliage of autumn, or the serene tranquility of a winter landscape, your waterfall offers year-round visual and sensory delight.
By embracing these opportunities to enjoy and appreciate your pondless waterfall, you can fully immerse yourself in the natural beauty and peaceful ambiance it brings to your outdoor space. Whether seeking relaxation, entertainment, or inspiration, your serene oasis is a testament to the rewarding nature of DIY home improvement projects.