
Home>Create & Decorate>DIY & Crafts>DIY Deer Feeder: How To Build Your Own Wildlife Feeding Station
DIY & Crafts
DIY Deer Feeder: How To Build Your Own Wildlife Feeding Station
Published: June 11, 2024

Senior Editor in Create & Decorate, Kathryn combines traditional craftsmanship with contemporary trends. Her background in textile design and commitment to sustainable crafts inspire both content and community.
Learn how to create a DIY deer feeder for your backyard with our step-by-step guide. Build your own wildlife feeding station with our easy DIY & Crafts tutorial.
(Many of the links in this article redirect to a specific reviewed product. Your purchase of these products through affiliate links helps to generate commission for Twigandthistle.com, at no extra cost. Learn more)
Introduction
Are you a nature enthusiast looking to attract wildlife to your property? Building your own deer feeder can be a rewarding and fulfilling project that not only benefits the local wildlife but also provides you with the opportunity to observe these majestic creatures up close. In this article, we will guide you through the process of creating your very own wildlife feeding station, specifically designed to attract and nourish deer. Whether you're a seasoned DIYer or a novice looking for a new project, constructing a deer feeder can be a fun and practical way to enhance your outdoor space. So, let's dive in and explore the world of DIY wildlife feeding stations!
Benefits of Building Your Own Deer Feeder
Building your own deer feeder offers a multitude of benefits, both for the wildlife and for you as the creator. Here are some compelling reasons to embark on this DIY project:
-
Cost-Effective: Constructing your own deer feeder can be a cost-effective alternative to purchasing a pre-made one. By using readily available materials and your own labor, you can save money while still providing a valuable resource for local wildlife.
-
Customization: When you build your own deer feeder, you have the freedom to customize it to suit your specific needs and preferences. You can tailor the size, design, and features of the feeder to best accommodate the deer population in your area.
-
Educational Opportunity: For DIY enthusiasts, building a deer feeder presents an educational opportunity to learn about wildlife behavior, habitat requirements, and the importance of conservation. It can also be a great project to involve children and teach them about the natural world.
-
Wildlife Observation: By attracting deer to your property with a well-placed feeder, you create the opportunity to observe these graceful creatures up close. This can be a rewarding and educational experience for nature lovers and wildlife enthusiasts.
-
Contribution to Conservation: Providing a reliable food source for deer can contribute to their overall health and well-being, especially during harsh weather conditions or periods of food scarcity. By building a deer feeder, you play a role in supporting the local wildlife population.
-
Enhanced Outdoor Experience: A strategically placed deer feeder can enhance your outdoor experience by bringing the beauty of nature closer to home. Whether you enjoy hunting, photography, or simply appreciating the natural world, a deer feeder can enrich your outdoor activities.
In summary, building your own deer feeder offers a range of benefits, from cost savings and customization to educational opportunities and wildlife conservation. It's a project that can bring you closer to nature while making a positive impact on the local deer population.
Choosing the Right Location for Your Wildlife Feeding Station
Selecting the optimal location for your wildlife feeding station is crucial to its effectiveness and the safety of the visiting deer. Here are some key considerations to keep in mind when choosing the right spot for your DIY deer feeder:
-
Proximity to Cover: Deer feel most comfortable when they have nearby cover to retreat to after feeding. Choose a location that is within a reasonable distance from wooded areas, brush, or other natural cover where deer can seek refuge.
-
Accessibility: Ensure that the chosen location is easily accessible for both you, for maintenance and refilling, and the deer, for feeding. Avoid placing the feeder in areas with difficult terrain or obstacles that could deter deer from approaching.
-
Visibility: Position the feeder in a location that allows for easy observation. Whether you're interested in wildlife photography or simply enjoy watching deer, a visible location will enhance your ability to appreciate the visiting wildlife.
-
Safety: Prioritize the safety of the deer by avoiding areas with high human or vehicular traffic. Placing the feeder in a secluded spot can minimize the risk of disturbance and potential harm to the deer.
-
Wind Direction: Consider the prevailing wind direction in your area when choosing the location for your deer feeder. Placing the feeder downwind from the direction of approach can help minimize the chances of deer detecting human scent and feeling wary.
-
Legal Considerations: Be aware of any local regulations or restrictions regarding wildlife feeding on your property. Some areas may have specific guidelines or prohibitions related to feeding wildlife, so it's important to be informed and compliant.
By carefully considering these factors, you can select a suitable location for your wildlife feeding station that promotes the well-being of the deer and enhances your overall experience of observing and interacting with local wildlife.
Materials and Tools Needed
Before embarking on the construction of your DIY deer feeder, it's essential to gather all the necessary materials and tools. Here's a comprehensive list of what you'll need to bring your wildlife feeding station to life:
Materials:
- Wood: Select sturdy and weather-resistant wood for the construction of the feeder. Cedar or pressure-treated lumber are excellent choices due to their durability and resistance to decay.
- Screws and Nails: Stock up on an assortment of screws and nails in various sizes to secure the components of the feeder.
- PVC Pipe: A length of PVC pipe will be used to create the feeding trough for the deer. Ensure it is wide enough to accommodate the deer comfortably.
- Hinges and Latches: These will be essential for the access door of the feeder, allowing for easy refilling and maintenance.
- Roofing Material: To protect the feed from the elements, you'll need roofing material such as metal or shingles to cover the top of the feeder.
- Wood Glue: Opt for a weatherproof wood glue to reinforce the joints and connections of the feeder.
- Wood Stain or Sealant: Applying a protective stain or sealant will help prolong the life of the feeder by shielding it from moisture and UV exposure.
Tools:
- Circular Saw or Miter Saw: A saw will be necessary for cutting the wood to the required dimensions.
- Drill and Bits: A drill with a selection of bits for pilot holes and screw-driving will be indispensable for assembling the feeder.
- Measuring Tape and Square: Accurate measurements and square angles are crucial for constructing a sturdy and functional feeder.
- Screwdriver and Hammer: Basic hand tools for driving screws and nails into place.
- Paintbrushes: If you plan to apply wood stain or sealant, having a few paintbrushes on hand will be essential for the finishing touches.
- Safety Gear: Don't forget to prioritize safety by wearing protective gear such as goggles, gloves, and a dust mask when working with wood and power tools.
By ensuring you have all the necessary materials and tools at your disposal, you'll be well-prepared to tackle the construction of your DIY deer feeder with confidence and efficiency.
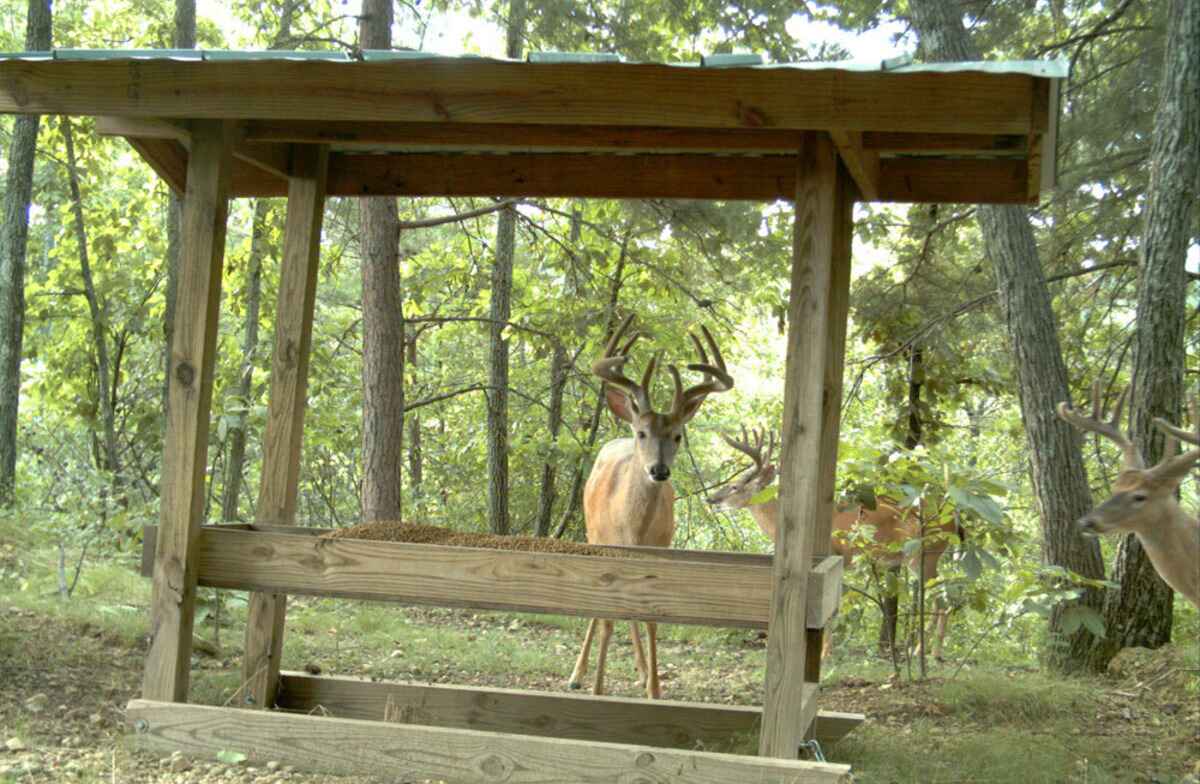
Step-by-Step Instructions for Building Your DIY Deer Feeder
Now that you have gathered all the necessary materials and tools, it's time to dive into the step-by-step process of constructing your DIY deer feeder. Follow these detailed instructions to bring your wildlife feeding station to life:
-
Prepare the Materials: Begin by laying out all the materials and tools in a well-ventilated workspace. Ensure that you have a clear and level area to work on, with ample space to maneuver the wood and tools.
-
Cut the Wood: Use a circular saw or miter saw to cut the wood to the required dimensions. You will need to create panels for the sides, base, roof, and access door of the feeder. Take accurate measurements and use a square to ensure precise cuts.
-
Assemble the Frame: Start by assembling the frame of the feeder using the pre-cut wood panels. Use screws and wood glue to secure the corners and joints, creating a sturdy and stable structure.
-
Install the Feeding Trough: Cut the PVC pipe to the desired length, ensuring that it provides enough space for the deer to access the feed comfortably. Attach the PVC pipe inside the feeder to create the feeding trough, using screws or brackets to hold it in place.
-
Add the Roof: Install the roofing material over the top of the feeder to provide protection from the elements. Whether you opt for metal roofing or shingles, ensure that it is securely attached to prevent water from seeping into the feeder.
-
Attach the Access Door: Install hinges and a latch to create an access door for the feeder. This will allow for easy refilling of the feed and maintenance of the interior components. Ensure that the door is secure but can be easily opened when needed.
-
Apply Wood Finish: If desired, apply a weatherproof wood stain or sealant to the exterior of the feeder. This will help protect the wood from moisture, UV exposure, and insect damage, prolonging the life of the feeder.
-
Position the Feeder: Once the construction is complete, carefully position the feeder in the chosen location, taking into account the proximity to cover, visibility, and safety considerations for the visiting deer.
-
Fill the Feeder: Finally, fill the feeder with an appropriate deer feed, such as corn or specially formulated deer pellets. Monitor the feed levels regularly and replenish as needed to ensure a consistent food source for the wildlife.
By following these step-by-step instructions, you can successfully build your own DIY deer feeder and create a welcoming and nourishing environment for the local deer population. Enjoy the satisfaction of observing wildlife up close and contributing to their well-being through your DIY efforts.
Tips for Maintaining and Using Your Wildlife Feeding Station
Maintaining and using your wildlife feeding station is essential to ensure its effectiveness and the well-being of the visiting deer. Here are some valuable tips to help you maintain and make the most of your DIY deer feeder:
-
Regular Inspection: Schedule regular inspections of the feeder to check for any signs of wear, damage, or weathering. Ensure that the structure remains sturdy and secure, and address any issues promptly to prevent further deterioration.
-
Cleanliness: Keep the feeder clean and free from debris to maintain a hygienic feeding environment for the deer. Regularly remove any accumulated feed residue, moisture, or mold to prevent contamination and ensure the feed remains fresh and palatable.
-
Refill Responsibly: Monitor the feed levels in the feeder and replenish it as needed to provide a consistent food source for the deer. Avoid overfilling the feeder, as excess feed can attract unwanted pests and lead to spoilage.
-
Seasonal Adjustments: Consider making seasonal adjustments to the type of feed and the frequency of refilling based on the changing dietary needs of deer. During harsh winter months, providing high-energy feed can support the deer's nutritional requirements.
-
Predator Deterrence: Take measures to deter potential predators from accessing the feeder, as their presence can disrupt the feeding patterns of deer. Consider installing deterrents or positioning the feeder in a way that minimizes the risk of predator interference.
-
Observation and Documentation: Take the opportunity to observe and document the behavior of deer visiting the feeder. This can provide valuable insights into their feeding habits, social interactions, and overall well-being, contributing to your understanding of local wildlife.
-
Community Involvement: Consider involving the local community in the maintenance and use of the wildlife feeding station. Engaging neighbors, nature enthusiasts, or conservation groups can foster a sense of shared responsibility for wildlife welfare and encourage collaboration in sustaining the feeder.
-
Educational Outreach: Use the presence of the feeder as an educational tool to raise awareness about wildlife conservation and responsible feeding practices. Share information about the importance of maintaining a balanced ecosystem and respecting the natural behaviors of deer.
-
Record Keeping: Keep a record of the maintenance activities, observations, and any notable wildlife encounters related to the feeder. This documentation can serve as a valuable reference for tracking the impact of the feeder on local wildlife and informing future conservation efforts.
-
Adapt to Feedback: Pay attention to any feedback or observations from wildlife experts, local authorities, or experienced wildlife enthusiasts regarding the use and maintenance of the feeder. Remaining open to constructive feedback can help optimize the feeder's impact on the surrounding ecosystem.
By implementing these tips for maintaining and using your wildlife feeding station, you can ensure that the feeder continues to provide a valuable resource for local deer while promoting responsible wildlife interaction and conservation efforts.
Conclusion
In conclusion, building your own DIY deer feeder is a fulfilling and impactful endeavor that offers a range of benefits, from supporting local wildlife to providing opportunities for observation and education. By carefully selecting the location, gathering the necessary materials and tools, and following the step-by-step construction process, you can create a welcoming and nourishing environment for deer on your property. The maintenance and responsible use of the wildlife feeding station are essential for ensuring its long-term effectiveness and the well-being of the visiting deer. By incorporating the provided tips and embracing a proactive approach to feeder management, you can contribute to the conservation of local wildlife and foster a deeper connection with the natural world. Whether you're a seasoned DIY enthusiast or a newcomer to wildlife interaction, the construction and maintenance of a DIY deer feeder can be a rewarding and meaningful way to enhance your outdoor space and make a positive impact on the local ecosystem.