Home>Create & Decorate>DIY & Crafts>Lego Table DIY: How To Create Your Own Lego Play Station

DIY & Crafts
Lego Table DIY: How To Create Your Own Lego Play Station
Published: June 8, 2024

Senior Editor in Create & Decorate, Kathryn combines traditional craftsmanship with contemporary trends. Her background in textile design and commitment to sustainable crafts inspire both content and community.
Discover how to build your own Lego table with this step-by-step DIY guide. Create a fun and organized play station for your kids with this easy project. Perfect for DIY & Crafts enthusiasts!
(Many of the links in this article redirect to a specific reviewed product. Your purchase of these products through affiliate links helps to generate commission for Twigandthistle.com, at no extra cost. Learn more)
Introduction
Are you tired of stepping on Lego pieces scattered all over the floor? Do you want to create a dedicated space for your kids to play with their Lego sets? A Lego table DIY project might just be the perfect solution for you. In this guide, we will walk you through the steps to create your very own Lego play station, complete with storage options and personalized touches. With a little creativity and some basic tools, you can transform a simple table into a functional and fun space for Lego building and play. Let's dive into the materials and steps you'll need to bring this project to life.
Materials Needed
To get started on your Lego table DIY project, you'll need a few essential materials and tools. Here's a list of what you'll require:
- Table: Choose a sturdy and spacious table that can accommodate the Lego base and provide enough room for play.
- Lego Baseplates: These will form the foundation for building and securing the Lego pieces in place.
- Screws and Screwdriver: For attaching the Lego baseplates to the table securely.
- Storage Containers: Consider adding small storage containers or drawers to keep Lego pieces organized.
- Paint and Brushes: If you plan to personalize the table with paint, make sure to have the necessary supplies on hand.
- Measuring Tape and Pencil: For marking and measuring the placement of the Lego baseplates.
- Optional: Power Drill: If you need to make holes for screws, a power drill can be handy.
Gather these materials before you begin, and you'll be all set to start creating your custom Lego play station.
Step 1: Choosing the Right Table
The first step in creating your Lego play station is selecting the perfect table. When choosing a table for this DIY project, consider the size and height that will best suit your needs. Look for a table that provides ample space for building and playing with Lego sets. Additionally, ensure that the table is at a comfortable height for your kids to sit and play without feeling cramped.
Opt for a sturdy table that can withstand the weight of the Lego baseplates and the play activities that will take place on top. A solid wood or metal table is a great choice for durability. If you prefer a table with a smooth surface, it will make it easier to clean up any spilled Lego pieces or messes during playtime.
Keep in mind that the table's design and color should complement the overall aesthetic of the play area or room where it will be placed. Whether you choose a classic wooden table or a modern, colorful one, the goal is to create a visually appealing and functional Lego play space for your kids to enjoy.
Once you've found the right table, you're ready to move on to the next step in the Lego table DIY project.
Step 2: Preparing the Lego Base
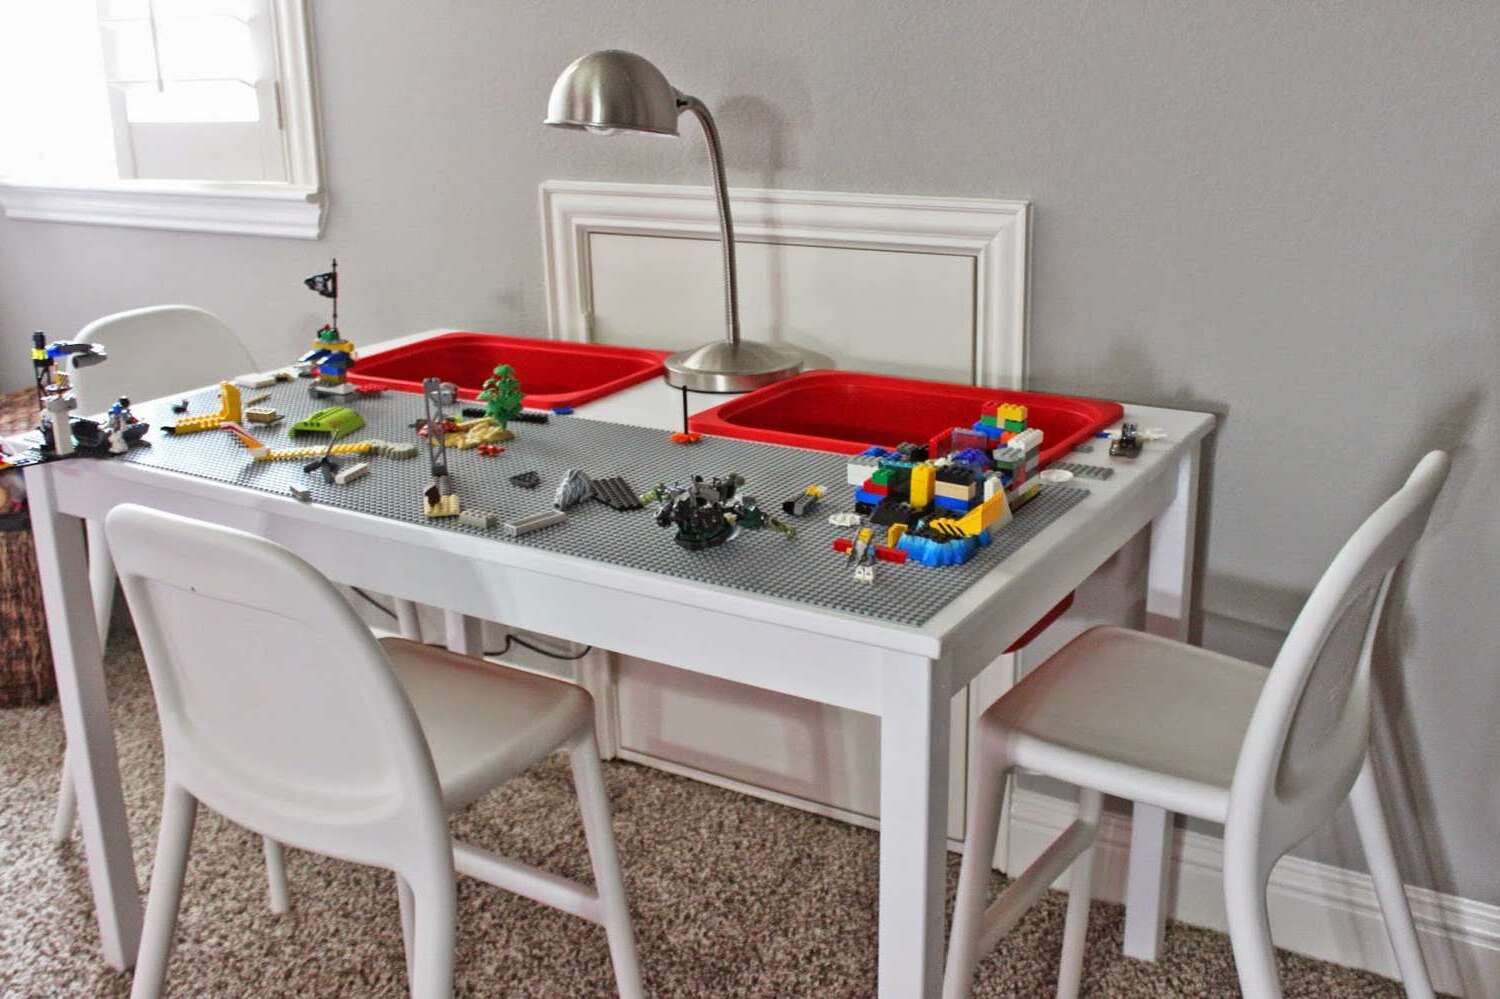
Now that you have the perfect table, it's time to prepare the Lego base that will serve as the foundation for building and securing the Lego pieces. Start by laying out the Lego baseplates on the surface of the table to determine the configuration that works best for the available space. You can arrange the baseplates in a single large section or multiple smaller sections, depending on the size of the table and your preferences.
Once you've decided on the layout, use a measuring tape and pencil to mark the positions where the baseplates will be attached to the table. This step is crucial for ensuring that the baseplates are aligned correctly and securely fastened in place. After marking the positions, you can proceed to attach the baseplates to the table using screws and a screwdriver.
When attaching the baseplates, make sure to space the screws evenly along the edges of each baseplate to prevent any warping or lifting over time. For added stability, consider using washers with the screws to distribute the pressure more evenly across the baseplates.
After securing the baseplates to the table, give them a gentle tug to ensure that they are firmly attached and can withstand the weight of Lego constructions. With the Lego base in place, you're one step closer to completing your custom Lego play station. The next step will involve adding storage options to keep the Lego pieces organized and easily accessible during playtime.
Step 3: Attaching Lego Base to the Table
Attaching the Lego base to the table is a critical step in ensuring the stability and functionality of your DIY Lego play station. Once you have determined the layout of the Lego baseplates on the table, it's time to securely fasten them in place. Using screws and a screwdriver, begin by carefully positioning the baseplates on the table according to the markings you made in the previous step.
As you attach the baseplates, make sure to place the screws along the edges of each baseplate, spacing them evenly to provide uniform support. This method helps distribute the pressure across the entire surface of the baseplates, preventing any potential warping or lifting over time. For added reinforcement, consider using washers with the screws to create a more secure attachment.
When tightening the screws, be mindful not to overtighten them, as this could cause the baseplates to bend or become misaligned. Aim for a firm and secure attachment that ensures the baseplates remain flat and stable on the table. Once all the baseplates are securely fastened, give them a gentle tug to test their stability. This step will help confirm that the baseplates can withstand the weight of Lego constructions and the play activities that will take place on top of them.
With the Lego base firmly attached to the table, you have successfully completed a crucial stage in the creation of your custom Lego play station. The next step will involve adding storage options to keep the Lego pieces organized and easily accessible during playtime.
Read more: How to Build a DIY Grill Station
Step 4: Adding Storage Options
Incorporating storage options into your DIY Lego table is essential for keeping the play area organized and clutter-free. There are various ways to integrate storage solutions that will accommodate Lego pieces and accessories, making them easily accessible for play and cleanup. Here are some creative storage ideas to consider:
-
Under-Table Drawers: Utilize the space beneath the table by adding slide-out drawers or bins to store Lego bricks and minifigures. These drawers can be installed on either side of the table, providing convenient access to the stored items while keeping them neatly tucked away when not in use.
-
Hanging Storage Pouches: Attach colorful fabric pouches or shoe organizers to the sides of the table to hold smaller Lego pieces and accessories. This approach not only adds a pop of color to the play area but also offers a practical storage solution that encourages tidiness.
-
Stackable Storage Bins: Place stackable plastic bins or containers near the table to store larger Lego sets and bulkier pieces. Opt for transparent bins to easily identify the contents, making it simple for kids to find the specific pieces they need for their creations.
-
Built-In Shelves: If you're up for a more advanced DIY project, consider adding built-in shelves to the sides or back of the table. These shelves can hold storage baskets or bins, providing ample space to organize and display various Lego sets and building materials.
-
Lego-Compatible Storage Solutions: Invest in storage containers specifically designed for Lego storage, such as sorting trays, compartmentalized cases, or stackable storage units. These specialized storage options are tailored to accommodate different types of Lego pieces, making it easier for kids to sort and access their collection.
By incorporating these storage options into your Lego table design, you can create a well-organized and functional play space that encourages creativity and minimizes clutter. The next step will involve personalizing your Lego table to add a unique touch that reflects your kids' interests and personalities.
Step 5: Personalizing Your Lego Table
Personalizing your Lego table is an exciting opportunity to add a unique and creative touch to the play space. By incorporating personalized elements, you can make the Lego table truly special and reflective of your kids' interests and personalities. Here are some fun and imaginative ways to personalize your DIY Lego play station:
1. Custom Paint Design
Consider adding a splash of color and creativity to the table by painting a custom design on the surface. Whether it's a vibrant geometric pattern, a whimsical scene, or a favorite Lego-themed motif, the possibilities are endless. Encourage your kids to participate in the painting process, allowing them to contribute their artistic flair to the table's design.
2. Name or Initials
Incorporate your kids' names or initials into the table design to give it a personalized touch. You can use stencils or vinyl decals to add the names in a playful font, creating a sense of ownership and pride in their designated play area.
Read more: How to Build a DIY Dining Table
3. Lego Minifigure Display
Create a dedicated space on the table for displaying Lego minifigures. Whether it's a small shelf, a display stand, or a designated area with mini platforms, showcasing the minifigures adds a charming and personalized element to the play station.
4. Themed Accessories
Enhance the personalized theme by incorporating themed accessories that align with your kids' interests. Whether it's adding decals of their favorite characters, incorporating themed storage containers, or including decorative elements related to their hobbies, these touches can make the play area feel uniquely theirs.
5. Collaborative Building Area
Designate a section of the table as a collaborative building area where your kids can showcase their ongoing Lego creations. Encourage them to display their completed builds and collaborate on new projects, fostering a sense of creativity and teamwork within the personalized play space.
6. Inspirational Quotes or Messages
Incorporate inspirational quotes, encouraging messages, or fun Lego-themed phrases into the table design. These uplifting additions can serve as motivational reminders and contribute to the positive and playful atmosphere of the play station.
By personalizing your Lego table with these creative touches, you can transform it into a one-of-a-kind space that reflects your kids' individuality and sparks their imagination. With the personalized elements in place, your DIY Lego play station will not only be a functional area for building and play but also a special and cherished part of your home.
Read more: How to Build a DIY Bar Table
Conclusion
In conclusion, creating your own Lego play station through a DIY Lego table project is a rewarding endeavor that combines practicality with creativity. By carefully selecting the right table, preparing and attaching the Lego base, adding storage options, and personalizing the play space, you can craft a dedicated area that fosters imaginative play and organization. The incorporation of storage solutions ensures that Lego pieces are easily accessible and neatly stored, while the personalized touches add a unique and meaningful flair to the play station. With the completion of this project, you have not only provided a designated space for Lego building and play but also a customized area that reflects your kids' interests and personalities. Embrace the joy of seeing your kids engage in imaginative play and collaborative building within the inviting and personalized environment of their new Lego play station.

