
Home>Create & Decorate>DIY & Crafts>How To Install Lattice Under Deck
DIY & Crafts
How To Install Lattice Under Deck
Published: February 23, 2024

Content Creator specializing in woodworking and interior transformations. Caegan's guides motivate readers to undertake their own projects, while his custom furniture adds a personal touch.
Learn how to install lattice under your deck with this step-by-step DIY guide. Enhance your outdoor space with this easy and affordable project. Perfect for DIY & Crafts enthusiasts!
(Many of the links in this article redirect to a specific reviewed product. Your purchase of these products through affiliate links helps to generate commission for Twigandthistle.com, at no extra cost. Learn more)
Introduction
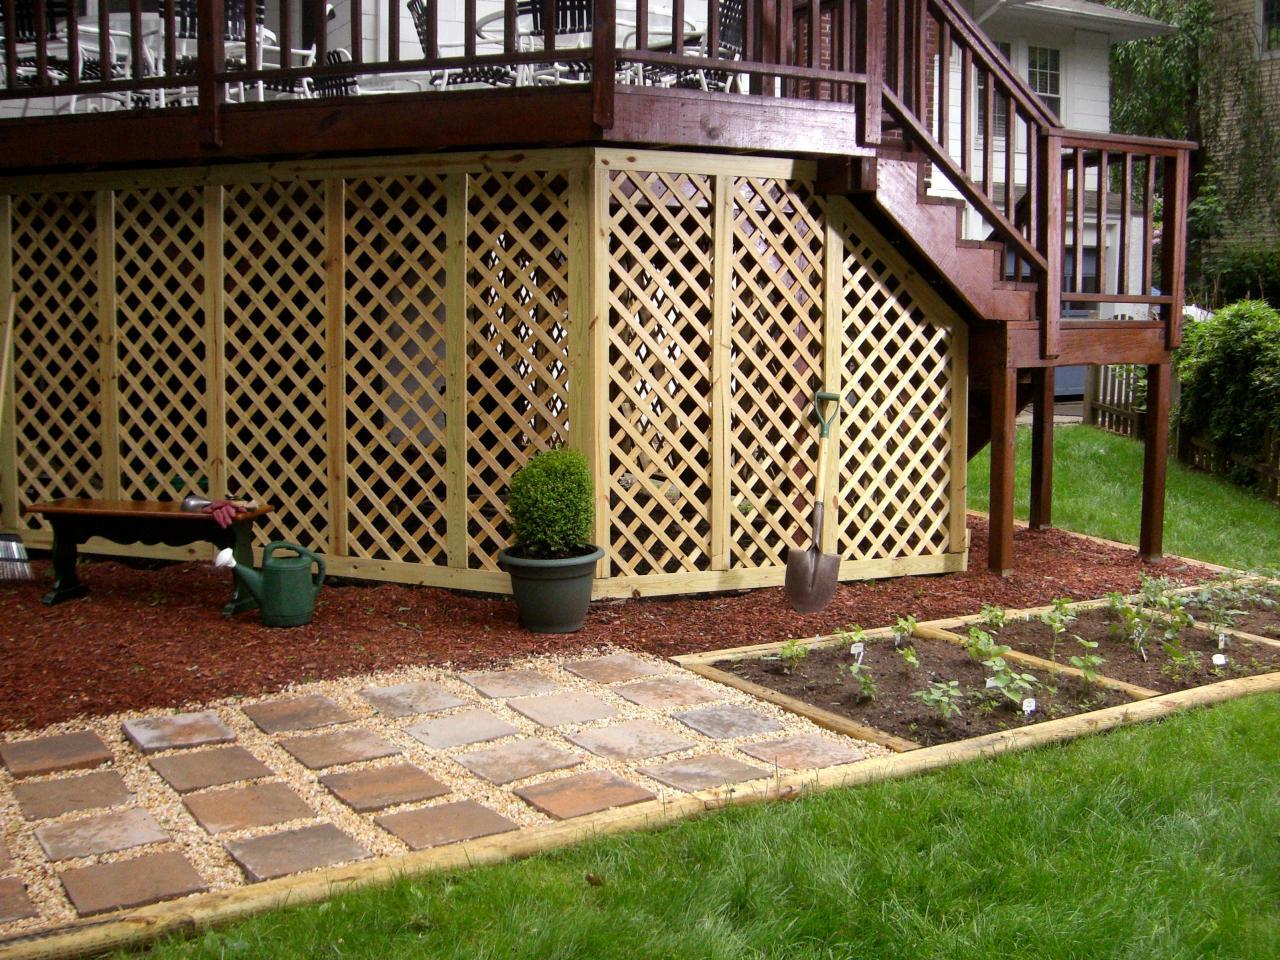
Installing lattice under your deck not only enhances the overall aesthetic appeal of your outdoor space but also serves practical purposes. It provides a stylish enclosure, conceals the area beneath the deck, and prevents unwanted critters from making themselves at home. Whether you're a seasoned DIY enthusiast or a novice looking to embark on a new project, this guide will walk you through the process of installing lattice under your deck, ensuring that you achieve a professional-looking result.
By following the steps outlined in this guide, you'll be able to create a polished and functional under-deck area that complements your outdoor living space. From gathering the necessary materials and tools to measuring and cutting lattice panels to fit perfectly, each step is designed to help you achieve a seamless installation process. Additionally, you'll learn how to install support posts to provide stability and attach the lattice panels securely.
Furthermore, this guide doesn't stop at the installation process. It also includes tips for adding finishing touches to elevate the visual appeal of the lattice enclosure. Additionally, you'll find valuable maintenance tips to ensure that your newly installed lattice remains in top condition for years to come.
Whether you're aiming to create a cozy outdoor retreat, a storage area, or simply want to enhance the appearance of your deck, installing lattice underneath is a practical and visually appealing solution. With the right guidance and a bit of effort, you can transform the under-deck space into a functional and attractive extension of your outdoor living area. So, roll up your sleeves, gather your tools, and let's get started on this rewarding DIY project!
Step 1: Gather Materials and Tools
Before diving into the installation process, it's crucial to gather all the necessary materials and tools to ensure a smooth and efficient workflow. Here's a comprehensive list of items you'll need:
Materials:
- Lattice panels: Measure the dimensions of the area beneath your deck to determine the quantity of lattice panels required. Opt for high-quality, weather-resistant panels to ensure durability.
- Support posts: These are essential for providing stability and securing the lattice panels in place.
- Screws or nails: Choose corrosion-resistant fasteners to attach the lattice panels securely to the support posts and framework.
- Concrete mix: If your deck is elevated, you'll need concrete mix to secure the support posts in the ground.
- Gravel: This will be used as a base for the support posts if you're installing them directly into the ground.
- Lattice cap or trim: To add a polished finish to the top of the lattice panels and conceal any rough edges.
Tools:
- Measuring tape: Accurate measurements are crucial for ensuring the lattice panels fit perfectly beneath the deck.
- Circular saw or jigsaw: These tools will be used to cut the lattice panels to the required dimensions.
- Power drill: Essential for drilling pilot holes and attaching the lattice panels and support posts.
- Level: To ensure that the support posts are installed evenly and the lattice panels are attached straight.
- Shovel: If you're installing support posts directly into the ground, a shovel will be needed for digging holes.
- Safety gear: This includes gloves, safety glasses, and a dust mask to protect yourself during the cutting and installation process.
By gathering these materials and tools beforehand, you'll be well-prepared to commence the installation process without interruptions. Additionally, it's advisable to double-check the quantities and conditions of the materials to ensure a seamless workflow. With everything at your disposal, you're ready to move on to the next step of measuring and cutting the lattice panels to fit the space beneath your deck.
Step 2: Measure and Cut Lattice Panels
Accurate measurements are the foundation of a successful lattice installation. Start by measuring the dimensions of the area beneath your deck where the lattice will be installed. Use a measuring tape to determine the length and height of each section, taking into account any irregularities in the terrain or structure. It's essential to measure each section individually, as even slight variations can affect the fit of the lattice panels.
Once you have the precise measurements, transfer them to the lattice panels. Using a pencil and a straight edge, mark the cutting lines on the panels according to the measurements. If the panels need to fit around obstacles such as posts or corners, make additional markings to indicate where the panels will need to be notched or trimmed.
With the cutting lines clearly marked, it's time to cut the lattice panels to size. A circular saw or jigsaw is the ideal tool for this task, allowing for precise and controlled cuts. When cutting the panels, ensure that they are adequately supported to prevent splintering or cracking. It's also advisable to wear safety glasses and a dust mask during the cutting process to protect yourself from debris.
If the lattice panels require notching to fit around obstacles, carefully use a jigsaw to make the necessary cuts. Take your time to ensure that the notches are precise and fit seamlessly around the obstacles. Additionally, if the panels need to be trimmed to fit within a specific space, use the appropriate cutting tool to achieve clean and accurate cuts.
After cutting the lattice panels to the required dimensions, inspect the edges to ensure they are smooth and free from any splinters or rough spots. Sand down any rough edges to create a clean finish and minimize the risk of snagging or splinter injuries.
By meticulously measuring and cutting the lattice panels to fit the space beneath your deck, you'll lay the groundwork for a professional-looking installation. The precision and care taken during this step will ensure that the lattice panels fit seamlessly, creating a visually appealing and functional enclosure beneath your deck. With the panels cut to size, you're now ready to proceed to the next step of installing support posts to provide stability for the lattice structure.
Step 3: Install Support Posts
The installation of support posts is a critical step in ensuring the stability and structural integrity of the lattice enclosure beneath your deck. These posts will provide the necessary framework for securely attaching the lattice panels, creating a durable and visually appealing under-deck space. Here's a detailed guide on how to install support posts effectively:
Assess the Placement:
Begin by assessing the layout of the area beneath your deck to determine the optimal placement for the support posts. It's essential to space the posts evenly to provide adequate support for the lattice panels. Take into account any existing obstacles or features, such as stairs or utilities, and plan the placement of the support posts accordingly.
Digging the Holes:
If your deck is elevated, you'll need to dig holes for the support posts. Use a shovel to excavate holes at the predetermined locations, ensuring that they are deep enough to provide stability. The depth of the holes will depend on the height of your deck and the local building codes. It's advisable to consult these codes to ensure compliance with the required depth for post installation.
Adding Gravel and Setting the Posts:
Once the holes are dug, add a layer of gravel to the bottom of each hole. This will facilitate drainage and prevent the posts from sitting directly in water, reducing the risk of rot over time. With the gravel in place, set the support posts in the holes, ensuring that they are plumb and level. Temporary bracing can be used to hold the posts in position while the concrete is added.
Securing with Concrete:
To secure the support posts in place, fill the holes with concrete mix around the posts. Use a level to ensure that the posts remain plumb and aligned during the concrete setting process. Allow the concrete to cure as per the manufacturer's instructions, ensuring that the posts are firmly anchored and stable.
Verifying Stability:
Once the concrete has fully cured, verify the stability of the support posts by applying gentle pressure and checking for any wobbling or movement. The posts should be solid and immovable, providing a sturdy foundation for the lattice installation.
By following these steps to install support posts, you'll establish a robust framework for attaching the lattice panels, ensuring that the under-deck enclosure is structurally sound and visually appealing. With the support posts securely in place, you're now ready to proceed to the next step of attaching the lattice panels to complete the installation process.
Step 4: Attach Lattice Panels
With the support posts securely installed, it's time to proceed with attaching the lattice panels to create a polished and functional enclosure beneath your deck. This step is crucial in completing the installation process, as it not only enhances the visual appeal of the under-deck space but also provides privacy and protection from the elements. Here's a detailed guide on how to effectively attach the lattice panels:
Positioning the Panels:
Begin by positioning the lattice panels against the support posts and framework to assess the fit and alignment. It's essential to ensure that the panels are level and aligned correctly before securing them in place. Take into account any obstacles or features, such as access doors or utilities, and plan the positioning of the panels accordingly.
Attaching the Panels to Support Posts:
Using corrosion-resistant screws or nails, attach the lattice panels to the support posts. It's advisable to pre-drill pilot holes to prevent the panels from splitting during the attachment process. Start at one corner of the panel and work your way across, ensuring that the panels are securely fastened to the support posts. Additionally, check for levelness and alignment as you progress to maintain a uniform and professional appearance.
Securing the Panels to the Framework:
In addition to attaching the panels to the support posts, secure them to the existing framework of the deck. This will provide added stability and ensure that the panels remain in place, especially during inclement weather. Use appropriate fasteners to secure the panels to the framework, taking care to space the fasteners evenly to maintain a consistent and secure attachment.
Adding Lattice Cap or Trim:
To add a polished finish to the top of the lattice panels and conceal any rough edges, consider installing lattice cap or trim. This not only enhances the visual appeal of the enclosure but also provides a protective barrier against moisture and debris. Secure the lattice cap or trim in place using suitable fasteners, ensuring that it complements the overall aesthetic of the lattice enclosure.
By meticulously following these steps to attach the lattice panels, you'll complete the installation process with a professional-looking and functional under-deck enclosure. The secure attachment of the panels to the support posts and framework will ensure that the lattice structure remains stable and visually appealing for years to come. With the lattice panels securely in place, you're now ready to add finishing touches and implement maintenance tips to preserve the beauty and functionality of the newly installed lattice beneath your deck.
Step 5: Finishing Touches and Maintenance Tips
After completing the installation of lattice panels beneath your deck, adding finishing touches will elevate the visual appeal and functionality of the under-deck space. Additionally, implementing maintenance tips will ensure that the lattice enclosure remains in top condition for years to come.
Adding Decorative Elements:
To enhance the aesthetic appeal of the lattice enclosure, consider incorporating decorative elements such as climbing plants or outdoor lighting. Climbing plants, such as ivy or flowering vines, can be trained to grow on the lattice, adding a touch of natural beauty to the space. Outdoor lighting, strategically placed around the perimeter of the lattice structure, not only enhances the ambiance but also provides functional illumination for evening gatherings.
Staining or Painting:
Applying a coat of stain or paint to the lattice panels can further enhance their visual appeal and longevity. Choose a high-quality outdoor stain or paint that complements the existing color scheme of your deck. Before applying the stain or paint, ensure that the lattice panels are clean and free from any debris. A fresh coat of stain or paint not only adds a pop of color but also provides a protective barrier against the elements, extending the lifespan of the lattice enclosure.
Regular Cleaning and Inspection:
Routine cleaning and inspection are essential for maintaining the lattice panels and support structure. Use a gentle cleaning solution and a soft brush to remove dirt, debris, and mildew from the lattice panels. Additionally, inspect the support posts and framework for any signs of wear, rot, or insect damage. Addressing any issues promptly will prevent potential structural problems and prolong the life of the lattice enclosure.
Seasonal Maintenance:
As the seasons change, it's important to perform seasonal maintenance to keep the lattice enclosure in optimal condition. In colder climates, ensure that the lattice panels are clear of snow and ice buildup to prevent excessive weight and stress on the structure. In warmer climates, inspect the lattice for signs of sun damage and make any necessary repairs or touch-ups to the finish.
Inspecting Fasteners and Hardware:
Regularly inspect the fasteners and hardware securing the lattice panels to the support posts and framework. Over time, exposure to the elements can cause corrosion or loosening of fasteners. Tighten or replace any loose or damaged fasteners to maintain the structural integrity of the lattice enclosure.
By incorporating these finishing touches and implementing maintenance tips, you'll ensure that the lattice enclosure beneath your deck remains a visually appealing and functional extension of your outdoor living space. With proper care and attention, the lattice structure will continue to enhance the beauty and utility of your deck for years to come.