
Home>Create & Decorate>DIY & Crafts>DIY Floating Desk: Create Your Own Stylish Workspace
DIY & Crafts
DIY Floating Desk: Create Your Own Stylish Workspace
Published: May 10, 2024

Senior Editor in Create & Decorate, Kathryn combines traditional craftsmanship with contemporary trends. Her background in textile design and commitment to sustainable crafts inspire both content and community.
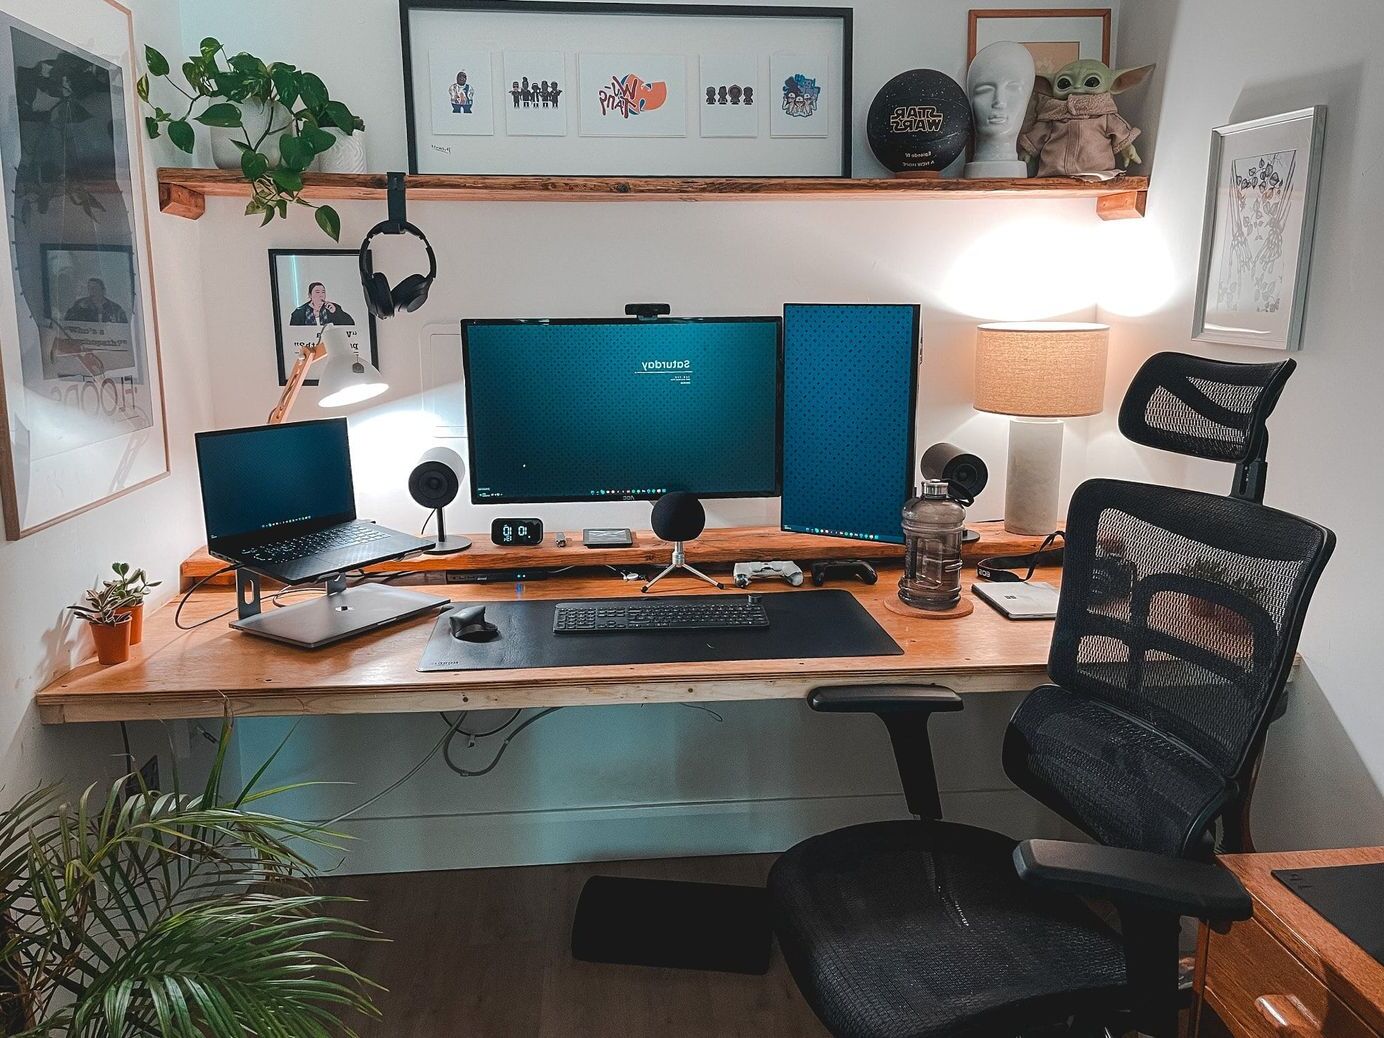
Create your own stylish workspace with our DIY floating desk ideas. Get inspired with our DIY & Crafts tutorials and start building your dream desk today!
(Many of the links in this article redirect to a specific reviewed product. Your purchase of these products through affiliate links helps to generate commission for Twigandthistle.com, at no extra cost. Learn more)
Introduction
Are you looking to create a stylish and functional workspace in your home? A DIY floating desk might be just the solution you need. Whether you're tight on space or simply want to add a modern touch to your home office, a floating desk can be a practical and aesthetically pleasing addition to any room. In this article, we'll guide you through the process of creating your own DIY floating desk, from gathering the necessary materials to installing the final touches. Let's get started on transforming your space into a productive and stylish environment!
Materials Needed
To get started on your DIY floating desk project, you'll need to gather the following materials:
- Wall brackets: These will be used to support the desk and keep it securely attached to the wall.
- Desk surface: This can be a piece of wood, a countertop, or any other sturdy material that will serve as the actual work surface.
- Stud finder: This tool will help you locate the studs in your wall, which are essential for securely mounting the desk.
- Screws and anchors: These will be used to attach the wall brackets to the wall and ensure they stay in place.
- Level: A level will help you ensure that the desk is installed evenly and straight, preventing any wobbling or unevenness.
- Drill and drill bits: You'll need these to create holes for the screws and anchors, as well as to attach the desk surface to the wall brackets.
- Sandpaper and finish: If you're using a wooden desk surface, sandpaper and finish will help you smooth out any rough edges and give the desk a polished look.
- Paint or stain: If you want to customize the look of your desk surface, you may want to have paint or stain on hand to add a pop of color or enhance the natural wood grain.
Gathering these materials will set you up for success as you embark on creating your own DIY floating desk.
Step 1: Measure and Mark the Wall
Before you start installing your DIY floating desk, it's crucial to measure and mark the wall where the desk will be mounted. Here's how to do it:
-
Choose the Location: Decide where you want to place your floating desk. Consider factors such as the available space, the height at which you want the desk, and the proximity to electrical outlets if you'll be using electronic devices.
-
Locate the Studs: Use a stud finder to locate the studs in the wall. These are essential for providing the necessary support for your desk. Mark the positions of the studs with a pencil.
-
Measure and Mark: Using a measuring tape, determine the desired length and width of your desk. Mark these measurements on the wall, ensuring that they align with the studs you've located.
-
Account for Brackets: If you're using specific wall brackets, take their size and placement into account when marking the wall. This will help you visualize how the desk will be positioned and ensure that it's properly supported.
By carefully measuring and marking the wall, you'll set the foundation for a secure and well-positioned floating desk installation.
Step 2: Install Wall Brackets
Once you've measured and marked the wall for your floating desk, it's time to move on to installing the wall brackets. These brackets will provide the essential support for your desk, ensuring that it stays securely attached to the wall. Here's a detailed guide on how to install the wall brackets for your DIY floating desk:
-
Positioning the Brackets: Place the wall brackets against the wall, aligning them with the marks you've made for the desk's dimensions and the locations of the studs. Use a level to ensure that the brackets are perfectly horizontal, as this will contribute to the overall stability of the desk.
-
Marking the Screw Holes: Once the brackets are positioned correctly, use a pencil to mark the locations of the screw holes on the wall. These marks will serve as guides for drilling the pilot holes for the screws.
-
Drilling Pilot Holes: With the help of a drill and the appropriate drill bit, carefully create pilot holes at the marked locations. Pilot holes are essential for ensuring that the screws can be inserted smoothly and securely into the wall.
-
Attaching the Brackets: Place the brackets back against the wall, aligning them with the pilot holes. Use screws and anchors to attach the brackets firmly to the wall. Make sure the screws are tightened securely to provide strong support for the desk.
-
Double-Check Stability: Once the brackets are installed, give them a gentle shake to ensure that they are firmly attached and can support the weight of the desk. Making any necessary adjustments at this stage will contribute to the overall stability of your floating desk.
By following these steps, you'll successfully install the wall brackets for your DIY floating desk, setting the stage for the next phase of the installation process.
Step 3: Attach Desk Surface
With the wall brackets securely in place, it's time to move on to the exciting step of attaching the desk surface to create your DIY floating desk. Follow these detailed steps to ensure a smooth and successful attachment process:
-
Positioning the Desk Surface: Carefully place the desk surface on top of the installed wall brackets, ensuring that it aligns perfectly with the brackets and sits evenly. Take your time to position it accurately, as this will contribute to the overall stability and appearance of the desk.
-
Securing the Surface to Brackets: Using screws and a drill, attach the desk surface to the wall brackets. Make sure to drive the screws through the underside of the desk surface and into the brackets securely. This step is crucial for ensuring that the desk is firmly anchored to the wall and can support the weight of items placed on it.
-
Checking for Stability: Once the desk surface is attached to the wall brackets, test its stability by gently applying pressure and ensuring that it feels secure and level. Any wobbling or unevenness should be addressed at this stage to guarantee a stable and reliable floating desk.
-
Adding Reinforcement (Optional): Depending on the size and weight of your desk surface, you may consider adding additional reinforcement, such as L-brackets or corner braces, to further enhance the stability of the desk. These reinforcements can provide extra support and peace of mind, especially for larger or heavier desk surfaces.
-
Finishing Touches: With the desk surface securely attached, take a moment to admire your handiwork. If you're using a wooden desk surface, this is also the perfect time to sand any rough edges and apply a finish, paint, or stain to achieve the desired look and feel for your floating desk.
By following these steps, you'll successfully attach the desk surface to the wall brackets, bringing your DIY floating desk one step closer to completion.
Step 4: Add Finishing Touches
After successfully attaching the desk surface to the wall brackets, it's time to add the finishing touches to complete your DIY floating desk project. This step allows you to personalize and enhance the appearance of your workspace, ensuring that it not only serves a functional purpose but also adds a stylish touch to your home. Here's how to add the perfect finishing touches to your floating desk:
-
Cable Management: Take the opportunity to incorporate effective cable management solutions to keep your workspace tidy and organized. Use cable clips, zip ties, or cable sleeves to neatly secure and conceal cords and cables, preventing them from cluttering the space and creating a sleek, streamlined look.
-
Task Lighting: Consider adding task lighting to illuminate your workspace effectively. Whether it's a sleek desk lamp or under-cabinet lighting, the right lighting can enhance productivity and create a welcoming ambiance. Choose lighting options that complement the style of your floating desk while providing ample illumination for your tasks.
-
Organizational Accessories: Integrate organizational accessories such as floating shelves, wall-mounted organizers, or desk caddies to keep essential supplies within reach. By incorporating these accessories, you can optimize the functionality of your workspace and maintain a clutter-free environment.
-
Personalization: Add personal touches to make the space your own. Whether it's displaying artwork, photographs, or decorative elements, infusing your personality into the workspace can create a more inspiring and inviting atmosphere.
-
Ergonomic Considerations: Ensure that your floating desk setup promotes ergonomic comfort. Choose a comfortable chair, position your monitor at eye level, and maintain proper posture to support your well-being while working at the desk.
-
Final Adjustments: Take a moment to make any final adjustments to the desk surface, ensuring that it is level, stable, and free from any imperfections. This attention to detail will contribute to the overall functionality and aesthetics of your DIY floating desk.
By adding these finishing touches, you'll elevate your DIY floating desk into a stylish and functional workspace that reflects your personal style and enhances your productivity. Enjoy the satisfaction of creating a customized and inviting area where you can tackle tasks with ease and comfort.
Conclusion
Congratulations on successfully creating your own stylish and functional workspace with a DIY floating desk! By following the step-by-step process outlined in this guide, you've transformed your home environment into a productive and aesthetically pleasing area. Your attention to detail in measuring, installing wall brackets, attaching the desk surface, and adding finishing touches has resulted in a customized workspace that suits your needs and reflects your personal style.
As you settle into your newly crafted workspace, take pride in the fact that you've not only built a practical desk but also a space that inspires creativity and productivity. The careful consideration of cable management, task lighting, organizational accessories, personalization, and ergonomic comfort has contributed to a well-rounded and inviting workspace.
Whether you're using your DIY floating desk for work, study, creative projects, or simply as a dedicated area for organization, you've created a versatile and functional space that can adapt to your needs. Embrace the satisfaction of having designed and built a workspace that aligns with your vision and enhances your daily activities.
As you enjoy the benefits of your new DIY floating desk, don't hesitate to make further adjustments or additions to tailor the space to your evolving requirements. Your creativity and resourcefulness have led to the creation of a workspace that is uniquely yours, providing a sense of ownership and accomplishment.
With your DIY floating desk in place, you now have a stylish and efficient area where you can tackle tasks, pursue hobbies, and engage in activities that bring you joy. Embrace the sense of empowerment that comes with crafting a functional and visually appealing workspace, and let it inspire you to continue exploring DIY projects and home improvement endeavors in the future.