
Home>Create & Decorate>DIY & Crafts>DIY Screened In Porch: Transform Your Outdoor Space
DIY & Crafts
DIY Screened In Porch: Transform Your Outdoor Space
Published: May 10, 2024

Content Creator specializing in woodworking and interior transformations. Caegan's guides motivate readers to undertake their own projects, while his custom furniture adds a personal touch.
Transform your outdoor space with our DIY screened in porch ideas and crafts. Create a cozy and stylish retreat with our step-by-step guides. Discover the perfect DIY projects for your screened porch!
(Many of the links in this article redirect to a specific reviewed product. Your purchase of these products through affiliate links helps to generate commission for Twigandthistle.com, at no extra cost. Learn more)
Benefits of a Screened In Porch
A screened-in porch offers a multitude of benefits that can enhance your outdoor living experience. Whether you're looking to create a cozy spot for relaxation or a space for entertaining guests, a screened-in porch can be a valuable addition to your home. Here are some of the key benefits of having a screened-in porch:
-
Protection from Insects: One of the most significant advantages of a screened-in porch is the protection it provides from pesky insects. By enclosing your porch with screens, you can enjoy the fresh air and outdoor views without having to worry about mosquitoes, flies, or other bugs disrupting your time outdoors.
-
Extended Living Space: A screened-in porch effectively extends your living space, providing a transitional area between the indoors and outdoors. It offers a versatile area that can be used for various activities, such as dining, reading, or simply enjoying the natural surroundings.
-
Increased Home Value: Adding a screened-in porch can increase the value of your home. Potential buyers often view a screened-in porch as a desirable feature, especially for those who appreciate outdoor living spaces but want protection from the elements.
-
Protection from the Elements: In addition to keeping insects at bay, a screened-in porch also provides protection from the elements. It offers shelter from rain, wind, and excessive sun exposure, allowing you to spend time outside regardless of the weather conditions.
-
Enhanced Aesthetics: A well-designed screened-in porch can enhance the overall aesthetics of your home. It adds visual interest to the exterior and can be customized to complement the architectural style of your house.
-
Versatility: Whether you want to create a cozy retreat for relaxation or a space for entertaining, a screened-in porch offers versatility. You can furnish it with comfortable seating, outdoor rugs, and decorative elements to suit your specific needs and preferences.
-
Improved Air Circulation: With the ability to open windows and doors, a screened-in porch promotes better air circulation throughout your home. This can help reduce energy costs and create a more comfortable indoor environment.
Overall, a screened-in porch provides a seamless blend of indoor comfort and outdoor enjoyment, making it a valuable and versatile addition to any home.
Planning Your DIY Screened In Porch Project
Planning is a crucial first step when embarking on a DIY screened-in porch project. It involves careful consideration of various factors to ensure a successful and well-executed outcome. Here are the key aspects to focus on during the planning phase:
-
Determine the Purpose: Start by defining the primary purpose of your screened-in porch. Are you creating a space for relaxation, entertaining guests, or enjoying meals outdoors? Understanding the intended use will guide the design and layout of the porch.
-
Assess the Space: Evaluate the available space for the porch and consider its orientation in relation to the sun and prevailing winds. This assessment will help determine the optimal location for the porch and how it will integrate with the existing outdoor area.
-
Set a Budget: Establish a realistic budget for the project, taking into account materials, tools, and any professional assistance that may be required. Having a clear budget in mind will help you make informed decisions throughout the project.
-
Check Local Regulations: Before proceeding with the project, check local building codes and regulations regarding the construction of a screened-in porch. Obtain any necessary permits to ensure compliance with local requirements.
-
Design Considerations: Consider the design elements that will enhance the functionality and aesthetics of the porch. This includes the layout, size, roof style, and any additional features such as lighting, ceiling fans, or built-in seating.
-
Material Selection: Research and select suitable materials for the construction of the porch, including the frame, roofing, flooring, and screening. Consider factors such as durability, maintenance requirements, and how well the materials will complement your home's exterior.
-
Timeline and Schedule: Create a realistic timeline for the project, taking into account factors such as weather conditions and the availability of tools and equipment. Establish a schedule for each phase of the project to ensure a systematic and organized approach.
By thoroughly planning your DIY screened-in porch project, you can lay a solid foundation for a successful and enjoyable outdoor living space. This phase sets the stage for the subsequent steps of construction and ultimately contributes to the overall satisfaction with the finished porch.
Choosing the Right Materials
Selecting the appropriate materials is a critical aspect of building a DIY screened-in porch. The materials chosen will not only contribute to the structural integrity of the porch but also impact its durability, maintenance requirements, and overall aesthetic appeal. Here are the key considerations when choosing the right materials for your screened-in porch project:
1. Frame Material
The frame serves as the structural backbone of the porch, providing support for the roof and screening. Common options for frame materials include pressure-treated wood, cedar, or composite materials. Each material has its own advantages, such as resistance to rot and insect damage, as well as overall longevity. Consider the climate and environmental factors in your area when selecting the most suitable frame material for your porch.
2. Roofing Material
The choice of roofing material for your screened-in porch will depend on factors such as budget, aesthetic preferences, and climate. Options range from traditional shingles to metal roofing or even translucent panels for added natural light. Ensure that the selected roofing material provides adequate protection from the elements while complementing the overall design of the porch.
3. Flooring Material
When it comes to the flooring of a screened-in porch, durability and resistance to moisture are key considerations. Popular choices for porch flooring include pressure-treated wood, composite decking, or stone tiles. The selected flooring material should be able to withstand outdoor conditions while providing a comfortable and visually appealing surface for the porch.
4. Screening Material
The type of screening material used will directly impact the visibility, airflow, and level of protection provided by the porch. Options range from traditional fiberglass screens to more durable materials such as aluminum or vinyl-coated polyester. Consider factors such as insect resistance, ease of maintenance, and the desired level of transparency when choosing the screening material.
5. Trim and Finishing Materials
Selecting the right trim and finishing materials can add a polished look to your screened-in porch. This includes elements such as trim boards, railings, and decorative accents. Choose materials that complement the overall design of the porch while offering durability and resistance to weather-related wear and tear.
By carefully considering these material options and their respective qualities, you can ensure that your DIY screened-in porch is constructed with the most suitable and durable materials for long-term enjoyment and functionality.
Building the Frame and Roof
When it comes to constructing the frame and roof of your DIY screened-in porch, attention to detail and precision are paramount. The frame serves as the foundational structure, providing support for the roof and screening, while the roof offers protection from the elements and contributes to the overall aesthetic appeal of the porch. Here's a detailed overview of the essential steps involved in building the frame and roof for your screened-in porch:
1. Design and Layout
Begin by carefully following the predetermined design and layout plans for the porch. This includes marking the precise location of the support posts, ledger boards, and any additional structural elements. Accurate measurements and alignment are crucial at this stage to ensure the proper fit and stability of the frame and roof components.
2. Frame Construction
Constructing the frame involves assembling the support posts, beams, and joists according to the specified dimensions and layout. Depending on the chosen frame material, such as pressure-treated wood or composite materials, ensure that all connections are securely fastened using appropriate hardware and techniques. The frame should be structurally sound and capable of supporting the weight of the roof and any additional loads.
3. Roofing Considerations
Select the appropriate roofing material based on the predetermined design and the specific requirements of your location. Whether opting for traditional shingles, metal roofing, or alternative options, ensure that the chosen material is installed according to manufacturer guidelines and local building codes. Proper flashing and underlayment should be incorporated to prevent water infiltration and ensure long-term durability.
4. Roof Installation
Carefully install the roofing material, following a systematic approach to achieve a weather-tight and visually appealing result. Pay close attention to the alignment and overlap of roofing components, as well as the integration of any necessary ventilation or drainage features. Properly securing the roofing material is essential to withstand wind, rain, and other environmental factors.
5. Structural Integrity
Throughout the construction process, prioritize the structural integrity of the frame and roof. This includes ensuring that all connections are securely fastened, load-bearing components are properly supported, and the overall framework is level and plumb. Regular inspections and adjustments may be necessary to maintain the structural integrity as the frame and roof take shape.
6. Safety Measures
Adhere to safety protocols and guidelines when working on the frame and roof construction. This includes the use of appropriate personal protective equipment, safe handling of tools and materials, and adherence to proper ladder and scaffolding practices. Prioritize safety to minimize the risk of accidents or injuries during the construction process.
By meticulously following these steps and considerations, you can effectively build the frame and roof of your DIY screened-in porch with confidence and precision. The result will be a well-constructed and visually appealing outdoor space that provides shelter, comfort, and enjoyment for years to come.
Installing the Screens
Installing the screens is a crucial step in completing your DIY screened-in porch project. The screens not only provide protection from insects but also contribute to the overall comfort and functionality of the porch. Here's a detailed guide on how to effectively install the screens for your screened-in porch:
-
Preparation: Before installing the screens, ensure that the frame and roof of the porch are structurally sound and properly finished. Any necessary trim and molding should be in place, and the surrounding areas should be clean and free of debris.
-
Screen Selection: Choose the appropriate screening material based on your specific needs and preferences. Options include traditional fiberglass screens, durable aluminum screens, or vinyl-coated polyester screens. Consider factors such as visibility, airflow, and insect resistance when making your selection.
-
Measuring and Cutting: Accurately measure the dimensions of each opening where the screens will be installed. Use these measurements to cut the screening material to the appropriate size, allowing for a slight overlap to ensure a secure fit.
-
Securing the Screens: Begin by securing the screens to one side of the porch frame using staples, tacks, or a screen spline and roller tool, depending on the chosen installation method. Work methodically, ensuring that the screens are taut and free of wrinkles as you progress.
-
Tensioning the Screens: Once the screens are secured on one side, carefully tension the material and secure it to the opposite side of the frame. This process may require assistance to ensure that the screens are evenly tensioned and properly aligned.
-
Trimming and Finishing: Trim any excess screening material, ensuring that the edges are neatly finished and securely fastened to the frame. Install trim or molding to conceal the screen edges and provide a polished look to the porch.
-
Inspection and Adjustment: Thoroughly inspect the installed screens, checking for any tears, loose areas, or imperfections. Make any necessary adjustments to ensure that the screens are securely in place and free of defects.
-
Functional Testing: Test the functionality of the screens by opening and closing doors and windows, ensuring smooth operation and a secure fit. Verify that the screens effectively keep insects out while allowing for adequate airflow and visibility.
By following these steps and taking a meticulous approach to installing the screens, you can ensure that your DIY screened-in porch is equipped with high-quality screening that enhances the outdoor experience while providing protection and comfort.
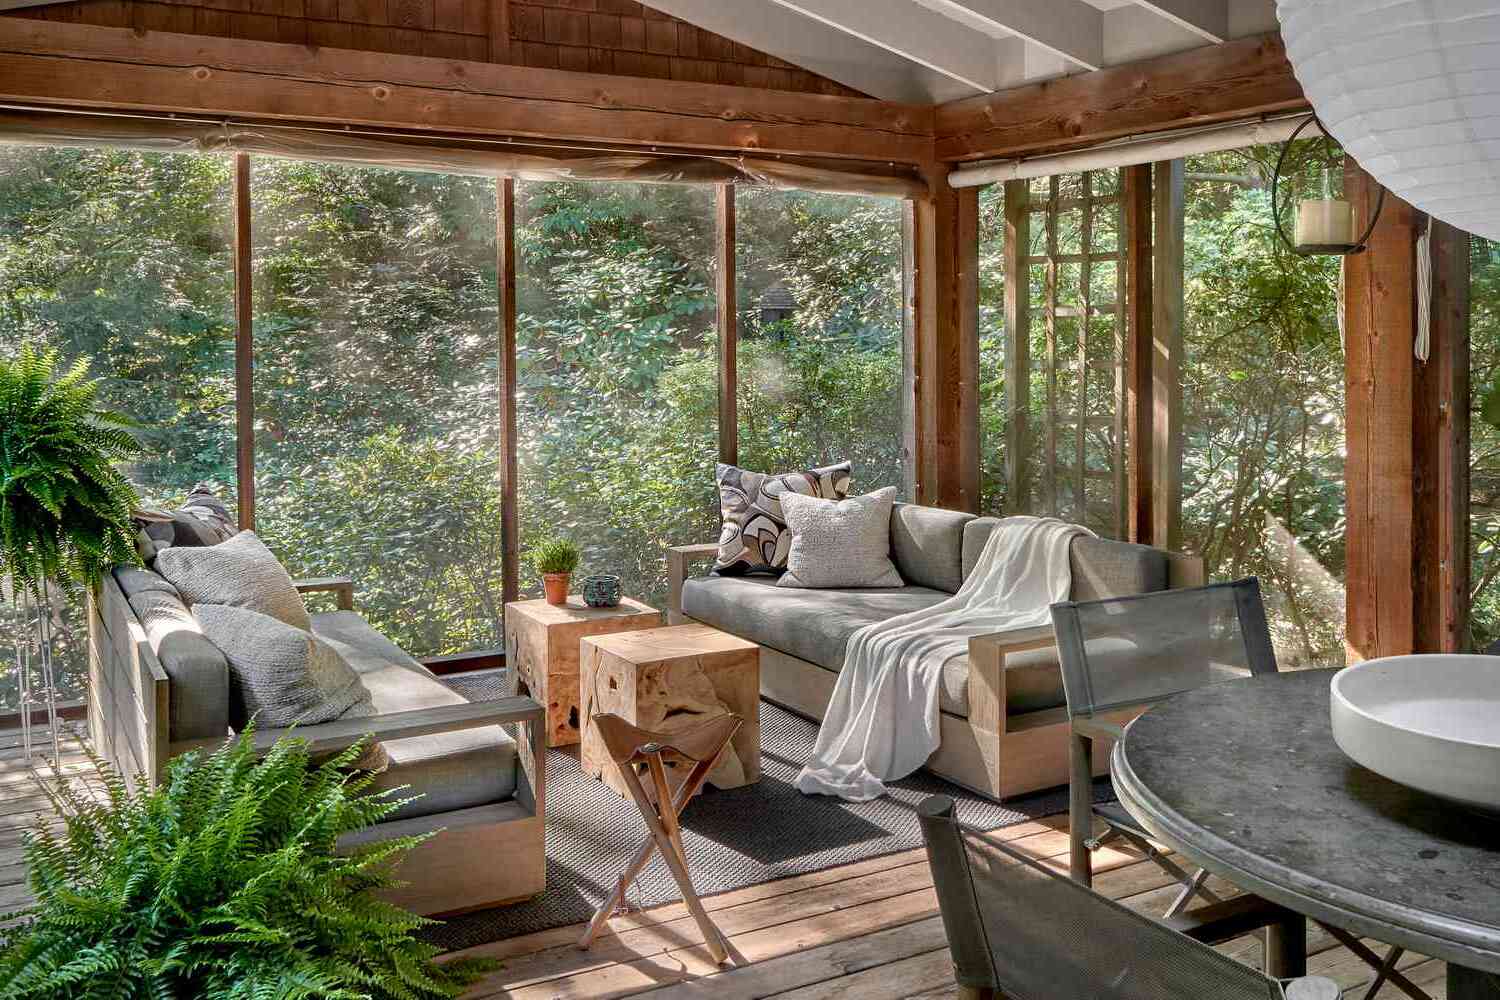
Adding Finishing Touches and Decor
Once the structural elements of your DIY screened-in porch are in place, it's time to focus on adding the finishing touches and decor that will elevate the space and make it truly inviting. The right decor and finishing touches can enhance the aesthetics, comfort, and functionality of your porch, creating a welcoming outdoor retreat. Here are some key considerations for adding the perfect finishing touches and decor to your screened-in porch:
-
Furniture Selection: Choose outdoor furniture that suits the intended use of the porch. Whether you prefer a cozy seating area for relaxation, a dining set for al fresco meals, or a combination of both, select furniture that is durable, weather-resistant, and comfortable. Consider options such as wicker, metal, or teak furniture that can withstand outdoor conditions.
-
Comfortable Cushions and Pillows: Enhance the comfort and style of your outdoor furniture with cushions and pillows. Opt for weather-resistant fabrics and materials that can withstand exposure to sunlight and moisture. Incorporate a mix of patterns and colors to add visual interest and personality to the space.
-
Lighting Solutions: Extend the functionality of your screened-in porch into the evening hours with strategic lighting. Consider options such as string lights, lanterns, or wall-mounted fixtures to create a warm and inviting ambiance. Lighting can also contribute to safety and security, allowing you to enjoy the porch after dark.
-
Outdoor Rugs: Define different areas within your screened-in porch by incorporating outdoor rugs. Rugs not only add a layer of comfort underfoot but also contribute to the visual appeal of the space. Choose rugs that are designed for outdoor use and can withstand exposure to the elements.
-
Decorative Accents: Personalize your porch with decorative accents such as potted plants, artwork, or decorative wall hangings. Incorporate elements that reflect your personal style and create a cohesive look that complements the overall design of the porch.
-
Ceiling Fans and Ventilation: Enhance the comfort of your screened-in porch by installing ceiling fans to promote air circulation. Ceiling fans can help maintain a comfortable temperature and reduce the presence of insects. Additionally, consider incorporating natural ventilation options such as operable windows or skylights.
-
Privacy and Shade Solutions: Depending on your preferences, consider adding privacy screens, curtains, or shades to create a more secluded and intimate atmosphere. These solutions can also provide protection from direct sunlight and enhance the versatility of the porch.
-
Functional Storage: Incorporate functional storage solutions to keep the porch organized and clutter-free. Consider options such as outdoor storage benches, cabinets, or shelving to store cushions, outdoor accessories, and other essentials.
By carefully considering these finishing touches and decor elements, you can transform your DIY screened-in porch into a stylish and functional outdoor living space that reflects your personal taste and enhances your overall enjoyment of the area.
Enjoying Your Transformed Outdoor Space
Now that your DIY screened-in porch project is complete, it's time to fully embrace and enjoy the transformed outdoor space. Your screened-in porch offers a versatile and inviting area that can be utilized for various activities and relaxation. Here are some ways to make the most of your newly created outdoor retreat:
-
Relaxation and Unwinding: Take advantage of the serene atmosphere of your screened-in porch to unwind and relax. Whether it's enjoying a morning cup of coffee, reading a book in the afternoon, or simply taking in the sights and sounds of nature, your porch provides a tranquil setting for relaxation.
-
Al Fresco Dining: Embrace the opportunity to dine outdoors by setting up a cozy dining area on your screened-in porch. Enjoy meals with family and friends while savoring the fresh air and natural surroundings. The screened-in environment provides protection from insects and the elements, allowing for enjoyable outdoor dining experiences.
-
Entertaining Guests: Your screened-in porch serves as an ideal space for entertaining guests. Host gatherings, small parties, or casual get-togethers in this versatile outdoor area. The comfortable seating, ambient lighting, and protection from the elements create a welcoming environment for socializing and making lasting memories.
-
Outdoor Work or Hobbies: Utilize the screened-in porch as a designated area for hobbies, crafts, or even remote work. The natural light, fresh air, and peaceful ambiance make it an inspiring and productive space for pursuing creative activities or catching up on work tasks while enjoying the outdoors.
-
Stargazing and Nighttime Relaxation: Extend your enjoyment of the porch into the evening hours. Spend time stargazing, listening to the sounds of the night, or simply unwinding under the moonlight. The screened-in environment provides a sense of security and comfort, allowing you to fully appreciate the nighttime atmosphere.
-
Seasonal Enjoyment: Embrace the changing seasons by adapting your use of the screened-in porch. In the warmer months, take advantage of the shaded and breezy environment for outdoor lounging and relaxation. As the weather cools, add cozy blankets and warm beverages to continue enjoying the porch throughout the year.
-
Wellness and Meditation: Create a peaceful sanctuary on your screened-in porch for wellness activities such as yoga, meditation, or mindfulness practices. The connection to nature and the fresh air can enhance the overall experience, providing a rejuvenating space for self-care and reflection.
-
Family Bonding: Encourage quality time with family members by using the porch as a gathering place for conversations, games, or simply enjoying each other's company. The screened-in environment offers a comfortable and inclusive space for family bonding activities.
By embracing these various ways to enjoy your transformed outdoor space, you can fully appreciate the benefits of your DIY screened-in porch and create lasting memories in a welcoming and versatile outdoor retreat.