
Home>Create & Decorate>DIY & Crafts>How To Build A Door Using 2X4
DIY & Crafts
How To Build A Door Using 2X4
Published: June 6, 2024

Senior Editor in Create & Decorate, Kathryn combines traditional craftsmanship with contemporary trends. Her background in textile design and commitment to sustainable crafts inspire both content and community.
Learn how to build a sturdy and stylish door using 2x4 lumber with our step-by-step DIY guide. Perfect for your next crafting project.
(Many of the links in this article redirect to a specific reviewed product. Your purchase of these products through affiliate links helps to generate commission for Twigandthistle.com, at no extra cost. Learn more)
Introduction
So, you're looking to add a personal touch to your home by building your own door using 2x4s? Well, you've come to the right place! Building a door using 2x4s is a great way to customize the look of your home while also saving some money. In this article, we'll walk you through the step-by-step process of creating your own door using 2x4s. Whether you're a seasoned DIY enthusiast or just starting out, we've got you covered. Let's roll up our sleeves and get started!
Materials Needed
To build a door using 2x4s, you'll need the following materials:
-
2×4 lumber: This will be the main material for constructing the door frame and panels. Make sure to measure the dimensions of your doorway to determine how much lumber you'll need.
-
Wood glue: Essential for securing the joints and ensuring the door's stability.
-
Wood screws: These will be used to fasten the 2x4s together and create a sturdy frame.
-
Door panels: Depending on your preference, you can use plywood, reclaimed wood, or any other material to serve as the door panels.
-
Hinges and hardware: You'll need hinges to attach the door to the door frame, as well as a handle and lock if desired.
-
Measuring tape and pencil: For accurate measurements and marking the 2x4s before cutting.
-
Circular saw or miter saw: To cut the 2x4s to the required lengths for the door frame and panels.
-
Sandpaper and wood finish: For sanding down any rough edges and applying a finish to the door for a polished look.
Gather these materials before you begin, and you'll be all set to start building your custom door using 2x4s.
Cutting the 2x4s to Size
The first step in building a door using 2x4s is to cut the lumber to the required sizes. Start by measuring the dimensions of your doorway carefully. Use a measuring tape and a pencil to mark the 2x4s according to the measurements. A circular saw or miter saw will come in handy for cutting the 2x4s to the precise lengths needed for the door frame and panels. Remember to measure twice and cut once to ensure accuracy.
When cutting the 2x4s for the door frame, you'll need to cut two longer pieces for the vertical sides and two shorter pieces for the horizontal top and bottom. The dimensions will depend on the size of your doorway, so be sure to double-check your measurements before making any cuts.
For the door panels, cut the 2x4s to create a grid-like pattern that will fit within the door frame. This grid will provide stability to the door and serve as a base for attaching the door panels. Again, precise measurements and cuts are crucial to ensure that the panels fit snugly within the frame.
After cutting the 2x4s to size, use sandpaper to smooth out any rough edges and ensure a clean finish. Taking the time to cut the 2x4s accurately will set the foundation for a well-constructed door that will stand the test of time.
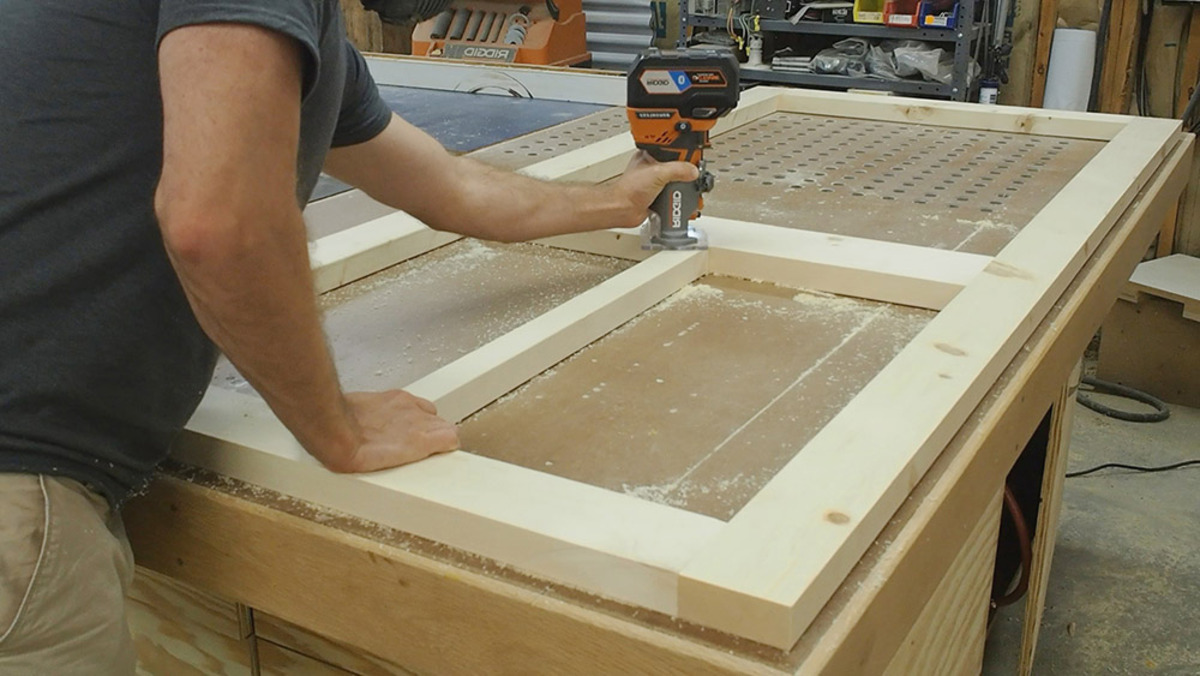
Assembling the Door Frame
Now that you have the 2x4s cut to the required sizes, it's time to assemble the door frame. Begin by laying out the pieces of the frame on a flat surface, ensuring that the edges align perfectly. Use wood glue along the joints to secure the 2x4s together. This will provide additional strength and stability to the frame. Once the glue is applied, use wood screws to reinforce the joints and create a sturdy door frame.
Start by attaching the shorter horizontal 2x4s to the longer vertical pieces. This will form the basic rectangular shape of the door frame. Use a carpenter's square to ensure that the corners are perfectly perpendicular. This step is crucial in ensuring that the door will hang properly and swing smoothly once it's installed.
After the basic frame is assembled, it's time to add additional support and stability. Cut additional 2×4 pieces to fit within the frame, creating a grid-like pattern. These pieces will be attached horizontally across the frame, providing reinforcement and preventing the door from warping over time. Secure these pieces in place using wood glue and screws, making sure they are evenly spaced for uniform support.
Once the grid-like pattern is in place, double-check the frame for any inconsistencies or misalignments. Making adjustments at this stage will save you from potential issues when it comes to hanging the door. Take the time to ensure that the frame is sturdy and well-constructed before proceeding to the next step.
Assembling the door frame is a critical part of the door-building process. Taking the time to align the pieces accurately and reinforce the joints will result in a durable and reliable door that will serve its purpose for years to come. With the frame assembled, you're one step closer to completing your custom door using 2x4s.
Attaching the Door Panels
With the door frame securely assembled, it's time to attach the door panels. Depending on your preference and the overall design of your door, you can use plywood, reclaimed wood, or any other material to serve as the door panels. Measure the dimensions of the door frame to ensure that the panels will fit snugly within the opening.
Lay the door frame on a flat surface with the interior side facing up. Begin by placing the door panels within the grid-like pattern created by the 2x4s. Ensure that the panels are positioned evenly and that there is uniform spacing between each panel. This will create a visually appealing design while also providing the necessary support for the door.
Once the panels are in position, use wood screws to secure them to the grid created by the 2x4s. Make sure to drive the screws through the panels and into the 2x4s to create a strong bond. Depending on the size of the door and the number of panels used, you may need to use multiple screws along the edges of each panel to ensure they are firmly attached.
After attaching the panels, double-check the door to ensure that they are securely in place and that there are no loose or protruding screws. The panels should be flush with the frame and provide a smooth, even surface. This step is crucial in ensuring that the door not only looks great but also functions properly.
With the door panels securely attached, you've completed a significant portion of the door-building process. The panels not only add to the aesthetic appeal of the door but also contribute to its overall strength and durability. With this step complete, you're ready to move on to the next phase of building your custom door using 2x4s.
Adding Hinges and Hardware
Now that the door frame and panels are in place, it's time to add hinges and hardware to complete the door. Hinges are essential for attaching the door to the door frame and allowing it to swing open and closed smoothly. Begin by positioning the hinges on the side of the door that will be attached to the door frame. Depending on the size and weight of the door, you may need two or three hinges evenly spaced along the height of the door.
Once the hinge placement is determined, use a pencil to mark the screw holes on both the door and the door frame. Pre-drill pilot holes to prevent the wood from splitting when you attach the hinges. Secure the hinges in place using wood screws, ensuring that they are firmly anchored to both the door and the frame. Test the movement of the door to ensure that it swings open and closed smoothly without any resistance.
In addition to hinges, you'll also need to install a handle and lock if desired. Measure and mark the placement of the handle and lock on the door, ensuring that they are positioned at a comfortable height for easy access. Use a drill to create holes for the handle and lock, then secure them in place according to the manufacturer's instructions.
With the hinges, handle, and lock in place, test the functionality of the door to ensure that it opens and closes securely. The addition of hinges and hardware not only completes the functionality of the door but also adds to its overall aesthetic appeal. With this step complete, your custom door using 2x4s is nearly ready for installation.
Finishing Touches and Installation
After completing the assembly of your custom door using 2x4s, it's time to add the finishing touches and prepare for installation. Start by carefully inspecting the entire door for any rough edges, splinters, or imperfections. Use sandpaper to smooth out any uneven surfaces and ensure that the door has a clean and polished appearance.
Once the door is sanded and free of any imperfections, it's time to apply a wood finish to enhance its durability and visual appeal. Choose a wood finish that complements the overall style of your home and apply it according to the manufacturer's instructions. The wood finish will not only protect the door from the elements but also bring out the natural beauty of the 2x4s.
With the finishing touches complete, it's time to prepare for the installation of your custom door. Carefully measure the doorway to ensure that the door will fit properly. If necessary, enlist the help of a friend or family member to assist with lifting and positioning the door in place.
Once the door is in position, use shims to ensure that it is level and plumb within the doorway. Secure the door to the door frame using wood screws, making sure that it is firmly anchored in place. Test the functionality of the door by opening and closing it to ensure that it operates smoothly and securely.
After the door is installed, take a step back and admire your handiwork. Your custom door using 2x4s is not only a functional addition to your home but also a testament to your DIY skills. With the finishing touches complete and the door securely installed, you can take pride in knowing that you've created a unique and personalized element for your home.
Conclusion
In conclusion, building a door using 2x4s is a rewarding DIY project that allows you to customize the look and feel of your home while showcasing your woodworking skills. By following the step-by-step process outlined in this article, you can create a durable and visually appealing door that adds a personal touch to your living space. From cutting the 2x4s to size and assembling the door frame to attaching the panels and adding hinges and hardware, each step plays a crucial role in the construction of a well-crafted door. With the right materials, tools, and attention to detail, you can successfully build a custom door using 2x4s that enhances the overall aesthetic of your home. Whether you're a seasoned DIY enthusiast or a beginner looking to take on a new project, building a door using 2x4s is a fulfilling endeavor that yields a functional and beautiful result.