
Home>Create & Decorate>DIY & Crafts>How To Build A 10X10 Deck
DIY & Crafts
How To Build A 10X10 Deck
Published: February 24, 2024

Senior Editor in Create & Decorate, Kathryn combines traditional craftsmanship with contemporary trends. Her background in textile design and commitment to sustainable crafts inspire both content and community.
Learn how to build a 10x10 deck with our step-by-step DIY guide. Get creative with your outdoor space and enhance your home with this fun and practical project. Ideal for DIY & Crafts enthusiasts.
(Many of the links in this article redirect to a specific reviewed product. Your purchase of these products through affiliate links helps to generate commission for Twigandthistle.com, at no extra cost. Learn more)
Introduction
Building a 10×10 deck can be a rewarding and fulfilling DIY project that adds both aesthetic appeal and functional space to your outdoor living area. Whether you envision it as a cozy spot for morning coffee or a space for entertaining friends and family, a well-constructed deck can significantly enhance the enjoyment and value of your home.
In this comprehensive guide, we will walk you through the step-by-step process of building a 10×10 deck, from the initial planning and design phase to the finishing touches and maintenance tips. By following these instructions, you can create a beautiful and sturdy deck that complements your home and provides a versatile outdoor space for various activities.
Throughout this guide, we will provide valuable insights and practical tips to help you navigate each stage of the construction process with confidence. From obtaining permits and checking local regulations to gathering the necessary materials and tools, we will cover all the essential aspects of building a deck that meets safety standards and your personal preferences.
Whether you are a seasoned DIY enthusiast or a beginner looking to embark on your first major construction project, this guide is designed to equip you with the knowledge and resources needed to tackle the task effectively. By breaking down the process into manageable steps and offering clear instructions, we aim to empower you to take on this project with enthusiasm and achieve professional-looking results.
So, roll up your sleeves, gather your tools, and get ready to embark on an exciting journey of creating a 10×10 deck that will become a cherished extension of your home. Let's dive into the planning, preparation, and construction process, ensuring that every detail is carefully considered and executed to bring your vision to life.
Step 1: Planning and Design
Before you start building your 10×10 deck, thorough planning and thoughtful design are essential to ensure that the end result meets your needs and complements your home's architecture. This initial phase sets the foundation for a successful construction project and involves several key considerations.
Assess Your Needs and Preferences
Begin by envisioning how you intend to use the deck. Will it primarily serve as a space for outdoor dining, relaxation, or social gatherings? Understanding your specific requirements will guide the design process and help determine the deck's layout, size, and features. Consider factors such as seating arrangements, built-in amenities, and any special requirements based on your lifestyle and preferences.
Survey the Site
Survey the area where the deck will be constructed, taking note of any existing features, such as trees, landscaping, or natural slopes. Assess the orientation of the sun and prevailing winds to optimize the deck's positioning for comfort and usability. Additionally, consider the visual impact of the deck from various vantage points, both inside and outside your home, to ensure that it integrates harmoniously with the surroundings.
Create a Design Plan
With your needs and site characteristics in mind, sketch out a preliminary design plan for your 10×10 deck. Consider the layout, traffic flow, and potential focal points. Explore various design options, such as single or multi-level platforms, integrated planters, or built-in seating. This is also the stage to decide on the materials, colors, and finishes that will complement your home's exterior and your personal style.
Consider Safety and Building Codes
Safety is paramount when designing a deck. Familiarize yourself with local building codes and regulations to ensure compliance with structural, safety, and zoning requirements. Factors such as railing height, load-bearing capacity, and foundation specifications must align with the applicable codes. Incorporating safety features from the outset will contribute to a secure and durable deck that enhances your outdoor living space.
Seek Inspiration and Professional Advice
Gathering inspiration from home improvement magazines, online resources, and local home design showcases can provide valuable insights and ideas for your deck project. Additionally, consulting with a professional architect or deck builder can offer expert guidance on design considerations, material selection, and construction techniques, helping you refine your vision and make informed decisions.
By dedicating ample time to the planning and design phase, you lay the groundwork for a well-executed and visually appealing 10×10 deck. Thoughtful consideration of your needs, site characteristics, safety requirements, and design elements will inform the subsequent stages of the construction process, ensuring that your deck fulfills both functional and aesthetic objectives.
Step 2: Obtaining Permits and Checking Regulations
Before commencing the construction of your 10×10 deck, it is crucial to navigate the regulatory landscape by obtaining the necessary permits and adhering to local building codes and regulations. This step is essential to ensure that your deck is constructed in compliance with safety standards and legal requirements, ultimately safeguarding the structural integrity and usability of the finished product.
Begin by contacting your local building department or municipal office to inquire about the specific permits required for building a deck on your property. Different jurisdictions may have varying regulations, and it is imperative to familiarize yourself with the procedural and documentation requirements for obtaining the relevant permits. This typically involves submitting detailed construction plans, property surveys, and permit applications, accompanied by the requisite fees.
In addition to permit requirements, it is essential to check local building codes and zoning regulations that pertain to deck construction. These regulations may encompass aspects such as setback requirements, maximum allowable deck height, railing specifications, and load-bearing considerations. By understanding and adhering to these regulations, you can ensure that your deck is constructed within the parameters of the law and is safe for use.
Furthermore, if your property is part of a homeowners' association (HOA) or a community with specific architectural guidelines, it is advisable to review any applicable covenants, conditions, and restrictions (CC&Rs) that may impact the design and construction of your deck. Some HOAs may have stringent guidelines regarding the size, style, and location of decks, and obtaining approval from the association may be a prerequisite before commencing construction.
Engaging with the permitting and regulatory process early in the project timeline allows for sufficient time to address any potential challenges or revisions that may arise. It is essential to factor in the time required for permit review and approval when planning the construction schedule, ensuring that the project progresses smoothly and in accordance with legal requirements.
By diligently obtaining permits and checking regulations, you demonstrate a commitment to building your 10×10 deck responsibly and in accordance with established standards. This proactive approach not only ensures compliance with legal requirements but also contributes to the long-term safety, functionality, and value of your outdoor living space.
Step 3: Gathering Materials and Tools
Gathering the necessary materials and tools is a pivotal step in the process of building a 10×10 deck. The quality of the materials and the suitability of the tools directly impact the structural integrity, durability, and overall aesthetic of the finished deck. By meticulously selecting high-quality materials and ensuring access to the appropriate tools, you set the stage for a successful and efficient construction process.
Materials
-
Lumber: The primary material for constructing the deck frame and decking surface is pressure-treated lumber, known for its durability and resistance to decay and insect damage. Carefully calculate the quantity of lumber required based on the deck dimensions and design, accounting for joists, beams, posts, and decking boards.
-
Hardware: Essential hardware components include galvanized or stainless steel screws, nails, and joist hangers. These fasteners play a crucial role in securing the structural elements of the deck, ensuring stability and longevity.
-
Concrete and Gravel: For the foundation and footings, concrete mix and gravel are indispensable. The specific quantity of concrete and gravel needed will depend on the soil conditions and the design of the deck's support system.
-
Decking Material: Choose the decking material that aligns with your aesthetic preferences and maintenance considerations. Options include traditional wood planks, composite decking, or PVC boards, each offering distinct advantages in terms of appearance, durability, and upkeep.
-
Railing and Balusters: If your design incorporates railing, select the appropriate railing system and balusters that complement the overall style of the deck. Options range from wood and metal railings to composite and vinyl systems, each requiring specific components for installation.
-
Waterproofing and Sealant: To protect the deck from moisture and prolong its lifespan, invest in a high-quality waterproofing sealant suitable for the chosen decking material. This essential step helps prevent warping, rot, and decay, ensuring the longevity of the deck.
Tools
-
Power Tools: Essential power tools for deck construction include a circular saw, power drill, impact driver, and a miter saw for precision cutting and drilling tasks.
-
Hand Tools: A comprehensive set of hand tools such as a hammer, tape measure, level, framing square, and adjustable wrench are indispensable for accurate measurements, layout, and assembly.
-
Digging and Mixing Tools: Shovels, post hole diggers, and a mixing tool for concrete are essential for excavating the footings and preparing the foundation.
-
Safety Gear: Prioritize safety by equipping yourself with protective gear, including safety glasses, work gloves, and hearing protection, to safeguard against potential hazards during construction.
By meticulously sourcing the required materials and ensuring access to the appropriate tools, you lay a solid foundation for the construction phase, setting the stage for a smooth and efficient building process. This proactive approach not only streamlines the construction timeline but also contributes to the overall quality and longevity of the completed 10×10 deck.
Step 4: Preparing the Site
Preparing the site for the construction of your 10×10 deck is a critical phase that sets the groundwork for a stable and long-lasting outdoor structure. This step involves a series of essential tasks aimed at ensuring the site is properly leveled, cleared of obstructions, and equipped to support the deck's foundation and structural components.
Clearing and Marking the Area
Begin by clearing the designated area where the deck will be built. Remove any vegetation, rocks, or debris from the site, ensuring a clean and level surface for the construction process. Use marking paint or stakes and string to outline the perimeter of the deck, clearly defining the boundaries and layout according to the design plan.
Excavating Footings
Excavate the footings for the deck's support posts, adhering to the depth and diameter specifications outlined in the design and local building codes. Typically, this involves digging below the frost line to ensure the footings are stable and resistant to ground movement. Use a post hole digger or auger to achieve the required dimensions for the footings, accounting for the soil composition and load-bearing considerations.
Installing Support Posts
Once the footings are excavated, install the support posts according to the predetermined layout and spacing. Position the posts securely in the footings, ensuring they are plumb and aligned with the deck's design plan. Utilize temporary bracing to maintain the vertical alignment of the posts as the construction progresses, providing essential support during the framing phase.
Leveling and Grading
Ensure that the site is properly leveled and graded to facilitate efficient water drainage away from the deck structure. Use a level and grading tools to verify the evenness of the ground, making any necessary adjustments to achieve a uniform slope away from the house. Proper grading is essential for preventing water accumulation and potential damage to the deck and adjacent structures.
Weed Barrier and Gravel
To inhibit weed growth and enhance the stability of the deck's foundation, lay a weed barrier fabric over the cleared and leveled site. This barrier helps prevent unwanted vegetation from encroaching on the deck and provides an additional layer of protection. Subsequently, spread a layer of gravel over the weed barrier to promote drainage and create a stable base for the deck's support system.
By meticulously preparing the site for the construction of your 10×10 deck, you establish a solid foundation for the subsequent phases of the building process. Attention to detail during site preparation contributes to the structural integrity, longevity, and overall performance of the completed deck, ensuring a safe and enjoyable outdoor living space for years to come.
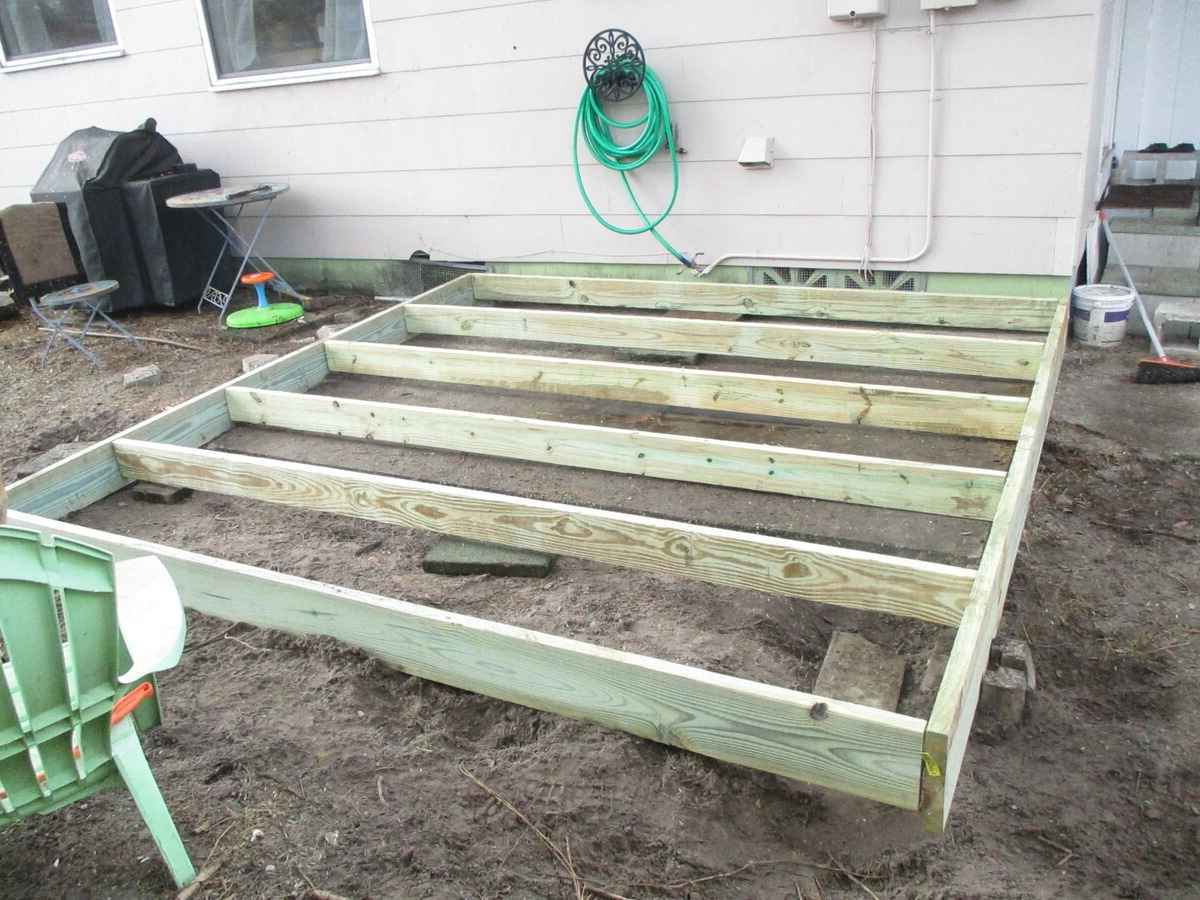
Step 5: Building the Frame
With the site meticulously prepared, the construction process transitions to building the foundational frame of the 10×10 deck. The frame serves as the structural backbone, providing support for the decking surface and ensuring the overall stability and integrity of the deck structure. This phase involves precise measurements, strategic assembly, and adherence to design specifications to create a sturdy and reliable framework for the deck.
Setting the Ledger Board
Begin by attaching a ledger board to the exterior wall of the house, serving as the starting point for the deck frame. Position the ledger board at the predetermined height, ensuring it is level and securely anchored to the house's framing with lag screws or through-bolts. The ledger board provides essential support for the deck joists and facilitates the seamless integration of the deck with the existing structure.
Installing the Joists
Once the ledger board is in place, install the joists perpendicular to the ledger, maintaining the specified spacing and alignment. Joist hangers are utilized to secure the joists to the ledger and provide additional structural support. Careful attention to joist placement and leveling is crucial to ensure the uniformity and stability of the deck's substructure, laying the groundwork for a level and secure decking surface.
Adding Beams and Support Posts
Incorporate beams and support posts to reinforce the joist framework and distribute the load evenly across the deck structure. The beams are positioned perpendicular to the joists and supported by the posts, contributing to the overall stability and load-bearing capacity of the deck. Proper attachment and alignment of the beams and support posts are essential to ensure the structural integrity of the frame.
Bracing and Reinforcement
Implement diagonal bracing and additional reinforcement as necessary to enhance the rigidity and stability of the frame. Diagonal bracing effectively minimizes lateral movement and sway, contributing to a solid and secure deck structure. Attention to detail in bracing and reinforcement bolsters the frame's ability to withstand external forces and ensures a durable and resilient foundation for the deck.
Inspecting and Adjusting
Throughout the frame construction process, conduct regular inspections to verify the accuracy of measurements, the integrity of connections, and the overall alignment of the frame components. Make any necessary adjustments to ensure that the frame meets the design specifications and safety standards, addressing any discrepancies or deficiencies promptly.
By meticulously executing the frame construction phase, you establish a robust and reliable foundation for the 10×10 deck, setting the stage for the subsequent installation of the decking surface, railing, and finishing touches. The careful assembly and reinforcement of the frame contribute to the overall structural integrity and longevity of the deck, ensuring a safe and enduring outdoor living space for years to come.
Step 6: Installing the Decking
With the frame meticulously constructed, the focus shifts to the installation of the decking, a pivotal phase that transforms the structural framework into a functional and visually appealing outdoor living space. The decking material, whether traditional wood planks, composite boards, or PVC alternatives, plays a defining role in the deck's aesthetics, durability, and maintenance requirements. The installation process demands precision, attention to detail, and a methodical approach to ensure a seamless and enduring decking surface.
Preparation and Layout
Before commencing the installation, carefully inspect the frame for any protruding nails, uneven surfaces, or structural imperfections that may hinder the decking's uniform placement. Address any irregularities and ensure that the frame is clean, level, and free of debris to provide an optimal foundation for the decking material. Additionally, establish a strategic layout plan for the decking boards, considering factors such as orientation, pattern, and potential seam locations to achieve a visually pleasing and structurally sound result.
Fastening and Alignment
Begin the installation by securing the first row of decking boards to the frame, ensuring proper alignment and spacing between each board. Utilize corrosion-resistant screws or hidden fastening systems designed for the specific type of decking material to achieve a secure and visually unobtrusive attachment. Pay close attention to the alignment and levelness of the boards, making necessary adjustments to maintain a uniform and aesthetically pleasing decking surface.
Cutting and Trimming
As the installation progresses, custom fitting and trimming of the decking boards may be necessary to accommodate the deck's perimeter, features, and any obstructions such as posts or angles. Utilize a circular saw or miter saw to achieve precise cuts, ensuring clean edges and seamless integration with the frame. Attention to detail in cutting and trimming contributes to a polished and professional finish, enhancing the overall visual appeal and functionality of the deck.
Finishing Touches
Upon completing the primary decking installation, attend to finishing touches such as concealing fastener heads, addressing exposed ends, and implementing any desired design elements such as picture framing or decorative inlays. Additionally, consider the application of a high-quality waterproofing sealant or protective finish to safeguard the decking material against moisture, UV exposure, and general wear, prolonging its lifespan and maintaining its aesthetic appeal.
Quality Assurance
Throughout the installation process, conduct regular inspections to verify the uniformity, stability, and overall quality of the decking surface. Address any discrepancies, loose fasteners, or imperfections promptly to ensure a flawless and enduring result. By upholding meticulous standards and attention to detail during the decking installation, you contribute to the overall longevity, visual appeal, and usability of the completed 10×10 deck, creating a welcoming and functional outdoor space for relaxation, entertainment, and enjoyment.
Step 7: Adding Railing and Stairs
The addition of railing and stairs marks a pivotal phase in the construction of a 10×10 deck, enhancing both the safety and visual appeal of the outdoor living space. The railing serves as a crucial safety feature, providing a protective barrier along the deck's perimeter, while the inclusion of stairs facilitates seamless access and egress, ensuring the deck is functional and accessible. This phase demands meticulous attention to detail, adherence to safety standards, and a focus on aesthetic integration to achieve a cohesive and inviting deck design.
Railing Installation
Commence the railing installation by selecting a suitable railing system that aligns with the deck's architectural style and your personal preferences. Options range from traditional wood railings to modern metal or composite systems, each offering distinct visual characteristics and maintenance considerations. Ensure that the chosen railing system complies with local building codes and safety standards, particularly regarding railing height, spacing of balusters, and load-bearing capacity.
Position the railing posts at strategic intervals along the deck's perimeter, securing them to the frame and ensuring they are plumb and securely anchored. Subsequently, install the railing sections or balusters, maintaining the specified spacing and alignment to create a secure and visually appealing barrier. Pay close attention to the structural integrity and stability of the railing components, verifying that they provide adequate protection and contribute to the overall aesthetic cohesion of the deck.
Stair Construction
When incorporating stairs into the deck design, prioritize safety, functionality, and visual harmony. Begin by determining the optimal location and orientation of the stairs, considering factors such as traffic flow, access points, and integration with the overall deck layout. Accurately measure the height and width of the stairs, ensuring compliance with local building codes and safety regulations governing stair dimensions and tread depth.
Construct the stair stringers, ensuring they are precisely cut and assembled to provide stable support for the stair treads. Install the treads and risers, securing them firmly to the stringers and verifying that they are level and securely anchored. Attention to detail in the construction of the stairs is essential to ensure a safe and user-friendly transition between the deck and the surrounding landscape.
Aesthetic Integration
Incorporate design elements that enhance the visual integration of the railing and stairs with the overall deck aesthetic. Consider options such as decorative post caps, lighting fixtures, or ornamental baluster designs to infuse the railing with character and charm. Additionally, explore creative approaches to seamlessly blend the stairs with the deck's architectural style, ensuring a cohesive and inviting transition between different levels of the outdoor space.
By meticulously executing the installation of railing and stairs, you elevate the safety, functionality, and visual appeal of the 10×10 deck, creating a welcoming and secure environment for leisure, entertainment, and relaxation. The seamless integration of these elements contributes to the overall cohesiveness and usability of the deck, ensuring it becomes a cherished extension of your home's outdoor living area.
Step 8: Finishing Touches and Maintenance Tips
As the construction of your 10×10 deck nears completion, attention turns to the finishing touches that elevate the visual appeal and functionality of the outdoor living space. Additionally, implementing proactive maintenance strategies ensures the longevity and optimal performance of the deck, safeguarding your investment and enhancing your enjoyment of the outdoor environment.
Enhancing Aesthetics
Incorporate decorative elements such as post caps, trim pieces, and lattice skirting to add character and visual interest to the deck. These embellishments not only contribute to the overall aesthetic appeal but also provide a polished and cohesive finish to the structure. Consider integrating outdoor lighting fixtures to extend the deck's usability into the evening hours, creating an inviting ambiance and enhancing safety.
Furniture and Accessories
Selecting suitable outdoor furniture and accessories tailored to your lifestyle and preferences transforms the deck into a functional and inviting space. Whether it's a cozy seating arrangement, a dining set for al fresco meals, or accent pieces that reflect your personal style, the right furnishings complement the deck's design and encourage relaxation and social gatherings.
Protective Finishes
Applying a high-quality sealant or protective finish to the decking material and any exposed wood surfaces is essential for safeguarding the deck against the elements. Regular maintenance coats help prevent moisture penetration, UV damage, and general wear, preserving the integrity and appearance of the deck. Additionally, consider staining or painting the deck to enhance its visual appeal while providing an additional layer of protection.
Landscaping Integration
Integrate landscaping elements such as potted plants, flower beds, or trellises to soften the transition between the deck and the surrounding yard. Thoughtfully placed greenery and natural accents create a harmonious connection between the deck and the outdoor environment, enhancing the overall aesthetic and contributing to a tranquil and inviting atmosphere.
Maintenance Tips
Regular maintenance is essential to uphold the deck's structural integrity and visual appeal. Implement a routine cleaning schedule to remove debris, dirt, and organic matter from the deck surface and between the boards. Inspect the deck for signs of wear, loose fasteners, or wood decay, addressing any issues promptly to prevent further damage.
Periodically inspect the railing, stairs, and support components to ensure they remain secure and stable. Tighten any loose fasteners, replace damaged or worn components, and verify the structural integrity of the railing and stair systems. Additionally, check for signs of water accumulation or moisture-related issues, addressing any drainage concerns to prevent potential damage to the deck.
By attending to these finishing touches and implementing proactive maintenance measures, you ensure that your 10×10 deck remains a vibrant, safe, and inviting outdoor space for years to come. The combination of aesthetic enhancements and diligent maintenance practices preserves the deck's beauty and functionality, allowing you to fully enjoy the benefits of your outdoor retreat.
Conclusion
In conclusion, the construction of a 10×10 deck represents a significant undertaking that culminates in the creation of a versatile and inviting outdoor living space. Throughout the comprehensive process outlined in this guide, from the initial planning and design phase to the meticulous execution of each construction stage, the emphasis has been on achieving a harmonious balance between functionality, safety, and aesthetic appeal.
By meticulously planning and designing the deck, considering individual needs, site characteristics, and safety requirements, homeowners can lay the groundwork for a successful construction project. The careful selection of materials and tools, coupled with thorough site preparation, ensures that the deck is built on a solid foundation, poised for enduring performance and longevity.
The construction of the frame, installation of the decking, and addition of railing and stairs represent pivotal phases that demand precision, attention to detail, and adherence to safety standards. Each step contributes to the overall structural integrity, visual cohesion, and usability of the completed deck, creating a welcoming and secure environment for leisure, entertainment, and relaxation.
As the construction nears completion, the integration of finishing touches and proactive maintenance strategies further enhances the deck's appeal and ensures its long-term performance. From decorative elements and outdoor furnishings to protective finishes and landscaping integration, these final touches elevate the deck's visual appeal and functionality, creating an inviting and tranquil outdoor retreat.
Ultimately, the construction of a 10×10 deck is a testament to the transformative power of a well-executed DIY project. It not only adds value to the home but also provides a space for creating cherished memories, fostering connections, and embracing the beauty of outdoor living. By following the comprehensive guide and infusing the construction process with creativity, attention to detail, and a commitment to quality, homeowners can embark on a rewarding journey of building a 10×10 deck that becomes an integral part of their lifestyle and home.