
Home>Create & Decorate>DIY & Crafts>DIY Dresser Makeover: Transforming An Old Piece Into A Stylish Statement
DIY & Crafts
DIY Dresser Makeover: Transforming An Old Piece Into A Stylish Statement
Published: February 27, 2024

Content Creator specializing in woodworking and interior transformations. Caegan's guides motivate readers to undertake their own projects, while his custom furniture adds a personal touch.
Learn how to give new life to an old dresser with our DIY dresser makeover guide. Transform it into a stylish statement piece with our easy-to-follow tips and tricks. Perfect for DIY & Crafts enthusiasts!
(Many of the links in this article redirect to a specific reviewed product. Your purchase of these products through affiliate links helps to generate commission for Twigandthistle.com, at no extra cost. Learn more)
Introduction
Are you ready to embark on a creative journey that will breathe new life into an old, tired dresser? A DIY dresser makeover is a fantastic way to unleash your creativity and transform a mundane piece of furniture into a stunning and stylish statement that reflects your personal taste and flair. Whether you're a seasoned DIY enthusiast or a novice looking for a fun and rewarding project, this comprehensive guide will equip you with the knowledge and inspiration to revamp your dresser with confidence and panache.
Revamping a dresser is not just about giving it a fresh coat of paint or adding new hardware; it's about infusing it with your unique personality and vision. With the right tools, materials, and a dash of creativity, you can turn a drab dresser into a focal point that exudes charm and character in any room of your home.
In the following sections, we'll delve into the essential steps and considerations for a successful dresser makeover. From selecting the perfect dresser for your project to choosing the ideal paint or stain, adding eye-catching hardware and accents, and putting the finishing touches, this guide will walk you through each stage of the transformation process. Additionally, we'll provide expert styling tips to help you seamlessly incorporate your revamped dresser into your home decor.
So, roll up your sleeves, gather your supplies, and get ready to unleash your inner artist as we embark on this exciting DIY journey together. Whether you're aiming for a rustic, shabby-chic look, a sleek and modern finish, or a whimsical and colorful design, this guide will empower you to breathe new life into your dresser and create a stunning piece that reflects your individual style and creativity. Let's dive in and discover the art of transforming an old dresser into a captivating and stylish statement piece!
Choosing the Right Dresser for Your Makeover
The first and most crucial step in embarking on a dresser makeover journey is selecting the right piece to transform. Whether you're repurposing an old dresser you already own or scouting for the perfect candidate at thrift stores, garage sales, or online marketplaces, several key factors should guide your decision-making process.
Consider the Size and Style
Before diving into the makeover process, carefully assess the size and style of the dresser. Take into account the dimensions of the space where the revamped dresser will reside. If you're aiming to revamp a dresser for a compact bedroom, a smaller, more streamlined piece might be the ideal choice. Conversely, for a spacious living area, a larger dresser with ample storage and surface space could be more suitable. Additionally, consider the existing decor and aesthetic of the room. Are you aiming for a vintage, rustic look, or do you prefer a sleek, modern style? The dresser's style should harmonize with the overall ambiance of the space.
Evaluate the Condition
Inspect the dresser's structural integrity and overall condition. Look for signs of damage, such as warped drawers, chipped veneer, or wobbly legs. While minor imperfections can often be remedied during the makeover process, extensive damage or structural issues may require more advanced restoration skills and resources. Additionally, consider the quality of the dresser's construction. Solid wood dressers are typically more durable and lend themselves well to makeovers, allowing for sanding, staining, and painting to achieve a fresh, updated look.
Unleash Your Creativity
When selecting a dresser for your makeover project, don't be afraid to think outside the box. Embrace the potential for transformation and envision the dresser's possibilities beyond its current state. Look for unique details, such as intricate drawer pulls, elegant carvings, or distinctive hardware, that can serve as focal points in the revamped design. Keep an open mind and let your creativity guide you as you seek out a dresser that sparks inspiration and ignites your imagination.
By carefully considering the size, style, condition, and creative potential of the dresser, you can lay a solid foundation for a successful and fulfilling makeover project. With the right dresser as your canvas, you'll be well-equipped to embark on the exhilarating journey of breathing new life into a piece of furniture and creating a captivating statement that reflects your personal style and vision.
Preparing the Dresser for Transformation
Before diving into the exciting process of revamping your dresser, it's essential to prepare the piece thoroughly for its upcoming transformation. This crucial phase sets the stage for a successful makeover and ensures that the subsequent steps, such as painting, staining, and adding new hardware, yield impeccable results.
Clear the Canvas
Begin by clearing out the dresser's drawers and removing any existing hardware, such as knobs or pulls. This step not only facilitates easier access to the entire surface but also allows for a more comprehensive assessment of the dresser's condition. Take this opportunity to inspect the drawers, interior, and exterior for any hidden damage, lingering debris, or imperfections that may require attention before proceeding with the makeover.
Surface Preparation
To achieve a flawless finish, the dresser's surface must be meticulously prepared. Start by thoroughly cleaning the entire piece, removing accumulated dust, grime, and residue. A mild detergent solution or a gentle wood cleaner can effectively eliminate years of buildup, preparing the surface for the subsequent refinishing steps. Once cleaned, allow the dresser to dry completely before proceeding.
Sanding and Smoothing
Sanding is a critical step in the preparation process, as it not only smoothens the surface but also creates a suitable foundation for paint or stain adhesion. Utilize varying grits of sandpaper to address different areas of the dresser. Coarser grits, such as 80 or 100, can effectively remove old finishes, rough patches, and imperfections, while finer grits, such as 220, can refine the surface to a silky smooth texture. Pay special attention to intricate details, edges, and corners to ensure uniformity in the surface texture.
Repair and Patch
During the inspection phase, if any structural issues or blemishes were identified, now is the time to address them. Repair minor dents, scratches, or gouges with wood filler, allowing it to dry and then sanding it smooth. For more extensive damage, such as deep gouges or missing veneer, consider employing advanced restoration techniques or seeking professional assistance to ensure the dresser's structural integrity is restored.
By meticulously preparing the dresser for its transformation, you are laying the groundwork for a successful and visually stunning makeover. This diligent approach sets the stage for the subsequent stages of the process, ensuring that your efforts yield a revitalized dresser that exudes charm, character, and a touch of your unique style.
Selecting the Perfect Paint or Stain
The choice of paint or stain plays a pivotal role in defining the aesthetic appeal and overall ambiance of your revamped dresser. Whether you envision a vibrant burst of color, a timeless and elegant stain, or a distressed, weathered finish, selecting the perfect paint or stain sets the tone for the entire makeover. Consider the following factors to guide your decision and ensure a harmonious and visually captivating result.
Embrace Your Vision
Before delving into the myriad of paint and stain options, take a moment to envision the desired look and feel of your revamped dresser. Are you aiming for a bold, statement-making piece that injects a pop of color into the room? Or do you prefer a more subdued, natural finish that accentuates the dresser's inherent beauty? By clarifying your vision, you can narrow down the vast array of paint and stain choices and align them with your creative aspirations.
Color and Finish Selection
If you opt for paint, explore a spectrum of colors that resonate with your personal style and complement the existing decor. Consider the room's color palette and the dresser's intended placement to ensure a cohesive and harmonious integration. From serene pastels to bold jewel tones and classic neutrals, the color selection presents an opportunity to infuse the dresser with your unique personality.
Alternatively, if you lean towards a stain, contemplate the natural hues and undertones of the wood. Stains can enhance the wood's grain and texture, imbuing the dresser with warmth and depth. Whether you prefer a rich, dark stain for a touch of sophistication or a light, airy finish that exudes a rustic charm, the stain selection can accentuate the dresser's inherent character while preserving its organic allure.
Consider the Application Process
Evaluate the application process associated with your chosen paint or stain. Water-based paints offer easy cleanup and emit fewer fumes, making them a convenient and eco-friendly choice. Oil-based paints, on the other hand, provide a durable finish and are well-suited for high-traffic areas. When it comes to stains, assess whether a wipe-on, brush-on, or spray application aligns with your proficiency and desired outcome. Understanding the application nuances ensures a seamless and gratifying experience throughout the makeover process.
Test and Experiment
Before committing to a specific paint or stain, conduct test applications on inconspicuous areas of the dresser or on sample wood pieces. This experimentation allows you to observe how the paint or stain interacts with the dresser's surface and how the color or finish harmonizes with your envisioned aesthetic. Additionally, consider experimenting with distressing techniques, layering colors, or incorporating decorative effects to infuse the dresser with depth and character.
By carefully considering your vision, color and finish preferences, application requirements, and conducting thorough experimentation, you can confidently select the perfect paint or stain that aligns with your creative vision and breathes new life into your dresser. The chosen paint or stain will serve as the artistic medium through which your unique style and personality are expressed, culminating in a captivating and visually striking statement piece.
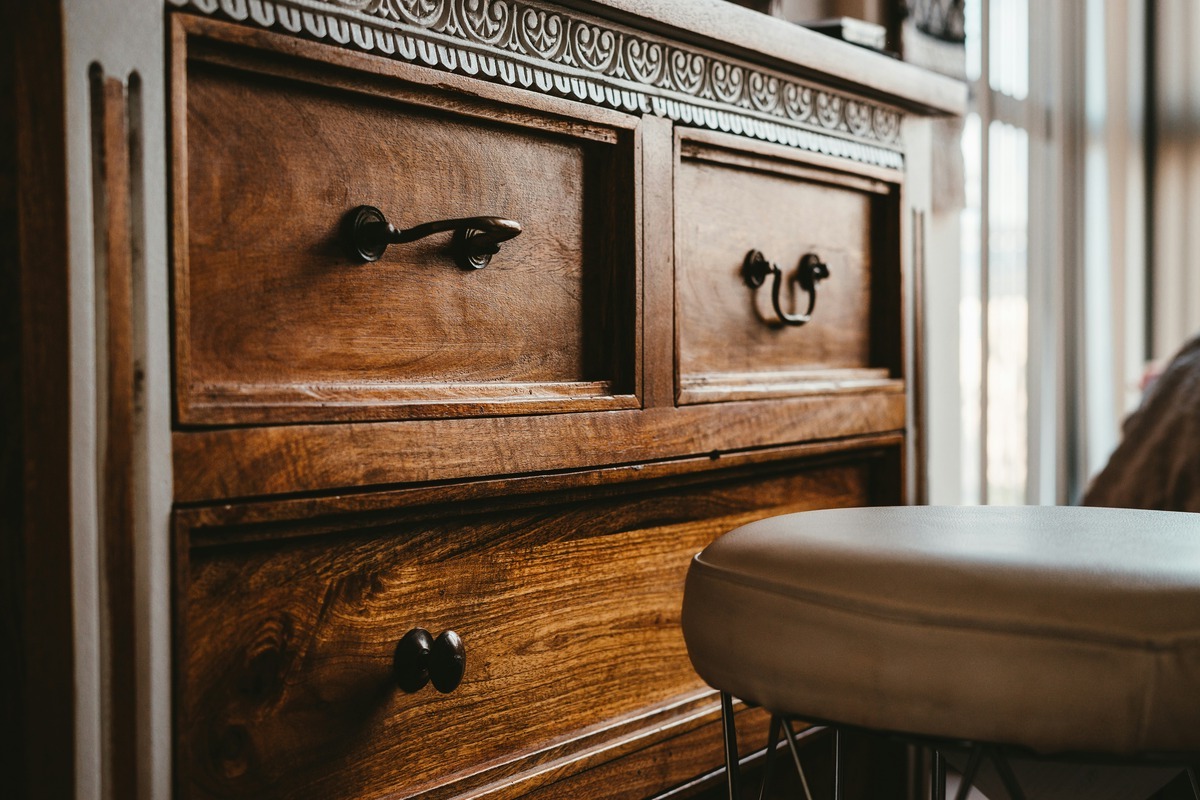
Adding Hardware and Accents
Once the foundation of your dresser makeover is laid with the perfect paint or stain, it's time to elevate the visual allure and functionality of the piece through carefully selected hardware and accents. The choice of knobs, pulls, and decorative elements presents an opportunity to infuse the dresser with personality, charm, and a touch of individuality. Here's how you can expertly navigate this transformative phase of the makeover process.
Embrace Coherence and Contrast
When selecting hardware, consider the existing style of the dresser and the overarching theme of the room. Embrace coherence by choosing hardware that complements the dresser's aesthetic and aligns with the room's decor. For a vintage dresser, ornate and antique-style hardware can enhance its timeless appeal, while sleek, contemporary knobs and pulls can infuse a modern dresser with a touch of sophistication. Alternatively, consider introducing contrast by juxtaposing the dresser's style with unexpected hardware choices, such as mixing metals or incorporating eclectic, whimsical accents that serve as focal points.
Unleash Creativity with DIY Accents
Elevate the dresser's visual impact by incorporating DIY accents that reflect your creativity and ingenuity. Consider embellishing the edges of the drawers with hand-painted designs, decoupage elements, or stenciled patterns that infuse the dresser with a bespoke, artisanal touch. Additionally, explore the possibility of crafting custom hardware or repurposing unconventional items, such as vintage brooches, decorative keys, or reclaimed architectural elements, to add a distinctive and personalized flair to the dresser.
Harmonize with the Finish
Ensure that the chosen hardware harmonizes with the dresser's finish, whether it's a painted surface or a stained wood grain. For painted dressers, the hardware can serve as a striking accent, introducing pops of color or metallic finishes that enliven the overall aesthetic. In the case of stained dressers, opt for hardware that complements the wood's natural tones and grain, enhancing the organic beauty of the piece. By aligning the hardware with the dresser's finish, you create a cohesive and harmonious visual composition that elevates the dresser's allure.
Functional and Aesthetic Considerations
Beyond aesthetic appeal, prioritize the functionality of the chosen hardware. Select knobs and pulls that are ergonomic and practical, facilitating effortless access to the dresser's drawers while seamlessly integrating with the overall design. Additionally, consider the scale and proportion of the hardware in relation to the dresser's dimensions, ensuring that the chosen accents enhance the piece without overwhelming its visual impact.
By thoughtfully curating hardware and incorporating personalized accents, you can infuse the dresser with character, charm, and a touch of your unique style. This transformative phase of the makeover process allows you to elevate the dresser from a functional piece of furniture to a captivating and visually striking statement that reflects your creativity and attention to detail.
Finishing Touches and Styling Tips
As you approach the culmination of your dresser makeover journey, the final touches and styling considerations play a pivotal role in refining the visual impact and seamlessly integrating the revamped dresser into your home decor. These thoughtful details and styling tips elevate the dresser from a refurbished piece of furniture to a captivating focal point that harmonizes with its surroundings and reflects your personal style.
Embrace Cohesive Styling
When positioning the revamped dresser within a room, consider its relationship with the surrounding elements. Embrace cohesive styling by incorporating complementary decor items, such as artwork, mirrors, or decorative accents, that resonate with the dresser's aesthetic. By establishing visual connections and thematic coherence, you create a harmonious vignette that enhances the dresser's presence and contributes to the overall ambiance of the space.
Layer Textures and Elements
Introduce depth and visual interest by layering textures and elements atop the dresser. Consider adorning the surface with a curated selection of decorative objects, such as vases, candles, or sculptural pieces, to create a captivating tableau. Embrace a mix of heights, shapes, and materials to craft a dynamic composition that captivates the eye and infuses the dresser with personality and allure.
Lighting Enhancement
Strategically incorporate lighting elements to accentuate the dresser's newfound charm. Whether through the addition of a stylish table lamp, a cascading pendant light, or the play of natural light, thoughtful illumination enhances the dresser's presence and draws attention to its distinctive features. Consider the interplay of light and shadow to highlight the dresser's texture, color, and decorative accents, creating a captivating visual interplay within the space.
Reflective Surfaces
Integrate reflective surfaces, such as mirrors or metallic accents, into the dresser's styling to amplify its visual impact. A strategically positioned mirror can expand the perceived space and infuse the area with luminosity, while metallic elements add a touch of glamour and sophistication. By leveraging reflective surfaces, you create a sense of depth and dimension, elevating the dresser's presence within the room.
Personalized Flourishes
Infuse the dresser with personalized flourishes that speak to your individuality and experiences. Consider displaying cherished mementos, family photographs, or heirloom treasures atop the dresser, infusing the space with sentimental value and narrative depth. By incorporating these personal touches, the dresser becomes a meaningful and evocative expression of your life and journey, enriching the room with warmth and character.
By embracing these finishing touches and styling tips, you can seamlessly integrate the revamped dresser into your home decor, creating a captivating and harmonious ensemble that reflects your creativity, style, and attention to detail. Each element and consideration contributes to a cohesive and visually striking presentation, ensuring that the dresser stands as a testament to your artistic vision and design sensibilities.
Conclusion
As we reach the conclusion of this comprehensive guide to transforming an old dresser into a stylish statement piece, it's evident that a DIY dresser makeover is not merely a creative endeavor; it's a journey of self-expression, ingenuity, and personalization. Throughout this transformative process, we've explored the essential steps and considerations, from selecting the right dresser and preparing it for its revitalization to choosing the perfect paint or stain, adding captivating hardware and accents, and applying the finishing touches with expert styling tips.
Undertaking a dresser makeover is a testament to the power of creativity and resourcefulness. It's an opportunity to breathe new life into a piece of furniture, infusing it with character, charm, and a touch of individuality. By carefully selecting a dresser that aligns with your vision, meticulously preparing its surface, and thoughtfully curating the paint or stain, hardware, and styling elements, you have the ability to craft a captivating statement piece that reflects your unique style and personality.
The culmination of a successful dresser makeover extends beyond the visual appeal of the revamped piece. It encompasses the satisfaction of having transformed a mundane item into a cherished and visually striking addition to your home. The process itself is a testament to your creativity, patience, and dedication to infusing everyday objects with artistry and flair.
As you position your revamped dresser within your living space, it becomes more than just a piece of furniture; it becomes a reflection of your creativity, style, and attention to detail. Each brushstroke, hardware selection, and styling choice contributes to a cohesive and harmonious ensemble that enriches the ambiance of the room and resonates with your personal narrative.
Ultimately, a DIY dresser makeover is a celebration of individuality and the transformative power of creativity. It's a reminder that with a dash of inspiration, a sprinkle of imagination, and a willingness to embark on a hands-on project, you can breathe new life into the ordinary, infusing it with extraordinary charm and allure. So, as you admire your revamped dresser, basking in the glow of a successful makeover, take pride in the fact that you've not only revitalized a piece of furniture but also imbued it with your unique essence, making it a true reflection of your artistic vision and ingenuity.