
Home>Outdoors & Camping>BBQ & Grill>DIY Grill Island: How To Build Your Own Outdoor Cooking Oasis
BBQ & Grill
DIY Grill Island: How To Build Your Own Outdoor Cooking Oasis
Published: March 6, 2024

Content Creator for Outdoors & Camping, Sophie turns any yard into a sustainable paradise. Her dedication to DIY outdoor projects and volunteer work in community gardens shares joy and knowledge.
Learn how to create your own BBQ & Grill island with our step-by-step guide. Transform your outdoor space into the ultimate cooking oasis!
(Many of the links in this article redirect to a specific reviewed product. Your purchase of these products through affiliate links helps to generate commission for Twigandthistle.com, at no extra cost. Learn more)
Introduction
So, you're tired of lugging your grill in and out of the garage every time you want to cook up some burgers or steaks? Or maybe you're just ready to take your outdoor cooking game to the next level? Building your own DIY grill island could be the perfect solution! Not only will it provide a permanent home for your grill, but it will also give you a dedicated space for prepping, cooking, and serving your outdoor feasts. In this guide, we'll walk you through the step-by-step process of creating your very own outdoor cooking oasis. Let's fire up those DIY skills and get started!
Planning Your DIY Grill Island
Before you dive into the actual construction, it's crucial to start with a solid plan. Here's how to get started:
-
Choose the Location: Select a spot in your outdoor space that is both convenient for cooking and entertaining. Consider factors such as proximity to the house, prevailing wind direction, and any potential obstructions.
-
Design the Layout: Determine the size and shape of your grill island. Consider the space needed for your grill, countertop workspace, and any additional features like storage cabinets or a mini-fridge.
-
Check Local Codes and Regulations: Before you start building, make sure to check with your local building department to ensure compliance with any zoning or building regulations.
-
Create a Materials List: Once you have a clear plan in mind, make a list of all the materials and tools you'll need for the project. This may include lumber, concrete blocks, mortar, countertop materials, and the grill itself.
By taking the time to plan your DIY grill island thoroughly, you'll set yourself up for a smoother construction process and a finished product that meets your needs and complements your outdoor space.
Gathering Materials and Tools
Now that you have a clear plan in place, it's time to gather all the materials and tools you'll need to bring your DIY grill island to life. Here's a comprehensive list to get you started:
Materials:
- Lumber: Purchase pressure-treated lumber for the frame and base of the grill island. Opt for weather-resistant wood that can withstand outdoor elements.
- Concrete Blocks or Bricks: These will form the foundation and structure of your grill island. Choose durable blocks or bricks that can support the weight of the countertop and grill.
- Mortar: You'll need mortar to secure the concrete blocks or bricks in place and create a stable base for the countertop.
- Countertop Material: Select a suitable material for the countertop, such as granite, concrete, or natural stone. Ensure that it is heat-resistant and can withstand outdoor conditions.
- Grill Insert: Choose a high-quality grill insert that fits the dimensions of your grill island. Consider features like built-in burners, rotisseries, and ample cooking space.
- Fasteners and Hardware: Stock up on screws, bolts, and other fasteners needed for assembly. Additionally, gather hinges and handles for any cabinet doors or storage compartments.
Tools:
- Circular Saw: A circular saw will be essential for cutting lumber and countertop materials to the desired dimensions.
- Level: Ensure your grill island is perfectly level by using a spirit level during construction.
- Trowel: You'll need a trowel for applying mortar when laying the concrete blocks or bricks.
- Drill/Driver: A drill/driver will come in handy for securing the lumber and assembling the various components of the grill island.
- Work Gloves and Safety Gear: Protect your hands with work gloves and wear appropriate safety gear, including goggles and a dust mask, when working with materials and power tools.
By gathering all the necessary materials and tools beforehand, you'll be well-prepared to tackle each phase of the construction process with confidence and efficiency.
Building the Base
The base of your DIY grill island serves as the foundation for the entire structure, providing stability and support for the countertop and grill. Here's a step-by-step guide to building the base:
-
Prepare the Site: Begin by clearing and leveling the ground where the grill island will be located. Use a shovel and a tamper to create a flat and compacted surface.
-
Lay the Foundation: If you're using concrete blocks or bricks, start by laying them in a level and staggered pattern to form the base of the island. Use a spirit level to ensure that the blocks are even and stable.
-
Secure the Blocks: Once the first layer of blocks is in place, apply mortar to the top surface of each block before adding the next layer. This will create a strong bond and prevent shifting over time.
-
Build the Frame: Construct a sturdy frame using pressure-treated lumber that will sit on top of the concrete blocks. The frame should match the dimensions of your grill island and provide ample support for the countertop.
-
Attach the Frame: Secure the frame to the top of the concrete blocks using screws or heavy-duty construction adhesive. Ensure that the frame is level and securely anchored to the base.
-
Add Cross Bracing: To further reinforce the base, consider adding cross braces within the frame. This will help distribute the weight evenly and prevent any potential sagging over time.
-
Check for Stability: Once the base is assembled, double-check for stability and levelness. Make any necessary adjustments before moving on to the next phase of construction.
By following these steps, you'll create a solid and reliable base for your DIY grill island, setting the stage for the next stages of the project.
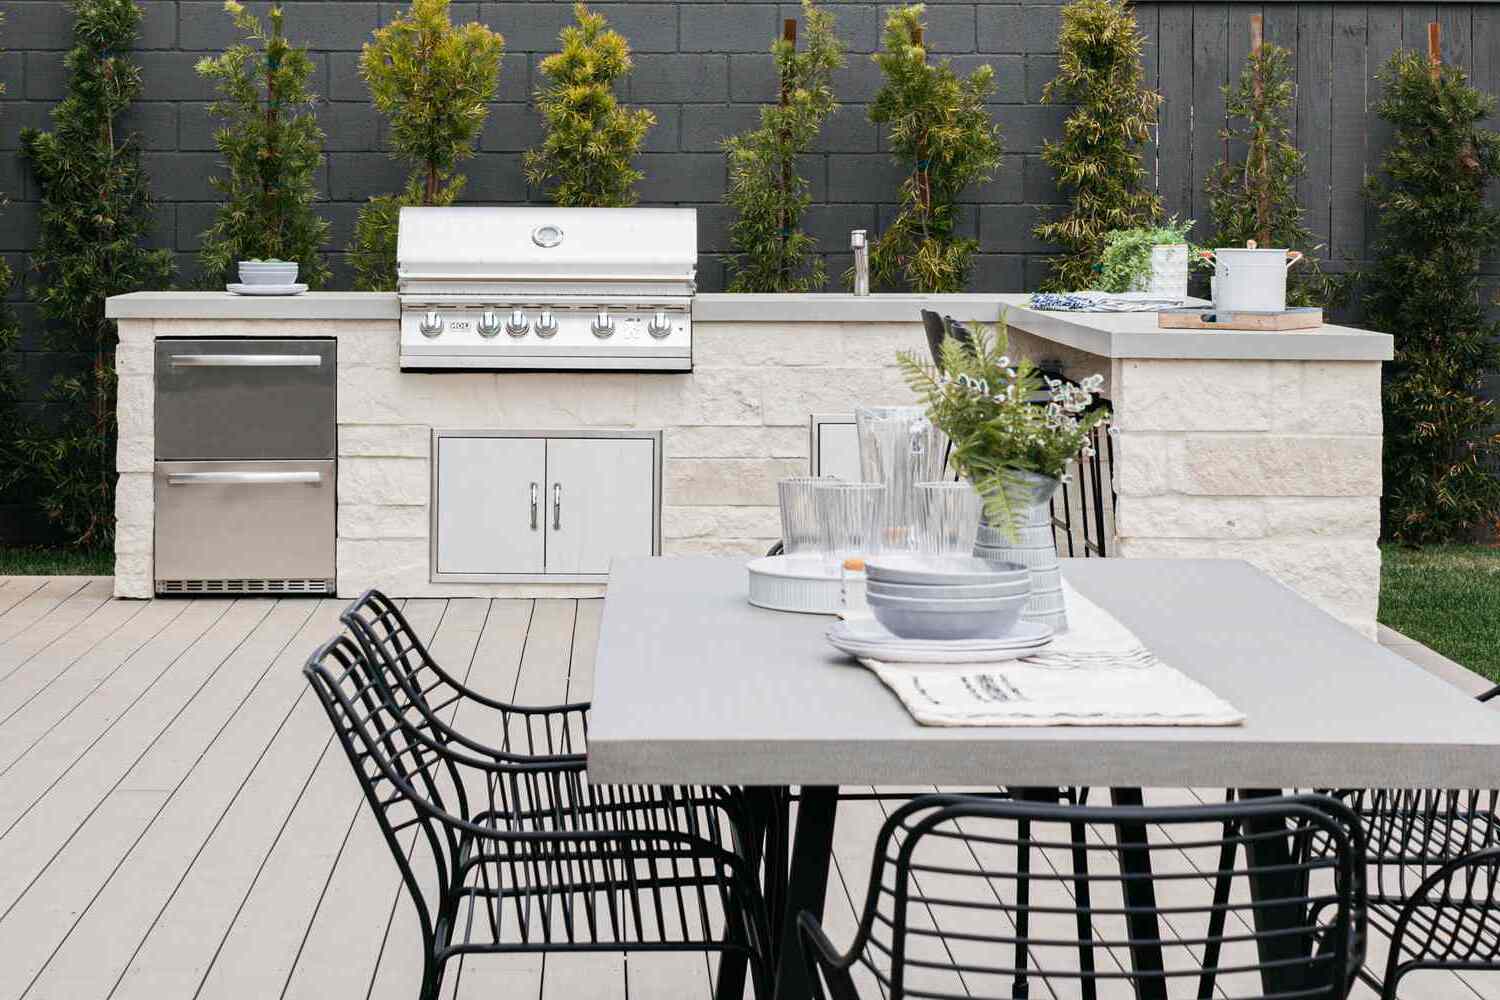
Constructing the Countertop and Grill Area
With the base of your DIY grill island in place, it's time to focus on constructing the countertop and grill area. This phase will bring your outdoor cooking oasis one step closer to completion. Here's how to tackle this crucial stage of the project:
-
Selecting the Countertop Material: Choose a durable and heat-resistant material for your countertop, such as granite, concrete, or natural stone. Ensure that the dimensions of the countertop will accommodate your grill and provide ample workspace for food preparation.
-
Cutting and Fitting the Countertop: Use a circular saw to cut the countertop material to the desired dimensions. Double-check the measurements to ensure a precise fit over the frame of the grill island. If necessary, enlist the help of a friend to assist with lifting and placing the countertop in position.
-
Securing the Countertop: Once the countertop is in place, secure it to the frame using construction adhesive or mounting brackets. Ensure that the countertop is level and securely anchored to the base, providing a stable surface for cooking and serving.
-
Installing the Grill Insert: Carefully follow the manufacturer's instructions to install the grill insert within the designated area of the countertop. Make sure the grill is positioned securely and that all connections for gas or electricity are properly installed and tested.
-
Creating a Grill Surround: Consider adding a decorative surround or backsplash around the grill area to enhance the visual appeal of your outdoor cooking space. This could involve using additional countertop material, stone veneer, or tile to create a stylish and functional backdrop for your grill.
-
Adding Functional Features: If desired, incorporate additional features into the countertop and grill area, such as built-in storage compartments, a sink, or a mini-fridge. These elements can further enhance the functionality and convenience of your outdoor kitchen.
By following these steps, you'll successfully construct the countertop and grill area of your DIY grill island, bringing you one step closer to enjoying your own outdoor cooking oasis.
Adding Finishing Touches
As you near the completion of your DIY grill island, it's time to add those final details that will elevate both the functionality and aesthetic appeal of your outdoor cooking oasis. Here's how to put the finishing touches on your project:
-
Sealing the Countertop: Depending on the material you've chosen for your countertop, it may require sealing to protect it from stains, moisture, and the outdoor elements. Follow the manufacturer's guidelines for applying a suitable sealant to ensure the longevity and durability of your countertop.
-
Applying Decorative Elements: Consider incorporating decorative elements such as tile accents, mosaic designs, or custom engraving to personalize the look of your grill island. These touches can add a unique and stylish flair to your outdoor cooking space.
-
Installing Lighting: Enhance the functionality and ambiance of your grill island by installing outdoor lighting. This could include overhead lighting to illuminate the cooking area, as well as accent lighting to create a welcoming atmosphere for evening gatherings.
-
Adding Bar Seating: If space allows, consider incorporating a bar overhang or dedicated seating area adjacent to your grill island. This will provide a comfortable and inviting space for guests to gather while you work your culinary magic.
-
Accessorizing with Plants and Décor: Soften the look of your grill island by adding potted plants, herbs, or decorative accents. Not only will this add a touch of greenery to your outdoor space, but it can also contribute to a more inviting and welcoming atmosphere.
-
Incorporating Functional Storage: Integrate storage solutions such as drawers, cabinets, or shelves into your grill island design. This will provide convenient storage for grilling tools, utensils, and other essentials, keeping your outdoor kitchen organized and efficient.
By attending to these finishing touches, you'll not only enhance the functionality and visual appeal of your DIY grill island but also create a space that reflects your personal style and enhances your outdoor cooking experience. Now, it's time to step back, admire your handiwork, and get ready to fire up the grill!
Enjoying Your Outdoor Cooking Oasis
Now that your DIY grill island is complete, it's time to savor the fruits of your labor and fully embrace the outdoor cooking oasis you've created. Here's how to make the most of your new culinary haven:
-
Host Memorable Gatherings: Invite friends and family over for unforgettable outdoor gatherings. Whether it's a casual weekend barbecue or a celebratory feast, your grill island provides the perfect setting for creating lasting memories.
-
Experiment with New Recipes: Take advantage of your outdoor kitchen to explore new recipes and cooking techniques. From sizzling steaks to wood-fired pizzas, the possibilities are endless. Let your creativity and culinary skills shine as you whip up delectable dishes for your guests.
-
Create Ambiance with Outdoor Décor: Enhance the ambiance of your outdoor cooking space by adding decorative elements such as string lights, outdoor rugs, and comfortable seating. Transform your grill island into a welcoming and stylish retreat where everyone will want to gather.
-
Enjoy Al Fresco Dining: Embrace the joy of dining al fresco by setting up a charming outdoor dining area near your grill island. Whether it's a cozy breakfast nook or a spacious dining table, dining outdoors adds a special touch to any meal.
-
Relax and Unwind: After preparing a delicious meal, take a moment to relax and unwind in your outdoor oasis. Sit back, savor the flavors, and enjoy the company of your guests in the comfort of your beautifully crafted outdoor space.
-
Maintain and Care for Your Grill Island: To ensure that your outdoor cooking oasis remains in top condition, establish a regular maintenance routine. Clean the grill, seal the countertop as needed, and keep the surrounding area tidy to preserve the beauty and functionality of your DIY creation.
By embracing these tips, you'll be able to fully appreciate and enjoy the benefits of your DIY grill island. Whether it's a casual weeknight dinner or a festive outdoor celebration, your outdoor cooking oasis is sure to become a beloved focal point of your home. Cheers to many memorable moments and delicious meals in your new outdoor culinary haven!