
Home>Outdoors & Camping>BBQ & Grill>DIY: How To Build An Outdoor Grill
BBQ & Grill
DIY: How To Build An Outdoor Grill
Published: March 6, 2024

Content Creator for Outdoors & Camping, Sophie turns any yard into a sustainable paradise. Her dedication to DIY outdoor projects and volunteer work in community gardens shares joy and knowledge.
Learn how to build your own outdoor grill with our step-by-step DIY guide. Create the perfect BBQ and grill setup for your backyard!
(Many of the links in this article redirect to a specific reviewed product. Your purchase of these products through affiliate links helps to generate commission for Twigandthistle.com, at no extra cost. Learn more)
Introduction
So, you want to take your outdoor cooking game to the next level? Building your own outdoor grill is a fantastic way to do just that. Not only will you have the satisfaction of creating something with your own two hands, but you'll also have a custom grill perfectly suited to your needs. Whether you're a barbecue enthusiast or just love the idea of cooking al fresco, this DIY project is sure to bring a lot of joy and delicious meals to your outdoor space. But where do you start? Let's dive into the materials and steps you'll need to build your very own outdoor grill.
Materials Needed
To get started on your outdoor grill project, you'll need to gather the following materials:
- Bricks: These will form the main structure of your grill, so make sure to choose durable, heat-resistant bricks that can withstand high temperatures.
- Grill Grate: Look for a high-quality stainless steel grill grate that fits the size of your grill. This will be the surface where you cook your delicious meals.
- Concrete: You'll need this to secure the bricks in place and create a solid base for your grill.
- Metal Grate: This will be used to support the charcoal or wood for your grill, so opt for a sturdy, heat-resistant metal grate.
- Level: Ensuring that your grill is level is crucial for even cooking, so a good level will be essential for this project.
- Trowel: You'll use this tool to apply and shape the concrete as you build the base of your grill.
- Safety Gear: Don't forget to prioritize safety! Gloves and safety goggles are a must when working with bricks and concrete.
- Measuring Tape: Precision is key when building your grill, so a measuring tape will help you ensure everything is in the right place.
- Charcoal/Wood: Of course, you'll need fuel for your grill, so stock up on your preferred choice of charcoal or wood for cooking.
Gathering these materials will set you up for success as you embark on this exciting DIY outdoor grill project.
Step 1: Choosing the Location
The first step in building your outdoor grill is choosing the perfect location for it. Consider the layout of your outdoor space and think about where the grill will be most convenient for cooking and entertaining. Here are some key factors to keep in mind:
-
Accessibility: You'll want to place the grill in an area that is easily accessible from your kitchen or dining area. This will make it more convenient to transport food and supplies to and from the grill.
-
Safety: Ensure that the location you choose is a safe distance from your home, any flammable materials, and low-hanging branches. Safety should always be a top priority when selecting the spot for your grill.
-
Ventilation: Adequate ventilation is essential for outdoor grilling. Choose a location that allows for good airflow to prevent smoke from accumulating in unwanted areas.
-
Level Ground: It's important to place your grill on a level surface to ensure stability and even cooking. If the ground is not level, consider leveling it out before proceeding with the construction of the grill base.
By carefully considering these factors, you can select the ideal location for your outdoor grill, setting the stage for a successful and enjoyable grilling experience.
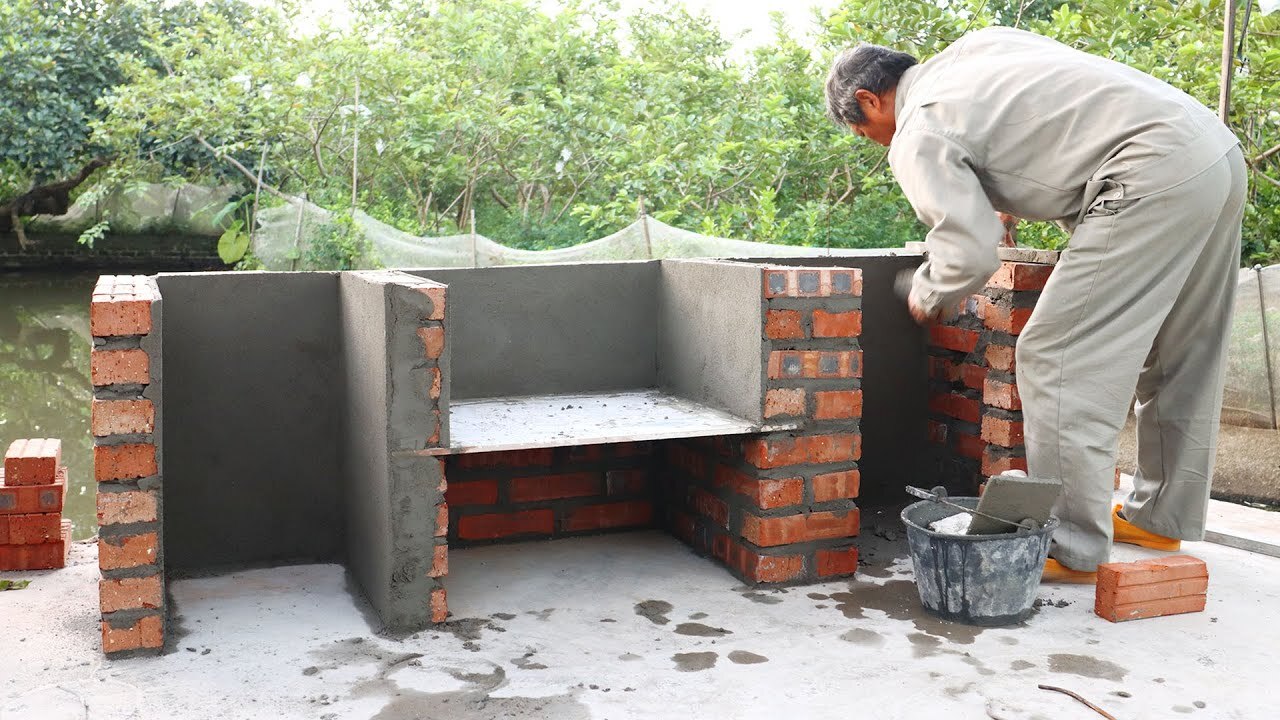
Step 2: Building the Base
Once you've chosen the perfect location for your outdoor grill, it's time to start building the base. The base serves as the foundation for your grill, providing stability and support for the cooking surface. Here's how to get started:
-
Lay the Foundation: Begin by marking the area where you want to build the base using stakes and string. Then, dig a shallow trench and fill it with a layer of gravel to create a stable foundation for the base.
-
Arrange the Bricks: Using heat-resistant bricks, start laying the first layer in the shape and size of your desired grill base. Be sure to use a level to ensure that the bricks are even and stable.
-
Secure with Concrete: Once the first layer of bricks is in place, mix concrete according to the manufacturer's instructions and use it to secure the bricks together. This will create a solid and durable base for your grill.
-
Build the Walls: Continue stacking the bricks to create the walls of the base, ensuring that each layer is level and securely bonded with concrete. Leave an opening for the grill grate and the charcoal or wood support.
-
Reinforce the Structure: To add extra stability, consider adding metal braces or supports to reinforce the corners and sides of the base. This will help ensure that your grill is strong and long-lasting.
By following these steps, you'll be well on your way to creating a sturdy and reliable base for your outdoor grill. Once the base is complete, you can move on to the exciting next step of constructing the grill itself.
Step 3: Constructing the Grill
Now that the base of your outdoor grill is solid and ready, it's time to move on to the exciting step of constructing the grill itself. This is where the magic happens, as you'll be creating the cooking surface and the space for the fuel that will bring your outdoor meals to life. Here's how to go about it:
-
Install the Grill Grate: Place the stainless steel grill grate on the designated area within the base. Ensure that it fits securely and is level. This will be the surface where you'll be grilling your delicious food, so it's essential to position it correctly.
-
Add the Charcoal/Wood Support: Next, install the metal grate that will support the charcoal or wood for your grill. This should be positioned beneath the grill grate, allowing for easy access when it's time to light the fuel.
-
Create the Cooking Area: Use additional bricks to build up the walls around the grill grate, leaving enough space for airflow. This will help contain the heat and create a defined cooking area for your outdoor grill.
-
Ensure Stability and Alignment: As you construct the grill, periodically check for stability and alignment. Use a level to ensure that the grill grate and the surrounding bricks are even, ensuring that your grill will provide consistent and reliable cooking results.
-
Finishing Touches: Once the main structure of the grill is in place, take a moment to add any finishing touches. Consider adding a handle to the grill grate for easy removal, or incorporating a shelf for holding utensils and condiments.
By following these steps, you'll be well on your way to constructing a functional and efficient grill that will be the centerpiece of your outdoor cooking adventures. With the grill in place, you'll be ready to move on to the final step of adding those all-important finishing touches.
Step 4: Adding Finishing Touches
As you near the completion of your DIY outdoor grill project, it's time to add those final details that will elevate both the functionality and aesthetics of your creation. These finishing touches will not only make your grill more convenient to use but also add a personal touch to the overall design. Here's how to add those important final elements:
-
Handle and Hinges: Consider adding a handle to the grill lid, if applicable, to make it easier to open and close. Additionally, installing hinges on the lid can provide added convenience and a professional finish to your grill.
-
Shelves or Countertops: If space allows, adding shelves or countertops adjacent to the grill can provide a convenient area for food preparation, holding utensils, or placing cooked items. This can enhance the functionality of your outdoor cooking space.
-
Hooks and Racks: Incorporating hooks or racks on the sides of the grill can offer a handy solution for hanging cooking utensils, towels, or grill brushes. This not only keeps essential items within reach but also adds a decorative and practical element to your grill.
-
Weather Protection: Depending on your climate, you may want to consider adding a protective cover or shelter for your outdoor grill. This can help shield it from the elements and prolong its lifespan, ensuring that it remains in top condition for years to come.
-
Personalization: Finally, consider adding personal touches to make the grill uniquely yours. Whether it's painting the exterior, adding decorative tiles, or incorporating other design elements, infusing your personality into the grill can make it a standout feature of your outdoor space.
By adding these finishing touches, you'll not only enhance the functionality and convenience of your outdoor grill but also create a custom piece that reflects your personal style and preferences. With these elements in place, your DIY outdoor grill will be ready to take center stage in your outdoor cooking adventures.
Conclusion
Congratulations! You've successfully completed the construction of your very own outdoor grill. By following the steps outlined in this guide and adding those all-important finishing touches, you've created a custom grilling space that's perfectly tailored to your needs. Now, it's time to fire up the grill, gather your favorite ingredients, and start cooking up a storm in the great outdoors. Whether you're hosting a backyard barbecue or simply enjoying a peaceful evening meal al fresco, your DIY outdoor grill is sure to bring joy, delicious flavors, and unforgettable memories to your outdoor space. So, grab your apron, gather your loved ones, and get ready to savor the fruits of your labor as you embark on a culinary adventure with your brand-new outdoor grill. Cheers to many happy grilling sessions ahead!