
Home>Create & Decorate>DIY & Crafts>DIY Carport: How To Build A Sturdy And Stylish Shelter For Your Vehicle
DIY & Crafts
DIY Carport: How To Build A Sturdy And Stylish Shelter For Your Vehicle
Published: February 28, 2024

Senior Editor in Create & Decorate, Kathryn combines traditional craftsmanship with contemporary trends. Her background in textile design and commitment to sustainable crafts inspire both content and community.
Learn how to build a sturdy and stylish DIY carport to protect your vehicle with our step-by-step guide. Perfect for DIY & Crafts enthusiasts!
(Many of the links in this article redirect to a specific reviewed product. Your purchase of these products through affiliate links helps to generate commission for Twigandthistle.com, at no extra cost. Learn more)
Introduction
Are you tired of your vehicle being exposed to the elements, from scorching sun to heavy rain and snow? Building a DIY carport can provide the perfect solution to protect your vehicle while adding a stylish addition to your property. Whether you're a seasoned DIY enthusiast or a novice looking for a rewarding project, constructing a sturdy and stylish carport can be a fulfilling endeavor.
A well-designed carport not only shields your vehicle from the elements but also enhances the aesthetic appeal of your property. By embarking on this DIY project, you can customize the carport to suit your specific needs and complement the architectural style of your home. Additionally, building a carport can add value to your property and provide a versatile space for various outdoor activities.
In this comprehensive guide, we will walk you through the step-by-step process of building a durable and visually appealing carport. From planning and preparation to selecting the right materials and executing the construction, we will cover every aspect to ensure that you are well-equipped to take on this project with confidence. Whether you're aiming to create a simple and functional carport or a more elaborate and stylish structure, this guide will provide you with the essential knowledge and inspiration to bring your vision to life.
By the end of this guide, you will have the expertise to design and build a carport that not only safeguards your vehicle but also adds a touch of elegance to your property. So, roll up your sleeves, gather your tools, and let's embark on this exciting journey to create a sturdy and stylish shelter for your vehicle.
Planning and Preparation
Before diving into the construction phase, thorough planning and meticulous preparation are essential for the successful execution of your DIY carport project. This initial stage sets the foundation for the entire endeavor, ensuring that you have a clear roadmap and the necessary resources to bring your vision to life.
Assessing Your Needs
Begin by assessing your specific requirements for the carport. Consider the size of your vehicle(s) and any additional space needed for storage or outdoor activities. Evaluate the environmental factors such as prevailing wind direction, sun exposure, and potential snow loads to determine the optimal positioning and dimensions of the carport.
Research and Inspiration
Gather inspiration from various sources such as home improvement magazines, online platforms, and local architectural styles. Explore different carport designs and configurations to identify elements that resonate with your preferences and complement the aesthetics of your property.
Setting a Budget
Establish a realistic budget for the project, factoring in the cost of materials, tools, and any professional assistance if needed. Consider potential additional expenses such as lighting, drainage systems, and decorative elements to ensure that your budget encompasses all essential components.
Obtaining Permits and Regulations
Check with your local building authorities to understand the necessary permits and regulations for constructing a carport on your property. Familiarize yourself with zoning restrictions, setback requirements, and any specific building codes that apply to carport structures in your area.
Creating a Detailed Plan
Draft a detailed plan for your carport, including precise measurements, structural specifications, and a comprehensive list of materials and tools required for the construction. Consider the foundation type, roof design, and any embellishments that align with your vision for the carport.
Gathering Tools and Equipment
Compile a comprehensive list of tools and equipment needed for the construction, ensuring that you have everything from basic hand tools to specialized machinery required for specific tasks. Organize and prepare your workspace to facilitate a smooth and efficient building process.
Securing Assistance
Assess the scope of the project and determine if you require assistance from friends, family members, or professionals with expertise in construction and carpentry. Collaborating with individuals who have relevant skills can streamline the process and enhance the overall quality of the carport.
Environmental Considerations
Take into account the environmental impact of the materials you intend to use and explore eco-friendly options where feasible. Consider the longevity and sustainability of the chosen materials to ensure that your carport contributes to a greener and more environmentally conscious living space.
By meticulously addressing these crucial aspects during the planning and preparation phase, you will lay a solid foundation for the subsequent stages of building your DIY carport. This thoughtful approach will not only streamline the construction process but also contribute to the creation of a durable, functional, and visually appealing shelter for your vehicle.
Choosing the Right Location
Selecting the optimal location for your DIY carport is a pivotal decision that significantly influences its functionality, visual impact, and long-term durability. Careful consideration of various factors will guide you in identifying the right spot on your property to ensure that the carport serves its intended purpose effectively.
Assessing Accessibility and Convenience
Begin by evaluating the accessibility and convenience of potential locations for the carport. Consider the proximity to your home or main entry points, ensuring that the carport provides easy and direct access to your vehicles. Additionally, assess the convenience of maneuvering vehicles in and out of the carport, taking into account any existing landscaping, driveways, or pathways.
Sun Orientation and Weather Patterns
Analyze the orientation of the sun throughout the day to determine the ideal positioning of the carport. By understanding the sun's path, you can strategically place the carport to provide shade during the hottest hours while allowing natural light to filter through as desired. Furthermore, consider prevailing weather patterns, such as wind direction and potential exposure to heavy rainfall or snow accumulation, to minimize environmental impact on the vehicles and ensure the structural integrity of the carport.
Property Boundaries and Setback Requirements
Familiarize yourself with the property boundaries and setback requirements stipulated by local regulations and building codes. Ensure that the chosen location complies with these guidelines to avoid any legal or structural complications in the future. By adhering to the prescribed setback distances, you can maintain harmonious relationships with neighboring properties while maximizing the available space for the carport.
Aesthetic Integration with the Property
Harmonizing the carport with the existing architectural style and landscape of your property is essential for achieving a cohesive and visually appealing outcome. Consider how the carport will complement the overall aesthetic of your home, whether through matching or contrasting design elements. By integrating the carport seamlessly into the property, you can elevate its visual appeal and create a unified and harmonious outdoor space.
Future Expansion and Land Use
Anticipate potential future expansion or modifications to your property and evaluate how the carport's location may impact these plans. Assess the long-term land use and development possibilities to ensure that the chosen location allows for flexibility and adaptability. By considering future needs and possibilities, you can make informed decisions that align with your evolving property goals.
By carefully evaluating these considerations, you can confidently select the right location for your DIY carport, setting the stage for a successful and rewarding construction process. The chosen location will not only optimize the functionality and visual appeal of the carport but also contribute to a well-integrated and harmonious outdoor environment.
Selecting the Materials
The selection of materials for your DIY carport is a critical aspect that directly influences the structural integrity, longevity, and visual appeal of the finished structure. By choosing the right materials, you can ensure that your carport not only provides reliable protection for your vehicles but also enhances the overall aesthetic of your property. Here's a detailed exploration of the key materials to consider for your carport construction:
Structural Framework
Wood:
Wood remains a popular choice for carport construction due to its natural beauty and versatility. Pressure-treated lumber, such as cedar or redwood, offers excellent durability and resistance to decay, making it suitable for framing and support beams. Additionally, wood allows for easy customization and can be stained or painted to complement the existing exterior of your home.
Metal:
Steel and aluminum are favored for their strength and low maintenance requirements. Steel offers exceptional durability and can withstand harsh weather conditions, making it ideal for structural components. Aluminum, known for its lightweight properties and resistance to corrosion, is often used for framing and roofing elements, providing a sleek and modern aesthetic.
Roofing Materials
Polycarbonate Panels:
These translucent panels are lightweight, durable, and provide excellent UV protection. They allow natural light to filter through, creating a bright and airy carport space while shielding vehicles from the elements. Polycarbonate panels are available in various colors and designs, offering flexibility in achieving the desired aesthetic.
Metal Roofing:
Corrugated metal roofing sheets are renowned for their strength and weather resistance. They provide reliable protection against rain, snow, and UV exposure, ensuring that your vehicles remain sheltered in all conditions. Metal roofing is available in different profiles and finishes, allowing you to customize the look of your carport.
Foundation and Anchoring
Concrete:
For a robust and permanent foundation, concrete offers unparalleled strength and stability. It provides a solid base for the carport structure, ensuring that it remains secure and level over time. Additionally, concrete anchors can be used to secure the carport to the foundation, enhancing its resistance to wind and external forces.
Ground Anchors:
In areas where pouring a concrete foundation may not be feasible, ground anchors provide a practical alternative. These anchors, typically made of steel, are driven into the ground to secure the carport structure. They offer flexibility in installation and can be effective in various soil conditions.
Decorative and Finishing Elements
Trim and Fascia:
Adding decorative trim and fascia elements can elevate the visual appeal of your carport. These finishing touches, available in wood or metal, provide a polished look and help integrate the carport with the architectural style of your home.
Paint and Coatings:
Selecting high-quality exterior paint or protective coatings is essential for preserving the appearance and durability of the carport. Choose products designed to withstand outdoor conditions, offering resistance to fading, chipping, and corrosion.
By carefully considering these materials and their respective attributes, you can make informed decisions that align with your design preferences, budget, and long-term objectives for your DIY carport. The right combination of materials will contribute to the creation of a sturdy, stylish, and enduring shelter for your vehicles.
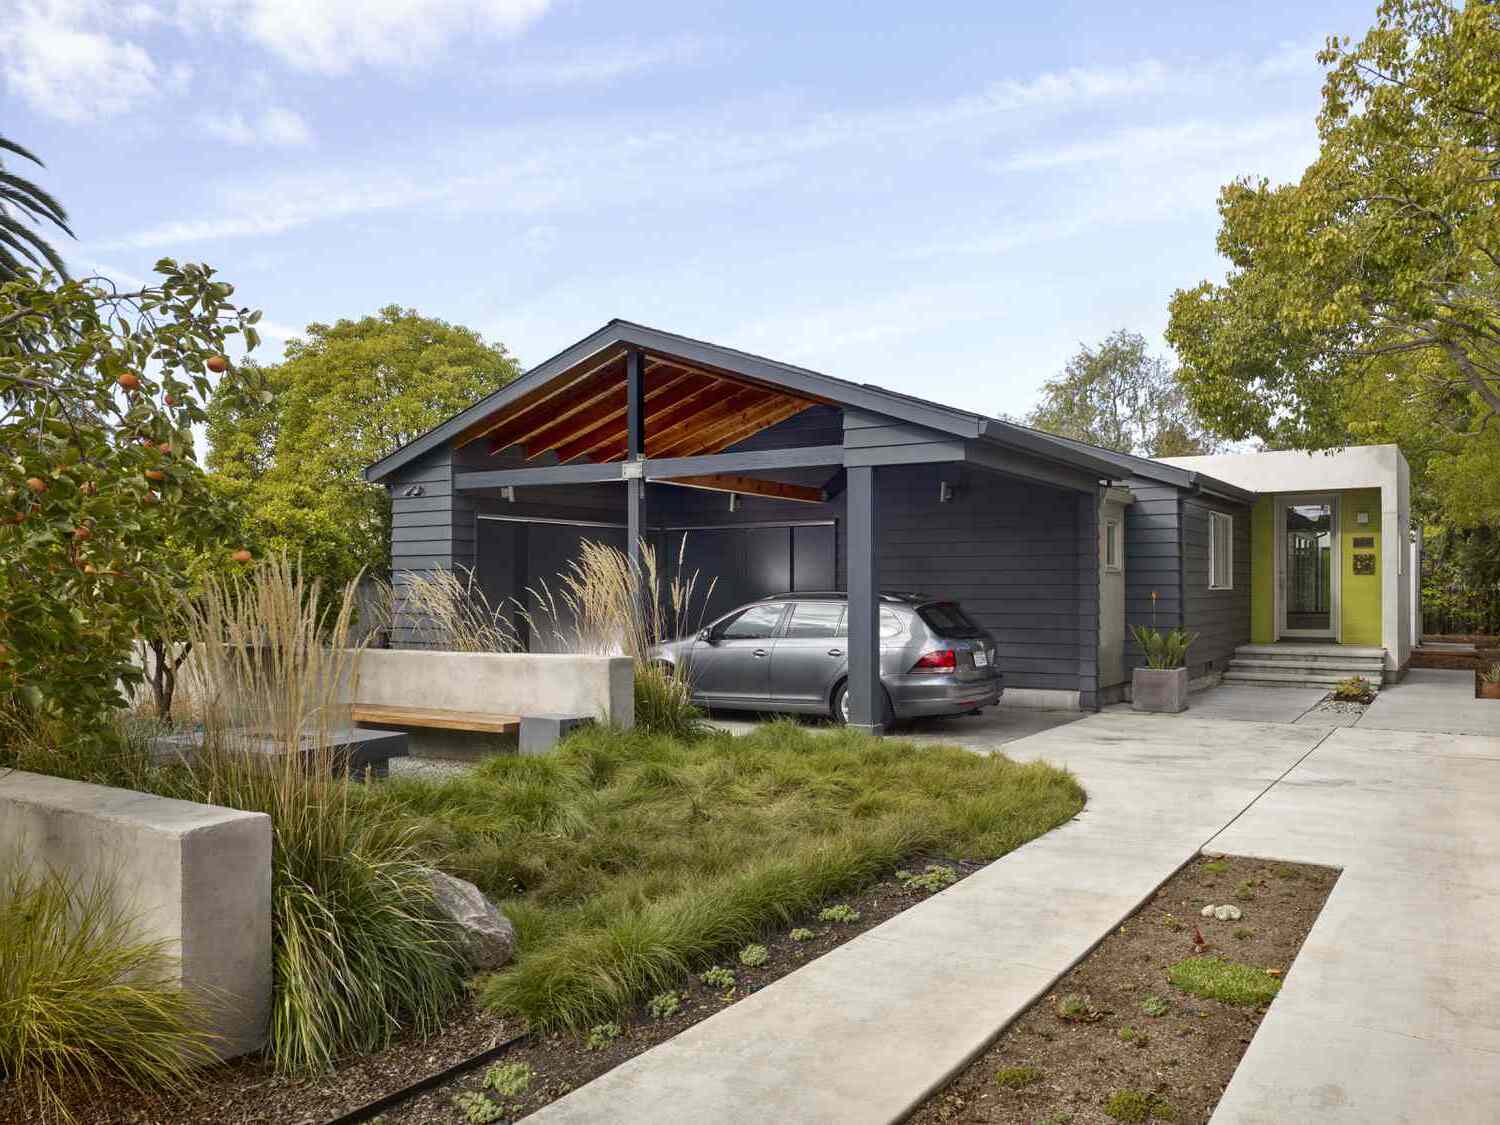
Designing the Structure
Designing the structure of your DIY carport is a pivotal phase that lays the groundwork for a functional, visually appealing, and structurally sound shelter for your vehicles. The design process encompasses a range of considerations, from the overall layout and dimensions to the specific architectural details that define the character of the carport. Here's a comprehensive exploration of the key aspects involved in designing the structure of your carport:
Layout and Dimensions
Begin by determining the optimal layout and dimensions of the carport based on the number and size of vehicles it will accommodate, as well as any additional space needed for storage or outdoor activities. Consider the clearance required for vehicle entry and exit, ensuring that the dimensions provide ample room for maneuvering. Additionally, assess the potential for future expansion or modifications, allowing for flexibility in the design to accommodate evolving needs.
Architectural Style and Aesthetic Elements
Explore various architectural styles and aesthetic elements to define the visual character of your carport. Whether you prefer a traditional, modern, or eclectic design, consider elements such as roof pitch, support column design, and decorative embellishments that harmonize with the existing architecture of your home. Integrating complementary design elements will create a cohesive and visually appealing addition to your property.
Roof Design and Overhang
The design of the carport's roof plays a crucial role in providing effective protection for your vehicles while contributing to its overall aesthetic appeal. Consider the roof pitch, material selection, and overhang dimensions to optimize weather protection and drainage. A well-designed overhang can enhance the functionality of the carport by providing additional sheltered space for outdoor activities or storage.
Support Structure and Column Placement
Evaluate the support structure and column placement to ensure adequate load-bearing capacity and structural stability. The positioning of support columns should facilitate unobstructed vehicle access while distributing the weight of the roof evenly. Additionally, consider the visual impact of the support structure and explore design options that blend seamlessly with the overall aesthetic of the carport.
Customization and Personalization
Embrace the opportunity to customize and personalize the design of your carport to reflect your unique style and preferences. Whether through decorative trims, ornamental details, or custom finishes, infuse elements that resonate with your vision for the carport. By adding personalized touches, you can create a one-of-a-kind structure that enhances the character of your property.
By meticulously addressing these design considerations, you can develop a comprehensive plan that encapsulates the functional, aesthetic, and personal aspects of your DIY carport. The thoughtful design of the structure will serve as the blueprint for the subsequent construction phases, guiding the realization of a stylish, durable, and purposeful shelter for your vehicles.
Building the Foundation
The foundation serves as the fundamental anchor for the entire structure of your DIY carport, providing stability, support, and longevity. Building a robust foundation is essential to ensure that the carport withstands external forces and maintains structural integrity over time. Here's a detailed exploration of the key steps involved in constructing the foundation for your carport:
Site Preparation
Begin by preparing the site where the carport will be erected. Clear the area of any debris, vegetation, or obstacles that may impede the construction process. Use a level to assess the ground's slope and make any necessary adjustments to ensure a flat and even surface for the foundation.
Marking and Layout
Mark the precise layout of the carport foundation using stakes and string. Accurately delineate the perimeter of the foundation, taking into account the dimensions and orientation determined during the planning phase. Double-check the measurements to ensure that the layout aligns with the intended design and positioning of the carport.
Excavation and Footings
Excavate the marked area to the required depth for the footings, considering the soil composition and load-bearing requirements. The footings serve as the base support for the foundation, distributing the weight of the structure and preventing settling or shifting. Ensure that the footings are dug to the appropriate depth and width, adhering to local building codes and regulations.
Pouring Concrete
Once the footings are prepared, it's time to pour the concrete to create the foundation. Use high-quality concrete mix and reinforce it with steel rebar for added strength and durability. Ensure that the concrete is poured evenly and leveled to form a solid and uniform foundation. Pay attention to the curing process, providing adequate time for the concrete to set and achieve its full strength.
Anchoring and Alignment
As the concrete sets, anchor the support columns or frame of the carport to the foundation. Use anchor bolts or embedded connectors to securely fasten the structural elements to the concrete foundation. Verify the alignment and levelness of the anchored components, making any necessary adjustments to ensure a precise and stable connection.
Drainage Considerations
Incorporate appropriate drainage elements into the foundation design to mitigate water accumulation and prevent moisture-related issues. Install drainage channels or sloping features to direct water away from the foundation, safeguarding the structural integrity of the carport and preserving the surrounding landscape.
By meticulously executing these foundational steps, you will establish a solid base for the construction of your DIY carport, setting the stage for the subsequent phases of framing, roofing, and finishing. A well-built foundation ensures the stability and durability of the carport, laying the groundwork for a reliable and enduring shelter for your vehicles.
Constructing the Frame
Constructing the frame of your DIY carport marks a significant phase in the construction process, laying the structural groundwork for the shelter that will safeguard your vehicles. The frame serves as the skeleton of the carport, providing support for the roofing structure and defining its overall shape and stability. Here's a detailed exploration of the key steps involved in constructing the frame for your carport:
Material Preparation
Begin by gathering the necessary materials for the frame construction, including the primary support beams, rafters, and any additional structural components. Ensure that the materials are of high quality and suitable for outdoor use, offering durability and resistance to environmental elements. If using wood, consider pressure-treated lumber for enhanced longevity and protection against decay.
Assembly and Installation
Lay out the groundwork for the frame assembly, following the precise measurements and design specifications outlined in your carport plan. Position the primary support beams in accordance with the predetermined layout, ensuring that they are securely anchored to the foundation and aligned to support the intended roof structure. Use level and plumb tools to verify the accuracy and vertical alignment of the support beams, making any adjustments as needed to achieve a stable and uniform frame.
Rafter Installation
Once the primary support beams are in place, proceed with the installation of the rafters to form the framework for the roof. Position the rafters at regular intervals along the length of the carport, ensuring that they are securely attached to the support beams and aligned to create a consistent and stable roof structure. Consider the appropriate spacing and overhang dimensions to optimize the functionality and aesthetics of the carport.
Bracing and Reinforcement
Incorporate bracing and reinforcement elements into the frame design to enhance its stability and resistance to external forces. Diagonal bracing can be strategically installed to prevent lateral movement and ensure the structural integrity of the frame. Additionally, consider reinforcing connections and joints with appropriate hardware to fortify the frame against wind loads and other environmental stressors.
Quality Assurance
Throughout the frame construction process, prioritize quality assurance by meticulously inspecting each component for structural soundness and proper alignment. Verify the integrity of the connections, the levelness of the frame, and the overall stability of the structure. Address any discrepancies or deficiencies promptly to uphold the strength and reliability of the frame.
By methodically executing these steps, you will establish a robust and well-constructed frame for your DIY carport, setting the stage for the subsequent phases of roofing, finishing, and ultimately, the realization of a functional, stylish, and enduring shelter for your vehicles.
Installing the Roof
Installing the roof of your DIY carport is a critical phase that not only provides essential protection for your vehicles but also contributes significantly to the overall aesthetic appeal of the structure. The roof serves as the primary shield against the elements, including rain, snow, and harsh sunlight, making it imperative to execute this phase with precision and attention to detail. Here's a comprehensive exploration of the key steps involved in installing the roof for your carport:
Roofing Material Selection
Begin by selecting the appropriate roofing material that aligns with your design preferences, durability requirements, and environmental considerations. Common options include polycarbonate panels, metal roofing sheets, and traditional shingles, each offering distinct advantages in terms of weather resistance, light transmission, and visual appeal. Consider the specific climatic conditions in your area and the desired aesthetic outcome when choosing the roofing material for your carport.
Roof Structure Integration
Ensure that the selected roofing material integrates seamlessly with the existing frame structure of the carport. Whether you opt for a gabled, flat, or sloped roof design, the installation process should align with the predetermined roof configuration. Verify that the frame is adequately prepared to accommodate the chosen roofing material, providing secure anchoring points and structural support for the roof panels or shingles.
Weatherproofing and Sealing
Prioritize weatherproofing measures to safeguard the interior of the carport from moisture infiltration and potential leaks. Install appropriate underlayment or sealing materials to create a protective barrier between the roofing material and the underlying structure. Pay close attention to the edges, seams, and penetrations, ensuring that they are effectively sealed to prevent water ingress and maintain a watertight roof assembly.
Secure Installation
Methodically install the roofing material according to the manufacturer's guidelines and best practices for the specific type of roofing chosen. Whether fastening polycarbonate panels, metal sheets, or shingles, use the recommended fasteners and installation techniques to secure the roofing material firmly in place. Adhere to proper spacing, overlap, and alignment to create a uniform and resilient roof surface.
Structural Reinforcement
Consider reinforcing the roof structure with additional bracing or support elements, especially in regions prone to high winds, heavy snow loads, or other extreme weather conditions. Strengthening the roof assembly enhances its ability to withstand external forces and prolongs its service life, contributing to the long-term durability of the carport.
Finishing Touches
Upon completing the installation of the roof material, attend to any finishing touches that enhance the functionality and visual appeal of the carport. Address the integration of gutters and downspouts to facilitate proper drainage, preventing water accumulation around the carport. Additionally, consider decorative elements or trim details that complement the overall design, adding a polished and cohesive finish to the roof structure.
By meticulously executing these steps, you will achieve a well-installed and weather-resistant roof for your DIY carport, culminating in the creation of a reliable, stylish, and enduring shelter for your vehicles. The completed roof not only provides essential protection but also contributes to the overall aesthetic harmony of your property, elevating its visual appeal and functional utility.
Adding Finishing Touches
As the construction of the DIY carport nears completion, the addition of finishing touches serves as the final step in transforming the structure into a functional, visually appealing, and integrated element of your property. This phase allows for the infusion of personalized details and practical enhancements that elevate the overall aesthetic and utility of the carport.
Decorative Trim and Fascia
Incorporating decorative trim and fascia elements not only adds a refined touch to the carport but also contributes to its seamless integration with the architectural style of your home. Whether opting for wood, metal, or composite materials, carefully selected trim and fascia details can create a polished and harmonious transition between the carport and the existing exterior features of your property.
Paint and Protective Coatings
Applying high-quality exterior paint or protective coatings is essential for preserving the appearance and durability of the carport. Choose products designed to withstand outdoor conditions, offering resistance to fading, chipping, and corrosion. Selecting a color scheme that complements the overall aesthetic of your property can enhance the visual impact of the carport while providing long-term protection against environmental elements.
Lighting and Electrical Considerations
Integrating lighting elements into the carport design enhances its functionality and safety, especially during evening hours. Consider installing overhead lighting fixtures or wall-mounted sconces to illuminate the carport space and provide enhanced visibility for vehicle maintenance or outdoor activities. Additionally, explore the possibility of incorporating electrical outlets for added convenience, catering to various power needs within the carport area.
Landscaping and Greenery
Surrounding the carport with carefully curated landscaping and greenery can soften its visual impact and create a more inviting outdoor environment. Incorporate potted plants, shrubs, or climbing vines to add a touch of natural beauty and integrate the carport seamlessly into the surrounding landscape. Thoughtful landscaping enhances the overall curb appeal of your property while complementing the functional purpose of the carport.
Custom Signage and Personalization
Consider adding custom signage or personalized elements to the carport, such as house numbers, family name plaques, or decorative motifs that reflect your individual style. These personalized touches not only infuse character into the carport but also contribute to a sense of ownership and identity, making the structure a unique and meaningful addition to your property.
By attending to these finishing touches, you will bring the DIY carport project to its culmination, creating a well-appointed, functional, and aesthetically pleasing shelter for your vehicles. The thoughtful integration of these details ensures that the carport not only serves its practical purpose but also enhances the overall visual harmony and appeal of your property.
Conclusion
In conclusion, the journey of building a DIY carport is a rewarding endeavor that culminates in the creation of a sturdy and stylish shelter for your vehicles. Throughout the planning, preparation, and construction phases, meticulous attention to detail and thoughtful decision-making have been instrumental in shaping the outcome of this project. By embarking on this journey, you have not only safeguarded your vehicles from the elements but also added a distinctive and functional element to your property.
The process began with careful planning and assessment of your specific needs, budget, and design preferences. Through thorough research and inspiration gathering, you identified the ideal location for the carport, considering factors such as accessibility, sun orientation, and aesthetic integration with your property. The selection of high-quality materials, including the structural framework, roofing components, and finishing details, has laid the foundation for a durable and visually appealing carport.
The meticulous execution of the construction phases, from building the foundation and framing the structure to installing the roof and adding finishing touches, has resulted in the realization of a well-crafted and reliable shelter. The integration of personalized elements, such as decorative trim, protective coatings, and lighting, has elevated the carport into a cohesive and integrated feature of your property.
As you stand back and admire the completed DIY carport, you can take pride in the accomplishment of creating a space that not only serves a practical purpose but also reflects your individual style and attention to detail. The carport stands as a testament to your dedication to enhancing the functionality and visual appeal of your property while embracing the satisfaction of a hands-on construction project.
Moving forward, the DIY carport will continue to provide essential protection for your vehicles, offering a sheltered space that adapts to your evolving needs. Whether it's a sunny day, a rainy evening, or a snowy morning, the carport stands ready to safeguard your vehicles while adding a touch of elegance to your property.
In the end, the completion of the DIY carport project signifies not only the creation of a functional structure but also the embodiment of your vision and creativity. It stands as a testament to the transformative power of DIY construction, leaving a lasting impression on your property and enhancing its overall value and appeal.