
Home>Create & Decorate>DIY & Crafts>How To Build A Shelter
DIY & Crafts
How To Build A Shelter
Published: February 27, 2024

Senior Editor in Create & Decorate, Kathryn combines traditional craftsmanship with contemporary trends. Her background in textile design and commitment to sustainable crafts inspire both content and community.
Learn how to build a shelter with our DIY & Crafts guide. Find step-by-step instructions and tips for creating your own shelter. Start your project today!
(Many of the links in this article redirect to a specific reviewed product. Your purchase of these products through affiliate links helps to generate commission for Twigandthistle.com, at no extra cost. Learn more)
Introduction
Building a shelter is a fundamental skill that has been passed down through generations. Whether you're an outdoor enthusiast, a survivalist, or simply someone looking to create a cozy retreat in your backyard, knowing how to construct a shelter is invaluable. In this comprehensive guide, we will walk you through the step-by-step process of building a shelter, providing you with the knowledge and confidence to embark on this fulfilling DIY project.
Shelters come in various forms, from simple lean-tos and debris huts to more elaborate structures like A-frame cabins and yurts. The type of shelter you choose to build will depend on factors such as the environment, available materials, and intended use. Regardless of the specific design, the principles of shelter construction remain consistent: providing protection from the elements and creating a safe, comfortable space.
As we delve into the intricacies of shelter building, it's important to recognize the profound connection between humans and the shelters they inhabit. Throughout history, shelters have been more than just physical structures; they have served as havens for storytelling, creativity, and community. By learning to build a shelter, you are not only mastering a practical skill but also tapping into a timeless tradition of craftsmanship and resilience.
Whether you're envisioning a rustic wilderness shelter nestled among towering trees or a quaint backyard hideaway for relaxation and reflection, the process of building a shelter is a journey that fosters resourcefulness, creativity, and a deep appreciation for the natural world. So, roll up your sleeves, gather your tools, and let's embark on this enriching endeavor of creating a shelter that harmonizes with nature and provides solace and security.
Step 1: Choosing a Location
Selecting the right location is the foundational step in building a shelter. The chosen site will significantly impact the shelter's stability, protection, and overall functionality. Here's a detailed guide to help you make an informed decision:
Consider the Terrain
Survey the terrain to identify a flat, well-drained area for your shelter. Avoid low-lying areas prone to flooding and areas with poor drainage. A level ground will facilitate easier construction and provide a stable foundation for your shelter.
Assess Natural Elements
Take into account the prevailing wind direction and intensity, as well as the path of the sun throughout the day. Position the shelter to minimize exposure to strong winds and maximize sunlight, especially during colder months. Additionally, consider natural features such as large trees or rock formations that can offer natural protection and structural support.
Proximity to Resources
Evaluate the proximity of essential resources such as water, firewood, and foraging areas. Choosing a location near these resources will enhance the practicality and sustainability of your shelter, reducing the effort required to gather necessities.
Environmental Impact
Be mindful of the environmental impact of your chosen location. Avoid disrupting fragile ecosystems, nesting areas, or natural habitats. Minimize the clearing of vegetation and strive to leave the surrounding environment as undisturbed as possible.
Legal Considerations
If you are building a shelter in a public or protected area, familiarize yourself with any regulations or permits required for construction. Respect land use regulations and obtain necessary permissions to ensure that your shelter-building endeavor is in compliance with local laws and environmental conservation efforts.
By carefully considering these factors, you can select an optimal location for your shelter that harmonizes with the natural surroundings, provides essential protection, and contributes to a sustainable and respectful interaction with the environment.
Step 2: Gathering Materials
Gathering the right materials is a crucial aspect of building a shelter. The selection of materials will not only determine the structural integrity of the shelter but also influence its resilience and ability to provide protection from the elements. Here's a comprehensive guide to help you gather the essential materials for your shelter-building project:
Natural Materials
When building a shelter in a wilderness or outdoor setting, utilizing natural materials can be both practical and sustainable. Look for sturdy branches, saplings, and logs to serve as the primary framework for your shelter. Seek out materials that are straight, free from rot or infestations, and long enough to provide adequate support for the structure.
For the walls and roofing, consider collecting natural coverings such as large leaves, grass, or bark. These materials can be layered to create effective insulation and weatherproofing. Additionally, if available, gather vines or strong fibers that can be used for lashing and securing the structural components together.
Salvaged or Repurposed Items
In more developed or urban environments, sourcing salvaged or repurposed materials can be a sustainable approach to shelter building. Look for discarded lumber, pallets, or construction materials that can be repurposed for framing and cladding. Salvaged windows, doors, and metal roofing can also be valuable finds for creating a more finished and weather-resistant shelter.
Tools and Fasteners
Ensure that you have the necessary tools and fasteners to assemble the shelter. Basic hand tools such as a saw, axe, hammer, and rope or cordage for lashing will be essential for shaping and securing the materials. If using salvaged materials, consider carrying a portable drill and screws to facilitate the construction process.
Personal Items and Comfort Features
Depending on the intended use of the shelter, consider incorporating personal items and comfort features into the construction plan. This could include a sleeping pad, blankets, or a portable stove for added comfort and functionality.
By thoughtfully gathering these materials, you can lay the groundwork for a well-constructed shelter that blends seamlessly with its surroundings and provides a secure and inviting space for relaxation, exploration, or survival.
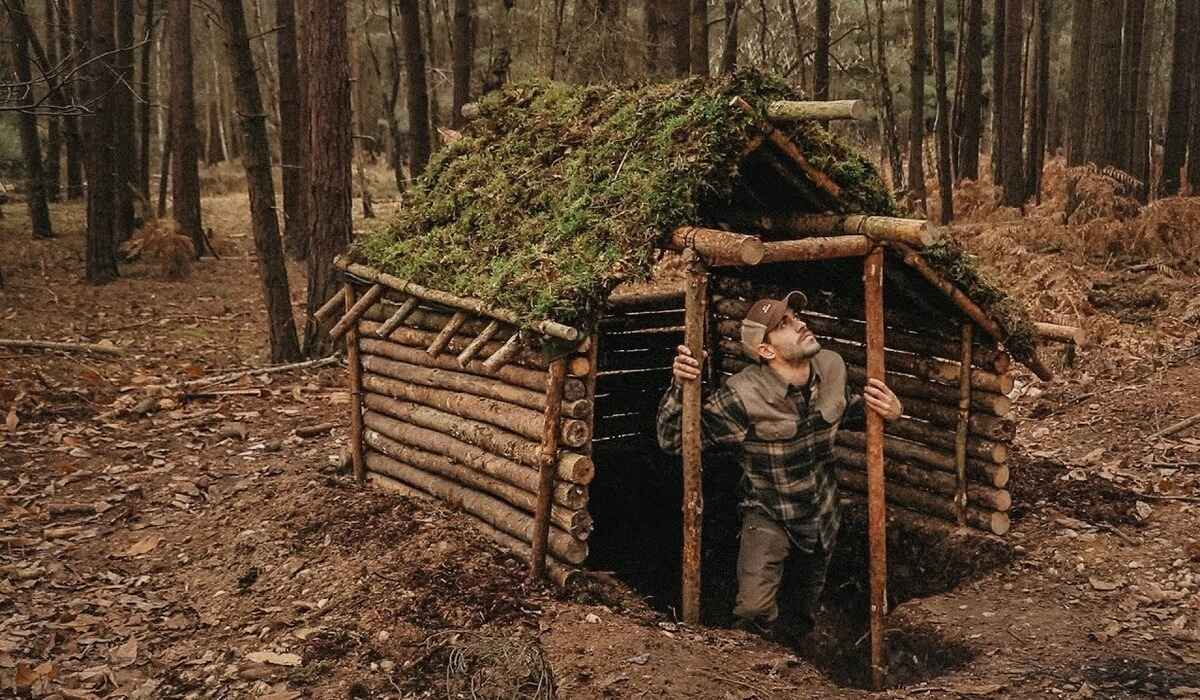
Step 3: Building the Frame
Building the frame is a pivotal phase in shelter construction, as it forms the structural skeleton upon which the entire shelter will be built. The frame provides stability, support, and shape to the shelter, laying the groundwork for the subsequent addition of walls and roofing. Here's a detailed guide to effectively construct the frame for your shelter:
Selecting and Preparing the Main Supports
Begin by identifying and preparing the main supports for the frame. These supports will form the primary structure of the shelter and are typically composed of sturdy, straight branches or logs. Select supports that are long enough to create the desired height and width for the shelter. Remove any protruding branches or irregularities that could affect the stability of the frame.
Establishing the Foundation
Lay out the main supports in the chosen location, ensuring that they are positioned securely and evenly. If necessary, use rocks or packed earth to stabilize the base of the supports and prevent shifting. The foundation of the frame should be level and well-aligned to provide a solid starting point for the construction process.
Securing the Joints
Once the main supports are in place, secure the joints where the supports intersect. Utilize lashing techniques such as the square lashing or tripod lashing to bind the supports together firmly. Natural fibers, cordage, or even strips of inner bark can be used for lashing, providing a strong and resilient connection between the structural elements.
Adding Cross Braces and Support Beams
To enhance the stability and rigidity of the frame, incorporate cross braces and support beams as necessary. These additional elements can prevent swaying or shifting of the structure, especially in windy conditions. Secure the cross braces diagonally across the frame, reinforcing the overall integrity of the shelter.
Assessing Structural Integrity
Thoroughly inspect the frame to ensure that it is structurally sound and capable of supporting the weight of the shelter. Test the stability by gently applying pressure to different points of the frame. Address any areas of concern and make necessary adjustments to reinforce the frame's strength and stability.
By meticulously constructing the frame, you establish a solid foundation for the shelter, setting the stage for the subsequent phases of adding walls, roofing, and finishing touches. The frame serves as the backbone of the shelter, dictating its overall strength and resilience in the face of environmental elements. With the frame in place, the vision of a secure and inviting shelter begins to take shape, bringing you one step closer to realizing your shelter-building aspirations.
Step 4: Adding Walls and Roof
With the frame of the shelter securely in place, the next critical step is to add walls and a roof to provide enclosure and protection from the elements. This phase transforms the skeletal structure into a functional and weather-resistant shelter, creating a space that offers security and comfort. Here's a detailed guide on adding walls and a roof to your shelter:
Wall Construction
Begin by selecting suitable materials for the walls, considering factors such as insulation, weatherproofing, and availability. If in a wilderness setting, large leaves, grass, or bark can be layered to form natural insulation and weather-resistant barriers. In more urban environments, salvaged lumber, plywood, or repurposed materials can be utilized for wall construction.
Secure the chosen materials to the frame, starting from the base and working upwards. Depending on the materials used, they can be lashed to the frame, nailed, or screwed in place. Ensure a snug fit and overlap the materials to create a seamless barrier against wind, rain, and cold.
As the walls take shape, pay attention to the structural integrity and stability. Reinforce the corners and junctions to prevent shifting or instability. Additionally, consider incorporating windows or vents if ventilation and natural light are desired within the shelter.
Roofing Installation
The roof is a crucial element in providing protection from precipitation and maintaining a comfortable interior environment. When selecting roofing materials, prioritize durability, water resistance, and weight. In a wilderness setting, large leaves, thatch, or tarpaulin can be used to create a weatherproof roof. In urban environments, salvaged metal roofing, shingles, or repurposed materials can serve as effective roofing solutions.
Carefully position and secure the roofing materials to the frame, ensuring a tight seal and adequate slope to facilitate water runoff. Overlapping the roofing materials will enhance their ability to shed water and prevent leaks. Seal any gaps or seams with additional materials to fortify the roof against inclement weather.
As the walls and roof come together, evaluate the overall stability and weatherproofing of the shelter. Test the resilience of the structure by simulating wind and rain conditions, ensuring that the walls and roof effectively shield the interior space.
By methodically adding walls and a roof to the shelter, you transform the frame into a secure and functional refuge. The completed structure provides a sense of safety and sanctuary, embodying the essence of shelter as a protective haven in the midst of the natural world.
This phase marks a significant milestone in the shelter-building process, bringing you closer to the realization of a resilient and inviting space that harmonizes with its surroundings. With the walls and roof in place, the shelter begins to exude a sense of permanence and security, embodying the timeless allure of a well-crafted sanctuary amidst the elements.
Step 5: Finishing Touches
As the structural elements of the shelter take shape, attention turns to the finer details that elevate the functionality, comfort, and aesthetic appeal of the space. The finishing touches not only add personality and character to the shelter but also enhance its usability and resilience. Here's a comprehensive exploration of the essential finishing touches that culminate in a well-crafted and inviting shelter.
Insulation and Weatherproofing
Evaluate the insulation and weatherproofing of the shelter to ensure that it provides a comfortable and secure interior environment. In colder climates, consider adding additional layers of natural insulation such as grass, leaves, or pine boughs to the walls and roof. This enhances heat retention and shields the interior from cold drafts. Seal any gaps or openings with additional materials to fortify the shelter against wind and moisture, creating a snug and protected space.
Flooring and Ground Cover
Create a comfortable and clean flooring surface within the shelter. If the ground is bare earth, consider laying down a thick layer of leaves, grass, or pine needles to provide insulation and a soft, natural flooring. In more permanent shelters, salvaged or repurposed materials such as pallets or wooden planks can be used to create a raised platform for the floor, elevating the interior space and minimizing contact with the ground.
Functional Additions
Incorporate functional elements that enhance the usability of the shelter. Install simple storage solutions such as hooks or shelves to keep essential items organized and easily accessible. Consider adding a designated area for a small camp stove or fire pit, ensuring that the shelter accommodates basic cooking and heating needs. These practical additions transform the shelter into a versatile and functional space for various activities and durations of stay.
Personalization and Comfort
Infuse the shelter with personal touches that reflect your individual style and preferences. Hang lightweight decorations, such as wind chimes or small artwork, to add a touch of charm and personality to the space. Introduce comfortable seating options, such as portable chairs or cushions, to create a cozy and inviting atmosphere. By personalizing the shelter, you create a space that feels like a home away from home, fostering a sense of belonging and relaxation.
Environmental Integration
Integrate the shelter with its natural surroundings to establish a harmonious connection with the environment. Use natural materials and colors that blend seamlessly with the landscape, minimizing the visual impact of the shelter. Consider planting native vegetation around the shelter to create a natural buffer and enhance its integration with the surroundings. By embracing the natural setting, the shelter becomes an organic extension of the environment, embodying a spirit of coexistence and respect.
Final Inspection and Maintenance
Conduct a thorough inspection of the completed shelter, addressing any potential maintenance needs or areas for improvement. Ensure that all structural elements are secure and stable, and that the shelter is prepared to withstand environmental conditions. Establish a maintenance routine to preserve the shelter's integrity, periodically checking for wear and tear, and making necessary repairs or adjustments to prolong its lifespan and functionality.
By attending to these finishing touches, the shelter evolves from a basic structure into a thoughtfully crafted and inviting space that embodies resilience, comfort, and a deep connection to the natural world. Each detail contributes to the overall functionality and ambiance of the shelter, culminating in a harmonious and purposeful retreat that beckons with warmth and security.
Conclusion
As we conclude this comprehensive guide to building a shelter, it's evident that the process of creating a shelter is far more than a practical endeavor; it is a deeply enriching journey that intertwines craftsmanship, resourcefulness, and a profound connection to the natural world. From the initial selection of the location to the meticulous construction of the frame, the addition of walls and roof, and the thoughtful finishing touches, each phase of shelter building encapsulates the timeless human endeavor to seek refuge, security, and solace amidst the elements.
Building a shelter transcends the mere act of construction; it embodies a convergence of human ingenuity and the innate desire to coexist harmoniously with nature. The shelter becomes a testament to resilience, adaptability, and the enduring bond between humans and their environment. Whether nestled in the heart of a dense forest, perched on a mountainside, or nestled in a backyard, the shelter stands as a testament to the enduring spirit of human creativity and the ability to craft havens that provide both physical and emotional shelter.
As you embark on your own shelter-building journey, may this guide serve as a source of inspiration and empowerment, equipping you with the knowledge and confidence to undertake this fulfilling endeavor. Whether you are driven by a passion for outdoor adventure, a commitment to self-reliance, or a yearning to create a tranquil retreat, the process of building a shelter invites you to embrace the art of craftsmanship, the wisdom of sustainability, and the beauty of integration with the natural world.
In the act of building a shelter, you are not merely assembling physical components; you are weaving a narrative of resilience, creativity, and reverence for the environment. The shelter becomes a sanctuary that shelters not only the body but also the spirit, fostering a sense of belonging and connection to the earth. It stands as a testament to the enduring human quest for security, comfort, and a place to call home, wherever that may be.
So, as you set out to build your shelter, may you embrace the journey with a spirit of curiosity, respect for nature, and a deep appreciation for the transformative power of crafting a space that embodies the timeless allure of shelter, security, and sanctuary. With each step, may you find fulfillment in the act of creation and the profound sense of accomplishment that comes with building a shelter that resonates with the essence of human resilience and the enduring bond between humans and their habitat.