
Home>Home & Furniture>Bathroom>How To Build A Shower
Bathroom
How To Build A Shower
Published: February 22, 2024
Editor-in-Chief with a decade in home renovation and a passion for vintage furniture. Diane is known for her weekend treasure hunts at flea markets, enriching our content with unique style insights.
Learn how to build a shower in your bathroom with our step-by-step guide. Create the perfect space with our expert tips and advice.
(Many of the links in this article redirect to a specific reviewed product. Your purchase of these products through affiliate links helps to generate commission for Twigandthistle.com, at no extra cost. Learn more)
Introduction
Building a shower from scratch can be a rewarding and fulfilling project that adds both functionality and aesthetic appeal to your bathroom. Whether you're embarking on a bathroom renovation or constructing a new home, creating a custom shower allows you to tailor every aspect to your preferences and needs. From the layout and design to the choice of fixtures and materials, the possibilities are endless when it comes to crafting your ideal shower space.
When undertaking the task of building a shower, it's essential to approach the project with careful planning and attention to detail. By breaking down the process into manageable steps and understanding the key components involved, you can navigate the construction journey with confidence and achieve a successful outcome.
Throughout this comprehensive guide, we will delve into the essential stages of building a shower, providing valuable insights and practical tips to help you navigate each phase of the project. From initial planning and preparation to the final touches and clean-up, each step plays a crucial role in bringing your vision to life.
Whether you're a seasoned DIY enthusiast or a first-time renovator, this guide is designed to equip you with the knowledge and guidance needed to tackle the construction of a shower with confidence. By understanding the intricacies of framing, plumbing, waterproofing, tiling, and fixture installation, you'll be well-prepared to embark on this exciting endeavor.
As we embark on this journey together, envision the transformation that awaits your bathroom space. From the satisfaction of seeing your design concepts take shape to the joy of stepping into a shower that reflects your personal style, the process of building a shower is a testament to creativity, craftsmanship, and the pursuit of a more comfortable and inviting home.
So, roll up your sleeves, gather your tools, and let's embark on the exhilarating journey of bringing your dream shower to fruition. With careful planning, dedication, and a touch of creativity, you'll soon be enjoying the luxurious comfort of a shower that's been custom-built to meet your every need.
Planning and Preparation
Before diving into the physical construction of a shower, meticulous planning and thorough preparation are paramount to the success of the project. This initial phase sets the foundation for the entire endeavor, ensuring that every subsequent step unfolds seamlessly and according to your vision. Here's a detailed breakdown of the essential aspects to consider during the planning and preparation stage:
-
Design Concept: Begin by envisioning the type of shower you desire. Consider factors such as the size, layout, and style that align with your preferences and complement the overall aesthetic of your bathroom. Whether you opt for a spacious walk-in shower or a cozy alcove design, clarity on the desired look and functionality is crucial.
-
Budget and Materials: Establish a realistic budget for the project, factoring in expenses for materials, tools, and potential labor costs if professional assistance is required. Research and select high-quality materials such as tiles, waterproofing membranes, and plumbing fixtures that align with your budget and design goals.
-
Space and Layout: Evaluate the available space in your bathroom to determine the optimal location and dimensions for the shower. Consider the placement of existing plumbing lines, windows, and doors, ensuring that the chosen layout maximizes both functionality and visual appeal.
-
Permits and Regulations: Check local building codes and regulations to determine if any permits are required for the construction of a new shower or the modification of existing plumbing. Adhering to these guidelines is essential to ensure compliance and safety throughout the project.
-
Timeline and Scheduling: Set a realistic timeline for the construction process, factoring in any potential delays or unexpected challenges. Coordinate the project schedule to align with your availability and consider any upcoming events or commitments that may impact the timeline.
-
Tools and Equipment: Take inventory of the necessary tools and equipment needed for the construction, including items such as a level, drill, tile saw, and pipe wrench. Ensure that all tools are in good working condition and acquire any additional tools required for specific tasks.
By meticulously addressing these key considerations during the planning and preparation stage, you'll lay a solid groundwork for the subsequent phases of building your shower. This thoughtful approach sets the stage for a smooth and successful construction journey, allowing you to bring your dream shower to life with confidence and precision.
Framing the Shower
Framing the shower is a critical phase that sets the structural framework for the enclosure, providing the necessary support for the shower walls, base, and any additional features such as niches or seating. This stage requires precision and attention to detail to ensure the stability and integrity of the shower structure. Here's a detailed overview of the key steps involved in framing the shower:
1. Measure and Mark:
Begin by accurately measuring the dimensions of the shower area to determine the placement of the framing studs. Use a level and pencil to mark the locations for the vertical studs on the walls, ensuring that they align with the intended layout and accommodate any openings for fixtures or accessories.
2. Select Quality Lumber:
Choose high-quality, moisture-resistant lumber for the framing, such as pressure-treated wood or rot-resistant species like cedar or redwood. These materials are essential for withstanding the humid environment of the shower and minimizing the risk of mold or decay over time.
3. Install the Vertical Studs:
Secure the vertical framing studs to the wall using appropriate fasteners, ensuring that they are plumb and securely anchored to the floor and ceiling. The spacing between the studs should align with the specifications outlined in building codes and accommodate the installation of wall materials such as cement board or waterproofing membranes.
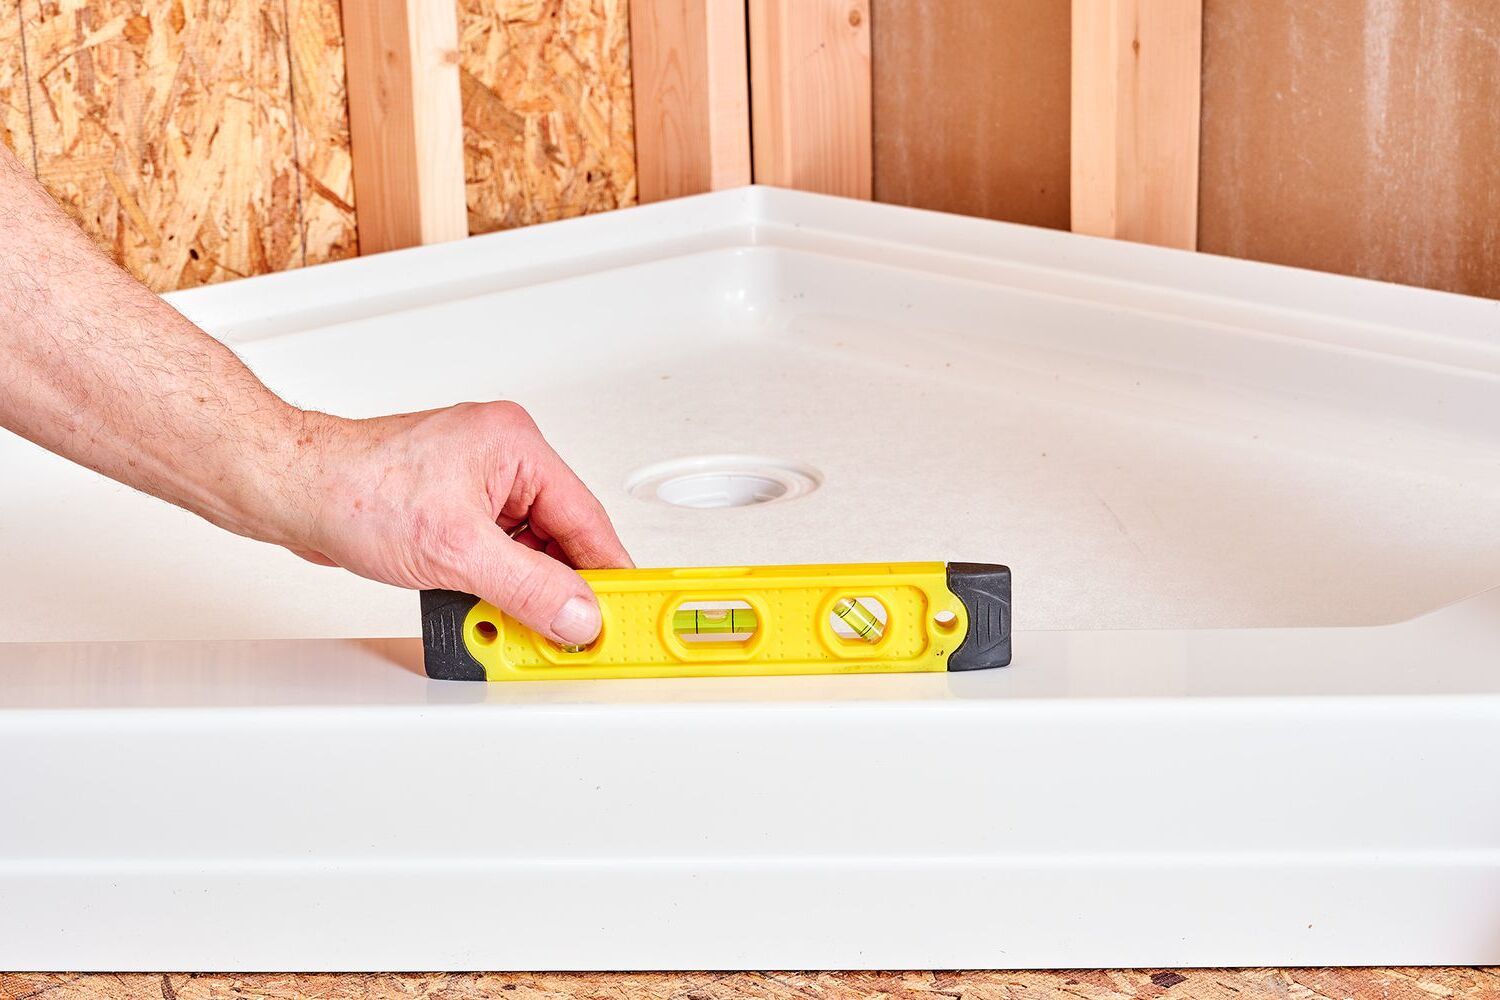
4. Construct the Shower Base:
If the shower includes a custom-built base, construct a sturdy and level base using the appropriate materials, such as mortar or pre-formed shower pans. The base should be designed to facilitate proper drainage and support the weight of the shower floor materials.
5. Consider Niche and Seating Options:
If incorporating niches or seating within the shower enclosure, plan for their placement during the framing stage. Ensure that the framing accommodates the installation of niche inserts and provides adequate support for built-in seating, enhancing both functionality and aesthetics.
6. Verify Structural Integrity:
Thoroughly inspect the framed structure to ensure that it exhibits structural integrity and stability. Address any discrepancies in alignment or stability, making necessary adjustments to reinforce the framework and mitigate potential issues during subsequent construction phases.
By meticulously executing the framing phase, you establish a solid foundation for the remainder of the shower construction process. The precision and care invested in framing the shower lay the groundwork for seamless progression into subsequent stages, ultimately culminating in the realization of your envisioned shower space.
Installing the Plumbing
Installing the plumbing for your shower is a pivotal step that demands precision and adherence to plumbing standards. This phase involves connecting water supply lines, drainage systems, and fixtures to ensure optimal functionality and performance. Here's a detailed breakdown of the essential steps involved in installing the plumbing for your shower:
-
Plan the Plumbing Layout: Begin by carefully planning the layout of the plumbing fixtures, including the showerhead, faucets, and drainage components. Consider the optimal positioning of the fixtures to align with the shower design and user convenience.
-
Prepare the Water Supply Lines: Install the necessary water supply lines to deliver hot and cold water to the shower. Use high-quality, durable piping materials such as copper or PEX, ensuring proper sizing and secure connections to prevent leaks.
-
Position the Shower Valve: Mount the shower valve within the wall cavity, ensuring it is accessible for future maintenance while remaining concealed within the shower space. Properly secure the valve and connect it to the water supply lines, verifying the functionality of the hot and cold water controls.
-
Address Drainage Requirements: Install the shower drain according to plumbing regulations, ensuring proper slope for effective drainage. Verify that the drain is securely fitted and integrated with the existing drainage system to prevent water accumulation within the shower enclosure.
-
Incorporate Waterproofing Measures: Integrate waterproofing membranes or materials around the plumbing fixtures and connections to safeguard against water infiltration. This crucial step helps prevent moisture-related issues and contributes to the longevity of the shower structure.
-
Test for Leaks and Functionality: Conduct thorough testing of the installed plumbing components to identify and address any leaks or functional irregularities. Pressurize the water supply lines and inspect the connections, valves, and drain to ensure they operate seamlessly without compromising the integrity of the shower.
-
Coordinate with Building Codes: Adhere to local building codes and regulations governing plumbing installations, ensuring compliance with safety and quality standards. Obtain any necessary permits and inspections to validate the proper installation of the shower plumbing.
By meticulously executing the installation of the plumbing, you establish the essential infrastructure that facilitates the reliable and efficient operation of your shower. Attention to detail, adherence to plumbing best practices, and compliance with regulatory requirements are integral to ensuring the long-term functionality and performance of the plumbing system within your custom-built shower.
Waterproofing the Shower
Waterproofing the shower is a critical step in the construction process, essential for safeguarding the structural integrity of the shower enclosure and preventing water damage to surrounding areas. Proper waterproofing measures are imperative to mitigate the risk of moisture infiltration, mold growth, and deterioration of building materials, ensuring a durable and resilient shower space. Here's a comprehensive overview of the key considerations and steps involved in waterproofing the shower:
1. Select Waterproofing Materials:
Choose high-quality waterproofing materials designed specifically for shower installations, such as waterproof membranes, cement boards, or liquid waterproofing compounds. These materials serve as a protective barrier against water penetration, creating a secure envelope within the shower enclosure.
2. Prepare the Substrate:
Thoroughly inspect and prepare the substrate, ensuring it is clean, level, and free from any debris or contaminants. Address any surface irregularities and apply suitable primers or bonding agents to promote adhesion between the substrate and waterproofing materials.
3. Apply Waterproof Membranes:
Install waterproof membranes in areas prone to direct water exposure, such as the walls surrounding the shower and the shower pan. Ensure that the membranes are installed according to manufacturer guidelines, with proper overlaps and seals to create a seamless barrier against moisture.
4. Waterproof Seams and Joints:
Pay special attention to sealing seams, corners, and joints within the shower enclosure. Utilize waterproofing tapes, bands, or sealants to reinforce these vulnerable areas and prevent water seepage through gaps or cracks.
5. Protect Transition Areas:
Address transition areas where different materials meet, such as the junction between the shower walls and the shower pan. Apply waterproofing solutions to these transition points to create a cohesive and watertight interface.
6. Verify Waterproofing Integrity:
Conduct thorough inspections and tests to verify the integrity of the waterproofing installation. Check for any potential weak points or areas that may compromise the waterproofing, addressing any deficiencies promptly.
7. Comply with Industry Standards:
Adhere to industry standards and building codes governing waterproofing practices in wet areas, ensuring compliance with regulations and best practices for moisture management.
8. Integrate Drainage Systems:
Coordinate the integration of drainage systems with the waterproofing measures, ensuring that proper slope and waterproofing strategies are in place to facilitate effective water evacuation.
By meticulously executing the waterproofing process, you establish a robust defense against water intrusion, reinforcing the longevity and performance of your custom-built shower. The meticulous application of waterproofing materials and techniques serves as a fundamental safeguard, preserving the structural integrity and visual appeal of the shower while promoting a durable and resilient environment for daily use.
Tiling the Shower
Tiling the shower marks a transformative phase in the construction process, where the visual appeal and character of the shower space begin to take shape. The selection and installation of tiles play a pivotal role in defining the aesthetic charm, functionality, and overall ambiance of the shower. Here's a comprehensive exploration of the essential steps and considerations involved in tiling the shower:
-
Selecting the Right Tiles: Begin by choosing tiles that align with your design vision and functional requirements. Consider factors such as material, size, color, texture, and slip resistance to ensure the tiles not only complement the overall aesthetic but also offer durability and safety in a wet environment.
-
Preparing the Substrate: Inspect the substrate to ensure it is clean, level, and properly waterproofed. Address any imperfections or irregularities in the substrate to create a smooth and stable surface for tile installation. Apply suitable bonding agents or primers to promote strong adhesion between the substrate and the tiles.
-
Laying the Tiles: Plan the layout and positioning of the tiles, taking into account any design patterns, borders, or accents. Begin by applying an appropriate thin-set mortar or adhesive to the substrate, using the notched trowel to create an even bed for the tiles. Carefully set each tile into place, maintaining consistent spacing and alignment for a polished finish.
-
Cutting and Shaping Tiles: Utilize tile cutting tools to trim tiles as needed to fit around fixtures, corners, or irregular spaces within the shower. Precision in cutting and shaping tiles ensures a seamless and professional-looking installation, minimizing gaps and enhancing the overall aesthetic appeal.
-
Grouting the Tiles: Once the tiles are set and the mortar has cured, proceed to grout the joints between the tiles. Select a high-quality grout that complements the tiles and provides effective water resistance. Apply the grout using a grout float, ensuring thorough coverage and smooth, uniform grout lines.
-
Sealing the Grout and Tiles: After the grout has cured, apply a suitable grout sealer to protect the grout from moisture and staining. Additionally, consider sealing the tiles themselves, especially if they are natural stone or porous materials, to enhance their longevity and resistance to water damage.
-
Cleaning and Finishing: Carefully clean any excess grout or adhesive residue from the tile surfaces, ensuring a pristine and polished appearance. Take the time to inspect the tiled surfaces for any imperfections or inconsistencies, addressing any areas that may require touch-ups or adjustments.
By meticulously executing the tiling process, you infuse the shower with a captivating blend of style, functionality, and enduring quality. The careful selection, precise installation, and meticulous finishing of the tiles contribute to the creation of a shower space that exudes elegance, durability, and a welcoming ambiance.
Installing the Shower Fixtures
The installation of shower fixtures marks the culmination of the construction process, where the functional elements that define the shower's utility and aesthetic appeal are seamlessly integrated. From the showerhead and faucets to the handles and accessories, each fixture plays a pivotal role in shaping the shower experience. Here's a detailed exploration of the essential steps and considerations involved in installing the shower fixtures:
-
Selecting the Fixtures: Begin by selecting high-quality fixtures that align with your design vision and functional preferences. Consider factors such as style, finish, water efficiency, and ease of maintenance. Opt for fixtures that not only complement the overall aesthetic of the shower but also offer reliable performance and longevity.
-
Positioning and Mounting: Plan the positioning of the shower fixtures to optimize functionality and user convenience. Ensure that the showerhead is positioned at an appropriate height and angle to provide optimal water coverage within the shower space. Securely mount the fixtures using the appropriate hardware and mounting techniques, ensuring stability and durability.
-
Connecting the Water Supply: Connect the water supply lines to the shower fixtures, ensuring secure and leak-free connections. Pay careful attention to the installation of the shower valve, ensuring proper alignment and functionality of the hot and cold water controls. Verify that the fixtures are effectively integrated with the plumbing system, allowing for seamless water flow and temperature control.
-
Sealing and Waterproofing: Apply suitable sealants and waterproofing measures around the fixture connections to prevent water infiltration into the wall cavity. This crucial step helps safeguard against moisture-related issues and contributes to the long-term integrity of the shower enclosure.
-
Testing and Calibration: Thoroughly test the functionality of the installed fixtures, checking for proper water flow, pressure, and temperature control. Calibrate the fixtures as needed to ensure optimal performance and user comfort. Address any irregularities or issues promptly to achieve a reliable and satisfying shower experience.
-
Accessorizing and Detailing: Consider incorporating additional accessories such as shelves, soap dishes, or grab bars to enhance the functionality and convenience of the shower space. Ensure that these accessories are thoughtfully positioned and securely installed to complement the overall design and usability of the shower.
By meticulously executing the installation of shower fixtures, you elevate the shower space with elements that blend form and function seamlessly. The careful selection, precise installation, and thorough testing of the fixtures contribute to the creation of a shower environment that embodies both style and practicality, enriching the daily bathing experience with comfort and elegance.
Final Touches and Clean-Up
As the construction of the shower nears completion, attention to final touches and thorough clean-up is essential to ensure a polished and inviting end result. This phase encompasses a range of meticulous tasks aimed at refining the aesthetic appeal, addressing any remaining details, and preparing the shower for immediate use. Here's a detailed exploration of the final touches and clean-up process:
-
Grout and Sealant Inspection: Conduct a comprehensive inspection of the grout lines and sealant application to verify their integrity and uniformity. Address any areas where grout touch-ups or resealing may be necessary to maintain a pristine and moisture-resistant finish.
-
Trim and Caulking: Install trim pieces and apply caulking along the edges and transitions within the shower space. This step not only enhances the visual cohesion of the shower but also serves as a protective barrier against water infiltration in vulnerable areas.
-
Hardware Alignment: Ensure that all hardware components, such as handles, towel bars, and shower caddies, are securely installed and aligned to perfection. Attention to detail in hardware placement contributes to the overall functionality and visual harmony of the shower.
-
Glass Cleaning and Treatment: If the shower enclosure features glass panels or doors, meticulously clean and treat the glass surfaces to remove any construction residues and ensure crystal-clear transparency. Consider applying a protective treatment to the glass for enhanced durability and ease of maintenance.
-
Floor Protection Removal: Safely remove any protective coverings or temporary floor protections that were utilized during the construction phase. Thoroughly clean the shower floor to eliminate any debris or adhesive residues, ensuring a clean and welcoming surface.
-
Dust and Debris Elimination: Conduct a comprehensive cleaning of the entire shower space, including the walls, floor, and fixtures, to eliminate any construction-related dust and debris. Pay attention to corners, grout lines, and hard-to-reach areas to achieve a spotless finish.
-
Functional Testing: Test the functionality of all installed fixtures, including the showerhead, faucets, and drainage systems, to verify seamless operation and address any potential issues before final use.
-
Final Inspection: Conduct a meticulous final inspection of the entire shower space, scrutinizing every detail to ensure that the construction meets the highest standards of quality and craftsmanship.
By meticulously attending to the final touches and conducting a thorough clean-up, the shower space is poised to deliver a captivating blend of elegance, functionality, and comfort. The culmination of these meticulous tasks sets the stage for the enjoyment of a meticulously crafted shower that embodies both visual allure and practical utility.
Conclusion
As the journey of building a custom shower draws to a close, it's a moment to celebrate the culmination of meticulous planning, precise craftsmanship, and unwavering dedication to creating a space that embodies both luxury and practicality. The transformation from a vision to a tangible, fully functional shower is a testament to the creativity, perseverance, and attention to detail invested in every phase of the construction process.
The journey began with envisioning the ideal shower, considering layout, design, and functionality. From the initial planning and preparation to the final touches, each step played a crucial role in shaping the shower space into a personalized oasis of comfort and elegance. The framing, plumbing, waterproofing, tiling, and fixture installation stages were orchestrated with precision, ensuring that every aspect of the shower reflects the envisioned concept.
The careful selection of materials, the meticulous execution of construction techniques, and the seamless integration of fixtures and accessories have collectively contributed to the realization of a shower that transcends mere functionality. It stands as a testament to craftsmanship, attention to detail, and the pursuit of a refined bathing experience.
As the final touches were meticulously attended to and the shower space was prepared for immediate use, it became a canvas of luxury and comfort, inviting indulgence and relaxation. The seamless fusion of style and functionality, coupled with the assurance of durability and longevity, positions the custom-built shower as a centerpiece of the bathroom, exuding charm and sophistication.
The journey of building a shower has not only resulted in the creation of a functional space but has also fostered a sense of accomplishment and pride. The dedication and effort invested in every aspect of the construction process have yielded a shower that embodies the unique preferences and aspirations of its creator, enriching the daily routine with a touch of luxury and refinement.
As the final inspection concludes and the shower stands ready for use, it represents the fulfillment of a vision, the embodiment of craftsmanship, and the promise of a rejuvenating bathing experience. The journey of building a custom shower has not only transformed a space within the home but has also left an indelible mark of creativity, dedication, and the pursuit of a more comfortable and inviting living environment.