
Home>Create & Decorate>DIY & Crafts>DIY Laundry Pedestal: How To Build Your Own
DIY & Crafts
DIY Laundry Pedestal: How To Build Your Own
Published: February 24, 2024

Senior Editor in Create & Decorate, Kathryn combines traditional craftsmanship with contemporary trends. Her background in textile design and commitment to sustainable crafts inspire both content and community.
Learn how to build your own DIY laundry pedestal with this step-by-step guide. Elevate your laundry room organization and storage with this easy DIY project. Perfect for DIY & Crafts enthusiasts.
(Many of the links in this article redirect to a specific reviewed product. Your purchase of these products through affiliate links helps to generate commission for Twigandthistle.com, at no extra cost. Learn more)
Introduction
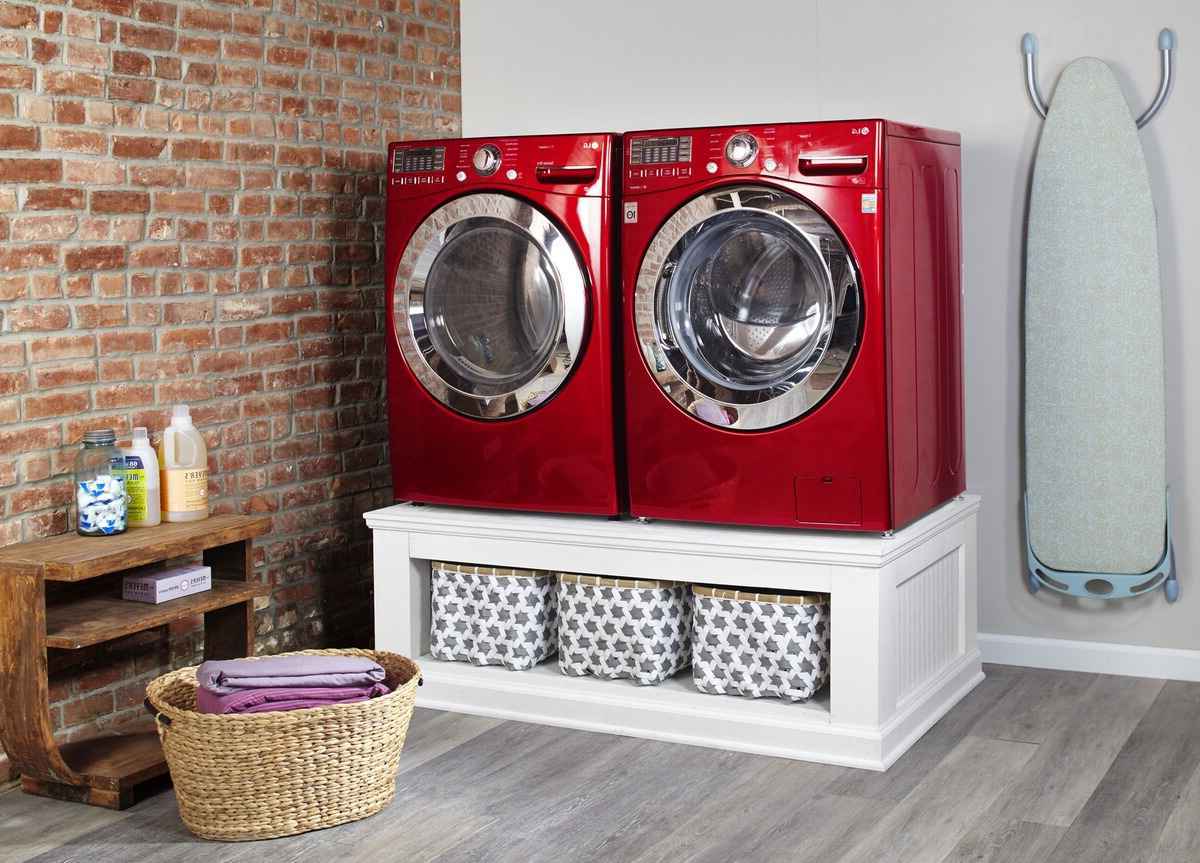
Are you tired of bending over to load and unload your laundry from the washer and dryer? A DIY laundry pedestal might just be the solution you've been looking for. Not only does it elevate your appliances to a more convenient height, but it also provides extra storage space for laundry essentials, such as detergent, fabric softener, and dryer sheets.
Building your own laundry pedestal can be a rewarding and cost-effective project, allowing you to customize the dimensions and design to fit your specific needs and space constraints. Whether you're a seasoned DIY enthusiast or a novice looking to embark on your first woodworking endeavor, this step-by-step guide will walk you through the process of constructing a sturdy and functional laundry pedestal.
By following these instructions and investing a bit of time and effort, you can create a practical and stylish addition to your laundry room while honing your carpentry skills. With the right materials, tools, and a can-do attitude, you'll soon be on your way to enjoying the convenience and organization that a custom-built laundry pedestal brings to your home. So, roll up your sleeves, gather your supplies, and let's get started on this exciting DIY project!
Materials Needed
To embark on this DIY laundry pedestal project, you'll need a selection of materials to ensure a sturdy and functional end result. Here's a comprehensive list of the items you'll require:
-
Plywood: This will serve as the primary material for constructing the top, bottom, and side panels of the laundry pedestal. Opt for a high-quality plywood that is strong and durable to support the weight of the washer and dryer.
-
2×4 Lumber: You'll need this lumber for creating the frame and legs of the pedestal. Ensure that the 2×4 lumber is straight and free from any defects to maintain the structural integrity of the pedestal.
-
Wood Screws: Select a variety of wood screws in different lengths to accommodate various assembly requirements. These screws will be essential for securing the plywood panels and lumber together securely.
-
Wood Glue: A reliable wood glue will be indispensable for reinforcing the joints and connections between the wooden components, enhancing the overall stability of the pedestal.
-
Finishing Nails: These nails will be used to add extra reinforcement to the joints and corners, contributing to the overall strength and durability of the laundry pedestal.
-
Sandpaper: To achieve a smooth and polished finish, have a supply of sandpaper on hand for sanding down rough edges and surfaces before applying any paint or finish.
-
Paint or Stain: Depending on your aesthetic preferences, you can choose to paint or stain the laundry pedestal to complement your laundry room decor. Select a high-quality paint or stain that is suitable for wooden surfaces.
-
Drawer Slides (Optional): If you plan to incorporate drawers into your laundry pedestal for additional storage, you'll need drawer slides to facilitate smooth opening and closing of the drawers.
-
Drawer Pulls or Knobs (Optional): Should you opt for the drawer feature, consider adding drawer pulls or knobs to provide a convenient and stylish means of accessing the storage compartments.
By ensuring that you have these materials readily available, you'll be well-equipped to commence the construction of your DIY laundry pedestal with confidence and efficiency.
Tools Needed
Embarking on the construction of a DIY laundry pedestal requires a selection of essential tools to facilitate the precise assembly and installation of the wooden components. Having the right tools at your disposal will not only streamline the construction process but also ensure the accuracy and structural integrity of the finished pedestal. Here's a comprehensive list of the tools you'll need to bring your laundry pedestal project to fruition:
-
Measuring Tape: A reliable measuring tape is indispensable for obtaining accurate dimensions of the plywood panels and lumber, ensuring that each component is cut to the precise size required for assembly.
-
Circular Saw or Table Saw: To cut the plywood and 2×4 lumber to the desired dimensions, a circular saw or table saw is essential. These power tools enable straight and precise cuts, contributing to the overall stability and professional finish of the laundry pedestal.
-
Power Drill: A power drill equipped with the appropriate drill bits will be used to create pilot holes for the wood screws, facilitating secure and seamless assembly of the wooden components.
-
Screwdriver: Both a Phillips-head and flat-head screwdriver will be necessary for driving the wood screws into the plywood and lumber, ensuring that the connections are tight and secure.
-
Clamps: Utilizing clamps during the assembly process will help to hold the wooden components in place, allowing for accurate alignment and preventing any shifting or misalignment during the attachment of the panels and frame.
-
Level: A level is essential for ensuring that the laundry pedestal is perfectly horizontal and balanced once assembled. This tool is crucial for achieving stability and preventing any wobbling or unevenness.
-
Hammer: A hammer will be used for driving finishing nails into the joints and corners, providing additional reinforcement and structural support to the laundry pedestal.
-
Sanding Block or Orbital Sander: To achieve a smooth and polished finish on the plywood panels and lumber, a sanding block or orbital sander will be employed to remove any rough edges and surfaces, preparing the wood for painting or staining.
-
Paintbrushes or Stain Applicators: If you choose to paint or stain the laundry pedestal, having a selection of paintbrushes or stain applicators will enable you to apply the finish evenly and efficiently, enhancing the aesthetic appeal of the finished product.
By ensuring that you have these essential tools at your disposal, you'll be well-prepared to tackle the construction of your DIY laundry pedestal with confidence and precision. Each tool plays a crucial role in the assembly process, contributing to the overall quality and functionality of the finished laundry pedestal.
Step 1: Measuring and Cutting the Wood
The initial step in constructing a DIY laundry pedestal involves precise measurement and accurate cutting of the wood components. This crucial phase sets the foundation for the entire project, ensuring that each piece is tailored to fit seamlessly within the assembly. Here's a detailed breakdown of the process:
Measuring the Plywood and Lumber
Begin by measuring the dimensions for the top, bottom, and side panels of the laundry pedestal using a reliable measuring tape. It's essential to double-check the measurements to guarantee accuracy before proceeding to the cutting phase. For the 2×4 lumber that will form the frame and legs, precise measurements are equally vital to ensure stability and structural integrity.
Cutting the Plywood and Lumber
Once the measurements are confirmed, utilize a circular saw or table saw to cut the plywood and 2×4 lumber according to the specified dimensions. It's crucial to exercise caution and precision during the cutting process to achieve clean, straight edges that will facilitate seamless assembly. Adhering to the precise measurements is paramount to ensure that the panels and frame components fit together snugly without any gaps or misalignment.
Sanding the Edges
After cutting the plywood and lumber, use sandpaper or an orbital sander to smooth out any rough edges and surfaces. This step not only enhances the overall appearance of the wood but also prepares it for the application of paint or stain. By meticulously sanding the edges, you'll create a professional and polished finish that adds to the aesthetic appeal of the laundry pedestal.
Organizing the Components
As the wood components are cut and sanded, it's beneficial to organize them according to their designated positions within the assembly. This proactive approach streamlines the subsequent stages of construction, allowing for a seamless transition from cutting and sanding to the precise assembly of the laundry pedestal.
By meticulously measuring, cutting, and preparing the wood components in this initial phase, you'll establish a solid foundation for the construction of your DIY laundry pedestal. Attention to detail and precision at this stage will set the stage for a successful and visually appealing end result.
Step 2: Assembling the Frame
With the wood components meticulously measured, cut, and prepared, the next pivotal phase of constructing a DIY laundry pedestal involves assembling the frame. This foundational element provides the structural support and stability necessary to elevate the washer and dryer to a convenient height while accommodating the weight of the appliances and laundry loads. Here's a comprehensive breakdown of the process:
Positioning the 2×4 Lumber
Begin by arranging the cut 2×4 lumber according to the predetermined dimensions, ensuring that the pieces are aligned and positioned correctly to form the frame of the laundry pedestal. The precision and accuracy of this step are paramount, as it sets the stage for a sturdy and reliable foundation that will support the weight of the appliances without compromise.
Securing the Joints
Using a power drill and the appropriate drill bits, create pilot holes in the lumber to facilitate the insertion of wood screws. With the pilot holes in place, proceed to secure the joints by driving wood screws through the lumber, effectively binding the frame components together. The use of wood glue in conjunction with the screws reinforces the connections, enhancing the overall stability and durability of the frame.
Verifying Alignment and Stability
As the frame takes shape, it's essential to verify that the components are aligned and the structure is level. Utilize a level to ensure that the frame is perfectly horizontal and balanced, minimizing the risk of wobbling or instability once the washer and dryer are placed on the pedestal. This meticulous attention to detail guarantees a reliable and secure foundation for the laundry appliances.
Adding Reinforcement
To further fortify the frame, consider incorporating additional support in the form of corner braces or angled brackets. These reinforcements contribute to the overall strength and rigidity of the frame, minimizing any potential sway or movement. By strategically placing these reinforcements, you enhance the load-bearing capacity of the frame, ensuring its ability to withstand the weight of the appliances and daily usage.
Preparing for the Next Phase
As the frame is assembled and reinforced, take a moment to review the integrity and stability of the structure. Confirm that all joints are secure, and the frame is robust enough to support the subsequent installation of the top and bottom panels. This meticulous approach sets the stage for a seamless transition to the next phase of the construction process, bringing you one step closer to completing your custom-built laundry pedestal.
By meticulously assembling the frame with precision and attention to detail, you establish a solid and reliable foundation for the laundry pedestal, setting the stage for the subsequent phases of construction. The careful alignment, reinforcement, and verification of stability ensure that the frame is well-equipped to support the weight of the appliances and fulfill its essential role in elevating the functionality and convenience of your laundry room.
Step 3: Attaching the Legs
As the frame of the DIY laundry pedestal takes shape, the next crucial step involves attaching the legs to provide essential elevation and support for the structure. The proper installation and alignment of the legs are pivotal in ensuring the stability and balance of the pedestal, ultimately contributing to the safe and efficient use of the appliances. Here's a detailed breakdown of the process:
Positioning the Legs
Begin by positioning the pre-cut 2×4 lumber segments as the legs of the laundry pedestal. Carefully align the legs at the designated corners of the frame, ensuring that they are perpendicular to the floor and precisely positioned to provide uniform support for the entire structure. The accuracy of this step is paramount, as it directly influences the overall stability and weight distribution of the pedestal.
Securing the Legs
Using a power drill and the appropriate drill bits, create pilot holes in the legs to facilitate the insertion of wood screws. With the pilot holes in place, proceed to secure the legs to the frame by driving wood screws through the legs and into the frame. The use of wood glue in conjunction with the screws reinforces the connections, enhancing the overall stability and load-bearing capacity of the legs.
Verifying Alignment and Leveling
As the legs are attached, it's essential to verify that they are aligned and the entire structure is level. Utilize a level to ensure that each leg is perfectly vertical and balanced, minimizing the risk of wobbling or unevenness once the washer and dryer are placed on the pedestal. This meticulous attention to detail guarantees a reliable and secure foundation for the laundry appliances.
Adding Floor Protectors (Optional)
Consider adding floor protectors to the base of each leg to prevent potential damage to the flooring surface. These protectors can be in the form of adhesive felt pads or rubber caps, providing a cushioned barrier between the pedestal and the floor. By incorporating floor protectors, you not only safeguard the flooring but also minimize any potential noise or vibrations during the operation of the appliances.
Final Inspection
Upon attaching the legs and ensuring their alignment and stability, conduct a final inspection of the entire structure. Confirm that all legs are securely attached, level, and capable of bearing the weight of the washer and dryer without compromise. This meticulous approach sets the stage for a seamless transition to the subsequent phase of the construction process, bringing you one step closer to completing your custom-built laundry pedestal.
By meticulously attaching the legs with precision and attention to detail, you establish a solid and reliable foundation for the laundry pedestal, setting the stage for the subsequent phases of construction. The careful alignment, reinforcement, and verification of stability ensure that the legs are well-equipped to support the weight of the appliances and fulfill their essential role in elevating the functionality and convenience of your laundry room.
Step 4: Adding the Top and Bottom Panels
With the frame and legs securely assembled, the next pivotal phase in constructing the DIY laundry pedestal involves adding the top and bottom panels to enclose the structure and create a functional platform for the washer and dryer. This critical step not only enhances the aesthetic appeal of the pedestal but also ensures a stable and level surface for the appliances. Here's a detailed breakdown of the process:
Placing the Top and Bottom Panels
Begin by positioning the pre-cut plywood panels on top of the assembled frame, ensuring precise alignment and overhang as per the predetermined dimensions. The top panel should rest evenly on the frame, providing a secure and level surface for the washer and dryer, while the bottom panel encloses the base of the pedestal, contributing to its overall stability and visual cohesiveness.
Securing the Panels
Using wood screws and a power drill, secure the top and bottom panels to the frame, driving the screws through the plywood and into the underlying 2×4 lumber. It's essential to space the screws evenly along the edges of the panels to ensure a secure and uniform attachment, minimizing any potential shifting or instability. Additionally, applying wood glue along the contact points reinforces the connections, enhancing the overall strength and rigidity of the pedestal.
Verifying Alignment and Stability
As the panels are attached, it's crucial to verify that they are aligned and the entire structure remains level. Utilize a level to ensure that the top panel is perfectly horizontal, providing a stable platform for the washer and dryer. Similarly, confirm that the bottom panel is securely attached, contributing to the overall stability and weight distribution of the pedestal.
Adding Finishing Touches
After securing the top and bottom panels, take the opportunity to inspect the entire structure for any rough edges or imperfections. Utilize sandpaper to smooth out any uneven surfaces and edges, preparing the pedestal for the application of paint or stain. This meticulous attention to detail ensures a polished and professional finish, elevating the visual appeal of the laundry pedestal.
Final Inspection
Upon adding the top and bottom panels and ensuring their alignment and stability, conduct a final inspection of the entire structure. Confirm that the panels are securely attached, level, and capable of providing a stable and reliable platform for the washer and dryer. This meticulous approach sets the stage for the subsequent phase of the construction process, bringing you one step closer to completing your custom-built laundry pedestal.
By meticulously adding the top and bottom panels with precision and attention to detail, you establish a solid and reliable platform for the laundry pedestal, setting the stage for the subsequent phases of construction. The careful alignment, reinforcement, and verification of stability ensure that the panels are well-equipped to support the weight of the appliances and fulfill their essential role in elevating the functionality and convenience of your laundry room.
Step 5: Finishing Touches
As the construction of the DIY laundry pedestal nears completion, the focus shifts to the crucial phase of adding the finishing touches. This stage not only enhances the visual appeal of the pedestal but also ensures that it is well-prepared for the practical demands of daily use. Here's a detailed exploration of the essential finishing touches that will elevate the functionality and aesthetic charm of your custom-built laundry pedestal.
Sanding and Smoothing
Before applying any paint or stain, it's imperative to meticulously sand and smooth the entire surface of the laundry pedestal. Utilize fine-grit sandpaper or an orbital sander to eliminate any rough spots, uneven edges, or imperfections. This meticulous approach not only enhances the tactile appeal of the pedestal but also ensures a flawless canvas for the subsequent application of the finishing materials.
Applying Paint or Stain
Depending on your aesthetic preferences and the decor of your laundry room, you can choose to apply paint or stain to the laundry pedestal. Select a high-quality paint or wood stain that complements the existing color scheme and style of the space. Apply the paint or stain evenly using a paintbrush or stain applicator, ensuring complete coverage and a smooth finish. Multiple coats may be necessary to achieve the desired depth of color and a professional appearance.
Sealing and Protecting
To safeguard the surface of the laundry pedestal and enhance its longevity, consider applying a clear sealant or polyurethane finish. This protective layer not only seals the paint or stain but also provides a durable barrier against moisture, scratches, and daily wear and tear. The sealant enhances the resilience of the pedestal, ensuring that it remains in pristine condition for years to come.
Installing Drawer Slides and Pulls (Optional)
If you've opted to incorporate drawers into your laundry pedestal for additional storage, this is the opportune moment to install drawer slides and pulls. Carefully follow the manufacturer's instructions to securely attach the drawer slides, ensuring smooth and effortless operation of the drawers. Additionally, select stylish drawer pulls or knobs that complement the overall design of the laundry pedestal, adding a touch of convenience and sophistication to the storage compartments.
Final Inspection and Touch-Ups
Upon completing the finishing touches, conduct a comprehensive inspection of the entire laundry pedestal. Verify that the paint or stain is evenly applied, the sealant is uniform, and any installed hardware is secure. Address any minor imperfections or touch-ups as needed, ensuring that the pedestal exudes a polished and professional appearance.
By meticulously attending to the finishing touches, you elevate the functionality and visual allure of your custom-built laundry pedestal. The seamless integration of these essential elements ensures that the pedestal not only serves as a practical platform for your washer and dryer but also stands as a stylish and enduring addition to your laundry room.
Conclusion
In conclusion, the journey of constructing your own DIY laundry pedestal has been a rewarding and empowering experience. From meticulously measuring and cutting the wood to assembling the frame, attaching the legs, adding the top and bottom panels, and finally, applying the finishing touches, each step has contributed to the creation of a functional and visually appealing addition to your laundry room.
As you stand back and admire the completed laundry pedestal, you can take pride in the craftsmanship and dedication that went into its construction. Not only does it elevate your washer and dryer to a more convenient height, but it also provides valuable storage space for essential laundry supplies. The personalized dimensions and design of the pedestal ensure that it seamlessly integrates into your laundry room, enhancing both its practicality and aesthetic charm.
Moreover, the utilization of high-quality materials and precise assembly techniques has resulted in a sturdy and reliable platform for your appliances. The reinforced frame, securely attached legs, and carefully installed top and bottom panels collectively contribute to the pedestal's ability to support the weight of the washer and dryer while maintaining stability and balance.
The application of paint or stain, coupled with a protective sealant, has not only enhanced the visual appeal of the pedestal but also fortified its surface against daily wear and tear. The optional addition of drawers, complete with smooth-operating slides and stylish pulls, further exemplifies the versatility and customization potential of this DIY project.
As you embark on the practical use of your custom-built laundry pedestal, you can revel in the convenience it brings to your daily laundry routines. No longer will you need to bend over uncomfortably to load and unload the washer and dryer. Instead, you'll enjoy the ergonomic advantage of a raised platform, coupled with the organizational benefits of additional storage space.
In essence, the completion of this DIY project signifies not only the construction of a laundry pedestal but also the cultivation of your woodworking skills and the fulfillment of your creative vision. It stands as a testament to your ability to transform raw materials into a functional and aesthetically pleasing piece of furniture that enhances the efficiency and elegance of your home.
As you continue to explore the world of DIY and crafts, may the knowledge and experience gained from this endeavor inspire future projects and ignite a passion for hands-on creativity. Whether it's building furniture, crafting decor, or tackling home improvement tasks, may the spirit of innovation and resourcefulness continue to guide your journey as a skilled DIY enthusiast.