
Home>Create & Decorate>DIY & Crafts>How To Build A Window Seat
DIY & Crafts
How To Build A Window Seat
Published: March 7, 2024

Senior Editor in Create & Decorate, Kathryn combines traditional craftsmanship with contemporary trends. Her background in textile design and commitment to sustainable crafts inspire both content and community.
Learn how to build a cozy window seat with our easy DIY & Crafts guide. Create a stylish and functional space in your home today!
(Many of the links in this article redirect to a specific reviewed product. Your purchase of these products through affiliate links helps to generate commission for Twigandthistle.com, at no extra cost. Learn more)
Introduction
So, you've been dreaming of a cozy spot by the window where you can curl up with a good book or simply enjoy the view outside. Well, building a window seat might just be the perfect DIY project for you! Not only does it add a charming and functional element to your home, but it also provides extra seating and storage space. In this guide, we'll walk you through the step-by-step process of creating your very own window seat. Whether you're a seasoned DIY enthusiast or a beginner looking for a fun project, we've got you covered. Let's dive in and get started on this exciting home improvement endeavor!
Step 1: Planning and Measuring
Before you start building your window seat, it's crucial to plan and measure the space where it will be installed. Here's how to get started:
-
Assess the Space: Begin by identifying the window where you want to install the seat. Consider the dimensions of the window and the available space around it. Take into account any obstacles such as radiators, vents, or electrical outlets that may affect the design and placement of the window seat.
-
Measurements: Use a tape measure to carefully measure the length, width, and height of the designated area. Take note of any architectural features or irregularities that may impact the construction process.
-
Design Considerations: Decide on the style and design of your window seat. Will it have a hinged top for storage? Will it be a simple bench or a more elaborate structure with built-in shelves? Consider how the window seat will complement the existing decor and architectural features of the room.
-
Ventilation and Insulation: If the window seat will cover a radiator or heating vent, ensure that proper ventilation is maintained. Additionally, consider insulation to prevent drafts and ensure comfort during colder months.
By carefully planning and taking accurate measurements, you'll set the foundation for a successful window seat construction project.
Step 2: Choosing Materials
Selecting the right materials is essential for building a sturdy and visually appealing window seat. Here's a breakdown of the materials you'll need:
-
Lumber: Opt for high-quality, durable lumber that can withstand the weight of seating and provide structural support. Common choices include pine, oak, or maple. Consider the dimensions needed for the base, frame, and seating surface.
-
Plywood: Choose plywood for constructing the base and any additional structural components. Look for plywood that is smooth, free of imperfections, and suitable for painting or staining.
-
Cushioning and Upholstery: If you plan to add cushions to the window seat, select comfortable foam padding and upholstery fabric that complements your interior decor. Consider factors such as color, texture, and durability.
-
Hardware: Gather essential hardware such as screws, nails, hinges, and drawer slides. Ensure that the hardware is appropriate for the weight and function of the window seat.
-
Finishing Supplies: Depending on your design preferences, you may need paint, stain, or sealant to finish the wood surfaces. Sandpaper, wood glue, and wood filler are also essential for achieving a polished final look.
-
Optional Features: If you're incorporating storage compartments or shelves, consider additional materials such as drawer pulls, hinges, and shelf brackets.
When choosing materials, prioritize both functionality and aesthetics to create a window seat that is not only structurally sound but also visually appealing and comfortable.
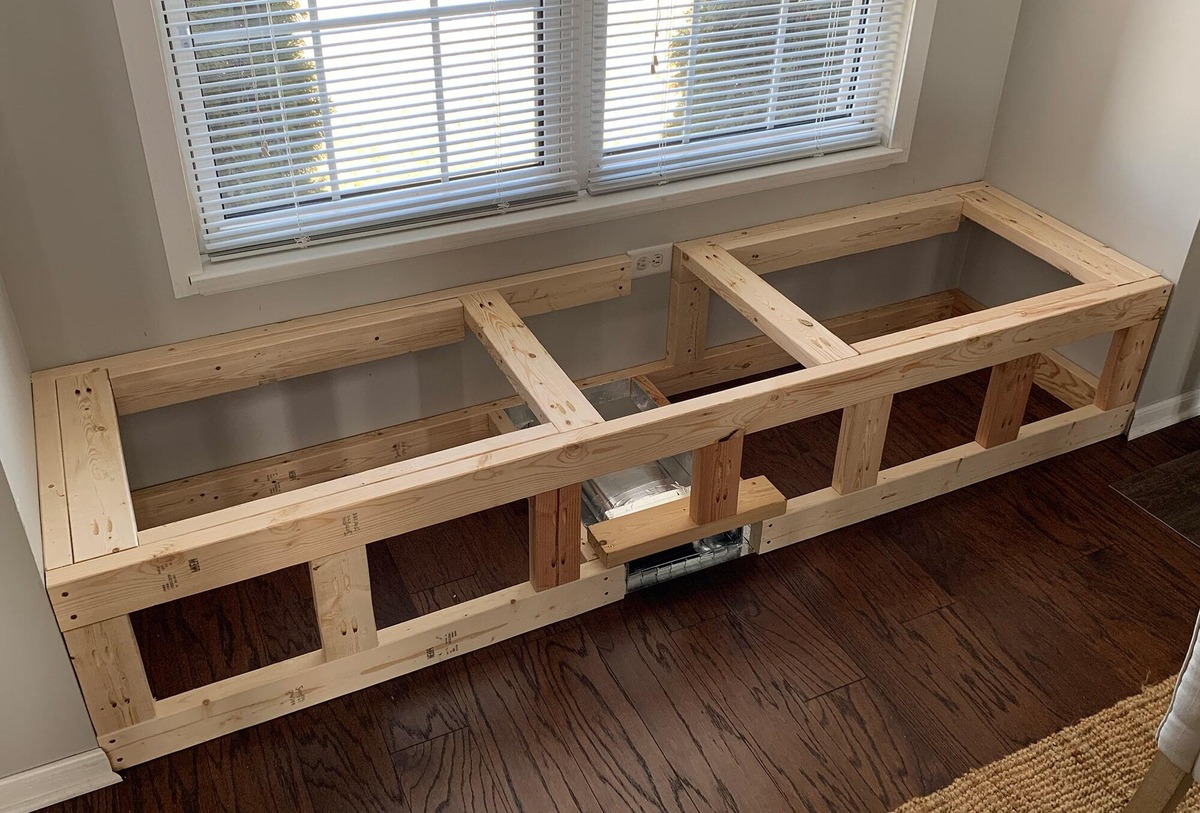
Step 3: Building the Base
Now that you've planned, measured, and gathered the necessary materials, it's time to construct the base of your window seat. Follow these steps to build a sturdy and reliable foundation for your seating area:
-
Cutting the Lumber: Begin by cutting the lumber to the appropriate dimensions for the base frame. Use a saw to carefully cut the pieces according to your measurements, ensuring precise angles and lengths for a seamless fit.
-
Assembling the Frame: Assemble the cut lumber pieces to create the frame of the base. Use wood screws or nails to securely join the components, ensuring that the frame is level and square. Reinforce the corners with additional bracing if needed for added stability.
-
Adding Support: Install support beams or braces within the frame to distribute weight evenly and prevent sagging over time. Consider the weight capacity of the window seat and reinforce the base accordingly to accommodate seating and potential storage.
-
Attaching the Plywood: Once the frame is constructed, attach a piece of plywood to the top to create a solid surface for the seat. Use screws to secure the plywood to the frame, ensuring a flush and even attachment.
-
Finishing Touches: Sand the edges and surfaces of the base to smooth out any rough areas or sharp corners. Apply wood filler to conceal any visible screws or nail holes, creating a seamless and polished appearance.
By following these steps, you'll create a robust and well-constructed base for your window seat, setting the stage for the next phase of the project.
Step 4: Constructing the Seat
With the base in place, it's time to focus on constructing the seat of your window seat. This is where comfort and aesthetics come together to create a welcoming and functional space. Here's how to proceed:
-
Cutting the Seating Surface: Measure and cut a piece of plywood or MDF to serve as the seating surface. Ensure that the dimensions align with the base frame and provide ample space for seating.
-
Adding Padding: If you plan to include cushions, cut foam padding to fit the dimensions of the seating surface. Secure the foam in place using adhesive, ensuring a comfortable and supportive seat.
-
Upholstering the Seat: Select upholstery fabric that complements your interior decor and the overall design of the window seat. Cut the fabric to size, allowing for enough material to wrap around the foam and plywood. Secure the fabric to the underside of the seating surface using a staple gun, pulling it taut for a smooth and professional finish.
-
Installing the Seat: Attach the upholstered seating surface to the base frame using hinges, allowing it to open for access to any storage compartments within the window seat. Ensure that the hinges are durable and positioned to support the weight of the seat.
-
Detailing and Trim: Add decorative trim or molding to the edges of the seating surface for a polished look. Consider details such as piping, buttons, or tufting to enhance the visual appeal of the seat.
By following these steps, you'll create a comfortable and stylish seating area that complements the overall design of your window seat. The construction of the seat brings together the functional and aesthetic elements of the project, providing a cozy and inviting space for relaxation and enjoyment.
Step 5: Adding Finishing Touches
As you near the completion of your window seat project, it's time to add the finishing touches that will elevate the overall look and functionality of the seating area. Paying attention to details and incorporating thoughtful elements will ensure that your window seat becomes a standout feature in your home. Here's how to add those final flourishes:
-
Paint or Stain: If you've opted for a natural wood finish, consider applying a coat of stain to enhance the grain and color of the wood. Alternatively, choose a paint color that complements your interior decor. Ensure that the finish is even and smooth, and allow sufficient drying time before proceeding.
-
Hardware and Accessories: Install any hardware such as drawer pulls, hinges, or decorative knobs if your window seat includes storage compartments. Choose hardware that aligns with the overall style of the seat and provides ease of use.
-
Cushions and Pillows: If you've included cushions or pillows as part of the seating area, add them to create a cozy and inviting look. Select cushions that coordinate with your decor and provide comfort for lounging or reading by the window.
-
Window Treatments: Consider the window area surrounding the seat. Install curtains, blinds, or valances that complement the design of the window seat and provide privacy or light control as needed. Coordinating window treatments will enhance the cohesive look of the space.
-
Decorative Accents: Add personal touches such as throw blankets, decorative pillows, or a small side table to complete the cozy atmosphere. Incorporate elements that reflect your personal style and make the window seat a welcoming retreat.
-
Lighting: If the window seat area lacks sufficient natural light, consider adding a small lamp or wall sconces to provide illumination for reading or relaxation. Thoughtfully placed lighting can enhance the ambiance of the space.
By focusing on these finishing touches, you'll bring your window seat project to its full potential, creating a functional, stylish, and inviting space that adds value to your home. Each detail contributes to the overall charm and comfort of the window seat, making it a favorite spot for both relaxation and admiration.
Conclusion
Congratulations on completing the construction of your very own window seat! By following the steps outlined in this guide, you've transformed a simple idea into a beautiful and functional addition to your home. Your window seat not only provides a cozy nook for relaxation and contemplation but also offers practical seating and potential storage. The careful planning, precise measurements, and attention to detail have culminated in a delightful space that enhances the charm of your home.
As you admire your handiwork, take pride in the craftsmanship and creativity that went into building the window seat. Whether you've chosen a classic design or added your own unique touches, the result is a testament to your DIY skills and vision for home improvement. Your window seat is now ready to be enjoyed, whether it's for curling up with a good book, savoring a cup of tea, or simply basking in the natural light and scenic views.
As you revel in the comfort and allure of your new window seat, take a moment to appreciate the sense of accomplishment that comes with completing a DIY project. Your dedication and effort have yielded a tangible and gratifying outcome that enriches your living space. With the right materials, tools, and a touch of creativity, you've successfully brought your window seat dream to life.
Now, as you settle into your inviting window seat, surrounded by the warmth of your home and the beauty of the outdoors, savor the fulfillment of a project well done. Your window seat stands as a testament to your ingenuity and determination, offering a tranquil retreat within the heart of your home. Enjoy the comfort, embrace the serenity, and take pride in the masterpiece you've created.