
Home>Create & Decorate>DIY & Crafts>How To Build Steps With Blocks
DIY & Crafts
How To Build Steps With Blocks
Published: April 22, 2024

Content Creator specializing in woodworking and interior transformations. Caegan's guides motivate readers to undertake their own projects, while his custom furniture adds a personal touch.
Learn how to build steps with blocks in this DIY & Crafts guide. Create a sturdy and stylish addition to your outdoor space with our step-by-step instructions.
(Many of the links in this article redirect to a specific reviewed product. Your purchase of these products through affiliate links helps to generate commission for Twigandthistle.com, at no extra cost. Learn more)
Introduction
So, you've decided to spruce up your outdoor space and add some stylish steps using blocks. Building steps with blocks can be a fantastic DIY project that not only enhances the aesthetic appeal of your home but also adds functionality. Whether you're looking to create a grand entrance to your garden or simply need a way to navigate a slope, building steps with blocks can be a rewarding and practical endeavor. In this guide, we'll walk you through the essential steps to help you create a sturdy and visually appealing set of steps using blocks. Let's dive in and get those creative juices flowing!
Choosing the Right Blocks
When it comes to building steps with blocks, selecting the right type of blocks is crucial for the overall strength and appearance of your steps. Here are some key factors to consider when choosing the blocks for your project:
1. Material
The first decision to make is the material of the blocks. Common options include concrete, natural stone, and brick. Concrete blocks are durable and come in a variety of colors and textures, making them a versatile choice. Natural stone blocks offer a more rustic and organic look, while brick blocks can add a classic and timeless appeal to your steps.
2. Size and Shape
Consider the size and shape of the blocks that will best suit your project. Rectangular blocks are commonly used for building steps due to their stability and ease of installation. However, you can also explore curved or irregularly shaped blocks for a more unique and customized look.
3. Texture and Finish
The texture and finish of the blocks can significantly impact the aesthetics of your steps. Smooth, polished blocks can create a modern and sleek appearance, while rough or textured blocks can add a more natural and rugged charm to your outdoor space.
4. Compatibility
Ensure that the blocks you choose are compatible with the overall design and style of your home and landscape. Consider the existing materials and architectural elements to select blocks that harmonize with the surroundings.
By carefully considering these factors, you can choose the right blocks that align with your design preferences and functional requirements, setting the foundation for a successful step-building project.
Planning and Measuring
Before diving into the physical construction of your block steps, thorough planning and precise measurements are essential for a successful outcome. Here's how to approach the planning and measuring phase:
-
Sketch Out the Design: Begin by sketching out the design of your steps. Consider the number of steps needed, the overall dimensions, and any specific features such as curves or landings. This visual representation will serve as a guide throughout the project.
-
Determine the Rise and Run: The rise refers to the vertical height of each step, while the run is the horizontal depth. Calculate the ideal rise and run for your steps based on building codes and safety standards. Typically, a comfortable step height falls between 6 to 8 inches, with a run of around 10 to 11 inches.
-
Account for the Tread and Riser: The tread is the flat, horizontal surface of the step, while the riser is the vertical face. Measure and plan for the dimensions of the tread and riser, ensuring consistency across all steps for uniformity and safety.
-
Consider Drainage and Grading: Take into account the natural drainage patterns and the overall grading of the area where the steps will be installed. Proper drainage is crucial to prevent water accumulation and potential damage to the steps over time.
-
Double-Check Measurements: Once you have the initial measurements and design in place, double-check all dimensions to ensure accuracy. It's always better to spend extra time verifying measurements at this stage than to encounter issues during the construction phase.
-
Gather Materials and Tools: Based on your design and measurements, make a list of the materials and tools required for the project. This may include the blocks, gravel, sand, adhesive, and any necessary equipment for excavation and leveling.
By meticulously planning and taking precise measurements, you'll lay a solid foundation for the construction phase, setting the stage for a smooth and efficient execution of your block step project.
Preparing the Base
The preparation of the base is a critical step in ensuring the stability and longevity of your block steps. Here's a detailed breakdown of how to prepare the base for your project:
-
Excavation: Begin by excavating the area where the steps will be installed. Use a shovel or a mechanical excavator to remove the topsoil and create a level surface for the base. The depth of the excavation will depend on the overall height of the steps and the type of base material you plan to use.
-
Base Material: Once the area is excavated, it's time to add the base material. Typically, a combination of gravel and sand is used to create a stable foundation for the steps. Start by adding a layer of gravel to the excavated area, ensuring it is spread evenly and compacted to provide a solid base.
-
Compaction: After the gravel layer, add a layer of sand on top. The sand layer should be leveled and compacted using a hand tamper or a mechanical compactor. Proper compaction is essential to prevent settling and shifting of the steps over time.
-
Leveling: Use a long, straight board or a level to ensure that the surface is perfectly level. Any unevenness at this stage can lead to instability in the final steps, so take the time to achieve a smooth and level base.
-
Consider Drainage: As you prepare the base, keep in mind the importance of drainage. Ensure that the base slopes away from any nearby structures to prevent water accumulation. Additionally, consider incorporating drainage pipes or channels if the area is prone to water buildup.
-
Edge Restraints: Depending on the design and layout of your steps, you may need to install edge restraints to hold the base materials in place. This is particularly important for retaining walls or curved step designs where the base materials need to be contained.
By meticulously following these steps to prepare the base, you'll create a solid and reliable foundation for the construction of your block steps. A well-prepared base sets the stage for the successful installation of the steps and ensures their durability for years to come.
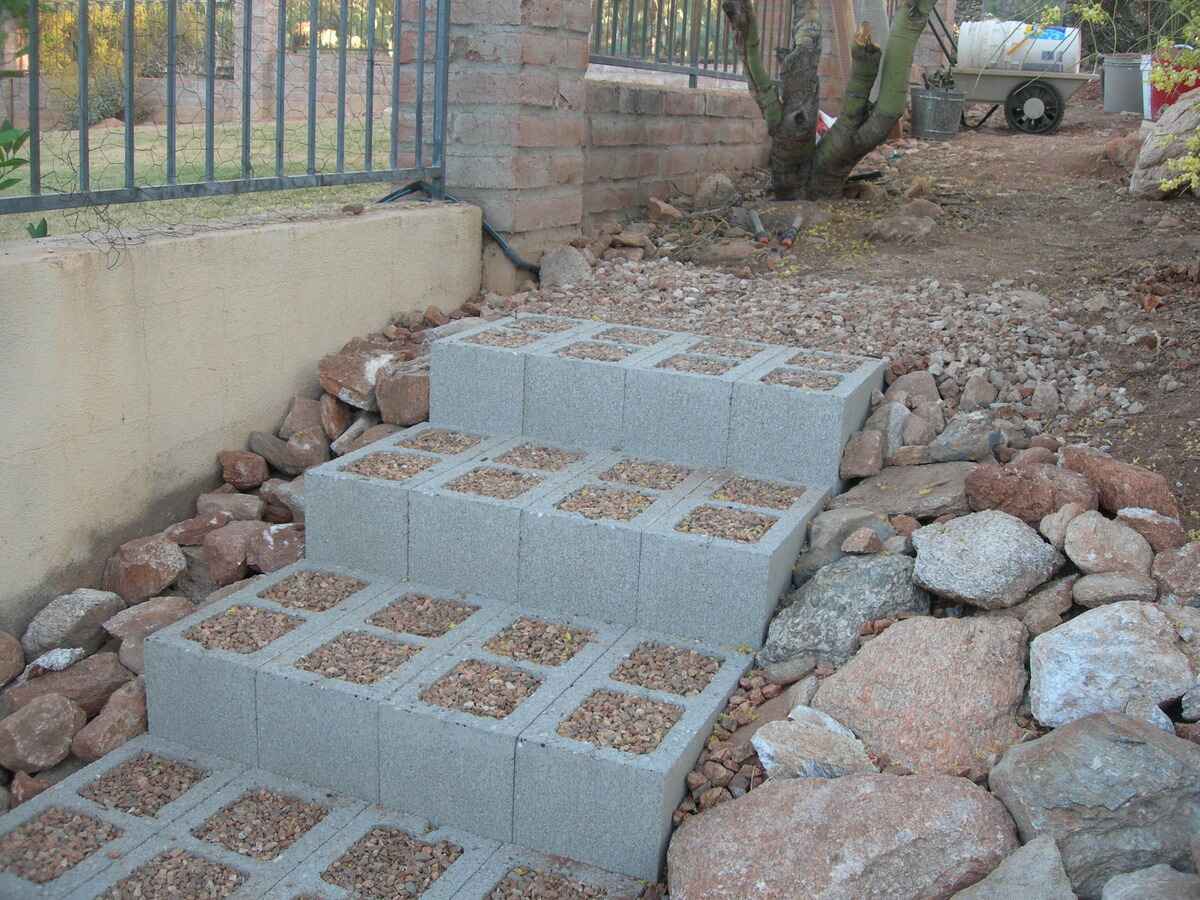
Building the Steps
Now that you've laid the groundwork, it's time to dive into the exciting phase of actually building the steps using blocks. Follow these step-by-step instructions to bring your vision to life:
-
Lay the First Course: Begin by placing the first row of blocks on the prepared base. Use a level to ensure that the blocks are perfectly aligned and even. This initial row serves as the foundation for the rest of the steps, so precision is key.
-
Add Adhesive: Once the first course is in place, apply a high-quality construction adhesive to the top surface of the blocks. This adhesive will create a strong bond between the courses of blocks, enhancing the stability of the steps.
-
Stack the Subsequent Courses: Continue stacking the blocks to create additional courses, applying adhesive between each layer. As you build upward, offset the blocks to create a sturdy and visually appealing step structure. Check the level frequently to maintain uniformity.
-
Cut Blocks as Needed: Depending on the design and layout of your steps, you may need to cut some blocks to fit specific dimensions or angles. Use a masonry saw or chisel to carefully trim the blocks to the required size, ensuring a precise fit.
-
Consider Landings and Curves: If your steps include landings or curves, plan and build these sections accordingly. Landings provide a resting area between sets of steps, while curves can add an elegant touch to the overall design.
-
Secure the Steps: As you progress, periodically backfill behind the blocks with gravel and compact it to provide additional support. This helps prevent shifting and settling, particularly for taller sets of steps.
-
Create a Non-Slip Surface: To enhance safety, consider adding a non-slip surface to the treads of the steps. This can be achieved by using specialized non-slip coatings or by selecting blocks with textured surfaces.
-
Add Finishing Touches: Once the main structure of the steps is in place, take the time to inspect the entire assembly. Make any necessary adjustments and ensure that all blocks are securely in position. Additionally, consider adding decorative elements or landscaping around the steps to complement the overall look.
By following these detailed steps, you'll be well-equipped to build a set of sturdy and visually appealing steps using blocks. The careful execution of each phase ensures that your block steps not only serve their practical purpose but also enhance the aesthetic appeal of your outdoor space.
Finishing Touches
Once the main structure of the steps is in place, it's time to focus on the finishing touches that will elevate the overall look and functionality of your block steps. Here are the essential steps to add those final details:
-
Inspect and Adjust: Take a thorough look at the entire assembly of the steps. Check for any misaligned blocks, uneven surfaces, or potential safety hazards. Make any necessary adjustments to ensure that the steps are secure and visually pleasing.
-
Non-Slip Surface: Safety is paramount, especially for outdoor steps. Consider adding a non-slip surface to the treads of the steps to prevent accidents, particularly during wet or icy conditions. Non-slip coatings or textured blocks can provide the necessary traction.
-
Decorative Elements: Enhance the aesthetic appeal of your steps by incorporating decorative elements. This could include adding potted plants, integrated lighting, or ornamental railings. These elements not only add visual interest but also contribute to the overall ambiance of your outdoor space.
-
Landscaping: Integrate landscaping around the steps to seamlessly blend them into the surrounding environment. Consider planting shrubs, flowers, or ground cover to soften the edges of the steps and create a cohesive transition between the steps and the adjacent landscape.
-
Sealing and Protecting: Depending on the material of the blocks, consider applying a sealant to protect them from the elements and enhance their longevity. Sealants can help prevent staining, moisture absorption, and color fading, keeping your steps looking pristine for years to come.
-
Maintenance Plan: Develop a maintenance plan for your block steps to ensure their continued durability and appeal. This may include regular cleaning, weed control, and periodic inspections for any signs of wear or damage.
By attending to these finishing touches, you'll not only enhance the visual impact of your block steps but also ensure that they remain safe, functional, and resilient in the face of varying weather conditions and everyday use.