Home>Create & Decorate>DIY & Crafts>DIY: Building A 3D Printer From Scratch

DIY & Crafts
DIY: Building A 3D Printer From Scratch
Published: June 11, 2024

Content Creator specializing in woodworking and interior transformations. Caegan's guides motivate readers to undertake their own projects, while his custom furniture adds a personal touch.
Learn how to build a 3D printer from scratch with our comprehensive DIY guide. Explore the world of DIY & Crafts and unleash your creativity.
(Many of the links in this article redirect to a specific reviewed product. Your purchase of these products through affiliate links helps to generate commission for Twigandthistle.com, at no extra cost. Learn more)
Introduction
Are you ready to take your DIY skills to the next level? Building a 3D printer from scratch can be a rewarding and challenging project for any home improvement enthusiast. Whether you're a hobbyist, a tinkerer, or someone who simply loves to create, constructing your own 3D printer allows you to delve into the world of additive manufacturing and unleash your creativity. In this guide, we'll walk you through the step-by-step process of building a 3D printer from the ground up, from understanding the components to troubleshooting common issues. So, roll up your sleeves and get ready to embark on this exciting DIY journey!
Read more: How to Build a DIY Camper Roof
Understanding the Components of a 3D Printer
So, you're ready to dive into the world of 3D printing, but where do you start? Understanding the key components of a 3D printer is the first step in your DIY journey. Here's a breakdown of the essential parts:
1. Frame and Structure
The frame and structure provide the foundation for your 3D printer. It's crucial to choose materials that are sturdy and durable to ensure stability during the printing process. Common materials for the frame include aluminum extrusions, steel rods, and acrylic sheets. The frame holds all the other components in place, so it's essential to get this part right.
2. Print Bed and Build Surface
The print bed is the platform where your 3D prints will take shape. It needs to be flat, level, and capable of reaching high temperatures to accommodate various filament types. Build surfaces such as glass, PEI sheets, or magnetic sheets provide a stable foundation for your prints and ensure adhesion during the printing process.
3. Extruder and Hotend
The extruder and hotend work together to feed filament into the 3D printer and melt it for extrusion. The extruder is responsible for pushing the filament, while the hotend heats and melts the filament before it's deposited onto the print bed. Choosing a reliable extruder and hotend is crucial for achieving high-quality prints.
4. Electronics and Control Board
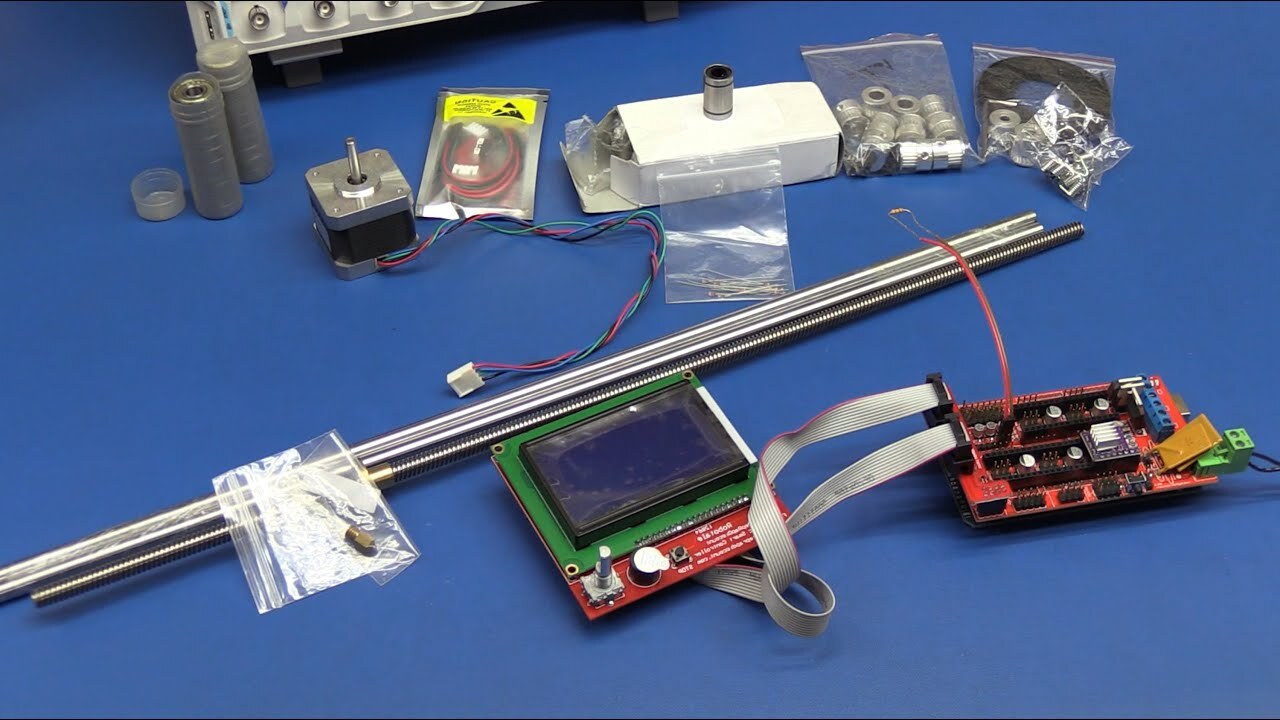
The electronics and control board serve as the brains of your 3D printer. They control the movement of the printer's components, regulate temperature, and interpret the G-code instructions from your computer. Common components include stepper motor drivers, microcontrollers, and power supplies.
5. Motors and Motion Components
Stepper motors and motion components drive the movement of the 3D printer. They control the position of the print head, the movement of the print bed, and the overall precision of the printing process. Choosing high-quality motors and motion components is essential for achieving accurate and reliable prints.
6. Cooling and Filtration Systems
Cooling fans and filtration systems help regulate the temperature of the printer's components and prevent overheating. They also aid in cooling the printed layers to ensure proper solidification. Proper cooling and filtration are essential for maintaining the quality of your prints and prolonging the lifespan of your 3D printer.
Understanding these components is crucial before you embark on building your own 3D printer. Once you have a grasp of what each part does, you'll be better equipped to source the necessary materials and start assembling your DIY 3D printer.
Sourcing the Necessary Parts and Tools
When it comes to sourcing the necessary parts and tools for building a 3D printer from scratch, thorough research and careful selection are key. Here's a comprehensive list of the essential components and tools you'll need to kickstart your DIY 3D printer project:
Read more: How to Build a DIY Greenhouse Roof
Essential Parts
- Frame and Structure Materials: Aluminum extrusions, steel rods, acrylic sheets, or any other sturdy materials for constructing the frame and structure of the printer.
- Print Bed and Build Surface: A flat, level print bed and a suitable build surface such as glass, PEI sheets, or magnetic sheets.
- Extruder and Hotend: Reliable extruder and hotend components for filament feeding and melting.
- Electronics and Control Board: Stepper motor drivers, microcontrollers, power supplies, and other electronic components for controlling the printer's functions.
- Motors and Motion Components: High-quality stepper motors and motion components for precise movement and positioning.
- Cooling and Filtration Systems: Cooling fans, heat sinks, and filtration systems to regulate temperature and prevent overheating.
Tools
- Calipers and Measuring Tools: For accurate measurements and ensuring precise fits during assembly.
- Screwdrivers and Allen Keys: A variety of screwdrivers and Allen keys for securing components and making adjustments.
- Soldering Iron and Solder: Essential for soldering electronic connections and components.
- Wire Cutters and Strippers: For cutting and stripping wires to the required lengths.
- Pliers and Tweezers: Useful for handling small components and making delicate adjustments.
- Leveling Tools: Such as a spirit level or dial indicator for ensuring the print bed is perfectly level.
Sourcing Options
- Online Retailers: Websites such as Amazon, eBay, and dedicated 3D printing stores offer a wide range of components and tools for building a 3D printer.
- Local Hardware Stores: Visit local hardware stores for materials such as aluminum extrusions, steel rods, and other structural components.
- Specialty 3D Printing Suppliers: Explore specialized 3D printing suppliers for specific components such as hotends, extruders, and electronic parts.
- Community Forums and Marketplaces: Engage with 3D printing communities and forums to seek recommendations and potentially find used parts at a lower cost.
By carefully sourcing the necessary parts and tools, you can ensure that your DIY 3D printer is equipped with high-quality components, setting the stage for a successful build and reliable performance.
Assembling the Frame and Structure
Assembling the frame and structure of your DIY 3D printer is a critical step that lays the foundation for the entire build. Follow these steps to ensure a sturdy and stable framework for your printer:
-
Gather the Frame Materials: Begin by gathering the materials for the frame and structure, such as aluminum extrusions, steel rods, or acrylic sheets. Ensure that the materials are cut to the correct lengths according to the specifications of your 3D printer design.
-
Assemble the Base: Start by assembling the base of the frame, which provides the support for the print bed and the rest of the printer components. Use precision measurements and right-angle brackets to ensure the base is square and level.
-
Build the Vertical Supports: Once the base is in place, attach the vertical supports to the base using appropriate fasteners. These supports will hold the upper structure of the printer and provide stability during the printing process.
-
Secure the Upper Structure: Attach the horizontal and diagonal elements to form the upper structure of the frame. This part of the assembly is crucial for maintaining the rigidity of the frame and preventing any wobbling during printing.
-
Mount the Print Bed: Install the print bed onto the frame, ensuring that it is level and securely attached. Proper alignment and stability of the print bed are essential for achieving accurate and consistent prints.
-
Check for Stability: Once the frame and structure are assembled, perform a thorough check for stability and squareness. Any misalignments or instabilities should be addressed before proceeding to the next steps.
By meticulously assembling the frame and structure of your 3D printer, you set the stage for the successful integration of the remaining components and the overall functionality of your DIY creation.
Read more: How to Build a DIY Sprinter Roof Rack
Installing the Electronics and Wiring
Installing the electronics and wiring is a crucial phase in the construction of your DIY 3D printer. This step involves integrating the control board, motors, power supply, and wiring the components together to ensure proper functionality. Here's a detailed guide to help you navigate through this essential phase:
-
Prepare the Electronics: Lay out all the electronic components including the control board, stepper motor drivers, power supply, and wiring harnesses. Ensure that you have a clear understanding of the wiring diagrams and instructions provided with each component.
-
Mount the Control Board: Find a suitable location within the frame to mount the control board. Ensure that it is positioned in a way that allows easy access for wiring and future maintenance. Use appropriate fasteners to secure the control board in place.
-
Connect the Power Supply: Carefully connect the power supply to the control board, ensuring that the polarity is correct and the connections are secure. Double-check the voltage settings and ensure that the power supply can deliver the required current for the printer's components.
-
Wire the Stepper Motors: Connect the stepper motors to the designated ports on the control board. Pay close attention to the wiring polarity and ensure that each motor is correctly identified and connected to the corresponding axis on the printer.
-
Integrate Endstops and Sensors: If your 3D printer design includes endstops or sensors for homing and calibration, wire these components according to the provided instructions. Proper calibration and functionality of these sensors are crucial for the printer's accuracy.
-
Organize the Wiring Harnesses: Neatly organize the wiring harnesses and ensure that they are secured to the frame to prevent interference with moving components. Use cable ties or cable management solutions to keep the wiring tidy and organized.
-
Test the Electronics: Before proceeding further, perform a preliminary test of the electronics to ensure that all connections are secure and the components are functioning as expected. Check for any loose connections or wiring errors that may affect the printer's performance.
-
Document the Wiring Layout: As you progress through the wiring process, document the layout and connections for future reference. This documentation will be valuable for troubleshooting and maintenance tasks down the line.
By meticulously following these steps and paying close attention to the details of installing the electronics and wiring, you can ensure that your DIY 3D printer is equipped with a reliable and well-integrated electrical system, setting the stage for successful calibration and testing.
Calibrating and Testing the 3D Printer
Calibrating and testing your DIY 3D printer is a critical phase that ensures its accuracy, reliability, and overall performance. Proper calibration and testing procedures are essential for achieving high-quality prints and identifying any potential issues that may arise during the printing process. Here's a detailed guide to help you navigate through the calibration and testing phase of your 3D printer build:
-
Bed Leveling: Begin by leveling the print bed to ensure that it is parallel to the print head's travel path. Use a leveling tool such as a dial indicator or a piece of paper to adjust the bed's leveling screws until it is uniformly leveled across the entire surface.
-
Extruder Calibration: Calibrate the extruder by ensuring that the correct amount of filament is being extruded during the printing process. Use a calibration cube or a similar test print to measure the actual dimensions of the printed object and adjust the extrusion multiplier in the printer's settings accordingly.
-
Print Speed and Temperature Calibration: Test different print speeds and temperatures to determine the optimal settings for your printer and the type of filament being used. Adjust the settings based on the print quality and structural integrity of the printed objects.
-
First Layer Adhesion Test: Perform a first layer adhesion test to ensure that the printed object adheres properly to the print bed. Adjust the print bed temperature and the distance between the nozzle and the bed to achieve optimal adhesion without causing the first layer to be squished or too loose.
-
Dimensional Accuracy Test: Print a calibration object such as a calibration cube or a calibration XYZ cube to verify the dimensional accuracy of the printed objects. Measure the dimensions of the printed object and compare them to the intended design to ensure accuracy.
-
Overhang and Bridging Test: Print test models with overhangs and bridges to evaluate the printer's ability to handle these challenging geometries. Adjust the cooling settings and print speeds to achieve clean and accurate overhangs and bridges without sagging or drooping.
-
Retraction Test: Test the retraction settings to minimize stringing and oozing between printed features. Adjust the retraction distance and speed to achieve clean and string-free prints, especially in models with intricate details and small features.
-
Functional Test Prints: Print functional test models such as gears, hinges, or interlocking parts to evaluate the printer's ability to produce mechanically functional objects. Test the fit and functionality of these parts to ensure that the printer can produce reliable functional prints.
By meticulously calibrating and testing your DIY 3D printer, you can fine-tune its settings, identify any potential issues, and ensure that it is capable of producing high-quality prints with accuracy and consistency. This phase sets the stage for the successful operation of your 3D printer and paves the way for your future 3D printing projects.
Troubleshooting Common Issues
When working with a DIY 3D printer, encountering common issues is a part of the learning process. Here are some common problems you might face and how to troubleshoot them:
-
Print Bed Adhesion Issues: If your prints are not sticking to the bed or are coming loose during printing, ensure that the print bed is clean and free from any debris or oils. Additionally, adjusting the bed leveling and increasing the bed temperature can improve adhesion.
-
Extrusion Problems: Inconsistent extrusion or under-extrusion can result in weak and incomplete prints. Check for any clogs in the hotend or extruder and ensure that the filament is feeding smoothly. Adjusting the extrusion multiplier and temperature settings can also help resolve this issue.
-
Layer Shifting: If you notice that the layers of your print are shifting or misaligned, it could be due to loose belts or insufficient motor current. Tighten the belts and adjust the motor current settings to ensure smooth and accurate movement.
-
Stringing and Oozing: Excessive stringing or oozing between printed features can be caused by improper retraction settings. Adjust the retraction distance and speed to minimize stringing and achieve cleaner prints.
-
Print Warping: Warping occurs when the edges of the print lift or curl during printing. Increasing the bed temperature and using adhesion aids such as glue or specialized bed adhesives can help prevent warping.
-
Nozzle Clogs: If the extruder nozzle becomes clogged, it can lead to inconsistent extrusion and poor print quality. Clear the clog using a nozzle cleaning tool or by performing a cold pull to remove any debris or filament buildup.
-
Overheating and Thermal Runaway: Overheating of the hotend or heated bed, as well as thermal runaway errors, can be dangerous and lead to print failures. Ensure that the cooling fans are functioning properly and that the temperature settings are within safe limits.
-
Print Quality Issues: Issues such as ghosting, ringing, or inconsistent layer heights can be attributed to mechanical issues or improper printer settings. Check for loose components, adjust print speeds, and fine-tune acceleration and jerk settings to improve print quality.
-
Electrical and Connection Problems: Intermittent electrical issues or faulty connections can cause erratic printer behavior. Inspect the wiring and connections, ensuring that they are secure and free from damage or wear.
-
Software and Firmware Errors: If you encounter erratic behavior or malfunctions, updating the printer's firmware and ensuring that the slicing software settings are optimized for your printer can help resolve software-related issues.
By addressing these common issues and implementing the troubleshooting steps, you can enhance the performance and reliability of your DIY 3D printer, ensuring that it consistently produces high-quality prints for your projects.
Conclusion and Next Steps
As you wrap up the construction and calibration of your DIY 3D printer, it's time to celebrate your achievement and look ahead to the next steps in your 3D printing journey. With your newly built 3D printer, you have unlocked a world of creative possibilities, allowing you to bring your ideas to life in three dimensions. Whether you're interested in prototyping, customizing parts, or creating artistic designs, your 3D printer is a powerful tool for turning imagination into reality.
Now that your 3D printer is up and running, consider exploring the following next steps to further enhance your 3D printing experience:
-
Advanced Calibration and Optimization: Dive deeper into the calibration process to fine-tune your printer's settings for specific filament types, print resolutions, and intricate designs. Experiment with advanced calibration techniques to achieve the highest level of print quality and precision.
-
Design and Modeling Software: Familiarize yourself with 3D modeling and design software to create your own custom designs and models. Learning to design for 3D printing opens up endless opportunities for creating unique and personalized objects.
-
Material Exploration: Explore a variety of 3D printing materials beyond standard filaments, such as flexible, composite, or specialty filaments. Each material offers unique properties and applications, allowing you to expand your printing capabilities.
-
Community Engagement: Join online 3D printing communities, forums, and maker spaces to connect with fellow enthusiasts, share experiences, and gain insights into advanced techniques, troubleshooting, and innovative applications of 3D printing.
-
Advanced Projects: Challenge yourself with complex and ambitious 3D printing projects, such as functional prototypes, mechanical assemblies, or intricate art pieces. Push the boundaries of what your 3D printer can create and expand your skills in additive manufacturing.
-
Maintenance and Upgrades: Regularly maintain and upgrade your 3D printer to ensure its longevity and performance. Stay informed about the latest advancements in 3D printing technology and consider implementing upgrades to enhance your printer's capabilities.
By embracing these next steps, you can continue to grow as a 3D printing enthusiast and unlock the full potential of your DIY 3D printer. With dedication, creativity, and a passion for making, your 3D printer will be a valuable tool for bringing your ideas to life and embarking on exciting new projects.

