
Home>Create & Decorate>DIY & Crafts>DIY: Building A Keyboard From Scratch
DIY & Crafts
DIY: Building A Keyboard From Scratch
Published: February 24, 2024

Senior Editor in Create & Decorate, Kathryn combines traditional craftsmanship with contemporary trends. Her background in textile design and commitment to sustainable crafts inspire both content and community.
Discover how to create your own custom keyboard from scratch with our DIY guide. Get creative with this fun and practical craft project.
(Many of the links in this article redirect to a specific reviewed product. Your purchase of these products through affiliate links helps to generate commission for Twigandthistle.com, at no extra cost. Learn more)
Introduction
Building a keyboard from scratch is a rewarding and creative DIY project that allows you to customize every aspect of your typing experience. Whether you're a tech enthusiast, a mechanical keyboard aficionado, or simply looking for a unique and personalized input device, embarking on this journey can be both educational and fulfilling.
Creating a custom keyboard offers a hands-on opportunity to delve into the intricate world of mechanical switches, keycaps, and circuitry. It's a chance to tailor the layout, feel, and aesthetics of your keyboard to suit your preferences, making it a truly one-of-a-kind piece that reflects your personality and style.
Throughout this DIY endeavor, you'll have the freedom to select high-quality components, experiment with different switch types, and design a layout that complements your typing habits. From the satisfying click of tactile switches to the smooth actuation of linear switches, the choices are vast, and each decision contributes to the overall feel and performance of the keyboard.
Moreover, the process of assembling and soldering the components provides a hands-on lesson in electronics and craftsmanship. It's an opportunity to hone your soldering skills, understand the intricacies of circuitry, and gain a deeper appreciation for the technology we interact with daily.
By the end of this DIY project, you'll not only have a fully functional custom keyboard but also a newfound understanding of the mechanics behind this essential tool. Whether you're a seasoned DIY enthusiast or a newcomer to the world of custom keyboards, this project promises to be an engaging and enlightening experience.
So, roll up your sleeves, gather your tools, and prepare to embark on a journey of creativity, learning, and customization as we delve into the art of building a keyboard from scratch.
Choosing the Right Components
Selecting the right components is a crucial first step in building a custom keyboard that aligns with your preferences and requirements. From switches and keycaps to the circuit board and frame, each component plays a pivotal role in shaping the functionality and aesthetics of the final product. Here's a comprehensive guide to help you navigate the process of choosing the perfect components for your DIY keyboard project.
1. Mechanical Switches
The heart of any mechanical keyboard lies in its switches. These are responsible for the tactile feedback and actuation force that define the typing experience. When choosing switches, consider factors such as actuation type (tactile, linear, or clicky), actuation force, and sound profile. Whether you prefer the satisfying click of a tactile switch, the smooth keystrokes of a linear switch, or the audible feedback of a clicky switch, there's a wide array of options to explore.
2. Keycaps
Keycaps not only contribute to the visual appeal of the keyboard but also impact the overall feel of the keys. Material, profile, and compatibility are key considerations when selecting keycaps. Whether you opt for durable PBT plastic, stylish double-shot ABS, or custom artisan keycaps, the choice is yours. Additionally, consider the keycap profile (OEM, Cherry, SA, DSA, etc.) and ensure compatibility with the chosen switches.
3. Circuit Board
The circuit board serves as the backbone of the keyboard, housing the electrical components and providing the platform for key switches. When selecting a circuit board, consider the layout (full-size, tenkeyless, 60%, etc.), programmability, and compatibility with the chosen switches and keycaps. Some enthusiasts may opt for a DIY-friendly PCB to customize the layout and features according to their preferences.
4. Keyboard Frame
The frame not only provides structural support but also contributes to the overall aesthetics of the keyboard. Materials such as aluminum, steel, and acrylic offer different levels of durability and visual appeal. Consider the form factor, design elements, and compatibility with the chosen circuit board when selecting a frame that complements your desired aesthetic and functionality.
5. Stabilizers
Stabilizers play a crucial role in ensuring consistent and smooth keypresses, especially for larger keys such as the spacebar and enter key. When choosing stabilizers, consider factors such as wire type, lubrication, and compatibility with the chosen keycaps and switches.
By carefully considering these components and their respective attributes, you can tailor your custom keyboard to meet your specific preferences and create a truly unique and personalized typing experience.
Assembling the Keyboard Frame
Assembling the keyboard frame is a pivotal step in the construction of a custom keyboard. The frame not only provides structural integrity but also serves as the canvas upon which the entire keyboard layout is built. Whether you opt for a sleek aluminum case, a minimalist acrylic frame, or a robust steel chassis, the assembly process remains a fundamental aspect of the DIY keyboard project.
1. Gather the Components
Before diving into the assembly, ensure that you have all the necessary components at hand. This includes the keyboard frame, screws, standoffs, and any additional accessories required for securing the frame and accommodating the circuit board and switches.
2. Preparing the Frame
Begin by inspecting the keyboard frame for any imperfections or debris that may hinder the assembly process. Clean the frame if necessary, and lay it out on a flat, stable surface. Take note of the orientation and any specific instructions provided by the frame manufacturer.
3. Mounting the Standoffs
If the frame requires standoffs to elevate the circuit board, carefully mount them at designated locations within the frame. Ensure that the standoffs are securely fastened to provide stable support for the circuit board and prevent any unwanted movement or flex during use.
4. Positioning the Circuit Board
With the standoffs in place, carefully position the circuit board within the frame, aligning it with the mounting points and ensuring a snug fit. Take caution to avoid any contact between the circuit board and the frame that may lead to electrical shorts or damage to the components.
5. Securing the Circuit Board
Using the provided screws, delicately secure the circuit board to the standoffs within the frame. Exercise care to avoid over-tightening the screws, as this may damage the circuit board or compromise the integrity of the frame.
6. Accommodating the Switches
Depending on the design of the frame, you may need to accommodate the switches within the designated slots or mounting points. Ensure that the switches align correctly with the keycap positions and are firmly seated to maintain stability and consistency during use.
7. Final Checks
Once the circuit board and switches are in place, perform a final inspection to verify the alignment, stability, and overall integrity of the assembly. Ensure that all components are securely fastened and that the frame provides adequate support for the keyboard's internal components.
By meticulously following these steps, you can effectively assemble the keyboard frame, laying the groundwork for the subsequent installation of switches, keycaps, and the final testing phase. This process not only contributes to the structural integrity of the keyboard but also sets the stage for the realization of a fully functional and personalized input device.
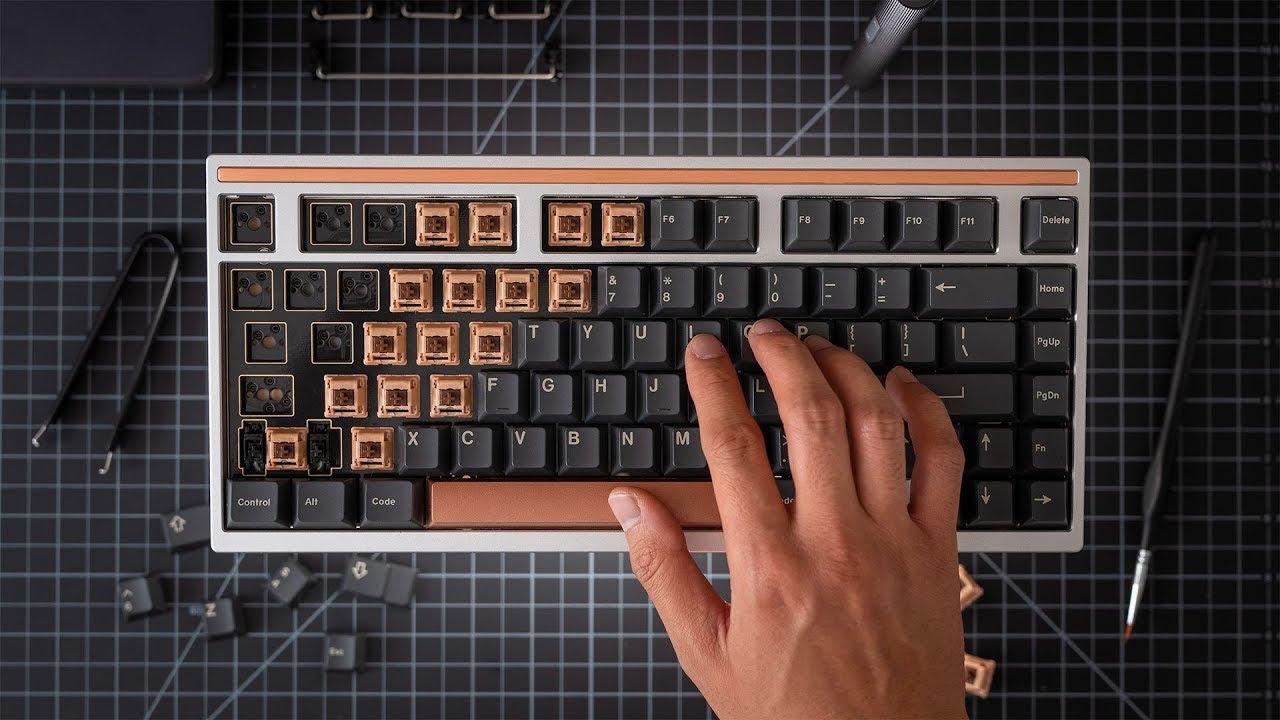
Installing the Switches
Installing the switches is a pivotal phase in the construction of a custom keyboard, as it directly influences the tactile feedback, actuation force, and overall typing experience. Whether you opt for tactile, linear, or clicky switches, the installation process demands precision and attention to detail to ensure optimal performance and longevity.
1. Preparing the Switches
Before commencing the installation, it's essential to prepare the switches for mounting. Inspect each switch for any manufacturing residues or irregularities that may affect its functionality. Additionally, ensure that the switches are compatible with the chosen circuit board and keycap layout to avoid any compatibility issues during installation.
2. Aligning the Switches
Carefully align the switches with their designated positions on the circuit board, ensuring that each switch sits flush and level with the mounting points. Proper alignment is crucial to guarantee consistent key travel and prevent any misalignment issues that may arise during use.
3. Securing the Switches
Gently press each switch into its designated position on the circuit board, ensuring a snug fit without applying excessive force. The switches should audibly click into place, indicating that they are securely seated and making proper contact with the circuit board for reliable electrical connectivity.
4. Verifying Stability
After installing the switches, perform a thorough inspection to verify the stability and alignment of each switch. Ensure that all switches are uniformly seated and exhibit consistent positioning to maintain a uniform typing experience across the keyboard.
5. Testing Actuation
Once the switches are installed, perform a preliminary actuation test to ensure that each switch registers key presses accurately. This can be done by gently pressing each switch and verifying the corresponding input on the connected device or testing software. Any inconsistencies or non-responsive switches should be addressed before proceeding to the next phase of the assembly.
6. Final Checks
Conduct a comprehensive review of the installed switches, confirming that they are securely mounted, aligned, and function as intended. Address any discrepancies or irregularities to ensure that the switches are primed for the subsequent installation of keycaps and the final testing phase.
By meticulously following these steps, you can effectively install the switches, laying the foundation for a responsive and reliable typing experience. This phase not only contributes to the functionality of the keyboard but also sets the stage for the realization of a fully customized and personalized input device.
Soldering the Circuit Board
Soldering the circuit board is a critical phase in the construction of a custom keyboard, as it involves the precise and meticulous attachment of electrical components to the PCB (Printed Circuit Board). This process not only establishes the electrical connections necessary for the keyboard's functionality but also demands a steady hand and attention to detail to ensure the integrity and reliability of the solder joints.
1. Preparation
Before commencing the soldering process, it's imperative to prepare the necessary tools and components. This includes a soldering iron with a fine tip, high-quality solder wire, flux, a soldering stand, and a well-ventilated workspace. Additionally, ensure that the circuit board and electrical components are clean and free from any contaminants that may hinder the soldering process.
2. Tinning the Soldering Iron
To ensure optimal heat transfer and solder flow, it's essential to tin the soldering iron tip. This involves applying a small amount of solder to the tip, allowing it to coat the surface evenly. Proper tinning promotes efficient heat conduction and prevents oxidation of the iron tip during the soldering process.
3. Applying Flux
Applying flux to the soldering joints is crucial for promoting solder flow and enhancing the quality of the solder connections. Carefully apply a small amount of flux to the contact pads on the circuit board, ensuring even coverage to facilitate the soldering process and minimize the risk of solder bridges or cold joints.
4. Soldering the Components
With the soldering iron at the appropriate temperature, delicately position the electrical components on the designated contact pads of the circuit board. Apply the soldering iron to the joint, allowing it to heat the pad and component lead simultaneously. Once the joint reaches the optimal temperature, introduce the solder wire to the joint, allowing it to flow and create a secure electrical connection.
5. Inspecting the Joints
After soldering each joint, carefully inspect the quality of the solder connections. Ensure that the joints exhibit a smooth, shiny appearance, indicating proper wetting and adhesion to the contact pads and component leads. Additionally, verify that there are no solder bridges or cold joints, as these may compromise the functionality and reliability of the keyboard.
6. Cleaning and Testing
Once all components are soldered to the circuit board, clean the board with a suitable solvent to remove any flux residues or contaminants. Following the cleaning process, perform a comprehensive electrical test to verify the integrity of the solder joints and ensure that all components are functioning as intended.
By meticulously following these steps and exercising precision throughout the soldering process, you can establish robust electrical connections and lay the groundwork for the final assembly of the custom keyboard. This phase not only contributes to the functionality and reliability of the keyboard but also represents a pivotal stage in the realization of a fully customized and personalized input device.
Attaching the Keycaps
Attaching the keycaps is a crucial and visually rewarding phase in the construction of a custom keyboard. Keycaps not only serve as the interface between the user and the switches but also contribute to the overall aesthetics and tactile experience of the keyboard. Whether you opt for standard keycap sets, artisan keycaps, or custom-designed keycaps, the process of attaching them demands precision and attention to detail to ensure a uniform and visually appealing layout.
1. Keycap Orientation
Before attaching the keycaps, it's essential to identify the correct orientation of each keycap. Most keycaps feature a sculpted profile, with varying heights and angles to accommodate the natural curvature of the fingers during typing. Ensure that the keycaps are positioned with the appropriate orientation to maintain a comfortable and ergonomic typing experience.
2. Aligning the Keycaps
Carefully align each keycap with its corresponding switch, ensuring that it sits flush and level with the switch stem. Proper alignment is crucial to guarantee consistent key travel and prevent any interference or binding during use. Take note of any specialty keycaps, such as stabilizer-compatible or stepped profile keycaps, and ensure they are positioned correctly.
3. Securing the Keycaps
Gently press each keycap onto the switch stem, exerting even pressure to ensure a snug and secure fit. The keycap should audibly snap into place, indicating that it is firmly seated and ready for use. Exercise caution to avoid applying excessive force, as this may damage the switches or keycap stems.
4. Verifying Uniformity
After attaching the keycaps, perform a comprehensive inspection to verify the uniformity and alignment of the keycap layout. Ensure that all keycaps are uniformly seated and exhibit consistent positioning to maintain a visually appealing and ergonomic typing surface.
5. Customization and Personalization
For enthusiasts seeking a personalized touch, this phase presents an opportunity to explore custom keycap sets, artisan keycaps, or even design and create their own keycaps. Whether it's a vibrant color scheme, a thematic design, or a bespoke artisan creation, the keycap attachment phase allows for creative expression and customization.
By meticulously following these steps and paying attention to the details, you can effectively attach the keycaps, culminating in a visually stunning and fully functional custom keyboard. This phase not only contributes to the aesthetics and tactile experience of the keyboard but also represents the realization of a fully customized and personalized input device.
Testing and Troubleshooting
Once the keyboard components are assembled, switches installed, and keycaps attached, it's crucial to conduct thorough testing to ensure the functionality and performance of the custom keyboard. This phase involves validating the electrical connections, key responsiveness, and overall user experience. Additionally, troubleshooting any potential issues that may arise during testing is essential to deliver a reliable and satisfying typing interface.
Electrical Testing
Begin by conducting an electrical test to verify the connectivity of the switches and the integrity of the soldered joints. Using a multimeter set to continuity mode, carefully probe the switch contact points on the circuit board to ensure that each key press registers a complete electrical circuit. This step is crucial for identifying any potential soldering issues or faulty connections that may affect the keyboard's performance.
Key Response Verification
After confirming the electrical connectivity, proceed to test the responsiveness of each key. Utilize a keyboard testing software or an online key tester to verify that each switch registers key presses accurately and consistently. This step ensures that the installed switches and keycaps function as intended, providing a seamless typing experience across the entire keyboard layout.
Functional Testing
Once the electrical and key response tests are completed, conduct functional testing to evaluate the overall performance of the custom keyboard. This involves typing various combinations of keys, testing modifier keys, and assessing the functionality of specialty keys such as the spacebar, enter key, and function keys. By simulating real-world usage scenarios, this testing phase aims to identify any potential inconsistencies or irregularities in key actuation and responsiveness.
Troubleshooting
In the event of any issues identified during testing, it's essential to engage in systematic troubleshooting to pinpoint and address the root cause. This may involve rechecking solder joints, inspecting switch alignment, and verifying keycap compatibility. Additionally, troubleshooting software or firmware-related issues, if applicable, is crucial to ensure the seamless operation of the custom keyboard.
Iterative Testing
Iterative testing and troubleshooting may be necessary to address any identified issues and ensure that the custom keyboard meets the desired performance standards. By systematically addressing and resolving any anomalies or irregularities, the iterative testing phase aims to refine the keyboard's functionality and deliver a consistent and reliable typing experience.
By meticulously conducting testing and troubleshooting, you can ensure that the custom keyboard not only meets your expectations but also delivers a seamless and personalized typing interface. This phase represents the final validation of the DIY project, ensuring that the custom keyboard is primed for everyday use and reflects the craftsmanship and attention to detail invested in its construction.
Conclusion
In conclusion, the journey of building a custom keyboard from scratch is a testament to the fusion of craftsmanship, creativity, and technical expertise. This DIY endeavor offers a profound sense of fulfillment as it culminates in the creation of a fully functional and personalized input device that reflects the unique preferences and style of its creator.
Throughout the process, the meticulous selection of components, from mechanical switches and keycaps to the circuit board and frame, allows for a tailored and immersive experience. The tactile feedback, actuation force, and visual aesthetics of the keyboard are carefully curated to align with individual preferences, resulting in a truly one-of-a-kind typing interface.
The assembly and soldering phases not only provide hands-on lessons in electronics and craftsmanship but also foster a deeper understanding of the intricate technology that underpins the keyboard's functionality. The precision and attention to detail required during these phases underscore the dedication and passion invested in the construction of the custom keyboard.
Attaching the keycaps serves as a visually rewarding and customizable phase, allowing for creative expression and personalization. Whether it's a vibrant color scheme, thematic design, or bespoke artisan keycaps, this phase encapsulates the opportunity to infuse the keyboard with a touch of individuality and flair.
The testing and troubleshooting phase represents the final validation of the custom keyboard, ensuring that it not only meets the desired performance standards but also delivers a seamless and reliable typing experience. The iterative nature of this phase underscores the commitment to refining and perfecting the keyboard's functionality, reflecting the dedication to craftsmanship and attention to detail.
Ultimately, the process of building a custom keyboard from scratch transcends the realm of a DIY project; it embodies a journey of self-expression, technical exploration, and creative ingenuity. The resulting keyboard stands as a testament to the fusion of art and technology, serving as a tangible manifestation of the passion and dedication poured into its construction.
As DIY enthusiasts embark on this endeavor, they not only craft a personalized input device but also cultivate a deeper appreciation for the intricacies of mechanical keyboards. The journey of building a custom keyboard from scratch is a celebration of individuality, creativity, and the boundless possibilities that arise from the intersection of craftsmanship and technology.