
Home>Create & Decorate>DIY & Crafts>How To Make A Garden Fence
DIY & Crafts
How To Make A Garden Fence
Published: February 24, 2024

Content Creator specializing in woodworking and interior transformations. Caegan's guides motivate readers to undertake their own projects, while his custom furniture adds a personal touch.
Learn how to make a garden fence with our DIY & Crafts guide. Create a beautiful and functional fence for your garden with our step-by-step instructions.
(Many of the links in this article redirect to a specific reviewed product. Your purchase of these products through affiliate links helps to generate commission for Twigandthistle.com, at no extra cost. Learn more)
Introduction
Creating a garden fence is a rewarding and practical DIY project that can enhance the aesthetics of your outdoor space while providing essential protection for your plants and flowers. Whether you're a seasoned DIY enthusiast or a novice looking to embark on your first outdoor project, building a garden fence can be an enjoyable and fulfilling endeavor.
A well-constructed garden fence serves multiple purposes, including defining the boundaries of your garden, safeguarding your plants from curious critters, and adding a touch of charm to your landscape. By taking the time to plan and execute this project with care, you can elevate the visual appeal of your garden while ensuring its security.
In this comprehensive guide, we will walk you through the step-by-step process of building a sturdy and visually appealing garden fence. From gathering the necessary materials to adding the finishing touches, each stage of the project is crucial in achieving a durable and attractive fence that complements your outdoor space.
Whether you envision a classic picket fence to evoke a quaint, cottage-style ambiance or a sleek and modern design to complement a contemporary landscape, this guide will equip you with the knowledge and confidence to bring your vision to life. With a bit of creativity and a willingness to roll up your sleeves, you can transform your garden into a haven that reflects your personal style and protects your cherished plants.
So, roll up your sleeves, gather your tools, and let's embark on this fulfilling journey of creating a beautiful and functional garden fence that will stand the test of time. Let's dive into the first step: gathering the materials you'll need to get started.
Step 1: Gather Materials
Before diving into the construction process, it's essential to gather all the necessary materials and tools to ensure a smooth and efficient workflow. Here's a comprehensive list of items you'll need to kickstart your garden fence project:
Materials:
- Fence Posts: These are the vertical supports that anchor the fence in place. Opt for durable, weather-resistant posts such as pressure-treated wood or metal.
- Fence Rails: These horizontal bars provide structural support and help secure the fence panels. Choose rails that complement the style and durability of your fence posts.
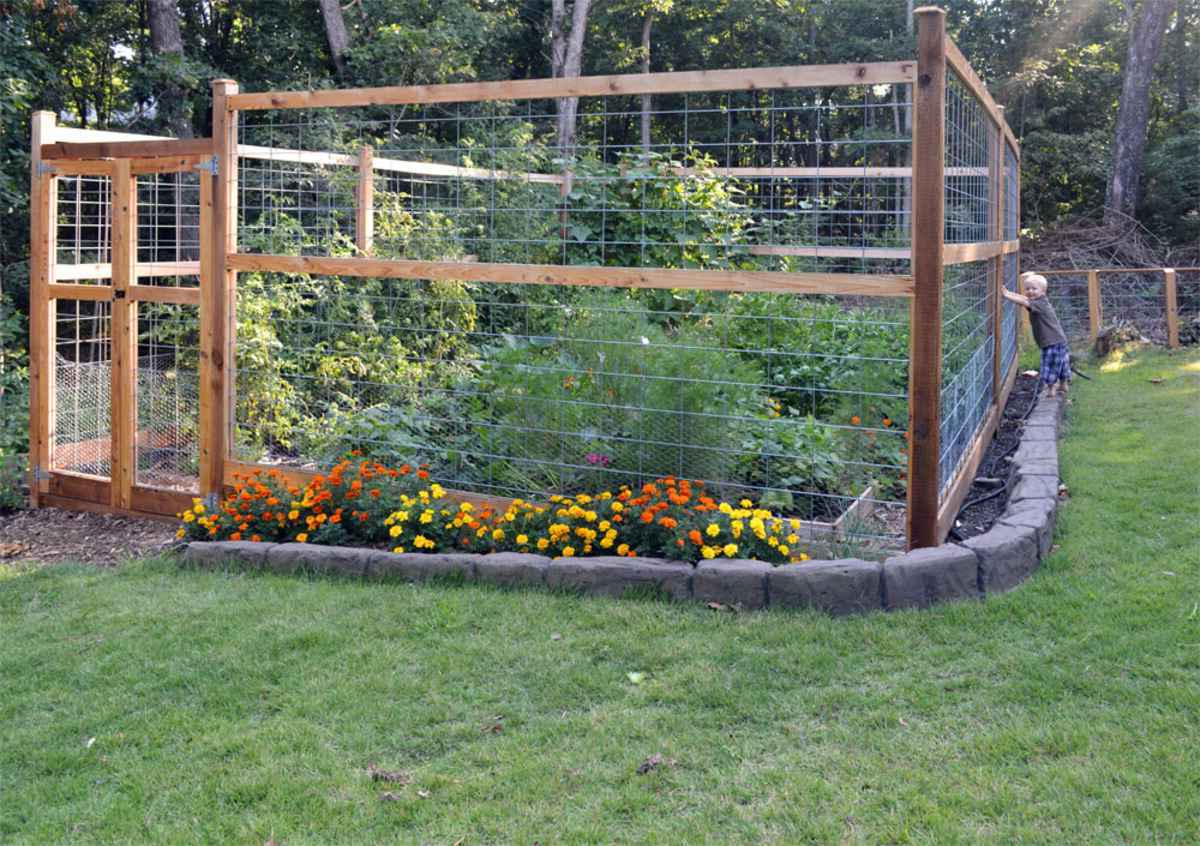
- Fence Panels: The main body of the fence, these panels come in various materials such as wood, vinyl, or metal. Select panels that align with your aesthetic preferences and provide the desired level of privacy and protection.
- Concrete: For securing the fence posts in the ground, high-quality concrete is essential to ensure stability and longevity.
- Gravel or Stone: Placing a layer of gravel or stone at the bottom of the post holes helps with drainage and prevents the posts from sitting in water, which can lead to rot.
- Fasteners: Nails, screws, or specialized fasteners, depending on the material of your fence panels and rails.
- Post Caps: These decorative elements add a polished look to the fence while protecting the exposed ends of the posts from moisture.
- Gate Hardware: If your fence includes a gate, ensure you have the necessary hardware for installation and functionality.
Tools:
- Measuring Tape: Essential for accurately determining the dimensions of your fence layout and ensuring uniform spacing between posts.
- Level: To ensure that the fence posts and panels are installed perfectly straight and level.
- Post-Hole Digger or Auger: For digging the holes to accommodate the fence posts.
- Shovel: Useful for mixing and pouring concrete, as well as backfilling the post holes.
- Saw: Depending on the type of fence panels and rails, a saw may be required for cutting materials to the appropriate size.
- Hammer or Drill: For securing fasteners and attaching fence panels and rails.
- Safety Gear: Gloves, safety glasses, and appropriate footwear to protect yourself during construction.
By gathering these materials and tools, you'll set the stage for a successful and efficient garden fence installation. With everything at your disposal, you're ready to move on to the next step: measuring and marking the layout for your fence.
Step 2: Measure and Mark
Accurate measurements and precise marking are fundamental to the successful construction of a garden fence. Before breaking ground or installing any components, it's crucial to meticulously plan the layout and dimensions of your fence. This step sets the foundation for a well-aligned and visually appealing structure that seamlessly integrates with your garden landscape.
Assess the Terrain
Begin by surveying the terrain where the fence will be installed. Take note of any slopes, uneven ground, or obstacles that may impact the placement of the fence. Understanding the natural features of the landscape will inform your layout decisions and help anticipate any challenges that may arise during installation.
Determine Property Lines
If you're installing the fence along property lines, it's imperative to verify the exact boundaries to avoid encroaching on neighboring properties. Consult property surveys or legal documents to confirm the precise demarcation of your land. Additionally, open communication with neighbors can help prevent disputes and ensure that the fence aligns with mutual agreements.
Measure and Stake Out the Layout
Using a measuring tape, stake out the intended path of the fence, marking the locations for the posts and indicating the corners and endpoints. Ensure that the spacing between posts is consistent and adheres to local building codes and regulations. For straight sections, a taut string can be stretched between stakes to create a visual guide for the fence line.
Consider Gate Placement
If your fence includes a gate, carefully plan its location during the marking phase. Gate placement should allow for smooth entry and exit while maintaining a harmonious flow within the overall fence design. Take precise measurements to ensure that the gate will fit seamlessly within the designated space.
Double-Check Measurements
Before proceeding to the next phase of construction, double-check all measurements and markings to confirm accuracy. Small errors at this stage can lead to significant discrepancies in the final fence layout. Taking the time to review and validate the measurements will contribute to a seamless and professional-looking installation.
By meticulously measuring and marking the layout of your garden fence, you establish a solid framework for the subsequent construction stages. This attention to detail sets the stage for a visually pleasing and structurally sound fence that will enhance the beauty and functionality of your outdoor space. With the layout established, you're ready to progress to the next step: digging post holes to prepare the foundation of your garden fence.
Step 3: Dig Post Holes
With the layout of your garden fence meticulously planned and marked, the next crucial step is to dig post holes to prepare the foundation for the fence. Properly dug and positioned post holes are essential for the stability and longevity of the entire structure. Here's a detailed guide on how to effectively dig post holes for your garden fence:
Selecting the Right Tools
Before commencing the digging process, ensure that you have the necessary tools readily available. A post-hole digger or auger is the primary tool for excavating the holes. These tools come in various sizes, allowing you to match the diameter of the holes with the dimensions of your fence posts. Additionally, a sturdy shovel will be indispensable for removing soil and debris from the holes.
Determining Hole Spacing
Refer to your previously marked layout to identify the precise locations for the post holes. The spacing between the holes will largely depend on the design and dimensions of your fence, as well as any local building codes or regulations. Typically, for a standard fence, the spacing between posts ranges from 6 to 8 feet, but it's essential to consult your specific design plans for accurate measurements.
Digging the Holes
Using the post-hole digger or auger, begin excavating the marked locations for the posts. The depth of the holes is equally important as the width, as it directly impacts the stability of the fence. As a general rule of thumb, aim to dig the holes approximately one-third to one-half of the length of the fence posts. This depth provides a solid foundation and helps prevent the posts from shifting or leaning over time.
Removing Excess Soil
As you dig, periodically remove the loosened soil from the holes using a shovel. Clearing out excess soil ensures that the holes are deep enough and allows for easier insertion of the fence posts. Take care to maintain a consistent diameter throughout the depth of the holes to accommodate the posts securely.
Checking Hole Alignment and Depth
Periodically verify the alignment and depth of the holes as you progress. Using a measuring tape or a level, confirm that the holes are uniform in depth and align with the intended layout of the fence. This attention to detail during the digging process will contribute to a level and visually appealing fence installation.
Preparing for Post Installation
Once all the post holes are dug to the appropriate specifications, the groundwork is laid for the subsequent step of setting the posts in place. With the holes prepared, you're one step closer to bringing your garden fence to fruition.
By meticulously digging post holes with precision and care, you establish a sturdy and reliable foundation for your garden fence. This foundational stage sets the groundwork for the subsequent steps of setting the posts, attaching the rails, and installing the fence panels. With the post holes dug and prepared, you're ready to advance to the next phase of the construction process.
Step 4: Set Posts
Setting the posts is a pivotal phase in the construction of a garden fence, as it establishes the vertical framework that supports the entire structure. The careful and precise installation of the posts is essential for ensuring the stability, alignment, and overall integrity of the fence. Here's a detailed guide on how to effectively set the posts for your garden fence:
Aligning the Posts
Begin by positioning the first fence post in the first pre-dug hole. Use a level to ensure that the post is perfectly plumb, both vertically and horizontally. Adjust the post as needed to achieve a straight and upright orientation. Once the first post is aligned, proceed to set the remaining posts in their respective holes, ensuring consistent alignment and verticality throughout the installation.
Adding Support and Stability
To enhance the stability and longevity of the fence, it's advisable to add support to the posts during the setting process. This can be achieved by bracing the posts with temporary supports, such as wooden stakes or braces, to hold them in position while the concrete sets. Ensuring that the posts remain steady and upright during the setting phase is crucial for a structurally sound fence.
Pouring and Compacting Concrete
With the posts aligned and supported, it's time to fill the post holes with high-quality concrete. Pour the concrete mix into the holes around the posts, ensuring that it reaches the bottom and completely surrounds the base of each post. As the concrete is added, use a shovel or rod to compact the mix and eliminate air pockets, promoting a solid and secure foundation for the posts.
Checking Alignment and Plumbness
As the concrete sets, periodically check the alignment and plumbness of the posts to ensure that they remain straight and level. Utilize a level to verify that each post maintains its vertical position during the curing process. Making any necessary adjustments at this stage will contribute to a uniform and visually appealing fence structure.
Allowing for Proper Curing
After the posts are set and the concrete is compacted, allow sufficient time for the concrete to cure and harden. Follow the manufacturer's recommendations for the curing duration, typically ranging from 24 to 48 hours. During this period, it's essential to refrain from applying any stress or load to the posts to facilitate a strong and durable bond between the concrete and the posts.
By meticulously setting the posts with attention to alignment, stability, and proper concrete installation, you establish a robust foundation for the subsequent stages of fence construction. With the posts securely set and the concrete cured, you're ready to advance to the next phase of attaching the rails, bringing you one step closer to completing your garden fence project.
Step 5: Attach Rails
With the posts firmly set and the foundation of your garden fence in place, the next critical step is to attach the rails. The rails play a pivotal role in providing structural support and stability to the fence panels while contributing to the overall aesthetic appeal of the structure. Here's a detailed guide on how to effectively attach the rails to complete the framework of your garden fence:
Selecting the Appropriate Rails
Before proceeding with the installation, ensure that you have the correct type and quantity of rails based on your specific fence design. The number of rails required will depend on the height and style of the fence, with taller fences typically necessitating additional rails for enhanced stability. Choose rails that complement the material and design of your fence posts and panels, ensuring a cohesive and visually pleasing result.
Positioning and Securing the Rails
Begin by positioning the first rail at the designated height on the fence posts, ensuring that it aligns uniformly across the length of the fence. Depending on the design, the rails may be attached to the inside or outside of the posts. Use a level to confirm that the rails are perfectly horizontal and adjust them as needed to achieve a consistent and level orientation.
Fastening the Rails
Once the rails are positioned, secure them to the posts using appropriate fasteners such as nails, screws, or specialized brackets, depending on the material of the rails and posts. Ensure that the fasteners are driven in securely to establish a firm connection between the rails and the posts, enhancing the structural integrity of the fence framework. Repeat this process for each rail, maintaining consistent spacing and alignment throughout the installation.
Reinforcing the Connections
To reinforce the connections and fortify the stability of the rails, consider adding additional fasteners or braces at critical junctions, such as where the rails meet the corner posts or gate posts. This extra reinforcement helps distribute the load evenly across the fence structure, minimizing the risk of sagging or warping over time.
Verifying Alignment and Levelness
Periodically verify the alignment and levelness of the rails as you progress through the installation. Utilize a level to confirm that the rails maintain a uniform and horizontal orientation, contributing to a visually appealing and professional-looking fence framework.
By meticulously attaching the rails with precision and care, you establish a sturdy and reliable framework for your garden fence. This foundational stage sets the groundwork for the subsequent step of installing the fence panels, bringing you one step closer to completing your garden fence project. With the rails securely attached, you're ready to advance to the next phase of installing the fence panels, further enhancing the functionality and visual appeal of your outdoor space.
Step 6: Install Fence Panels
The installation of fence panels marks a significant stage in bringing your garden fence project to fruition. Fence panels not only provide privacy and security but also contribute to the visual appeal of your outdoor space. Proper installation is crucial for ensuring a seamless and durable fence structure that enhances the overall aesthetics of your garden. Here's a detailed guide on how to effectively install fence panels to complete the construction of your garden fence:
Preparing the Panels
Before installing the fence panels, carefully inspect each panel to ensure that it is free from any defects or damage. If you are using wooden panels, consider applying a weather-resistant sealant or paint to enhance their durability and resistance to the elements. Additionally, verify that the panels are of the correct dimensions and design to align with your overall fence layout and style.
Positioning the Panels
Begin by positioning the first fence panel between the installed rails, ensuring that it is aligned evenly and level with the ground. Depending on the design of your fence, the panels may be attached to the inside or outside of the rails. Use a level to confirm that the panel is perfectly vertical and adjust its position as needed to achieve a uniform and visually appealing alignment.
Attaching the Panels
Once the panel is positioned correctly, secure it to the rails using appropriate fasteners such as nails, screws, or specialized brackets. Ensure that the fasteners are driven in securely to establish a firm connection between the panel and the rails, enhancing the structural integrity of the fence. Repeat this process for each panel, maintaining consistent spacing and alignment throughout the installation.
Reinforcing the Connections
To reinforce the connections and fortify the stability of the panels, consider adding additional fasteners or braces at critical junctions, such as where the panels meet the corner posts or gate posts. This extra reinforcement helps distribute the load evenly across the fence structure, minimizing the risk of sagging or warping over time.
Verifying Alignment and Levelness
Periodically verify the alignment and levelness of the panels as you progress through the installation. Utilize a level to confirm that the panels maintain a uniform and vertical orientation, contributing to a visually appealing and professional-looking fence structure.
By meticulously installing the fence panels with precision and care, you complete the construction of a sturdy and visually appealing garden fence. This pivotal stage brings your vision to life, providing privacy, security, and aesthetic enhancement to your outdoor space. With the fence panels securely installed, you have successfully realized the culmination of your garden fence project, creating a welcoming and protected environment for your cherished plants and flowers.
Step 7: Add Finishing Touches
With the main structure of your garden fence in place, it's time to add the finishing touches that will elevate its visual appeal and functionality. These final details not only contribute to the overall aesthetics of the fence but also enhance its durability and longevity. Here's a comprehensive guide on how to add the essential finishing touches to your garden fence:
Applying Protective Coating
If your fence is constructed from wood, applying a protective coating is essential to safeguard it from the elements. Choose a high-quality outdoor wood sealant or paint that provides protection against moisture, UV rays, and rot. The coating not only enhances the natural beauty of the wood but also extends its lifespan, ensuring that your fence remains resilient and attractive for years to come.
Installing Post Caps
Adding post caps to the tops of the fence posts serves both a decorative and functional purpose. Post caps provide a polished and cohesive look to the fence while protecting the exposed ends of the posts from moisture and potential damage. Select post caps that complement the style of your fence, whether it's a classic wooden cap or a sleek metal design, to add a refined finishing touch to the entire structure.
Incorporating Decorative Elements
To infuse personality and charm into your garden fence, consider incorporating decorative elements such as ornamental accents, lattice panels, or intricate carvings. These embellishments not only enhance the visual appeal of the fence but also create a unique and personalized touch that reflects your individual style. Whether you opt for subtle embellishments or more elaborate designs, these decorative elements can transform your garden fence into a standout feature of your outdoor space.
Adding Gate Hardware
If your fence includes a gate, installing high-quality gate hardware is crucial for ensuring smooth functionality and security. Select durable hinges, latches, and handles that complement the style of your fence while providing reliable operation. Properly installed gate hardware not only adds a professional finish to the fence but also enhances its practicality, allowing for convenient access to your garden while maintaining security.
Landscaping and Lighting
To further enhance the visual impact of your garden fence, consider integrating landscaping elements and lighting. Planting climbing vines or colorful flowers along the fence line can soften its appearance and create a harmonious blend with the surrounding garden. Additionally, strategically placed outdoor lighting can accentuate the fence's features, adding a warm and inviting ambiance to your outdoor space, especially during the evening hours.
By incorporating these finishing touches, you elevate your garden fence from a functional structure to a captivating and enduring centerpiece of your outdoor environment. Each detail contributes to the overall beauty, durability, and character of the fence, creating a space that is both visually stunning and purposeful. With the finishing touches in place, your garden fence stands as a testament to your craftsmanship and dedication to creating a welcoming and secure haven for your cherished garden.
Conclusion
In conclusion, the journey of building a garden fence is a testament to the transformative power of DIY projects. From the initial gathering of materials to the meticulous installation of the finishing touches, each step contributes to the creation of a functional, visually appealing, and enduring structure that enhances the beauty and security of your outdoor space.
As you reflect on the process, it becomes evident that the construction of a garden fence is not merely a practical endeavor but a creative expression of your personal style and dedication to nurturing your garden. The careful selection of materials, the precision of measurements, and the artistry of the finishing details all converge to form a cohesive and harmonious addition to your landscape.
Beyond its physical presence, the garden fence embodies the spirit of craftsmanship and the fulfillment of a vision. It stands as a symbol of protection, delineating the boundaries of your garden while safeguarding its inhabitants from external elements. Moreover, it serves as a canvas for self-expression, allowing you to infuse your unique flair and creativity into the outdoor environment.
The completion of the garden fence marks not just the end of a project, but the beginning of a new chapter in your outdoor living experience. It creates a sanctuary where your plants can thrive, where you can find solace in the beauty of nature, and where the boundary between the outside world and your personal oasis is defined with elegance and purpose.
As you admire the finished fence, adorned with post caps, embellishments, and a protective coating, take pride in the craftsmanship and dedication that have gone into its creation. The fence is a reflection of your commitment to nurturing your garden and curating a space that is both functional and enchanting.
In the end, the garden fence is more than just a structure; it is a testament to the joy of creation, the beauty of nature, and the fulfillment that comes from bringing a vision to life. It stands as a reminder of the transformative power of DIY endeavors and the enduring impact of craftsmanship in shaping our surroundings.