
Home>Outdoors & Camping>Landscaping>How To Build A Small Waterfall With Rocks
Landscaping
How To Build A Small Waterfall With Rocks
Published: March 7, 2024

Content Creator for Outdoors & Camping, Sophie turns any yard into a sustainable paradise. Her dedication to DIY outdoor projects and volunteer work in community gardens shares joy and knowledge.
Learn how to create a stunning small waterfall with rocks for your landscaping project. Get step-by-step instructions and tips for a beautiful water feature.
(Many of the links in this article redirect to a specific reviewed product. Your purchase of these products through affiliate links helps to generate commission for Twigandthistle.com, at no extra cost. Learn more)
Introduction
So, you want to add a touch of tranquility to your backyard? Building a small waterfall with rocks can be a rewarding and visually stunning project. Not only does it create a soothing ambiance, but it also adds a natural element to your outdoor space. In this guide, we'll walk you through the step-by-step process of creating your own small waterfall using rocks, allowing you to bring the calming sound of flowing water right into your own backyard. Let's get started!
Choosing the Right Location
When it comes to building a small waterfall with rocks, the first step is to choose the right location in your yard. Here are some key factors to consider:
-
Natural Slope: Look for a spot with a natural slope or create one by building up the ground. This will help the water flow naturally and create a more realistic waterfall effect.
-
Access to Power and Water: Ensure that the chosen location has access to a power source for the pump and a water supply. It's essential for the functionality of your waterfall.
-
Visibility: Consider the visibility of the waterfall from your home or patio. You'll want to enjoy the sight and sound of the waterfall from various vantage points in your outdoor space.
-
Landscaping: Take into account the surrounding landscaping. A waterfall can be a beautiful focal point, so choose a location that complements the overall design of your yard.
-
Sunlight: Consider the amount of sunlight the area receives. If you plan to incorporate plants around the waterfall, ensure they will thrive in the available light conditions.
Once you've identified the perfect location, you can move on to gathering the necessary materials for your small waterfall project.
Gathering the Necessary Materials
Before you start building your small waterfall with rocks, it's essential to gather all the necessary materials and tools. Here's what you'll need:
-
Pump: Choose a pump that is suitable for the size of your waterfall. It should have enough power to circulate the water effectively.
-
Tubing: You'll need tubing to connect the pump to the waterfall. Ensure that the diameter of the tubing matches the pump's outlet.
-
Rocks: Select a variety of rocks in different shapes and sizes. Larger rocks can be used for the main structure, while smaller rocks can fill in the gaps.
-
Liner: A rubber pond liner will help to retain the water and prevent leakage. Make sure it's large enough to cover the area of your waterfall.
-
Filter: Consider adding a filter to keep the water clean and free of debris. This is especially important if you plan to include fish in your waterfall.
-
Plants (Optional): If you want to enhance the natural look of your waterfall, consider adding aquatic plants such as water lilies or watercress.
-
Shovel and Wheelbarrow: These tools will be essential for moving and arranging the rocks and soil.
-
Level: To ensure that your waterfall is balanced and stable, a level will come in handy during the construction process.
-
Decorative Elements (Optional): You may want to include decorative elements such as driftwood, ceramic figurines, or LED lighting to personalize your waterfall.
Once you have all the necessary materials and tools, you can move on to planning the design of your small waterfall.
Planning the Design
Before you start stacking rocks and digging, it's crucial to have a clear plan for the design of your small waterfall. Here's how to approach the planning process:
-
Sketch the Layout: Begin by sketching out the desired layout of your waterfall. Consider the overall shape, the placement of rocks, and the path of the water flow. This will serve as your visual guide throughout the construction process.
-
Consider Water Flow: Think about how you want the water to flow down the rocks. Do you envision a gentle trickle or a more dramatic cascade? The design should complement the natural slope of the land and create an aesthetically pleasing flow of water.
-
Create Levels: To achieve a more natural look, plan to create different levels within the waterfall. This can be accomplished by strategically placing rocks of varying heights to create cascades and pools.
-
Incorporate Planting Areas: If you plan to include aquatic plants, designate areas within the waterfall where they can be planted. Consider how the plants will interact with the water flow and choose suitable locations for their growth.
-
Blend with Surroundings: Ensure that the design of your waterfall blends seamlessly with the surrounding landscape. The goal is to create a feature that looks like a natural part of the environment, rather than an artificial addition.
-
Visualize the End Result: Take some time to visualize the end result of your small waterfall. Imagine how it will look and sound once completed. This will help you make design decisions that contribute to the overall ambiance of your outdoor space.
By carefully planning the design of your small waterfall, you'll set the stage for a successful and visually appealing construction process. Once you have a clear plan in place, you can move on to the next steps of building the foundation and placing the rocks.
Building the Foundation
The foundation of your small waterfall is crucial for its stability and longevity. Here's how to build a solid foundation for your project:
-
Excavate the Area: Begin by excavating the area where the waterfall will be located. Dig a shallow trench for the pond liner and create a space for the reservoir where the pump will be housed. Ensure that the ground is level and free of any sharp objects that could puncture the liner.
-
Install the Reservoir: Place the reservoir in the excavated area, making sure it is level and stable. This reservoir will hold the water and house the pump, so it's essential to position it correctly.
-
Lay the Pond Liner: Once the reservoir is in place, carefully lay the pond liner over the excavated area, ensuring that it overlaps the edges of the reservoir. Smooth out any wrinkles or folds in the liner to prevent leaks.
-
Secure the Liner: Use rocks or bricks around the edges of the pond liner to secure it in place. This will help to keep the water contained within the designated area and prevent it from seeping into the surrounding soil.
-
Test for Leaks: Before proceeding, fill the reservoir with water and let it sit for a few hours. Check for any signs of leakage and make any necessary adjustments to the liner or reservoir to ensure a watertight seal.
By building a solid foundation, you'll create a stable base for the rest of the waterfall construction. With the foundation in place, you can move on to the exciting step of placing the rocks to form the structure of your small waterfall.
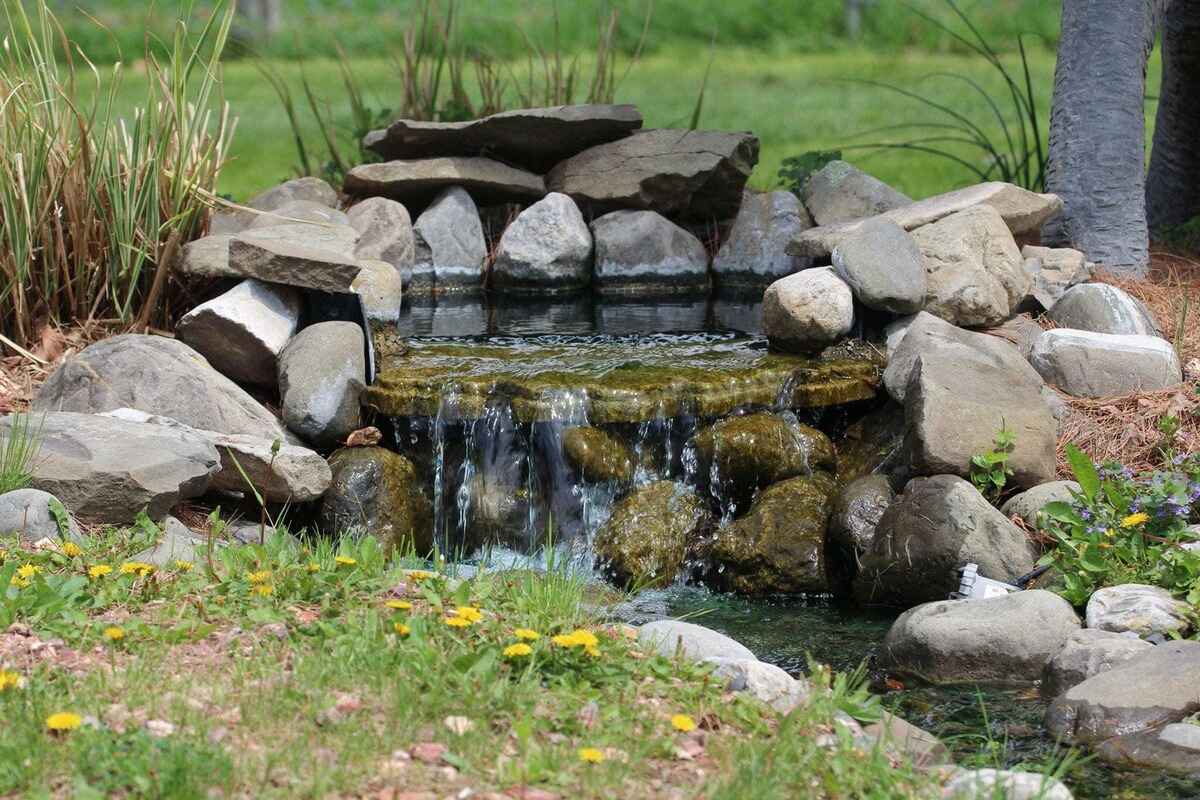
Placing the Rocks
Placing the rocks is where your small waterfall starts to take shape. Here's how to strategically position the rocks to create a natural and visually appealing structure:
-
Start with the Largest Rocks: Begin by placing the largest rocks at the base of the waterfall. These rocks will form the foundation and provide stability for the rest of the structure. Position them in a way that creates a natural-looking slope for the water to flow down.
-
Create Cascades and Pools: As you work your way up the waterfall, use a combination of large and medium-sized rocks to create cascades and pools. Stagger the rocks to form steps and ledges, allowing the water to cascade down in an organic manner.
-
Consider the Water Flow: Pay close attention to the direction of the water flow as you position the rocks. Ensure that the water will flow smoothly over each rock, creating an aesthetically pleasing and natural-looking effect.
-
Fill in the Gaps: Once the main structure is in place, fill in the gaps between the rocks with smaller stones and gravel. This will help to secure the larger rocks and create a more cohesive appearance.
-
Blend with the Surroundings: Take a step back periodically to assess how the rocks blend with the surrounding landscape. Aim for a design that looks like a natural part of the environment, seamlessly integrating with the plants and terrain.
-
Test the Water Flow: Before securing the rocks in their final positions, test the water flow to ensure that it cascades down the rocks as intended. Make any necessary adjustments to the positioning of the rocks to achieve the desired water flow.
By strategically placing the rocks, you'll create a visually stunning and natural-looking waterfall that enhances the beauty of your outdoor space. Once the rocks are in place, you can move on to the next step of creating the water flow for your small waterfall.
Creating the Water Flow
Creating the water flow for your small waterfall is a crucial step in bringing your project to life. Here's how to ensure a smooth and natural water flow:
-
Position the Pump: Place the pump in the reservoir at the base of the waterfall. Ensure that it is securely positioned and that the power cord and tubing are easily accessible for maintenance.
-
Connect the Tubing: Attach the tubing to the outlet of the pump, ensuring a secure and watertight connection. The tubing will carry the water from the pump to the top of the waterfall, creating the cascading effect.
-
Adjust the Water Flow: Most pumps have adjustable flow settings. Experiment with the flow rate to achieve the desired effect. A gentle, steady flow is often preferred for a small waterfall, creating a soothing and tranquil ambiance.
-
Test the Water Flow: Once the pump is running, observe the water flow as it cascades down the rocks. Make any necessary adjustments to the pump settings or the positioning of the tubing to achieve an even and natural-looking flow.
-
Consider Water Sounds: The sound of flowing water is an integral part of the waterfall experience. Position the water flow to create pleasing sounds, whether it's a gentle trickle or a soft, continuous flow.
-
Incorporate Waterfalls and Pools: If your design includes multiple cascades and pools, ensure that the water flows smoothly from one level to the next. Adjust the positioning of rocks and the flow rate to achieve a seamless transition between each section of the waterfall.
By carefully creating the water flow, you'll bring your small waterfall to life, creating a captivating and serene focal point in your outdoor space. Once the water flow is perfected, you can move on to adding the finishing touches to complete your project.
Adding the Finishing Touches
Once the rocks are in place and the water flow is perfected, it's time to add the finishing touches to complete your small waterfall project. Here's how to enhance the visual appeal and functionality of your waterfall:
-
Add Aquatic Plants: If you've chosen to incorporate aquatic plants, now is the time to plant them in designated areas within the waterfall. Water lilies, watercress, or other aquatic plants can add a natural and vibrant touch to the waterfall, enhancing its overall beauty.
-
Incorporate Lighting: Consider adding LED lighting to illuminate the waterfall during the evening hours. Subtle lighting can create a magical ambiance, highlighting the cascading water and enhancing the visual impact of the waterfall after dark.
-
Introduce Decorative Elements: Personalize your waterfall by adding decorative elements such as driftwood, ceramic figurines, or natural stones. These elements can add character and charm to the waterfall, making it a unique and eye-catching feature in your outdoor space.
-
Fine-Tune the Surrounding Landscape: Take the time to fine-tune the surrounding landscape to complement the waterfall. Add mulch, small plants, or decorative rocks around the base of the waterfall to create a seamless transition between the waterfall and the rest of your yard.
-
Consider Sound Enhancement: If you want to amplify the sound of flowing water, consider incorporating a sound enhancement system. This can create a more immersive and captivating auditory experience, further enhancing the tranquil ambiance of your outdoor space.
-
Maintain a Clean Environment: Regularly clean the waterfall and surrounding area to prevent the buildup of algae, debris, or leaves. This will help to maintain the visual appeal and functionality of your small waterfall over time.
By adding these finishing touches, you'll elevate the visual appeal and functionality of your small waterfall, creating a captivating and serene focal point in your outdoor space. With the project complete, you can now sit back, relax, and enjoy the soothing sights and sounds of your own backyard oasis.
Maintenance and Care
Maintaining your small waterfall with rocks is essential to ensure its longevity and continued functionality. Here are some key maintenance tasks and care tips to keep your waterfall in optimal condition:
-
Regular Cleaning: Schedule regular cleaning sessions to remove debris, algae, and leaves from the rocks and water. Use a soft brush or a pressure washer on a gentle setting to clean the rocks and dislodge any buildup.
-
Water Quality: Monitor the water quality in the reservoir and ensure it remains clean and free of pollutants. Consider using a water treatment solution or adding a biological filter to maintain optimal water conditions.
-
Pump Maintenance: Inspect the pump regularly to ensure it is functioning properly. Clean the pump intake to prevent clogging and check for any signs of wear or damage.
-
Winter Preparation: If you live in a region with cold winters, take steps to winterize your waterfall. This may include draining the water from the reservoir, removing the pump, and protecting the rocks from potential damage caused by freezing temperatures.
-
Inspect for Leaks: Periodically check the pond liner and reservoir for any signs of leaks or damage. Address any issues promptly to prevent water loss and potential structural damage.
-
Trim Surrounding Plants: If you have incorporated landscaping around the waterfall, regularly trim and maintain the plants to prevent overgrowth and ensure they complement the waterfall's aesthetic.
-
Monitor Water Levels: Keep an eye on the water levels in the reservoir, especially during hot and dry periods. Add water as needed to maintain the proper water level for optimal pump performance.
-
Check Lighting and Decor: If you have incorporated lighting or decorative elements, ensure they are functioning properly and make any necessary adjustments or replacements as needed.
By staying proactive with maintenance and care, you can ensure that your small waterfall remains a stunning and tranquil feature in your outdoor space for years to come. Regular attention to these maintenance tasks will help preserve the beauty and functionality of your waterfall, allowing you to continue enjoying its soothing presence in your backyard.
Conclusion
Congratulations! You've successfully created a stunning small waterfall with rocks, adding a touch of natural beauty and tranquility to your outdoor space. By carefully choosing the location, gathering the necessary materials, planning the design, building a solid foundation, placing the rocks, creating the water flow, adding the finishing touches, and understanding the importance of maintenance and care, you've brought your vision to life. Your small waterfall will not only enhance the aesthetic appeal of your yard but also provide a soothing and relaxing atmosphere for you to enjoy.
As you sit back and admire your handiwork, take pride in the fact that you've created a captivating focal point that will be a source of joy and relaxation for years to come. Whether you're unwinding after a long day or entertaining guests in your outdoor space, the sights and sounds of your small waterfall will undoubtedly leave a lasting impression. So, grab a seat, take a deep breath, and bask in the tranquil ambiance of your own backyard oasis. Cheers to your DIY success!