
Home>Create & Decorate>DIY & Crafts>How To Make A Picture Frame
DIY & Crafts
How To Make A Picture Frame
Published: February 23, 2024

Content Creator specializing in woodworking and interior transformations. Caegan's guides motivate readers to undertake their own projects, while his custom furniture adds a personal touch.
Learn how to make a picture frame with this easy DIY & Crafts tutorial. Create custom frames for your favorite photos and artwork at home. Step-by-step instructions included!
(Many of the links in this article redirect to a specific reviewed product. Your purchase of these products through affiliate links helps to generate commission for Twigandthistle.com, at no extra cost. Learn more)
Introduction
Making your own picture frame is a rewarding and creative DIY project that adds a personal touch to your home decor. Whether you want to showcase a cherished photograph, a piece of art, or a meaningful quote, crafting a custom picture frame allows you to tailor the design to your preferences and style. Not only does it provide a sense of accomplishment, but it also offers a budget-friendly alternative to store-bought frames.
By following a few simple steps and using basic materials, you can create a beautiful and unique picture frame that perfectly complements your space. This project is an excellent way to unleash your creativity and showcase your favorite memories or artwork in a frame that reflects your individuality.
In this guide, we will walk you through the process of making a picture frame from scratch. From measuring and cutting the wood to assembling the frame and adding the finishing touches, each step will be explained in detail to ensure that you can confidently tackle this project. Whether you're a seasoned DIY enthusiast or a beginner looking for a fun and fulfilling project, making your own picture frame is a fantastic way to add a personal touch to your home while honing your crafting skills.
So, gather your materials, roll up your sleeves, and let's dive into the wonderful world of DIY picture frame making. With a little creativity and a can-do attitude, you'll soon have a stunning custom frame to proudly display your treasured memories or artwork. Let's get started!
Materials Needed
To embark on the journey of creating your own picture frame, you will need a few essential materials. These items are readily available at most hardware stores and are relatively inexpensive, making this DIY project both accessible and budget-friendly. Here's a list of the materials you'll need to get started:
-
Wood: Select a high-quality wood material for your picture frame. Common choices include pine, oak, or poplar. Ensure that the wood is straight and free from knots or imperfections to achieve a polished final product.
-
Miter Saw or Hand Saw: A miter saw is ideal for making precise angled cuts, which are essential for creating the corners of the frame. If a miter saw is not available, a hand saw with a miter box can also be used to achieve accurate cuts.
-
Wood Glue: Opt for a strong wood glue that provides a secure bond. This will be used to join the frame's corners and ensure its stability.
-
Clamps: Clamps are necessary for holding the frame together while the wood glue sets. They help maintain even pressure at the joints, resulting in a seamless and sturdy frame.
-
Sandpaper: Choose fine-grit sandpaper to smooth the wood surfaces and eliminate any rough edges or imperfections. This step is crucial for achieving a professional-looking finish.
-
Wood Stain or Paint: Depending on your preference, you can use wood stain to enhance the natural beauty of the wood or paint to add a pop of color. Both options allow you to customize the frame to suit your decor style.
-
Backing Board: A backing board provides support for the artwork or photograph within the frame. Consider using a sturdy material such as foam board or hardboard.
-
Hanging Hardware: Select appropriate hanging hardware, such as D-rings and picture wire, to securely display your finished frame on the wall.
-
Measuring Tape and Pencil: Accurate measurements are essential for creating a well-proportioned frame. A measuring tape and pencil will help you mark the wood for precise cuts and assembly.
-
Safety Equipment: Prioritize safety by wearing protective gear, including safety goggles and gloves, when working with tools and materials.
Gathering these materials will set the stage for a successful picture frame-making endeavor. With these essentials in hand, you'll be well-equipped to bring your creative vision to life and craft a stunning frame that beautifully showcases your cherished memories or artwork.
Step 1: Measure and Cut the Wood
The initial step in creating a custom picture frame is to accurately measure and cut the wood components that will form the frame's structure. This process requires precision and attention to detail to ensure that the frame comes together seamlessly. Here's a detailed guide on how to tackle this crucial first step:
1. Select the Wood:
Begin by selecting high-quality wood for your picture frame. Opt for straight, smooth, and knot-free pieces of wood, such as pine, oak, or poplar. The wood should be of sufficient width and thickness to accommodate the desired dimensions of your frame.
2. Determine Frame Dimensions:
Decide on the dimensions of your picture frame based on the size of the artwork or photograph you intend to display. Use a measuring tape to determine the length and width of the frame, ensuring that the measurements are precise. Mark the measurements on the wood using a pencil, clearly indicating the points where cuts will be made.
3. Make Angled Cuts:
Using a miter saw or a hand saw with a miter box, carefully make 45-degree angled cuts at the ends of each wood piece to create the frame's corners. It's crucial to ensure that the cuts are precise and that the angles match perfectly to achieve seamless corner joints. Take your time to guarantee accuracy in this step, as precise cuts are essential for a professional-looking frame.
4. Dry-Fit the Pieces:
After cutting the wood, perform a dry-fit assembly by joining the pieces together without glue. This step allows you to verify that the frame components align correctly and that the corners form tight, gap-free joints. Make any necessary adjustments to the cuts if the fit is not optimal.
5. Label the Pieces:
To avoid confusion during assembly, label each wood piece with its corresponding position in the frame. Mark the top, bottom, and sides of the frame components to ensure that they are assembled in the correct orientation.
By meticulously measuring and cutting the wood according to these steps, you will lay a solid foundation for constructing a well-crafted picture frame. Attention to detail and precision in this phase will contribute to the overall quality and visual appeal of the finished product.
Step 2: Assemble the Frame
With the wood components accurately measured and cut, the next pivotal phase in creating a custom picture frame is the assembly process. This step involves joining the frame's pieces together to form a cohesive and sturdy structure. Follow these detailed guidelines to effectively assemble the frame:
-
Apply Wood Glue: Begin by applying a thin, even layer of high-quality wood glue to the mitered edges of the wood pieces. Ensure that the glue is evenly distributed to facilitate a strong and durable bond between the joints.
-
Join the Corners: Carefully bring together the glued mitered corners of the frame, aligning them precisely to form 90-degree angles. The use of a framing clamp can help hold the corners in place, ensuring that the joints are tightly bonded while the glue sets.
-
Check for Alignment: Verify that the frame components are aligned correctly and that the corners meet seamlessly. Make any necessary adjustments to the positioning of the wood pieces to achieve a uniform and professional-looking frame.
-
Wipe off Excess Glue: Promptly wipe off any excess wood glue using a damp cloth to prevent it from drying on the wood surfaces. This step contributes to a clean and polished finish once the frame is complete.
-
Allow the Glue to Set: After assembling the frame, allow sufficient time for the wood glue to set and create a secure bond. Follow the manufacturer's recommendations regarding the drying time for the specific type of wood glue used.
-
Perform a Dry Fit: Once the glue has fully dried, perform a dry fit of the backing board and the glass or acrylic panel within the frame to ensure that they fit snugly. This step allows you to address any potential issues before proceeding to the finishing touches.
By following these meticulous steps, you will successfully assemble a sturdy and visually appealing picture frame. The careful application of wood glue, precise alignment of the frame components, and thorough drying of the glue are essential factors in creating a durable and professional-quality frame. With the frame assembled, you are now ready to proceed to the next phase of the project: sanding and finishing the frame to achieve a polished and refined appearance.
Step 3: Sand and Finish
Once the frame is assembled, the next crucial step in the picture frame-making process is sanding and finishing. This phase plays a pivotal role in refining the frame's appearance, smoothing out imperfections, and preparing the surface for the application of stain or paint. Here's a detailed guide on how to effectively sand and finish your custom picture frame:
-
Sand the Frame: Begin by using fine-grit sandpaper to gently sand the entire surface of the frame. Pay close attention to the corners and edges, ensuring that any rough or uneven areas are smoothed out. The goal is to achieve a uniformly smooth texture across the wood, creating a flawless canvas for the finishing treatment.
-
Remove Dust: After sanding, thoroughly remove any dust and debris from the frame's surface. A clean, dust-free surface is essential for the successful application of the finishing treatment. Use a soft, dry cloth or a tack cloth to wipe away the sanding residue, leaving the wood surface pristine and ready for the next step.
-
Apply Wood Stain or Paint: Depending on your aesthetic preference, choose to either apply wood stain to enhance the natural beauty of the wood or paint to add a pop of color to the frame. Using a brush or a clean cloth, carefully apply the chosen finish in even strokes, ensuring complete coverage of the wood surface. Allow the stain or paint to dry according to the manufacturer's instructions.
-
Optional Distressing (for a Rustic Look): If you desire a rustic or weathered appearance for your frame, consider distressing the wood after applying the stain or paint. This can be achieved by lightly sanding certain areas of the frame to reveal the wood grain and create a vintage, time-worn effect.
-
Apply a Protective Finish: To safeguard the frame and enhance its longevity, consider applying a clear protective finish, such as polyurethane or lacquer. This final coat not only adds a lustrous sheen to the frame but also provides a protective barrier against moisture and wear.
-
Allow for Drying Time: Once the finishing treatment and protective coat have been applied, allow the frame to thoroughly dry in a well-ventilated area. This ensures that the finish sets properly and achieves the desired appearance.
By meticulously sanding and finishing the frame according to these steps, you will elevate its visual appeal and durability. The application of wood stain, paint, or a protective finish allows you to customize the frame to suit your decor style while ensuring that it remains resilient and long-lasting. With the frame now beautifully finished, the final phase of the project involves attaching the backing and hardware to complete your custom picture frame.
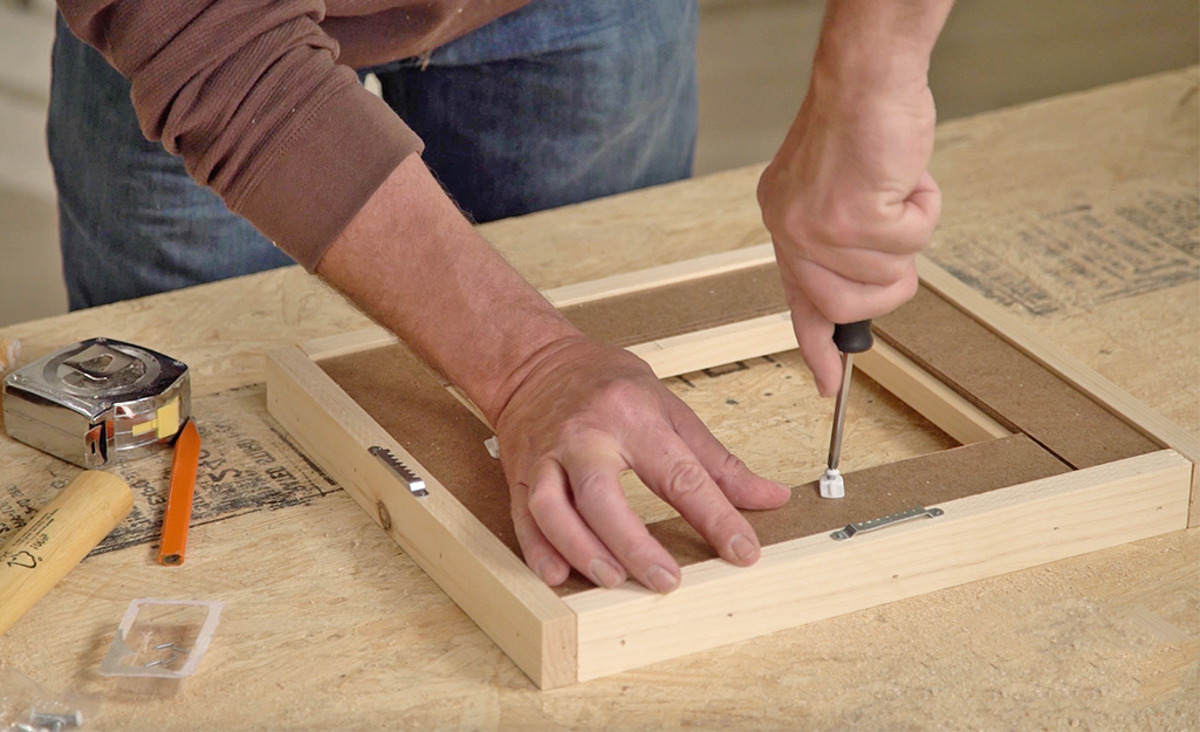
Step 4: Attach the Backing and Hardware
With the picture frame assembled, sanded, and finished to perfection, the final phase of this DIY project involves attaching the backing board and hardware to prepare the frame for displaying your cherished artwork or photograph. This step is crucial for ensuring that the contents of the frame are securely held in place and that the frame can be easily hung on a wall. Follow these detailed guidelines to effectively complete this essential phase:
-
Prepare the Backing Board: Begin by cutting the backing board to fit the dimensions of the frame. Use a sturdy material such as foam board or hardboard, ensuring that it provides ample support for the contents of the frame. Place the backing board against the rear of the frame to verify that it fits snugly within the frame's borders.
-
Secure the Backing Board: Once the backing board is sized correctly, use small nails or brads to secure it in place. Position the nails evenly around the perimeter of the backing board, ensuring that it is firmly attached to the frame. This step ensures that the contents of the frame are held securely and prevents them from shifting or falling out.
-
Attach Hanging Hardware: Select appropriate hanging hardware, such as D-rings and picture wire, to facilitate easy and secure wall mounting. Position the D-rings on the rear of the frame, ensuring that they are evenly spaced and aligned with each other. Secure the D-rings in place using small screws, ensuring that they are firmly attached to the frame. Once the D-rings are in place, attach the picture wire, ensuring that it is taut and securely fastened to the D-rings.
-
Inspect for Stability: After attaching the backing board and hanging hardware, carefully inspect the frame to ensure that the backing is secure and that the hanging hardware is properly affixed. Gently shake the frame to verify its stability and the integrity of the hanging hardware. This step ensures that the frame is ready for display and provides peace of mind regarding its durability.
By meticulously following these steps, you will successfully complete the assembly of your custom picture frame, ready to elegantly showcase your treasured memories or artwork. The secure attachment of the backing board and hanging hardware ensures that your frame is not only visually appealing but also functional and ready to adorn your wall with style and sophistication.
Conclusion
Congratulations! You have successfully embarked on a fulfilling journey of creating a custom picture frame from scratch. Through meticulous measurements, precise cuts, and thoughtful assembly, you have brought to life a stunning frame that beautifully showcases your cherished memories or artwork. As you reflect on the rewarding process you've undertaken, it's important to acknowledge the valuable skills and experiences gained along the way.
Crafting your own picture frame is not just a creative endeavor; it's a testament to your ability to transform raw materials into a functional and visually captivating piece. The attention to detail exhibited in measuring and cutting the wood, the precision required in assembling the frame, and the artistry involved in sanding and finishing have all contributed to the creation of a truly personalized and unique frame.
Beyond the tangible outcome, this DIY project has provided an avenue for self-expression and creativity. The ability to tailor the frame's design, from the choice of wood to the finishing treatment, has allowed you to infuse your personal style and aesthetic preferences into the final product. This level of customization ensures that the frame not only complements your decor but also serves as a reflection of your individuality.
Moreover, the journey of making a picture frame has equipped you with valuable skills that extend beyond this specific project. The attention to precision in measurements and cuts hones your ability to work meticulously and methodically, skills that are transferable to various other DIY endeavors. Additionally, the experience of sanding and finishing the frame has provided insight into the transformative power of simple materials, demonstrating the potential to breathe new life into everyday objects through creativity and craftsmanship.
As you admire the completed picture frame, take pride in the fact that you have not only created a beautiful piece of decor but have also cultivated a sense of accomplishment and self-sufficiency. The frame stands as a testament to your creativity, resourcefulness, and dedication to bringing your vision to fruition. Whether displayed in your home or gifted to a loved one, the custom picture frame serves as a tangible symbol of your ingenuity and artistic flair.
In conclusion, the process of making a picture frame is not merely a series of steps; it's a journey of creativity, skill-building, and self-expression. Embrace the sense of achievement that comes with completing this DIY project, and let it inspire you to explore further opportunities for crafting and personalizing your living space. With your newfound expertise and a beautifully crafted frame in hand, you are well-equipped to continue infusing your surroundings with creativity and a touch of your unique personality.