
Home>Home & Furniture>Garage & Basement>DIY Tarp Shed: Step-by-Step Guide To Building A Budget-Friendly Outdoor Storage Solution
Garage & Basement
DIY Tarp Shed: Step-by-Step Guide To Building A Budget-Friendly Outdoor Storage Solution
Published: February 20, 2024
Editor-in-Chief with a decade in home renovation and a passion for vintage furniture. Diane is known for her weekend treasure hunts at flea markets, enriching our content with unique style insights.
Learn how to build a budget-friendly DIY tarp shed for extra outdoor storage in your garage or basement with our step-by-step guide. Ideal for those seeking an affordable and practical solution.
(Many of the links in this article redirect to a specific reviewed product. Your purchase of these products through affiliate links helps to generate commission for Twigandthistle.com, at no extra cost. Learn more)
Introduction
Are you in need of extra storage space for your outdoor equipment, gardening tools, or seasonal items? Building a DIY tarp shed might be the perfect solution for you. This budget-friendly outdoor storage option provides protection from the elements while allowing easy access to your belongings.
A tarp shed is a versatile and practical addition to any property, offering a quick and customizable storage solution. Whether you're a seasoned DIY enthusiast or a novice looking to take on a new project, constructing a tarp shed can be a rewarding and straightforward endeavor. With the right materials, a bit of creativity, and a willingness to get your hands dirty, you can create a functional and durable storage space that meets your specific needs.
In this comprehensive guide, we will walk you through the step-by-step process of building your own tarp shed. From selecting the ideal location for your shed to adding optional features for enhanced functionality, we'll cover everything you need to know to bring your outdoor storage vision to life. By the end of this guide, you'll be equipped with the knowledge and confidence to embark on this DIY project and create a practical storage solution that complements your outdoor space.
So, roll up your sleeves, gather your materials, and get ready to embark on an exciting journey of building a DIY tarp shed. Whether you're looking to declutter your outdoor space or simply seeking a new project to tackle, this guide will empower you to create a cost-effective and efficient storage solution that stands the test of time. Let's dive in and explore the world of DIY tarp sheds together!
Materials Needed
To embark on the journey of building your own DIY tarp shed, you'll need a carefully curated selection of materials to ensure a successful and durable end result. Here's a comprehensive list of the essential items required for this project:
-
Tarp: The cornerstone of your tarp shed, the tarp will serve as the primary covering for the structure. Opt for a high-quality, durable tarp that is large enough to accommodate the size of shed you intend to build. Consider factors such as weather resistance and UV protection when selecting the tarp material.
-
PVC Pipes or Lumber: Depending on your preference and availability, you can choose either PVC pipes or lumber to construct the frame of the shed. PVC pipes offer a lightweight and easy-to-handle option, while lumber provides a sturdy and traditional alternative. Ensure that the selected material is suitable for outdoor use and can withstand the elements.
-
Connectors and Fasteners: To assemble the frame of the tarp shed, you'll need connectors and fasteners that are compatible with the chosen material. This may include PVC connectors for PVC pipes or appropriate screws and nails for lumber. Select connectors and fasteners that are designed for outdoor applications to ensure longevity.
-
Anchoring Materials: To secure the tarp shed to the ground and prevent it from being affected by wind or other external forces, anchoring materials are essential. This may include stakes, ropes, or other anchoring devices that can be easily installed and provide stability to the structure.
-
Measuring Tape and Marking Tools: Accurate measurements are crucial for ensuring that the tarp shed is constructed to the desired dimensions. A measuring tape and marking tools such as a pencil or chalk will be indispensable for marking and cutting the tarp and frame components to the appropriate sizes.
-
Utility Knife or Scissors: A sharp utility knife or a pair of heavy-duty scissors will be necessary for cutting the tarp to fit the dimensions of the shed and making any necessary adjustments during the assembly process.
-
Optional Features: Depending on your specific storage needs, you may choose to incorporate additional features such as shelves, hooks, or hanging organizers. Consider the items you plan to store in the shed and customize the interior with optional features to maximize its functionality.
By gathering these essential materials, you'll be well-prepared to commence the construction of your DIY tarp shed. With careful planning and attention to detail, you can transform these basic materials into a practical and cost-effective outdoor storage solution that meets your unique requirements.
Step 1: Choosing the Right Location
Selecting the optimal location for your DIY tarp shed is a crucial first step in the construction process. The chosen site will not only determine the functionality and accessibility of the shed but also impact its overall longevity and performance. Here are essential considerations to guide you in choosing the right location for your tarp shed:
1. Accessibility and Convenience
When identifying a location for your tarp shed, prioritize accessibility and convenience. Consider the proximity to areas where you frequently use outdoor equipment or tools. Placing the shed near a garden, patio, or driveway can enhance convenience and streamline the retrieval of stored items. Additionally, ensure that the chosen location allows for easy maneuverability around the shed, facilitating hassle-free access to its contents.
2. Ground Stability and Drainage
Assess the stability of the ground where the tarp shed will be situated. Opt for a level and well-drained area to prevent water accumulation and potential damage to the shed and its contents. Avoid low-lying areas that are prone to flooding or areas with poor drainage, as these conditions can compromise the structural integrity of the shed and lead to moisture-related issues.
3. Sun Exposure and Protection
Take into account the sun exposure and natural protection offered by the surrounding environment. While some sunlight is beneficial for ventilation and preventing moisture buildup, excessive exposure to direct sunlight can accelerate tarp degradation and cause items inside the shed to deteriorate. Aim to position the shed in an area that strikes a balance between sunlight and shade, ensuring adequate protection for both the tarp and the stored items.
4. Property Boundaries and Regulations
Before finalizing the location, familiarize yourself with local regulations and property boundaries. Ensure that the chosen site complies with zoning regulations and property lines to avoid potential conflicts or legal issues. Additionally, consider any aesthetic or visual impact the shed may have on the surrounding landscape and neighboring properties, aiming for a location that harmonizes with the overall aesthetics of the outdoor space.
By carefully evaluating these factors and selecting a location that aligns with your specific needs and environmental conditions, you can lay a solid foundation for the successful construction and long-term functionality of your DIY tarp shed. The right location will not only enhance the usability of the shed but also contribute to its durability and resilience in the face of varying weather conditions.
Step 2: Measuring and Cutting the Tarp
Accurate measurements and precise cutting of the tarp are essential steps in the construction of a DIY tarp shed. By meticulously sizing and cutting the tarp material, you can ensure a snug and secure fit over the shed frame, effectively safeguarding the contents from the elements. Here's a detailed walkthrough of the measuring and cutting process to guide you through this critical phase of the project.
1. Gather the Necessary Tools
Before commencing the measuring and cutting process, gather the essential tools required for working with the tarp. A measuring tape, marking tools such as a pencil or chalk, and a sharp utility knife or heavy-duty scissors are indispensable for achieving accurate and clean cuts. Ensure that the work area is well-lit and spacious, allowing for unrestricted movement and precise measurements.
2. Measure the Frame Dimensions
Begin by measuring the dimensions of the assembled frame to determine the exact size of the tarp needed. Take precise measurements of the length, width, and height of the frame, accounting for any additional overlap required for securing the tarp to the frame. It's advisable to double-check the measurements to avoid errors that could result in an ill-fitting tarp.
3. Mark and Cut the Tarp
Lay the tarp on a flat and clean surface, ensuring that it is free from wrinkles or folds that could affect the accuracy of the measurements. Use the marking tools to outline the dimensions obtained from the frame measurements, marking the areas where the tarp will be cut. Exercise caution and precision when marking the tarp to ensure that the lines are straight and aligned with the intended dimensions.
With the tarp accurately marked, carefully cut along the marked lines using a sharp utility knife or heavy-duty scissors. Maintain a steady hand and follow the lines closely to achieve clean and even cuts. If the tarp material is thick or resistant, consider using a utility knife with a fresh blade to facilitate smooth cutting without fraying the edges.
4. Test the Fit
Once the tarp has been cut to size, carefully drape it over the assembled frame to test the fit. Ensure that the tarp covers the frame adequately, with sufficient overlap to facilitate secure fastening. Make any necessary adjustments to the tarp edges to achieve a proper fit, trimming excess material if required.
By meticulously measuring and cutting the tarp to fit the dimensions of the shed frame, you can lay the groundwork for a well-constructed and weather-resistant tarp shed. Attention to detail and precision during this phase will contribute to the overall functionality and durability of the shed, ensuring that it effectively shields your belongings from the elements.
Step 3: Assembling the Frame
The assembly of the frame forms the structural backbone of your DIY tarp shed, providing stability and support for the tarp covering. This phase of the construction process involves transforming the selected material, whether PVC pipes or lumber, into a sturdy framework that will serve as the foundation for the tarp enclosure. Here's a detailed walkthrough of the steps involved in assembling the frame of your tarp shed.
1. Preparing the Materials
Before commencing the assembly, ensure that the PVC pipes or lumber components are cut to the appropriate lengths based on the dimensions of the shed. If using PVC pipes, utilize a PVC cutter or a saw to achieve clean and precise cuts. For lumber, a saw capable of cutting through the chosen material will be essential. Take care to measure and cut the components accurately, as this will directly impact the structural integrity and overall stability of the frame.
2. Creating the Frame Structure
Begin by laying out the cut PVC pipes or lumber components in the designated assembly area. If using PVC pipes, connect the pieces using PVC connectors to form the desired shape and dimensions of the shed frame. For lumber, assemble the pieces according to the predetermined design, ensuring that the corners are squared and the joints are secure. Depending on the chosen design, you may opt for a simple rectangular frame or a more elaborate structure with additional support elements.
3. Securing the Joints
Once the frame components are assembled, focus on securing the joints to reinforce the structure. For PVC pipe frames, ensure that the connectors are firmly attached, providing stability and preventing shifting or wobbling. If using lumber, utilize appropriate screws, nails, or fasteners to secure the joints, paying attention to the strength and stability of the connections. Reinforcing the joints is crucial for ensuring that the frame can withstand external forces and support the weight of the tarp covering.
4. Evaluating Stability and Alignment
After the frame is assembled and the joints are secured, assess the stability and alignment of the structure. Check for any wobbling or unevenness, making adjustments as necessary to achieve a level and balanced frame. This step is essential for laying a solid foundation for the tarp covering, as a stable and well-aligned frame will facilitate the proper fitting and tensioning of the tarp.
5. Ground Anchoring (if applicable)
If your tarp shed will be positioned in an area prone to strong winds or external forces, consider implementing ground anchoring to enhance the stability of the frame. This may involve installing stakes or anchors at strategic points around the perimeter of the shed, securing them to the frame to prevent displacement. Ground anchoring is particularly important for ensuring the longevity and resilience of the tarp shed in challenging weather conditions.
By meticulously following these steps and paying attention to the details of frame assembly, you can lay a solid groundwork for the successful construction of your DIY tarp shed. The assembled frame will serve as the structural core of the shed, providing the necessary support for the tarp covering and ensuring the overall durability and functionality of the outdoor storage solution.
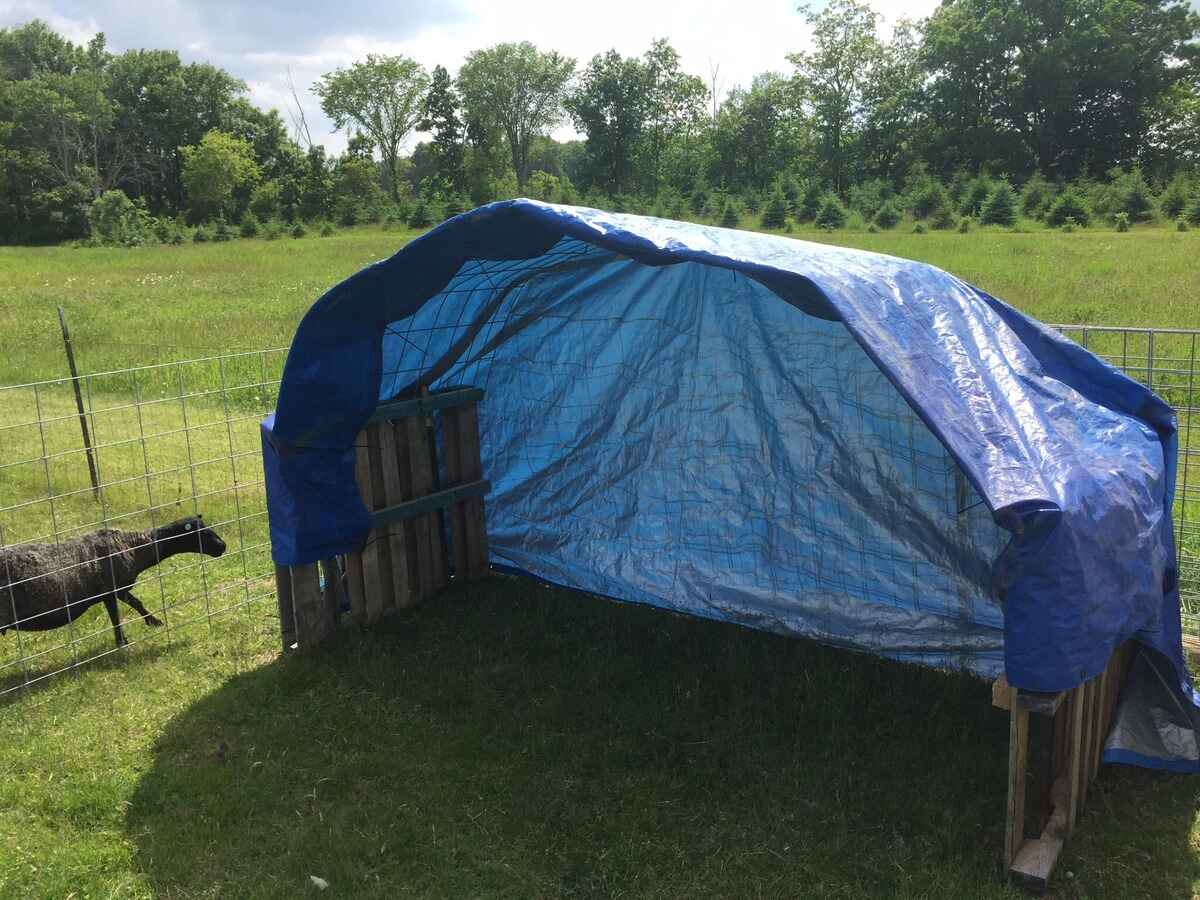
Step 4: Attaching the Tarp to the Frame
With the frame of your DIY tarp shed assembled, the next critical step involves securely attaching the tarp to the frame, creating a weather-resistant enclosure for your outdoor storage needs. This phase of the construction process requires attention to detail and precision to ensure that the tarp is snugly fitted and effectively shields the contents of the shed from the elements. Here's a detailed walkthrough of the steps involved in attaching the tarp to the frame of your tarp shed.
1. Positioning the Tarp
Begin by positioning the cut tarp over the assembled frame, ensuring that it is centered and evenly draped to cover the entire structure. Take care to align the edges of the tarp with the edges of the frame, allowing for an even overhang on all sides to facilitate secure fastening. This initial positioning step sets the foundation for a well-fitted tarp enclosure and ensures that the contents of the shed are adequately protected.
2. Securing the Tarp
Once the tarp is positioned over the frame, proceed to secure it in place using appropriate fastening methods. Depending on the material of the frame and the type of tarp used, you can employ various fastening techniques such as zip ties, bungee cords, or durable ropes. Start by fastening the tarp at the corners and then work your way along the edges, ensuring that the tarp is taut and free from wrinkles or sagging. This meticulous approach to securing the tarp will contribute to its longevity and weather resistance.
3. Tensioning and Adjustments
As you fasten the tarp to the frame, pay close attention to the tension and alignment of the material. Tension the tarp evenly to prevent excessive slack or tightness, which can impact its durability and resistance to wind and weather. Make any necessary adjustments to the fastenings to achieve a balanced and taut fit, ensuring that the tarp is securely anchored to the frame without undue stress on the material.
4. Trimming Excess Material
After the tarp is securely fastened and tensioned, trim any excess material along the edges to create a neat and streamlined appearance. Use a sharp utility knife or scissors to carefully trim the overhanging sections of the tarp, ensuring that the edges are clean and uniform. This final trimming step adds a polished touch to the tarp enclosure and eliminates any potential hazards or obstructions.
By meticulously following these steps and taking a meticulous approach to attaching the tarp to the frame, you can create a robust and weather-resistant enclosure for your outdoor storage needs. The securely fastened tarp will shield your belongings from the elements, ensuring that they remain protected and well-maintained within the confines of the DIY tarp shed.
Step 5: Adding Optional Features
Once the primary structure of your DIY tarp shed is in place, you have the opportunity to enhance its functionality and customization by incorporating optional features tailored to your specific storage needs. These optional features can elevate the utility of the shed, maximize its storage capacity, and optimize the organization of your outdoor belongings. Here are several optional features to consider integrating into your tarp shed:
1. Shelving and Storage Racks
Integrating shelves and storage racks within the tarp shed can significantly expand its storage capacity and organization. By installing sturdy shelves along the interior walls, you can create designated spaces for items such as gardening tools, pots, and other small to medium-sized equipment. Additionally, incorporating storage racks or hooks provides convenient hanging space for items like hoses, ropes, and hand tools, optimizing the utilization of vertical space within the shed.
2. Lighting Fixtures
Enhance the functionality and accessibility of your tarp shed by installing lighting fixtures. Battery-operated LED lights or solar-powered lamps can illuminate the interior of the shed, making it easier to locate and retrieve items during low-light conditions. Proper lighting also contributes to a more user-friendly and efficient storage environment, allowing you to navigate the contents of the shed with ease.
3. Ventilation and Air Circulation
Consider incorporating ventilation elements into the design of the tarp shed to promote air circulation and prevent moisture buildup. This can be achieved by installing vents or windows that can be opened to facilitate airflow. Adequate ventilation is essential for preserving the condition of stored items and preventing the development of mold or mildew within the shed.
4. Tool Hangers and Organizers
Efficiently organize and store your gardening and landscaping tools by integrating tool hangers and organizers. Wall-mounted tool racks or pegboards provide designated spaces for hanging and arranging tools, keeping them easily accessible and minimizing clutter within the shed. By implementing this feature, you can maintain a tidy and well-organized storage space for your outdoor equipment.
5. Security Enhancements
To safeguard valuable or sensitive items stored within the tarp shed, consider adding security enhancements such as padlocks, latches, or security cameras. Reinforcing the entry points of the shed with durable locks and implementing surveillance measures can provide peace of mind and protect your belongings from unauthorized access or theft.
By incorporating these optional features, you can tailor the tarp shed to align with your specific storage requirements and enhance its overall functionality. Whether you prioritize maximizing storage space, improving accessibility, or ensuring the security of stored items, these optional features offer valuable customization options to elevate the utility and practicality of your DIY tarp shed.
Conclusion
Congratulations on successfully completing the construction of your DIY tarp shed! By embarking on this project, you've not only created a practical and budget-friendly outdoor storage solution but also demonstrated your ability to tackle hands-on construction endeavors. As you stand back and admire the newly erected tarp shed, it's important to reflect on the journey and the value it brings to your outdoor space.
The DIY tarp shed represents more than just a shelter for your outdoor belongings; it embodies your creativity, resourcefulness, and commitment to enhancing your living environment. Through careful planning, precise measurements, and diligent assembly, you've transformed basic materials into a functional and durable structure that serves a vital purpose in your outdoor landscape.
As you look ahead to the utilization of your tarp shed, envision the convenience it will bring to your gardening activities, outdoor maintenance tasks, and seasonal storage needs. The shed stands ready to accommodate your tools, equipment, and seasonal items, providing a dedicated space that keeps them organized, accessible, and shielded from the elements.
Furthermore, the customization options available to you, such as adding shelves, lighting, and ventilation, enable you to tailor the shed to your specific requirements, ensuring that it seamlessly integrates into your outdoor lifestyle. Whether it's a sunny day in the garden or a rainy afternoon of yard work, the tarp shed will stand as a reliable ally, offering protection and convenience when you need it most.
Beyond its practical functionality, the DIY tarp shed embodies the spirit of self-sufficiency and creativity. It serves as a testament to your ability to envision a solution, gather the necessary materials, and bring your vision to life through hands-on construction. This sense of accomplishment and empowerment is invaluable, reinforcing your capability to take on future projects and make meaningful enhancements to your living space.
As you move forward, consider the potential for further customization and personalization of the tarp shed. Whether it's adding decorative touches, integrating additional features, or expanding its capacity, the shed remains a canvas for your creativity and a reflection of your unique outdoor storage needs.
In conclusion, the completion of your DIY tarp shed marks a significant achievement, symbolizing your ingenuity and determination to create a practical and personalized storage solution. As you begin to utilize the shed and experience the convenience it brings to your outdoor endeavors, take pride in the tangible impact of your efforts and the enduring value it adds to your living environment.