
Home>Create & Decorate>DIY & Crafts>DIY Tall Cabinet Plans: Step-by-Step Guide To Building A Spacious Storage Solution
DIY & Crafts
DIY Tall Cabinet Plans: Step-by-Step Guide To Building A Spacious Storage Solution
Published: May 29, 2024

Content Creator specializing in woodworking and interior transformations. Caegan's guides motivate readers to undertake their own projects, while his custom furniture adds a personal touch.
Discover step-by-step DIY tall cabinet plans for building a spacious storage solution. Perfect for DIY & Crafts enthusiasts looking to create their own storage unit.
(Many of the links in this article redirect to a specific reviewed product. Your purchase of these products through affiliate links helps to generate commission for Twigandthistle.com, at no extra cost. Learn more)
Introduction
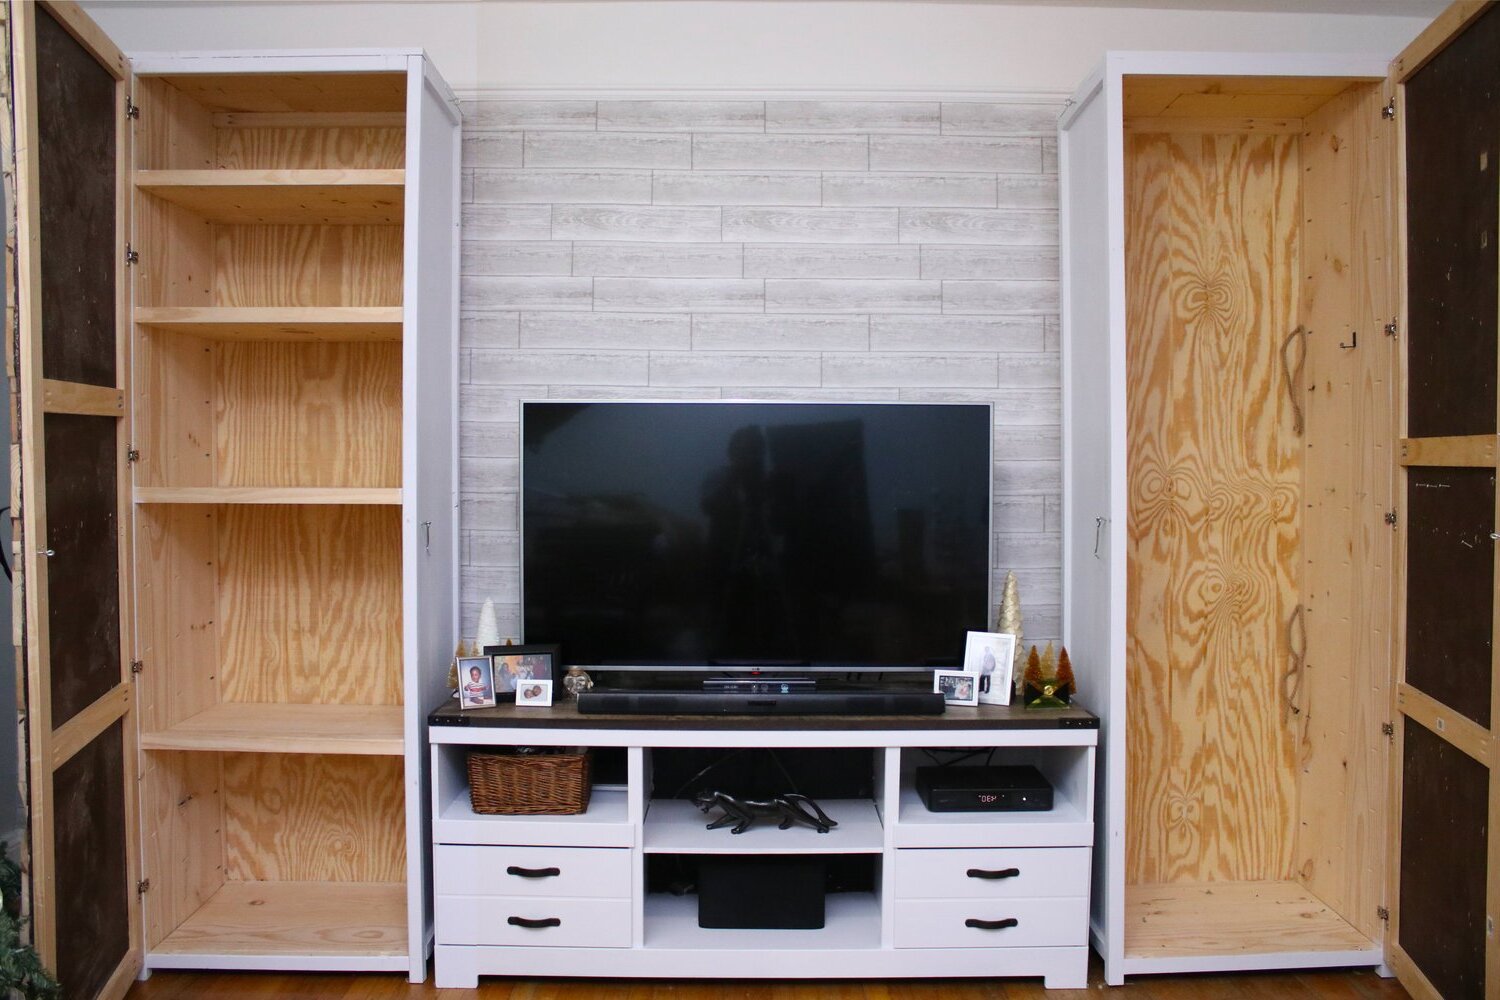
Are you in need of some extra storage space in your home? Building a tall cabinet can be a fantastic solution to your storage woes. Not only does it provide ample space for storing various items, but it can also be customized to fit your specific needs and style preferences. In this step-by-step guide, we will walk you through the process of building your own tall cabinet, from gathering the necessary materials and tools to adding the finishing touches with a fresh coat of paint. Whether you're a seasoned DIY enthusiast or a beginner looking to take on a new project, this guide will equip you with the knowledge and confidence to create a spacious storage solution for your home.
Materials and Tools Needed
Before diving into the construction process, it's essential to gather all the necessary materials and tools for building your DIY tall cabinet. Here's a comprehensive list to ensure you have everything you need to get started:
Materials:
- Plywood: Choose a sturdy plywood for the construction of the cabinet frame and shelves. The thickness of the plywood will depend on the overall size and intended use of the cabinet.
- Wood Screws: Opt for a variety of wood screws in different lengths to secure the cabinet frame and shelves together.
- Wood Glue: A reliable wood glue will help reinforce the joints and ensure the stability of the cabinet.
- Hinges and Handles: Select hinges and handles that complement the style of your cabinet and suit your functional requirements.
- Paint or Stain: Decide whether you want to paint or stain the cabinet to achieve the desired aesthetic.
Tools:
- Circular Saw or Table Saw: A saw will be essential for cutting the plywood to the required dimensions.
- Drill and Bits: A drill is necessary for creating holes for screws and installing hardware.
- Measuring Tape and Square: Accurate measurements and square angles are crucial for a well-constructed cabinet.
- Screwdriver: Both manual and electric screwdrivers will be useful for assembling the cabinet.
- Paintbrushes or Rollers: If you plan to paint the cabinet, have the appropriate brushes or rollers on hand.
By ensuring you have all the materials and tools listed above, you'll be well-prepared to embark on the construction of your DIY tall cabinet.
Preparing the Workspace
Before you begin the construction of your DIY tall cabinet, it's crucial to prepare a suitable workspace that provides ample room for maneuvering and assembling the components. Here's how to set up your workspace for a successful cabinet-building project:
-
Clear the Area: Start by clearing out a spacious area in your garage, workshop, or any other designated workspace. Remove any unnecessary clutter or obstacles to create a clean and open environment for the construction process.
-
Workbench or Sawhorses: If you have a workbench, utilize it as a sturdy and elevated surface for assembling the cabinet components. Alternatively, set up sawhorses and a large, flat board to create a makeshift work surface at a comfortable working height.
-
Ventilation: Ensure that the workspace is well-ventilated, especially if you plan to use wood glue, paint, or stain during the construction process. Good ventilation will help dissipate fumes and provide a more comfortable working environment.
-
Organize Tools and Materials: Arrange your tools and materials in a systematic manner, making them easily accessible as you progress through the construction steps. This organization will streamline the building process and minimize the time spent searching for specific items.
-
Protective Coverings: Consider laying down protective coverings, such as drop cloths or cardboard, to safeguard the floor and surrounding surfaces from any potential damage or spills during the construction and painting stages.
-
Lighting: Adequate lighting is essential for precision and safety. Ensure that your workspace is well-lit, either through natural light or by using portable work lights to illuminate the area where you'll be working.
By preparing a well-organized and functional workspace, you'll set the stage for a smooth and efficient construction process, allowing you to focus on building your DIY tall cabinet with ease and confidence.
Cutting and Assembling the Frame
The first step in constructing your DIY tall cabinet is to cut the plywood into the necessary pieces and assemble the frame. Follow these detailed steps to ensure a sturdy and well-constructed cabinet frame:
-
Measure and Mark: Begin by measuring and marking the dimensions for the cabinet frame components on the plywood. Use a measuring tape and a square to ensure accurate measurements and straight lines. The components will typically include the top and bottom panels, the two side panels, and any additional support pieces depending on the design of your cabinet.
-
Cut the Plywood: Using a circular saw or table saw, carefully cut along the marked lines to create the individual pieces for the cabinet frame. Take your time to maintain precision and accuracy during the cutting process, as these pieces will form the structural foundation of your tall cabinet.
-
Assemble the Frame: Once the plywood pieces are cut to size, begin assembling the frame by joining the top and bottom panels to the side panels. Apply wood glue along the edges before securing the pieces together with wood screws. Use a drill with the appropriate bit to create pilot holes for the screws, ensuring a secure and tight fit.
-
Reinforce Joints: To reinforce the joints and enhance the stability of the frame, consider adding corner braces or L-brackets at the inside corners of the cabinet. These additional supports will help distribute the weight evenly and prevent the frame from shifting or becoming misaligned over time.
-
Check for Squareness: After assembling the frame, use a measuring tape to check for squareness by measuring the diagonals of the frame. The measurements should be equal, indicating that the frame is perfectly square. If necessary, gently tap the frame into square alignment before allowing the wood glue to dry.
By following these steps, you'll successfully cut the plywood to the required dimensions and assemble a strong and reliable frame for your DIY tall cabinet. This sturdy foundation will serve as the basis for adding shelves, doors, and other components to complete your spacious storage solution.
Adding Shelves and Back Panel
With the cabinet frame securely assembled, the next crucial step in building your DIY tall cabinet is adding the shelves and back panel. This process will transform the frame into a functional storage unit, providing designated spaces for organizing various items. Follow these detailed steps to effectively incorporate the shelves and back panel into your cabinet:
-
Measure for Shelf Placement: Begin by measuring and marking the desired positions for the shelves inside the cabinet. Consider the items you intend to store and adjust the shelf heights accordingly. Use a measuring tape and a level to ensure accurate and evenly spaced shelf placements.
-
Cut Shelf Pieces: Using the measurements obtained in the previous step, cut the plywood into individual pieces for the shelves. Double-check the dimensions to guarantee a precise fit within the cabinet frame.
-
Install Shelf Supports: To support the shelves, attach shelf support strips or cleats along the inside walls of the cabinet frame. These strips will provide a stable base for the shelves to rest upon and prevent sagging over time. Secure the strips with wood glue and screws, ensuring they are level and evenly spaced.
-
Position and Secure Shelves: Place the cut shelf pieces onto the installed support strips within the cabinet. Use a level to confirm that the shelves are positioned evenly and horizontally. Secure the shelves in place by driving wood screws through the frame into the edges of the shelves.
-
Add the Back Panel: Once the shelves are in position, it's time to add the back panel to the cabinet. Cut a piece of plywood to the dimensions of the back of the cabinet frame and attach it using wood glue and screws. The back panel will provide stability to the cabinet structure and prevent items from pushing through the back.
-
Reinforce Shelf Joints: To reinforce the joints between the shelves and the cabinet frame, consider adding additional screws from the sides of the cabinet into the edges of the shelves. This extra reinforcement will enhance the overall strength and durability of the cabinet.
By following these steps, you will successfully integrate the shelves and back panel into your DIY tall cabinet, creating a well-organized and functional storage space for your home. This phase brings your project one step closer to completion, setting the stage for the final assembly of doors, hardware, and the finishing touches.
Attaching Doors and Hardware
The process of attaching doors and hardware is a pivotal step in completing your DIY tall cabinet, as it adds both functionality and aesthetic appeal to the storage unit. Follow these detailed steps to ensure the doors are properly installed and the hardware is securely attached:
-
Door Preparation: Before attaching the doors, ensure they are properly prepared. If you are using pre-made cabinet doors, check that they are sized to fit the cabinet openings. If you are constructing the doors yourself, measure and cut the plywood or lumber to the appropriate dimensions, ensuring a precise fit within the cabinet frame.
-
Hinge Installation: Begin by installing the hinges onto the cabinet frame. Position the hinges at the desired locations on the side of the frame where the doors will be attached. Use a drill to create pilot holes for the hinge screws, then secure the hinges in place using the provided screws. Ensure the hinges are aligned and level to allow the doors to open and close smoothly.
-
Door Alignment: With the hinges in place, carefully position the doors onto the installed hinges. Check for proper alignment and adjust the placement of the doors as needed to ensure they are level and evenly spaced within the cabinet openings. Use shims or spacers to achieve a consistent gap around the doors for a professional finish.
-
Hardware Installation: Once the doors are aligned and attached to the cabinet frame, it's time to install the hardware, including handles or knobs. Mark the locations for the hardware on the doors, ensuring they are positioned at a comfortable height and align with the overall design of the cabinet. Use a drill to create holes for the hardware screws, then attach the handles or knobs securely.
-
Test Operation: After attaching the doors and hardware, test the operation of the doors to ensure they open and close smoothly without any obstructions or misalignments. Make any necessary adjustments to the hinges or door placement to achieve optimal functionality.
-
Final Checks: Double-check the alignment and operation of the doors, ensuring they open and close seamlessly. Tighten any loose screws and make any final adjustments to the hardware to guarantee a professional and polished appearance.
By following these steps, you will effectively attach the doors and hardware to your DIY tall cabinet, elevating its functionality and visual appeal. This phase brings your project to the brink of completion, setting the stage for the final finishing touches and painting.
Finishing Touches and Painting
The final phase of completing your DIY tall cabinet involves adding the finishing touches and applying a fresh coat of paint to enhance its appearance and durability. Follow these detailed steps to ensure your cabinet receives the attention it deserves:
-
Sanding and Smoothing: Before applying any paint or finish, thoroughly sand the entire surface of the cabinet to smooth out any rough edges, imperfections, or uneven areas. Start with a coarse-grit sandpaper to remove any irregularities, then progress to a finer-grit sandpaper to achieve a smooth and uniform surface.
-
Priming the Surface: Once the cabinet is sanded and cleaned of any dust or debris, apply a coat of primer to the entire surface. Primer helps the paint adhere better and provides a uniform base for the topcoat. Choose a primer suitable for the type of paint you plan to use and allow it to dry completely according to the manufacturer's instructions.
-
Choosing the Right Paint: Select a high-quality paint that suits your aesthetic preferences and the intended use of the cabinet. Consider whether you want a glossy, satin, or matte finish, and choose a paint color that complements the decor of the room where the cabinet will be placed. Ensure the paint is suitable for use on wood surfaces and provides long-lasting durability.
-
Applying the Paint: Using a paintbrush, roller, or sprayer, apply an even coat of paint to the entire cabinet, including the doors, shelves, and back panel. Work in smooth, overlapping strokes to achieve a consistent finish. Allow the first coat to dry completely before applying a second coat for optimal coverage and a professional appearance.
-
Drying and Curing: After applying the final coat of paint, allow the cabinet to dry and cure in a well-ventilated area. Follow the recommended drying times provided by the paint manufacturer to ensure the paint fully cures and hardens, providing a durable and long-lasting finish.
-
Optional Finishing Touches: Consider adding additional finishing touches, such as decorative molding, trim, or hardware accents, to further enhance the visual appeal of the cabinet. These details can elevate the overall look of the cabinet and provide a customized touch to suit your personal style.
By following these steps, you will successfully complete the finishing touches and painting phase of your DIY tall cabinet project, resulting in a beautifully finished and functional storage solution for your home.
Conclusion
In conclusion, building your own DIY tall cabinet can be a rewarding and practical endeavor, providing you with a spacious storage solution tailored to your specific needs and style preferences. By following the step-by-step guide outlined in this article, you have gained the knowledge and confidence to embark on this fulfilling project. From gathering the necessary materials and tools to adding the finishing touches with a fresh coat of paint, each phase of the construction process has equipped you with the skills to create a sturdy and functional storage unit for your home. Whether you're a seasoned DIY enthusiast or a beginner looking to expand your skills, the completion of your DIY tall cabinet marks a significant achievement and a valuable addition to your living space. Embrace the satisfaction of a well-crafted and personalized storage solution, and enjoy the benefits of your handiwork for years to come.