
Home>Create & Decorate>DIY & Crafts>How To Build A Workbench
DIY & Crafts
How To Build A Workbench
Published: February 25, 2024

Senior Editor in Create & Decorate, Kathryn combines traditional craftsmanship with contemporary trends. Her background in textile design and commitment to sustainable crafts inspire both content and community.
Learn how to build a sturdy workbench with our step-by-step DIY guide. Perfect for your woodworking and crafting projects. Get started today!
(Many of the links in this article redirect to a specific reviewed product. Your purchase of these products through affiliate links helps to generate commission for Twigandthistle.com, at no extra cost. Learn more)
Introduction
Building a workbench is a rewarding and practical DIY project that can elevate your workspace and enhance your productivity. Whether you're a seasoned woodworker or a novice DIY enthusiast, constructing your own workbench allows you to customize it to your specific needs and preferences. From the sturdy frame to the spacious work surface, every aspect of the workbench can be tailored to accommodate your projects and tools.
A well-crafted workbench serves as the cornerstone of any workshop, providing a stable platform for various tasks such as woodworking, crafting, repairs, and assembly. By following a systematic approach and utilizing the right materials and tools, you can create a durable and functional workbench that will be the focal point of your workspace.
In this comprehensive guide, we will walk through the step-by-step process of building a sturdy and versatile workbench. From gathering the necessary materials and tools to adding finishing touches, each stage of the construction will be detailed to ensure a successful and satisfying outcome. Whether you're aiming to optimize your garage, shed, or dedicated workshop, this guide will equip you with the knowledge and confidence to embark on this fulfilling DIY endeavor.
So, roll up your sleeves, gather your tools, and let's dive into the gratifying journey of constructing a workbench that will not only support your projects but also reflect your craftsmanship and ingenuity. Let's get started on this exciting and rewarding DIY adventure!
Step 1: Gather Materials and Tools
Before diving into the construction process, it's crucial to gather all the necessary materials and tools to ensure a smooth and efficient workflow. Here's a comprehensive list of items you'll need to kickstart your workbench project:
Materials:
- Lumber: Select high-quality, sturdy lumber for the frame and work surface. Opt for hardwood such as oak, maple, or birch for durability.
- Plywood: Choose a thick, durable plywood for the workbench top. A 3/4-inch plywood sheet is recommended for its strength and stability.
- Wood Screws: Invest in a variety of wood screws in different lengths to secure the components of the workbench securely.
- Wood Glue: A reliable wood glue will reinforce the joints and enhance the overall sturdiness of the workbench.
- Finish: Consider the type of finish you'd like for your workbench. Whether it's paint, varnish, or wood stain, ensure you have the appropriate finish on hand.
Tools:
- Measuring Tape: Accurate measurements are essential for precision in cutting and assembly.
- Circular Saw or Table Saw: A reliable saw will be indispensable for cutting the lumber and plywood to the required dimensions.
- Drill and Bits: A power drill with a set of drill bits will be used for creating pilot holes and driving screws.
- Clamps: Sturdy clamps are essential for holding the components in place during assembly.
- Screwdriver: Both manual and electric screwdrivers will be handy for driving screws into the wood.
- Sanding Tools: Sandpaper, sanding block, or an electric sander will be necessary for smoothing the surfaces and edges of the wood.
- Safety Gear: Prioritize safety by having protective gear such as goggles, gloves, and a dust mask.
By ensuring that you have all the required materials and tools at your disposal, you'll be well-prepared to commence the construction process with confidence and efficiency. This proactive approach will minimize interruptions and allow you to focus on the craftsmanship and precision required to build a robust and functional workbench.
Step 2: Measure and Cut Wood
Accurate measurements and precise cuts are fundamental to the construction of a sturdy and well-proportioned workbench. This step requires meticulous attention to detail and a methodical approach to ensure that the components fit together seamlessly, resulting in a robust and reliable workbench.
Measuring the Lumber and Plywood
Begin by carefully measuring the lumber and plywood according to the dimensions of the workbench design. Use a reliable measuring tape to take precise measurements, ensuring that the lengths and widths are consistent and accurate. It's advisable to double-check the measurements to avoid errors that could compromise the structural integrity of the workbench.
Cutting the Lumber and Plywood
Once the measurements are confirmed, proceed to cut the lumber and plywood using a circular saw or table saw. It's essential to use a sharp, high-quality blade to achieve clean and precise cuts. Adhere to the measured dimensions and exercise caution while operating the saw to ensure safety and accuracy.
Creating Joints and Notches
Depending on the chosen workbench design, you may need to create joints and notches in the lumber to facilitate seamless assembly. This could involve cutting mortise and tenon joints, dovetail joints, or other specialized cuts to interlock the components securely. Careful attention to detail during this stage will contribute to the overall stability and durability of the workbench.
Sanding the Edges and Surfaces
After cutting the wood, it's essential to sand the edges and surfaces to remove any roughness or splinters. Utilize sandpaper, a sanding block, or an electric sander to achieve smooth and uniform surfaces. This not only enhances the visual appeal of the workbench but also minimizes the risk of splinters and ensures a professional finish.
By meticulously measuring and cutting the wood with precision, you'll lay a solid foundation for the subsequent stages of workbench assembly. This meticulous approach sets the stage for seamless integration of the components, resulting in a workbench that is not only structurally sound but also visually appealing.
Step 3: Assemble the Frame
With the lumber and plywood cut to the precise dimensions, it's time to embark on the pivotal stage of assembling the frame of the workbench. This step is crucial as it forms the structural backbone of the workbench, providing stability and support for the work surface and additional components. The assembly process demands attention to detail and a methodical approach to ensure that the frame is robust, square, and capable of withstanding the demands of various projects.
Positioning the Lumber
Begin by laying out the cut lumber according to the workbench design, ensuring that the pieces are positioned correctly for assembly. Take into account the placement of the legs, stretchers, and any additional supports or braces as specified in the chosen design. This initial arrangement allows for a visual confirmation of the assembly layout before securing the components together.
Securing the Joints
Utilize wood glue and wood screws to secure the joints of the frame, ensuring a strong and durable bond between the interconnected components. Apply a liberal amount of wood glue to the joints before fastening them with the appropriate screws. This combination of adhesive and mechanical fasteners enhances the structural integrity of the frame, providing a reliable foundation for the workbench.
Checking for Squareness
Throughout the assembly process, it's essential to frequently check for squareness to maintain the overall alignment and stability of the frame. This can be achieved by measuring the diagonals of the frame and adjusting the positioning of the components as needed to ensure that the frame is perfectly square. Attention to squareness at this stage is critical, as any discrepancies can impact the functionality and stability of the workbench.
Adding Additional Supports
Depending on the design and intended use of the workbench, it may be necessary to incorporate additional supports or braces to reinforce the frame. These supplementary components contribute to the overall rigidity of the workbench, especially in scenarios where heavy loads or vigorous activities are anticipated. Carefully follow the design specifications to integrate these supports seamlessly into the frame assembly.
Ensuring Stability and Alignment
Prior to proceeding to the next stage of workbench construction, thoroughly assess the stability and alignment of the assembled frame. Apply gentle pressure and test the structural integrity to identify any potential weak points or misalignments. Address any issues promptly to guarantee that the frame is solid, stable, and ready to accommodate the subsequent components.
By methodically assembling the frame with precision and attention to detail, you establish a solid foundation for the workbench, setting the stage for the seamless integration of the work surface and additional features. This meticulous approach ensures that the frame is not only structurally sound but also capable of withstanding the demands of diverse projects, making it an indispensable asset in your workshop or garage.
Step 4: Add the Work Surface
The work surface is the focal point of the workbench, providing a spacious and durable platform for various projects and tasks. Adding the work surface requires precision and attention to detail to ensure a level and stable area that can withstand the rigors of woodworking, crafting, and other activities. This stage of the construction process marks the transition from assembling the frame to creating a functional workspace that will serve as the cornerstone of your workshop or garage.
Attaching the Plywood Top
Begin by positioning the pre-cut plywood top onto the assembled frame, ensuring that it aligns evenly with the edges of the frame. Secure the plywood to the frame using wood screws, driving them through the underside of the plywood into the frame components. It's essential to space the screws evenly along the perimeter of the plywood to achieve a secure and uniform attachment. This process not only fastens the work surface to the frame but also contributes to the overall stability and integrity of the workbench.
Reinforcing the Work Surface
To enhance the durability and longevity of the work surface, consider reinforcing the underside of the plywood with additional supports. This can be achieved by attaching wooden braces or cleats beneath the plywood, providing supplementary reinforcement and preventing sagging or warping over time. By strategically placing these supports, you can bolster the structural integrity of the work surface, ensuring that it remains steadfast and reliable throughout its lifespan.
Smoothing and Finishing
Once the plywood top is securely attached, focus on refining the work surface to achieve a professional and functional finish. Utilize sandpaper or a power sander to smooth the edges and surfaces of the plywood, removing any roughness or imperfections. Pay particular attention to the corners and edges, ensuring that they are smooth and free of splinters. Following the sanding process, consider applying a protective finish such as varnish, wood stain, or paint to safeguard the plywood from moisture, wear, and tear. This finishing touch not only enhances the aesthetic appeal of the workbench but also contributes to its longevity and resilience.
Verifying Stability and Flatness
Before proceeding to the final stages of workbench construction, thoroughly assess the stability and flatness of the work surface. Apply gentle pressure and test the surface for any signs of unevenness or instability. Verify that the work surface is level and capable of accommodating various projects and tasks without compromise. Address any discrepancies promptly to ensure that the workbench provides a reliable and steadfast platform for your endeavors.
By meticulously adding the work surface with precision and care, you elevate the workbench from a frame to a functional and dependable workspace. This pivotal stage sets the foundation for a versatile and resilient workbench that will support your projects and activities with unwavering stability and durability.
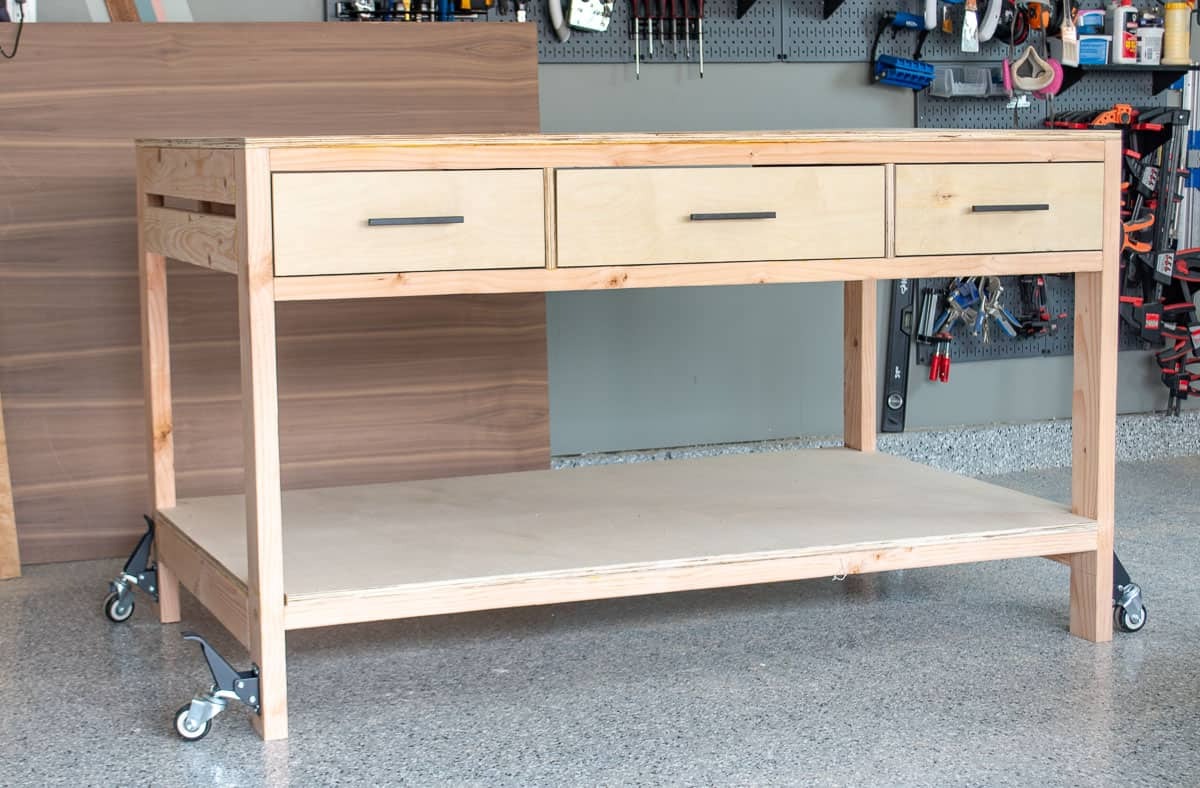
Step 5: Install Shelves or Drawers
The addition of shelves or drawers to your workbench introduces a new dimension of functionality and organization, enhancing the efficiency and versatility of your workspace. Whether you prioritize storage for tools, materials, or project components, integrating shelves or drawers into your workbench design optimizes accessibility and streamlines your workflow. This step focuses on customizing your workbench to accommodate your specific storage needs, providing a tailored solution that complements your projects and enhances your overall productivity.
Assessing Storage Requirements
Before proceeding with the installation of shelves or drawers, it's essential to assess your storage requirements and consider the types of items you intend to store within easy reach of your workbench. Whether it's hand tools, power tools, hardware, or project materials, a clear understanding of your storage needs will inform the design and configuration of the shelves or drawers. Consider the dimensions and weight capacity required for the items you plan to store, ensuring that the storage solutions are tailored to accommodate your specific tools and materials.
Designing the Storage Solutions
Based on your storage requirements, devise a design for the shelves or drawers that integrates seamlessly with the existing structure of your workbench. Consider the layout, dimensions, and accessibility of the storage solutions, aiming to maximize space utilization while maintaining a clear and organized workspace. Whether you opt for open shelves, enclosed drawers, or a combination of both, prioritize a design that aligns with your workflow and facilitates efficient access to your tools and materials.
Constructing and Installing the Storage Units
Once the design is finalized, proceed to construct the shelves or drawers according to the specified dimensions and configuration. Utilize sturdy lumber and reliable hardware to ensure the durability and stability of the storage units. Position the shelves or drawers within the framework of the workbench, securing them firmly to the structure to withstand the weight of the stored items. Pay attention to alignment and levelness, ensuring that the storage units integrate seamlessly with the workbench and contribute to its overall functionality.
Organizing and Optimizing Space
With the shelves or drawers securely installed, take the opportunity to organize your tools, materials, and supplies within the newly integrated storage units. Implement a systematic approach to arrange items based on frequency of use, category, or project relevance, optimizing the accessibility and efficiency of your workspace. Consider incorporating dividers, bins, or labeling systems to further enhance organization and streamline your workflow, creating a workspace that is not only functional but also conducive to creativity and productivity.
Enhancing Workflow and Accessibility
The installation of shelves or drawers elevates the practicality of your workbench, providing convenient access to essential tools and materials while minimizing clutter and maximizing workspace efficiency. By customizing your workbench with tailored storage solutions, you optimize the functionality of your workspace, creating an environment that empowers your projects and endeavors. The seamless integration of shelves or drawers reflects a thoughtful and purposeful approach to workbench design, underscoring the importance of organization and accessibility in fostering a productive and inspiring workspace.
Step 6: Sand and Finish
After the structural components of the workbench are assembled, the crucial step of sanding and finishing comes into play, transforming the raw materials into a polished and professional workspace centerpiece. This stage not only enhances the aesthetic appeal of the workbench but also contributes to its longevity and functionality.
Sanding the Surfaces
Commence the process by meticulously sanding all exposed surfaces of the workbench, including the frame, work surface, and any additional features. Utilize medium-grit sandpaper to smooth out any imperfections, rough edges, or blemishes, ensuring a uniform and tactilely pleasing finish. Pay particular attention to corners, edges, and joints, as these areas often require extra care to achieve a seamless and professional appearance.
Smoothing the Edges
Focus on refining the edges of the workbench to eliminate any sharp or rough protrusions that may pose a safety hazard or detract from the overall visual appeal. By employing fine-grit sandpaper, gently round off the edges to create a comfortable and user-friendly surface, promoting a workspace that is not only functional but also safe and inviting.
Preparing for Finishing
Once the sanding process is complete, prepare the workbench for the application of the chosen finish. Thoroughly remove any dust or debris resulting from the sanding process, ensuring that the surfaces are clean and free of any contaminants that could compromise the finish. This preparatory step sets the stage for a flawless and durable finish that will protect and enhance the workbench for years to come.
Applying the Finish
Select a suitable finish, such as wood stain, varnish, or paint, based on your aesthetic preferences and functional requirements. Apply the chosen finish evenly and methodically, following the manufacturer's instructions to achieve a professional and enduring result. Whether you opt for a natural wood finish that accentuates the grain and character of the lumber or a protective coat that safeguards the workbench from wear and tear, the application of the finish marks the culmination of the construction process, elevating the workbench to a refined and functional workspace centerpiece.
Evaluating the Final Result
Upon the completion of the finishing process, take a moment to admire the transformation of the raw materials into a polished and inviting workbench. Assess the surfaces for uniformity, smoothness, and adherence of the finish, ensuring that the workbench exudes a professional and well-crafted appearance. The finishing touch not only enhances the visual appeal of the workbench but also serves as a testament to the craftsmanship and dedication invested in creating a workspace that is both practical and aesthetically pleasing.
By meticulously sanding and finishing the workbench, you not only enhance its visual appeal but also fortify its durability and functionality. This final step encapsulates the culmination of your efforts, resulting in a workbench that not only serves as a reliable and versatile workspace but also stands as a testament to your dedication to craftsmanship and attention to detail.
Conclusion
In conclusion, the process of building a workbench is a gratifying journey that culminates in the creation of a versatile, durable, and personalized workspace. From the initial gathering of materials and tools to the meticulous assembly of the frame, addition of the work surface, integration of storage solutions, and the final touches of sanding and finishing, each step contributes to the transformation of raw materials into a functional and aesthetically pleasing workbench.
The construction of a workbench transcends the mere assembly of lumber and plywood; it embodies the fusion of craftsmanship, practicality, and ingenuity. As the final coat of finish is applied, the workbench emerges as a testament to the dedication and attention to detail invested in its creation. It stands as a tangible representation of the DIY enthusiast's commitment to optimizing their workspace and elevating their projects.
Beyond its physical attributes, the workbench symbolizes a space where creativity flourishes, projects materialize, and skills are honed. It becomes the cornerstone of a workshop, a hub of productivity, and a canvas for innovation. The integration of shelves or drawers further enhances its functionality, providing convenient access to tools and materials while maintaining a clutter-free environment conducive to productivity.
Moreover, the personalized nature of the workbench allows individuals to tailor it to their specific needs and preferences, reflecting their unique style and workflow. Whether it's a sleek, minimalist design or a rugged, industrial-inspired workbench, each creation embodies the personality and vision of its maker, fostering a sense of ownership and pride in the workspace.
As the construction process concludes, the newly built workbench stands ready to support a myriad of projects, from woodworking and crafting to repairs and assembly. It embodies resilience, stability, and reliability, poised to facilitate a wide range of tasks with unwavering steadfastness.
In essence, the journey of building a workbench transcends the mere act of construction; it encapsulates the spirit of creativity, the pursuit of functionality, and the fulfillment of DIY aspirations. It represents the fusion of practicality and artistry, resulting in a workspace that not only serves as a utilitarian asset but also embodies the passion and dedication of its creator.