
Home>Create & Decorate>DIY & Crafts>How To Build A Canoe
DIY & Crafts
How To Build A Canoe
Published: April 14, 2024

Content Creator specializing in woodworking and interior transformations. Caegan's guides motivate readers to undertake their own projects, while his custom furniture adds a personal touch.
Learn how to build a canoe with step-by-step DIY instructions. Explore the best tips and techniques for crafting your own canoe at home. Perfect for DIY & Crafts enthusiasts!
(Many of the links in this article redirect to a specific reviewed product. Your purchase of these products through affiliate links helps to generate commission for Twigandthistle.com, at no extra cost. Learn more)
Introduction
So, you've always wanted to build your own canoe, huh? Well, you've come to the right place! Building your own canoe can be a rewarding and fulfilling experience. Not only will you have a unique and personalized watercraft, but you'll also gain a sense of accomplishment from creating something with your own two hands. Whether you're a seasoned DIY enthusiast or a newcomer to the world of home improvement, this guide will walk you through the process of building your very own canoe from start to finish. So, grab your tools and let's get started!
Choosing the Right Materials
When it comes to building a canoe, selecting the right materials is crucial for ensuring the durability and performance of your watercraft. Here are the key materials you'll need to gather:
1. Wood
Choose a lightweight and sturdy wood such as cedar, cypress, or pine for the frame and gunwales of your canoe. These woods are known for their strength and ability to withstand the elements.
2. Fiberglass or Canvas
For the hull of your canoe, you'll need to decide between using fiberglass or canvas. Fiberglass is a popular choice for its durability and low maintenance, while canvas can provide a more traditional look and feel.
3. Epoxy Resin
Epoxy resin is essential for sealing and waterproofing the hull of your canoe. It creates a protective barrier that helps to prevent water from seeping into the wood and adds strength to the hull.
4. Fasteners and Hardware
Gather stainless steel or brass screws, bolts, and other hardware to assemble the various components of your canoe. These materials are resistant to corrosion and will help ensure the longevity of your watercraft.
5. Protective Finishes
Consider using marine-grade varnish or paint to protect the wood and enhance the appearance of your canoe. These finishes will shield the wood from UV rays, moisture, and general wear and tear.
By carefully selecting high-quality materials, you can lay a solid foundation for the construction of your canoe, ensuring that it will stand the test of time and provide you with many enjoyable adventures on the water.
Designing Your Canoe
Designing your canoe is a crucial step that will determine the overall look, feel, and performance of your watercraft. Here are the key aspects to consider when designing your canoe:
-
Shape and Size: Decide on the dimensions of your canoe based on factors such as the intended use, the number of passengers, and the storage space available. Consider whether you want a sleek and speedy design for solo paddling or a more stable and spacious design for family outings.
-
Stability and Maneuverability: Balance the trade-off between stability and maneuverability based on your skill level and preferences. A wider hull provides greater stability, while a narrower hull offers improved maneuverability. Finding the right balance is essential for an enjoyable paddling experience.
-
Seating and Storage: Plan the seating arrangement and storage options within the canoe. Consider incorporating comfortable seats, adjustable foot braces, and ample storage compartments for gear, snacks, and other essentials.
-
Aesthetics: Think about the visual appeal of your canoe. You can add personal touches such as decorative wood inlays, custom paint or varnish designs, and even personalized decals or emblems to make your canoe uniquely yours.
-
Weight Distribution: Carefully consider the distribution of weight within the canoe to ensure optimal performance on the water. Balancing the weight of passengers and cargo will help maintain stability and maneuverability.
By carefully designing your canoe to meet your specific needs and preferences, you can create a watercraft that not only performs well but also reflects your individual style and personality.
Gathering Tools and Supplies
Before diving into the construction process, it's essential to gather all the necessary tools and supplies to ensure a smooth and efficient building experience. Here's a comprehensive list of the tools and supplies you'll need:
-
Measuring and Marking Tools:
- Tape measure
- Straightedge
- Pencil or marker
- Clamps
-
Cutting Tools:
- Hand saw or circular saw
- Jigsaw or bandsaw
- Block plane or spokeshave
- Utility knife
-
Shaping and Smoothing Tools:
- Wood rasp or file
- Sandpaper (various grits)
- Wood chisels
-
Assembly Tools:
- Cordless drill and drill bits
- Screwdriver set
- Clamps (various sizes)
-
Safety Gear:
- Safety goggles
- Ear protection
- Dust mask
-
Materials for Frame Construction:
- Selected wood for the frame
- Epoxy resin and hardener
- Wood glue
- Stainless steel or brass screws and fasteners
-
Materials for Hull Construction:
- Fiberglass cloth or canvas
- Epoxy resin and hardener
- Paintbrushes or rollers
- Mixing containers
-
Finishing Supplies:
- Marine-grade varnish or paint
- Paintbrushes or spray gun
- Sanding sealer
- Wood filler
-
Miscellaneous Supplies:
- Rags or lint-free cloths
- Disposable gloves
- Mixing sticks or paddles
- Shop towels or paper towels
By ensuring you have all the necessary tools and supplies on hand, you'll be well-prepared to tackle each stage of the canoe construction process with confidence and precision.
Constructing the Frame
Constructing the frame of your canoe is a critical step that forms the skeleton of your watercraft. Here's a detailed guide to help you through the process:
-
Cutting the Wood: Begin by cutting the selected wood into the required pieces for the frame, including the gunwales, ribs, and keel. Use a precise measuring tool and a sharp cutting tool to ensure accuracy and clean cuts.
-
Assembling the Gunwales: The gunwales are the long, topmost pieces that form the outer edges of the canoe. Lay out the gunwales and mark the locations for the ribs. Use clamps to hold the ribs in place and attach them securely to the gunwales using wood glue and screws.
-
Installing the Ribs: Position the ribs evenly along the length of the gunwales, ensuring they are spaced at regular intervals to provide structural support for the hull. Secure the ribs in place using wood glue and screws, making sure they are aligned perpendicular to the gunwales.
-
Attaching the Keel: The keel runs along the bottom centerline of the canoe and provides additional strength and stability. Carefully attach the keel to the underside of the ribs and secure it with screws and wood glue, ensuring it follows the curvature of the hull.
-
Shaping the Frame: Once the basic frame is assembled, use a wood rasp, file, and sandpaper to smooth the edges, remove any rough spots, and shape the frame to the desired contours. Pay close attention to the joints and transitions between components to ensure a seamless and sturdy frame.
-
Reinforcing the Joints: To reinforce the joints and add extra strength to the frame, consider applying additional layers of epoxy resin along the seams and connections. This will help create a solid bond and provide protection against water infiltration.
By following these steps, you can construct a robust and well-crafted frame for your canoe, setting the stage for the next phase of the construction process.
Attaching the Hull
Attaching the hull to the frame is a pivotal stage in the construction of your canoe, as it forms the watertight enclosure that allows your watercraft to glide smoothly through the water. Here's a step-by-step guide to help you through the process:
-
Prepare the Hull Material: If you've opted for fiberglass, cut the fiberglass cloth to the appropriate size, allowing for some overlap around the edges of the hull. If you've chosen canvas, ensure that it is properly sized to cover the entire hull with some excess material for trimming.
-
Apply Epoxy Resin: Lay the hull material over the assembled frame, ensuring it is centered and aligned. Using a paintbrush or roller, apply a generous coat of epoxy resin to the hull material, saturating it thoroughly. Work methodically to remove any air bubbles and ensure complete impregnation of the material.
-
Smooth and Secure the Hull: Carefully smooth out the hull material, pressing out any wrinkles or air pockets to achieve a tight and uniform fit. Use a squeegee or plastic spreader to remove excess resin and ensure a snug bond between the hull material and the frame.
-
Repeat the Process: If using fiberglass, apply additional layers of fiberglass cloth and epoxy resin as needed to achieve the desired strength and thickness. For canvas, a second layer of canvas can be applied for added durability.
-
Allow for Curing: Once the hull material is in place, allow the epoxy resin to cure according to the manufacturer's instructions. This typically involves a waiting period to ensure that the resin hardens and creates a strong, waterproof seal.
-
Trim and Finish: After the resin has cured, trim any excess hull material using a sharp utility knife, leaving a clean and tidy edge along the gunwales. Sand the edges to smooth out any rough spots and prepare the hull for the application of protective finishes.
By following these steps, you can effectively attach the hull to the frame of your canoe, creating a robust and watertight enclosure that is essential for the functionality and longevity of your watercraft.
Finishing Touches
After constructing the frame and attaching the hull, it's time to add the finishing touches to your canoe. This phase involves applying protective finishes and adding any additional features to enhance the aesthetics and functionality of your watercraft. Here's a detailed guide to help you complete this crucial stage of the construction process:
-
Applying Protective Finishes:
- Begin by sanding the entire surface of the canoe to create a smooth and even texture. Start with a coarse grit sandpaper and gradually progress to finer grits for a polished finish.
- Apply a sealing coat of marine-grade varnish or paint to protect the wood from moisture, UV rays, and general wear and tear. Use a high-quality paintbrush or a spray gun for an even application.
-
Decorative Elements:
- Consider adding decorative elements such as wood inlays, custom paint designs, or personalized decals to give your canoe a unique and personalized appearance. These decorative touches can showcase your individual style and make your canoe stand out on the water.
-
Installing Seats and Hardware:
- Install comfortable and durable seats within the canoe, ensuring they are securely attached to the frame. Consider adding adjustable foot braces and backrests for enhanced comfort during paddling.
- Attach any necessary hardware such as carrying handles, tie-downs, and cleats to the exterior of the canoe. These features add functionality and convenience for transporting and securing your watercraft.
-
Final Inspections:
- Conduct a thorough inspection of the entire canoe, checking for any rough spots, drips, or imperfections in the finishes. Make any necessary touch-ups to ensure a flawless and professional appearance.
-
Quality Assurance:
- Test the overall stability and balance of the canoe by gently rocking it from side to side. Ensure that the seats are securely fastened and that the hull is properly aligned with the frame.
-
Personalization:
- Consider adding a nameplate or carving your name into the wood to personalize your canoe and make it truly your own. This small detail can add a sentimental touch to your watercraft.
By completing these finishing touches, you can transform your canoe into a stunning and functional piece of craftsmanship that is ready to take on the waters with style and reliability.
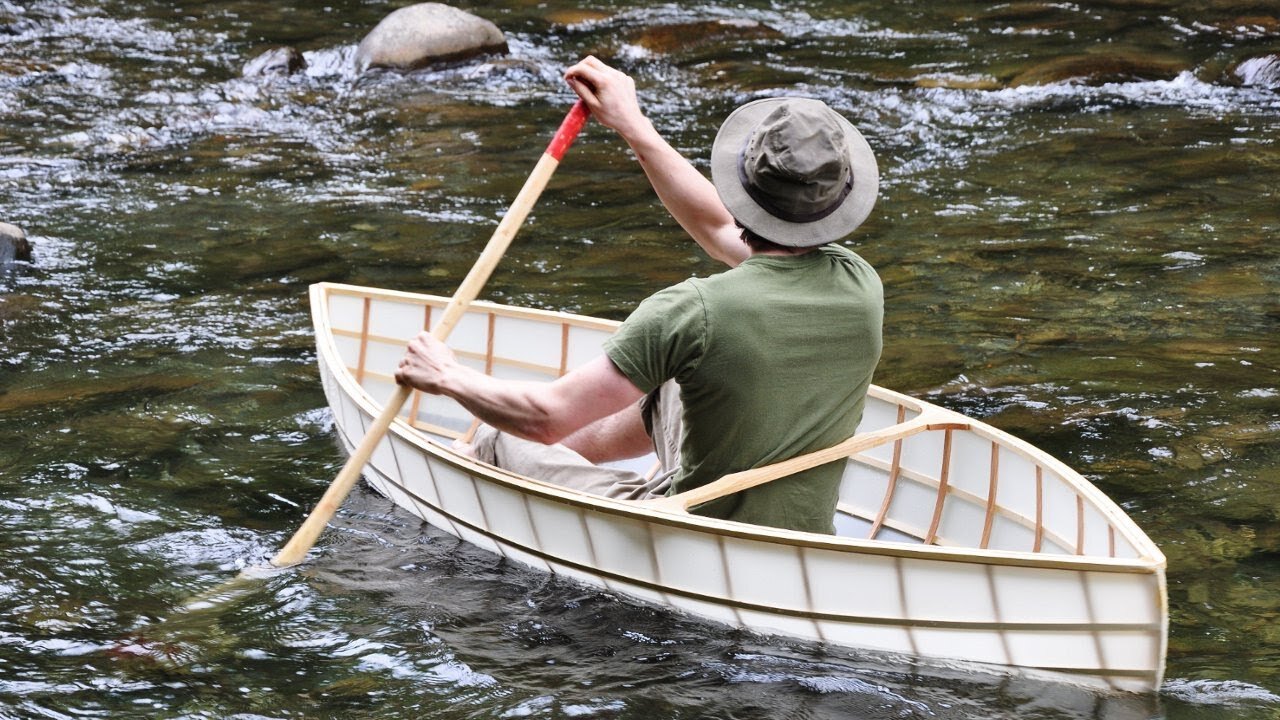
Launching and Testing Your Canoe
After putting in all the hard work and dedication to build your own canoe, the moment has finally arrived to launch it into the water and put it to the test. Here's a step-by-step guide to ensure a successful and enjoyable maiden voyage for your newly constructed watercraft:
-
Selecting the Launch Site: Choose a calm and gentle body of water for the initial launch of your canoe. Look for a location with minimal boat traffic and easy access to the water, such as a tranquil lake, slow-moving river, or sheltered cove.
-
Safety Preparations: Prior to launching, ensure that you have all the necessary safety equipment on board, including personal flotation devices (PFDs) for all passengers, a whistle or signaling device, and any additional safety gear required by local regulations.
-
Positioning the Canoe: Carefully position the canoe at the water's edge, ensuring that it is perpendicular to the shoreline. If possible, have a friend or helper assist you in gently lowering the canoe into the water to avoid any unnecessary strain.
-
Boarding the Canoe: Step into the canoe one foot at a time, maintaining a low center of gravity and keeping your weight centered as you find your balance. Once seated, distribute the weight evenly between the bow and stern to ensure stability.
-
Initial Paddling: Take a few gentle paddle strokes to get a feel for the responsiveness and handling of the canoe. Pay attention to how the canoe tracks, turns, and responds to your movements, making any necessary adjustments to your paddling technique.
-
Stability Testing: Gradually shift your weight from side to side to test the stability of the canoe. Get a sense of how it responds to weight shifts and movements, ensuring that it feels secure and balanced on the water.
-
Paddling Maneuvers: Practice various paddling maneuvers, such as forward strokes, turning strokes, and stopping techniques, to familiarize yourself with the handling characteristics of the canoe. Experiment with different paddle angles and strokes to gauge the responsiveness of the watercraft.
-
Observing for Leaks: Keep a close eye on the interior of the canoe for any signs of water seepage or leaks. While some initial seepage is normal as the wood and materials adjust to the water, excessive leakage may indicate a need for additional sealing or reinforcement.
-
Enjoying the Experience: Once you feel confident in the stability and performance of your canoe, take the time to savor the experience of paddling in your own handcrafted watercraft. Explore the surrounding waters, take in the scenery, and appreciate the fruits of your labor.
-
Returning to Shore: When you're ready to conclude the test run, carefully paddle back to the shore and disembark from the canoe. Take note of any observations or adjustments that may be needed for future outings, and congratulate yourself on a successful launch and test of your canoe.
By following these steps, you can ensure a smooth and rewarding experience when launching and testing your newly constructed canoe, setting the stage for many memorable adventures on the water.