
Home>Create & Decorate>DIY & Crafts>DIY Outdoor Tortoise Enclosure: Step-by-Step Guide
DIY & Crafts
DIY Outdoor Tortoise Enclosure: Step-by-Step Guide
Published: June 5, 2024

Content Creator specializing in woodworking and interior transformations. Caegan's guides motivate readers to undertake their own projects, while his custom furniture adds a personal touch.
Create a DIY outdoor tortoise enclosure with our step-by-step guide. Perfect for DIY & Crafts enthusiasts looking to build a safe and comfortable habitat for their pet tortoise.
(Many of the links in this article redirect to a specific reviewed product. Your purchase of these products through affiliate links helps to generate commission for Twigandthistle.com, at no extra cost. Learn more)
Introduction
Are you a proud tortoise owner looking to create a comfortable and safe outdoor space for your shelled friend? Building a DIY outdoor tortoise enclosure can be a rewarding project that provides your tortoise with a natural environment to thrive in. In this step-by-step guide, we will walk you through the process of planning, gathering materials, and constructing an outdoor tortoise enclosure that will keep your pet happy and healthy. Whether you're a seasoned DIY enthusiast or a beginner, this guide will help you create a fantastic outdoor habitat for your tortoise to enjoy. Let's get started!
Planning Your Outdoor Tortoise Enclosure
Before diving into the construction process, it's crucial to plan your outdoor tortoise enclosure thoroughly. Consider the following factors to ensure a suitable and safe environment for your tortoise:
-
Size and Space: Determine the size of the enclosure based on the number and size of your tortoises. As a general rule, provide at least 10 square feet of space per tortoise to allow for adequate movement and exploration.
-
Location: Choose a suitable location for the enclosure. Ensure it receives a good balance of sunlight and shade throughout the day. Avoid areas prone to flooding and predators.
-
Enclosure Design: Decide on the design and layout of the enclosure. Consider incorporating features such as hiding spots, basking areas, and varied terrain to mimic the tortoise's natural habitat.
-
Safety Measures: Plan for safety measures to prevent escapes and protect your tortoise from potential hazards. This may include burying fencing to deter digging and ensuring the enclosure is escape-proof.
By carefully planning these aspects, you can create an outdoor tortoise enclosure that meets your pet's needs while providing a safe and enriching environment.
Gathering Materials and Tools
Gathering the necessary materials and tools is a crucial step in preparing for the construction of your outdoor tortoise enclosure. Here's a comprehensive list to help you get started:
Materials:
- Lumber: Purchase untreated lumber to construct the frame and walls of the enclosure. Opt for rot-resistant wood species such as cedar or redwood for longevity.
- Hardware Cloth: This will be used to create the walls of the enclosure, providing ventilation and security. Ensure the mesh size is small enough to prevent predators from entering.
- Plywood or Solid Panels: These will be used to create the shelter and hiding spots within the enclosure.
- Outdoor-Safe Sealant or Paint: If you choose to paint or seal any wooden components, ensure the products are safe for outdoor use and non-toxic to your tortoise.
- Substrate: Select a suitable substrate such as topsoil, cypress mulch, or a mixture of both to create a comfortable and natural flooring for your tortoise.
- Plants: Choose tortoise-safe plants to add greenery and enrichment to the enclosure. Research tortoise-friendly species that are safe for consumption.
- Water Dish or Basin: Provide a shallow water dish or basin for your tortoise to drink from and soak in.
Tools:
- Measuring Tape and Level: Accurate measurements and leveling are essential for constructing a sturdy and well-built enclosure.
- Saw: A saw will be necessary for cutting lumber and plywood to the required dimensions.
- Drill and Screws: These will be used to assemble the frame and secure the hardware cloth to the structure.
- Staple Gun and Staples: Essential for attaching the hardware cloth to the frame securely.
- Paintbrushes or Sealant Applicators: If you choose to seal or paint any components, these tools will be necessary for application.
By gathering these materials and tools, you'll be well-prepared to begin the construction process and create a comfortable outdoor habitat for your tortoise.
Building the Frame
Building a sturdy and durable frame is the foundation of your outdoor tortoise enclosure. Follow these steps to construct a solid frame for the enclosure:
-
Cutting the Lumber: Begin by measuring and cutting the lumber to the desired lengths using a saw. Ensure that the dimensions align with your planned enclosure size and design.
-
Assembling the Base: Lay out the cut lumber to form the base of the frame. Use a measuring tape and level to ensure the corners are square and the base is level. Secure the pieces together using screws and a drill.
-
Adding Vertical Supports: Once the base is assembled, add vertical supports at regular intervals around the perimeter of the base. These supports will provide stability and structure for the walls of the enclosure.
-
Attaching Crossbeams: Install crossbeams across the top of the vertical supports to create a secure framework. This will help support the walls and roof of the enclosure.
-
Reinforcing Corners: To reinforce the corners and ensure the frame is sturdy, consider adding additional bracing or corner brackets as needed.
-
Checking for Stability: Once the frame is assembled, double-check for stability and make any necessary adjustments. The frame should be strong enough to support the walls and roof of the enclosure.
By following these steps, you can build a robust frame that forms the structural backbone of your outdoor tortoise enclosure. This solid foundation will support the remaining construction and ensure a safe and secure habitat for your tortoise.
Adding the Enclosure Walls
Once the frame is in place, the next step is to add the walls to enclose the outdoor tortoise habitat. Follow these steps to secure the enclosure walls:
-
Cutting the Hardware Cloth: Measure the dimensions of each side of the frame and cut the hardware cloth to fit. Use wire cutters to trim the mesh to the required size, ensuring it overlaps the frame slightly to allow for secure attachment.
-
Attaching the Hardware Cloth: Use a staple gun to attach the hardware cloth to the frame. Start at one corner and work your way around, pulling the mesh taut as you staple it in place. Ensure the mesh is securely fastened to prevent any gaps or loose sections.
-
Securing Corners and Edges: Pay special attention to the corners and edges of the enclosure walls. Fold and secure the edges of the hardware cloth to prevent any sharp or exposed edges that could pose a risk to your tortoise.
-
Inspecting for Weak Points: Once the hardware cloth is attached, inspect the walls for any weak points or areas that may need additional reinforcement. Address any issues promptly to ensure the walls are predator-proof and escape-proof.
-
Adding Access Points: If desired, create access points such as doors or removable panels in the walls to allow for easy entry and maintenance of the enclosure. Ensure these access points are secure when closed to prevent any potential escapes.
By following these steps, you can effectively add sturdy and secure walls to your outdoor tortoise enclosure, providing a safe and protected environment for your pet to enjoy.
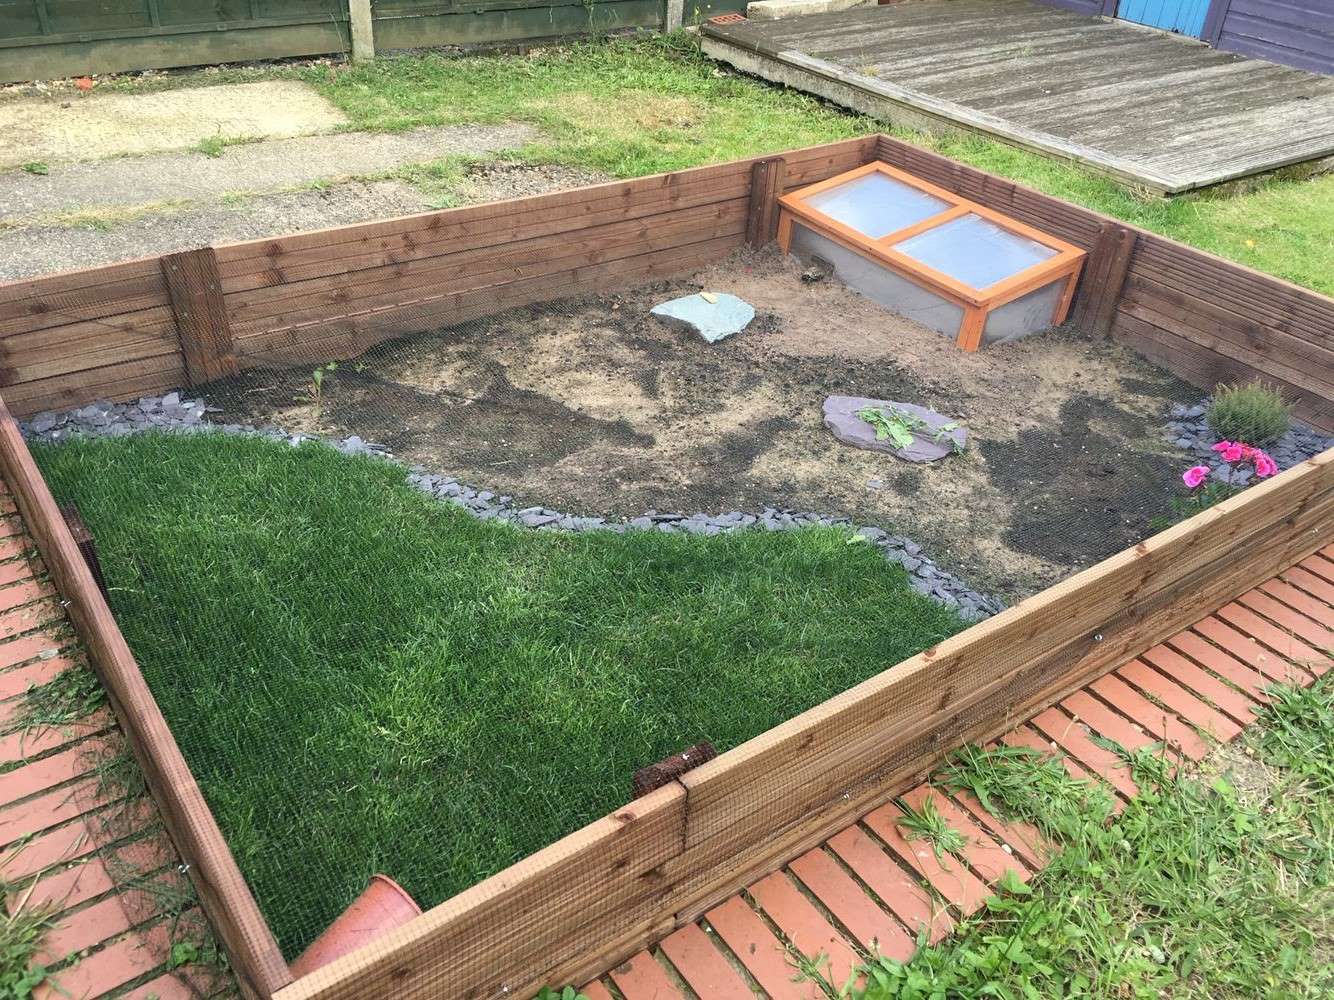
Creating a Shelter and Hiding Spots
Creating a shelter and providing hiding spots within the outdoor tortoise enclosure is essential for meeting the natural behavioral and physiological needs of your tortoise. Here's how to incorporate shelters and hiding spots into the enclosure:
-
Building a Shelter: Construct a shelter within the enclosure using plywood or solid panels. The shelter should provide protection from the elements and a secure retreat for your tortoise. Ensure the shelter is spacious enough to accommodate all tortoises in the enclosure and has a sturdy roof to offer shade and protection from rain.
-
Adding Entrances and Exits: Create multiple entrances and exits in the shelter to allow easy access for your tortoise. These openings should be large enough for the tortoise to enter and exit comfortably. Consider incorporating ramps or gentle slopes to facilitate movement in and out of the shelter.
-
Incorporating Hiding Spots: Place additional hiding spots throughout the enclosure to provide your tortoise with options for privacy and security. Use natural materials such as rocks, logs, and plant cover to create secluded areas where your tortoise can retreat and feel safe.
-
Creating Varied Terrain: Introduce varied terrain within the enclosure to offer natural hiding spots and exploration opportunities for your tortoise. Incorporate mounds, low walls, and plantings to create a diverse landscape that encourages natural behaviors.
-
Ensuring Adequate Ventilation: When designing the shelter and hiding spots, ensure there is adequate ventilation to prevent the buildup of heat and humidity. Proper airflow is crucial for maintaining a comfortable and healthy environment for your tortoise.
By incorporating shelters and hiding spots into the outdoor tortoise enclosure, you can create a habitat that meets your pet's instinctual needs for security, privacy, and exploration. These features contribute to the overall well-being and contentment of your tortoise in its outdoor environment.
Adding Substrate and Plants
When it comes to creating a natural and enriching environment for your outdoor tortoise enclosure, adding suitable substrate and plants is crucial. The substrate serves as the flooring of the enclosure, providing a comfortable surface for your tortoise to walk on, dig in, and even burrow into. Additionally, incorporating tortoise-safe plants not only adds visual appeal to the enclosure but also offers natural grazing opportunities and enrichment for your tortoise.
Selecting the Right Substrate
Choosing the appropriate substrate for your tortoise enclosure is essential for promoting natural behaviors and maintaining a healthy environment. Consider using a combination of topsoil and cypress mulch to create a suitable substrate. The topsoil provides a natural and soft surface for your tortoise to walk on, while the cypress mulch helps with moisture retention and odor control. Ensure the substrate layer is deep enough to allow for digging and burrowing, typically around 4-6 inches deep.
Planting Tortoise-Safe Vegetation
Introducing tortoise-friendly plants into the enclosure not only adds aesthetic value but also provides natural grazing opportunities for your tortoise. Research and select plant species that are safe for tortoises to consume and are well-suited for the local climate. Some examples of tortoise-safe plants include hibiscus, mulberry, grapevine, and various types of grasses and succulents. These plants not only offer visual interest but also contribute to the overall well-being of your tortoise by providing natural foraging opportunities.
Creating a Natural Landscape
When adding substrate and plants to the enclosure, aim to create a diverse and natural landscape that mimics the tortoise's native habitat. Incorporate different textures, heights, and colors of plants to provide visual interest and stimulation for your tortoise. Additionally, consider adding rocks, logs, and other natural elements to create a varied and engaging environment. This diverse landscape encourages natural behaviors such as exploration, foraging, and basking, contributing to your tortoise's overall well-being.
Maintaining the Substrate and Plants
Regular maintenance of the substrate and plants is essential to ensure a clean and healthy environment for your tortoise. Periodically check the substrate for moisture levels, spot clean any waste, and replace soiled substrate as needed. When it comes to the plants, monitor their growth and trim them as necessary to prevent overgrowth and maintain a well-groomed enclosure. By staying on top of maintenance, you can ensure that the substrate and plants continue to provide a comfortable and enriching environment for your tortoise.
By carefully selecting and incorporating suitable substrate and plants into the outdoor tortoise enclosure, you can create a natural and stimulating habitat that promotes your tortoise's well-being and allows for natural behaviors to flourish.
Installing a Water Source
Ensuring access to clean water is essential for the health and well-being of your tortoise. When installing a water source in the outdoor tortoise enclosure, consider the following steps to provide a safe and accessible watering area for your pet:
-
Selecting a Suitable Water Dish or Basin: Choose a shallow and sturdy water dish or basin that is large enough for your tortoise to soak in and drink from comfortably. Avoid deep containers to prevent the risk of drowning, especially for smaller tortoise species.
-
Placement within the Enclosure: Position the water dish or basin in a shaded area of the enclosure to prevent overheating and evaporation. Ensure that the water source is easily accessible to your tortoise but placed in a location that minimizes the risk of contamination from substrate or debris.
-
Monitoring Water Quality: Regularly check and refresh the water in the dish to maintain cleanliness and freshness. Tortoises may defecate or kick substrate into the water, so frequent monitoring and cleaning are necessary to ensure a hygienic water source.
-
Providing Soaking Opportunities: If your tortoise species benefits from soaking, ensure that the water dish is large enough to allow for soaking. Soaking can aid in hydration and help with shedding for certain tortoise species.
-
Preventing Accidental Tipping: To prevent the water dish from being tipped over by the tortoise, consider securing it in place or selecting a heavy, stable dish that is difficult to overturn.
By following these steps, you can effectively install a suitable water source within the outdoor tortoise enclosure, providing your pet with access to clean water for hydration and soaking. Regular monitoring and maintenance of the water source are essential to ensure a healthy and comfortable environment for your tortoise.
Adding Final Touches and Safety Measures
As you near the completion of your DIY outdoor tortoise enclosure, it's time to add the final touches and implement essential safety measures to ensure a secure and enriching habitat for your tortoise. These finishing touches and safety measures are crucial for maintaining the well-being of your pet and safeguarding the enclosure from potential hazards.
Final Touches
-
Decorative Elements: Enhance the visual appeal of the enclosure by adding natural decorative elements such as rocks, branches, and non-toxic ornaments. These elements not only contribute to the aesthetic appeal of the enclosure but also provide additional enrichment for your tortoise.
-
Basking and UVB Lighting: If your tortoise species requires access to basking and UVB lighting, install suitable fixtures within the enclosure. Position the lighting sources to provide a designated basking area where your tortoise can regulate its body temperature and receive essential UVB rays for calcium metabolism.
-
Enrichment Items: Introduce enrichment items such as tortoise-safe toys, puzzle feeders, and interactive elements to stimulate your tortoise's natural behaviors and prevent boredom. These items can include balls, tunnels, and foraging opportunities to keep your tortoise mentally and physically engaged.
-
Signage and Information: Consider adding informative signage near the enclosure to educate visitors and caretakers about the specific needs and behaviors of your tortoise. This can include details about the tortoise species, dietary requirements, and guidelines for interacting with the enclosure.
Safety Measures
-
Predator-Proofing: Inspect the enclosure for any potential entry points for predators and reinforce the structure as needed. Ensure that the walls, flooring, and access points are secure and predator-proof to protect your tortoise from potential threats.
-
Escape Prevention: Double-check the enclosure for any gaps, weak spots, or potential escape routes. Bury fencing or hardware cloth along the perimeter to deter digging and prevent your tortoise from escaping the enclosure.
-
Toxic Plant Avoidance: Ensure that all plants within the enclosure are non-toxic and safe for tortoises. Research and remove any potentially harmful plants that could pose a risk if ingested by your pet.
-
Temperature Regulation: Implement measures to regulate temperature within the enclosure, especially during extreme weather conditions. Provide shaded areas, shelters, and thermal gradients to allow your tortoise to seek out the most comfortable temperature zones.
-
Regular Inspections: Commit to regular inspections of the enclosure to identify and address any maintenance or safety concerns promptly. This includes checking for wear and tear, loose components, and any potential hazards that may compromise the integrity of the enclosure.
By incorporating these final touches and safety measures, you can ensure that your outdoor tortoise enclosure is not only visually appealing and enriching but also provides a safe and secure environment for your beloved tortoise to thrive in.
Conclusion
In conclusion, constructing a DIY outdoor tortoise enclosure is a fulfilling endeavor that allows you to provide a natural and enriching habitat for your tortoise. By carefully planning the enclosure, gathering the necessary materials and tools, and following the step-by-step construction process, you can create a safe and comfortable outdoor space for your shelled companion. From building a sturdy frame to adding substrate, plants, and essential features such as water sources and shelters, each step contributes to the overall well-being and happiness of your tortoise.
As you put the finishing touches on the enclosure and implement safety measures, you are not only creating a secure environment for your tortoise but also enhancing the visual appeal and functionality of the habitat. The final touches, including decorative elements, enrichment items, and informative signage, add a personalized touch to the enclosure while promoting mental and physical stimulation for your tortoise.
It's important to remember that the well-being of your tortoise is a top priority, and regular maintenance, monitoring, and adjustments to the enclosure are necessary to ensure a safe and comfortable environment. By staying attentive to your tortoise's needs and the condition of the enclosure, you can provide a space where your pet can thrive and exhibit natural behaviors.
Ultimately, the DIY outdoor tortoise enclosure serves as a testament to your dedication to providing the best possible care for your tortoise. It offers a space where your pet can bask, explore, and enjoy a natural environment that closely resembles its native habitat. With the completion of the enclosure, you can take pride in knowing that you have created a wonderful outdoor sanctuary for your tortoise to call home.