
Home>Create & Decorate>DIY & Crafts>DIY Trash Can Enclosure: How To Build A Stylish And Functional Solution
DIY & Crafts
DIY Trash Can Enclosure: How To Build A Stylish And Functional Solution
Published: May 15, 2024

Senior Editor in Create & Decorate, Kathryn combines traditional craftsmanship with contemporary trends. Her background in textile design and commitment to sustainable crafts inspire both content and community.
Discover how to create a stylish and practical DIY trash can enclosure with our step-by-step guide. Perfect for your outdoor space. Ideal for DIY & Crafts enthusiasts.
(Many of the links in this article redirect to a specific reviewed product. Your purchase of these products through affiliate links helps to generate commission for Twigandthistle.com, at no extra cost. Learn more)
Introduction
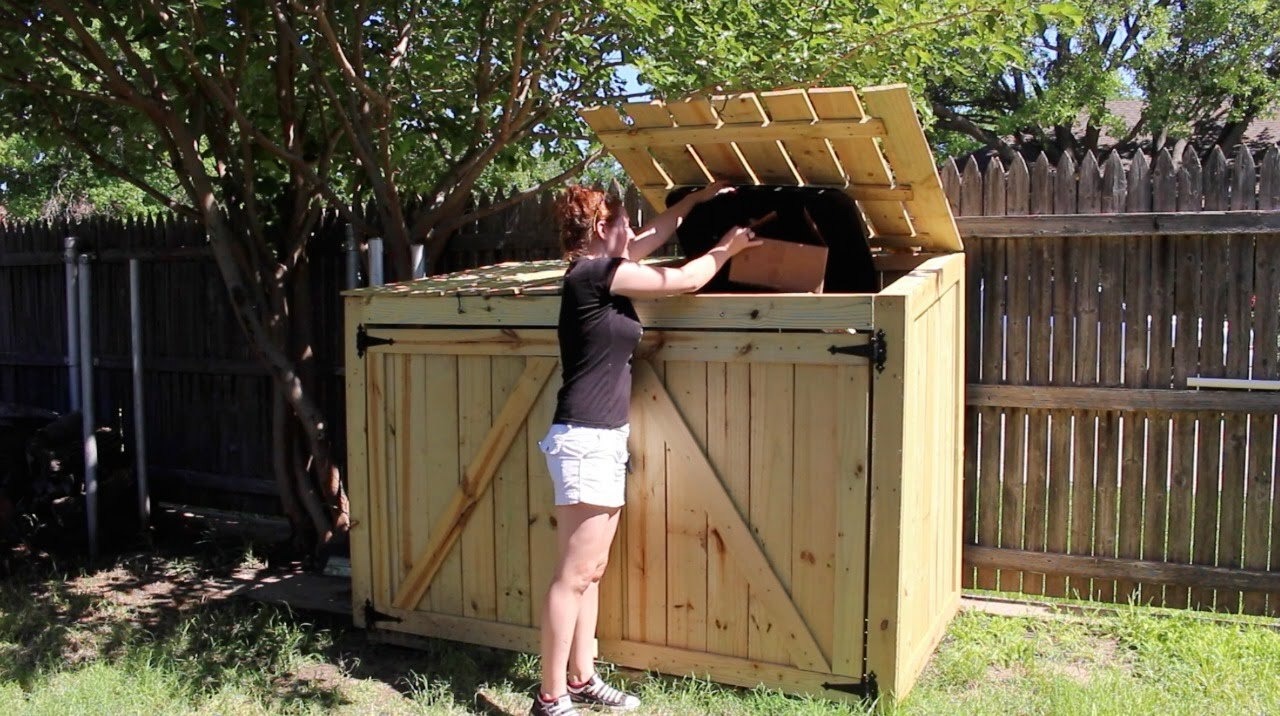
So, you're tired of looking at your unsightly trash cans cluttering up your yard, and you've decided it's time to do something about it. Building a DIY trash can enclosure is a fantastic solution to keep your garbage cans out of sight while adding a touch of style to your outdoor space. In this article, we'll guide you through the process of creating a stylish and functional trash can enclosure that will not only keep your yard looking tidy but also add a decorative element to your home's exterior. Let's dive into the steps to transform your trash can area from an eyesore to an attractive feature of your property.
Planning Your DIY Trash Can Enclosure
Before you start building your DIY trash can enclosure, it's essential to plan out the details to ensure that the end result meets your needs and complements your outdoor space. Here are the key steps to consider when planning your trash can enclosure:
-
Determine the Location: First, decide where you want to place the enclosure in your yard. Consider factors such as accessibility, visibility from the street or neighboring properties, and proximity to your home.
-
Measure the Space: Take accurate measurements of the area where the enclosure will be located. This will help you determine the appropriate size for the enclosure and ensure that it fits comfortably in the designated space.
-
Check Local Regulations: Before you begin construction, check with your local municipality or homeowners' association to ensure that you comply with any regulations or guidelines regarding the construction of outdoor structures.
-
Consider Design and Materials: Think about the overall design and style you want for your enclosure. Consider materials that will withstand the elements and complement your home's exterior, such as wood, vinyl, or metal.
-
Functionality: Determine how many trash cans you need to accommodate in the enclosure and plan for easy access when it's time to take out the trash. Consider adding features such as hinged doors or removable panels for convenient use.
By carefully planning these aspects, you'll set the stage for a successful DIY trash can enclosure project that meets both your practical and aesthetic needs.
Gathering Materials and Tools
When it comes to gathering materials and tools for your DIY trash can enclosure project, it's crucial to have everything you need on hand before you start construction. Here's a comprehensive list of materials and tools you'll likely need:
Materials
- Lumber: Purchase pressure-treated or weather-resistant lumber for the frame and siding of the enclosure. The quantity will depend on the size of the enclosure you're building.
- Hardware: Stock up on exterior-grade screws, hinges, and latches to assemble the enclosure securely.
- Siding: Choose durable and weather-resistant siding material such as cedar boards, vinyl panels, or composite planks to clad the exterior of the enclosure.
- Concrete: If you're planning to set posts in the ground for the enclosure, you'll need concrete mix for secure installation.
- Gravel or Pavers: Consider using gravel or pavers as a base for the enclosure to provide stability and drainage.
Tools
- Circular Saw: A circular saw will be essential for cutting lumber and siding to the required dimensions.
- Drill/Driver: Invest in a reliable drill/driver to pre-drill holes and drive screws during assembly.
- Level: Ensure your enclosure is plumb and level by using a spirit level throughout the construction process.
- Post Hole Digger: If you're setting posts in the ground, a post hole digger will make the task much easier.
- Measuring Tape: Accurate measurements are crucial, so a quality measuring tape is a must-have tool.
- Safety Gear: Don't forget safety glasses, work gloves, and hearing protection to keep yourself safe during construction.
By gathering all the necessary materials and tools in advance, you'll be well-prepared to tackle the construction of your DIY trash can enclosure without unnecessary interruptions or delays.
Building the Frame
Building the frame is a critical step in constructing your DIY trash can enclosure, as it provides the structure and support for the entire enclosure. Follow these steps to build a sturdy and durable frame for your trash can enclosure:
-
Cutting the Lumber: Begin by cutting the pressure-treated lumber to the required dimensions for the frame components. Use a circular saw to make precise cuts, ensuring that the pieces fit together seamlessly.
-
Assembling the Posts: If your design includes corner posts, start by setting them in the ground at the designated locations. Use a post hole digger to create holes of the appropriate depth, then secure the posts in place with concrete for stability.
-
Constructing the Frame: With the corner posts in place, attach horizontal and vertical members to form the frame structure. Use exterior-grade screws to secure the pieces together, ensuring that the frame is square and level as you work.
-
Adding Cross Braces: For added stability, consider adding diagonal cross braces within the frame. These braces will help prevent the enclosure from shifting or becoming misshapen over time, especially in areas prone to high winds or inclement weather.
-
Checking for Stability: Once the frame is fully assembled, double-check for stability and structural integrity. Make any necessary adjustments to ensure that the frame is solid and able to support the weight of the siding and any additional features you plan to include.
By carefully constructing a robust frame for your trash can enclosure, you'll create a solid foundation for the rest of the construction process, ensuring that your enclosure stands the test of time and effectively conceals your trash cans in a stylish and functional manner.
Adding Siding and Finishing Touches
Once the frame of your DIY trash can enclosure is in place, it's time to add the siding and incorporate those finishing touches that will elevate the appearance and functionality of the structure. Follow these steps to complete the enclosure with siding and thoughtful details:
-
Selecting the Siding: Choose the siding material that best suits your design and climate. Options such as cedar boards, vinyl panels, or composite planks offer durability and weather resistance. Consider the aesthetic appeal and maintenance requirements of each material before making your selection.
-
Cutting and Installing the Siding: Measure and cut the siding to fit the dimensions of the frame. Secure the siding to the frame using appropriate fasteners, ensuring that each piece is level and properly aligned with the adjacent panels. Take care to leave adequate ventilation and drainage space to prevent moisture buildup within the enclosure.
-
Adding Decorative Elements: Enhance the visual appeal of the enclosure by incorporating decorative elements such as trim, moldings, or lattice panels. These details can add a touch of elegance to the structure while also serving practical purposes, such as providing ventilation or concealing hardware.
-
Finishing the Exterior: Apply a weather-resistant finish or paint to the exterior of the enclosure to protect the siding from the elements and enhance its longevity. Choose a color that complements your home's exterior or adds a pop of personality to your outdoor space.
-
Incorporating Functional Features: Consider adding features such as hinged doors, lift-up lids, or access panels to ensure easy and convenient access to your trash cans. These functional elements can make the enclosure more user-friendly while maintaining its sleek appearance.
By carefully adding siding and attending to the finishing touches, you'll transform the basic frame into a stylish and functional trash can enclosure that seamlessly integrates with your outdoor environment. The attention to detail in this phase will contribute to the overall aesthetic appeal and practicality of the finished structure.
Installing the Enclosure in Your Yard
With the construction of your DIY trash can enclosure complete, the final step is to install it in your yard. Proper installation ensures that the enclosure is secure, stable, and positioned in a way that maximizes its functionality and aesthetic impact. Follow these steps to successfully install the enclosure in your yard:
-
Preparing the Site: Begin by clearing the area where the enclosure will be placed. Remove any debris, rocks, or vegetation that may interfere with the installation process. Ensure that the ground is level and compacted to provide a stable foundation for the enclosure.
-
Positioning the Enclosure: Carefully position the completed enclosure in the designated location within your yard. Enlist the help of a friend or family member to assist with lifting and maneuvering the structure, especially if it is large or heavy.
-
Anchoring the Enclosure: Depending on the design of your enclosure, you may need to anchor it to the ground for added stability. Use appropriate hardware such as ground anchors, stakes, or concrete footings to secure the enclosure in place. Ensure that it is level and plumb before finalizing the anchoring process.
-
Connecting Utilities (if applicable): If your enclosure includes features such as lighting or a hinged door with a lock, you may need to connect utilities such as electrical wiring or hardware for the locking mechanism. Exercise caution and follow safety guidelines when working with electrical components.
-
Landscaping Around the Enclosure: Once the enclosure is securely installed, consider landscaping around it to integrate the structure with the surrounding environment. Planting shrubs, flowers, or ornamental grasses around the enclosure can soften its appearance and create a cohesive look in your yard.
-
Final Inspection: Take a step back and conduct a final inspection of the installed enclosure. Ensure that it is positioned as desired, securely anchored, and free from any potential hazards. Make any necessary adjustments to guarantee that the enclosure is both visually appealing and fully functional.
By following these steps, you can ensure that your DIY trash can enclosure is expertly installed in your yard, ready to keep your trash cans neatly concealed while enhancing the overall appearance of your outdoor space.
Conclusion
In conclusion, building a DIY trash can enclosure is a rewarding project that not only addresses the practical need to conceal unsightly trash cans but also allows you to enhance the visual appeal of your outdoor space. By carefully planning the location, size, and design of the enclosure, gathering the necessary materials and tools, constructing a sturdy frame, adding durable siding and finishing touches, and expertly installing the enclosure in your yard, you can create a stylish and functional solution that complements your home's exterior.
With the right approach and attention to detail, your DIY trash can enclosure can become a standout feature of your property, seamlessly blending with your landscaping and contributing to a tidy and organized outdoor environment. Whether you opt for a classic wooden design, a modern vinyl-clad enclosure, or a custom creation that reflects your unique style, the end result will be a practical and visually appealing addition to your home.
So, roll up your sleeves, gather your materials, and get ready to transform your trash can area from an eyesore into an attractive and functional space that you can be proud of. With the guidance provided in this article, you're well-equipped to embark on this DIY project and enjoy the benefits of a stylish and efficient trash can enclosure in your yard.