
Home>Create & Decorate>DIY & Crafts>How To Build An Owl House
DIY & Crafts
How To Build An Owl House
Published: June 14, 2024

Senior Editor in Create & Decorate, Kathryn combines traditional craftsmanship with contemporary trends. Her background in textile design and commitment to sustainable crafts inspire both content and community.
Learn how to build an owl house with this DIY & Crafts guide. Create a cozy home for owls in your backyard and enjoy the beauty of nature. Start your project today!
(Many of the links in this article redirect to a specific reviewed product. Your purchase of these products through affiliate links helps to generate commission for Twigandthistle.com, at no extra cost. Learn more)
Introduction
So, you want to attract some wise old owls to your backyard? Building an owl house is a great way to provide a safe and cozy home for these nocturnal creatures. Not only will you be helping to conserve the owl population, but you'll also get the chance to observe these fascinating birds up close. In this article, we'll guide you through the process of building an owl house step by step. Whether you're a seasoned DIY enthusiast or a beginner, we've got you covered. Let's dive in and get started on creating a welcoming abode for our feathered friends!
Selecting the Right Location
When it comes to selecting the right location for your owl house, placement is key. Here are some tips to help you choose the perfect spot:
-
Privacy: Owls prefer quiet and secluded areas, so it's essential to place the owl house away from human activity and noise. A peaceful environment will make the owls feel safe and secure.
-
Height: Mount the owl house at an appropriate height. It should be at least 10 to 20 feet above the ground to protect the owls from predators and provide them with a clear view of their surroundings.
-
Orientation: Position the entrance hole of the owl house away from prevailing winds and direct sunlight. This will help regulate the temperature inside the house and protect the owls from extreme weather conditions.
-
Accessibility: Ensure that the owl house is easily accessible for maintenance and monitoring. You may need to clean the house or check on the inhabitants, so make sure it's within reach.
By carefully considering these factors, you can create an inviting and safe habitat for the owls in your area.
Choosing the Right Materials
Selecting the right materials for your owl house is crucial to ensure its durability and the comfort of its inhabitants. Here's what you'll need:
1. Wood
Choose untreated, rough-surfaced wood such as cedar or pine. These types of wood are durable and provide a natural grip for the owls as they enter and exit the house.
2. Fasteners
Opt for galvanized screws and nails to assemble the owl house. These materials are resistant to corrosion and will hold the structure together securely.
3. Roofing Material
For the roof, consider using asphalt shingles or metal to provide adequate protection from the elements. Ensure that the roofing material is waterproof and can withstand harsh weather conditions.
4. Non-Toxic Paint or Stain
If you decide to paint or stain the owl house for aesthetic purposes, make sure to use non-toxic products. The chemicals in some paints and stains can be harmful to the owls, so it's essential to prioritize their safety.
5. Insulation
To provide insulation and regulate the temperature inside the owl house, consider adding a layer of wood shavings or straw to the interior. This will help keep the owls warm during colder months.
By choosing the right materials, you can construct a sturdy and comfortable owl house that will stand the test of time and provide a welcoming home for these majestic birds.
Building the Owl House
Now that you have selected the perfect location and gathered all the necessary materials, it's time to roll up your sleeves and start building the owl house. Follow these steps to construct a cozy dwelling for your feathered friends:
-
Cutting the Wood: Begin by cutting the wood into the required pieces according to the dimensions of the owl house plan. Use a saw to carefully cut the panels for the walls, floor, roof, and entrance hole.
-
Assembling the Walls: Once the wood is cut, assemble the walls of the owl house using galvanized screws or nails. Ensure that the walls are securely attached to each other to form a sturdy structure.
-
Adding the Roof: Attach the roof to the top of the owl house, making sure it overhangs the walls slightly to provide protection from rain and snow. Use waterproof roofing material such as asphalt shingles or metal to shield the interior from the elements.
-
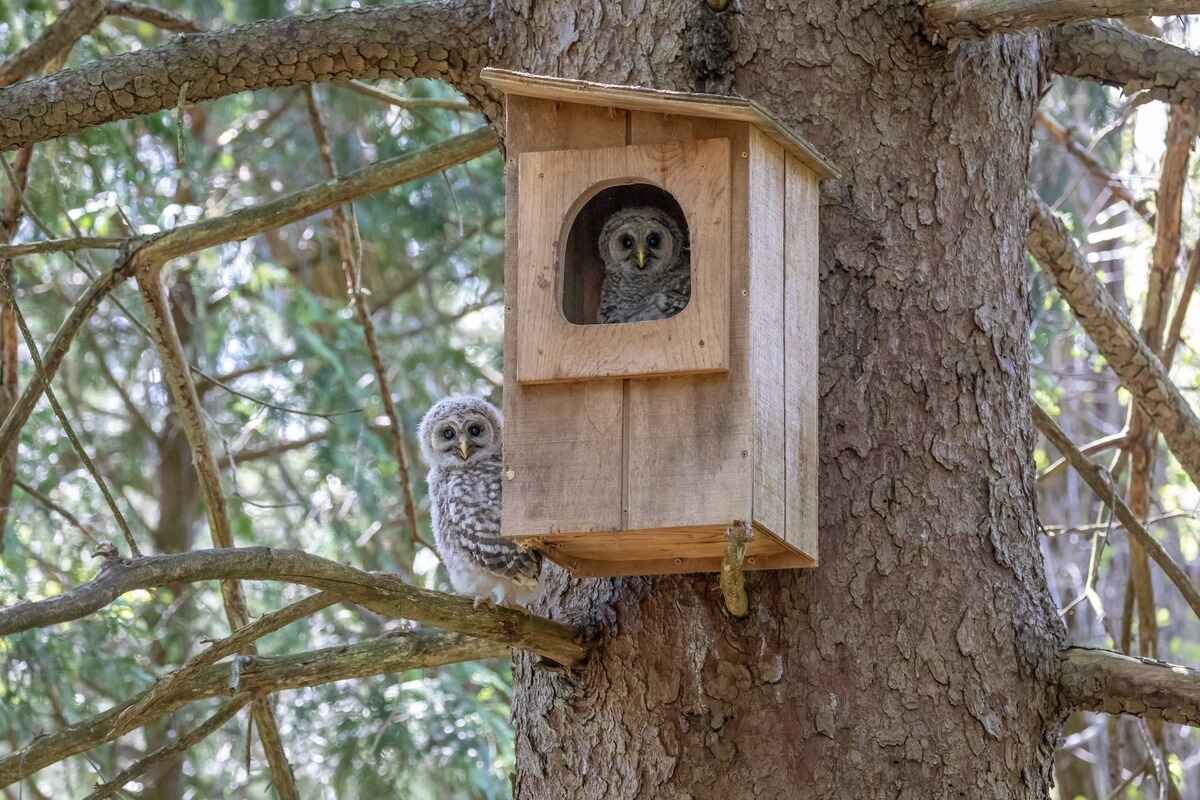
Creating the Entrance: Carefully carve out an entrance hole in one of the walls, making sure it is the appropriate size for the owl species you are hoping to attract. The entrance hole should be smooth to prevent any injuries to the owls as they come and go.
-
Installing the Perch: To assist the owls with landing and taking off, add a small perch below the entrance hole. This will give the owls a place to rest and survey their surroundings before entering the house.
-
Adding Insulation: If you live in an area with cold winters, consider adding insulation to the interior of the owl house. A layer of wood shavings or straw can help keep the owls warm during chilly nights.
-
Applying Finishing Touches: If desired, you can paint or stain the exterior of the owl house with non-toxic products to enhance its appearance. However, it's important to prioritize the safety of the owls when choosing any finishing materials.
By following these steps, you can construct a well-built and inviting owl house that will provide a safe and comfortable habitat for these magnificent birds.
Installing the Owl House
After you have successfully built the owl house, the next crucial step is to install it in the chosen location. Follow these steps to ensure a secure and proper installation:
-
Gathering the Necessary Tools: Before you begin, gather the tools you'll need, including a ladder, screws, and a drill. Having everything on hand will make the installation process smoother and more efficient.
-
Choosing the Mounting Surface: Select a sturdy and stable surface for mounting the owl house. A tree or a pole can be suitable options, ensuring that the house is at the recommended height and away from potential predators.
-
Positioning the Owl House: With the help of a ladder, carefully position the owl house in the chosen location. Ensure that it is facing the right direction, with the entrance hole away from prevailing winds and direct sunlight.
-
Securing the Owl House: Once the owl house is in the desired position, use screws and a drill to securely attach it to the mounting surface. Make sure the house is stable and can withstand strong winds and other environmental factors.
-
Monitoring the Installation: After the owl house is installed, monitor it regularly to ensure that it remains secure and undisturbed. Check for any signs of damage or shifting, and make any necessary adjustments to maintain its stability.
By following these steps, you can ensure that the owl house is installed securely and ready to provide a safe and welcoming home for the owls in your area.
Maintaining the Owl House
Proper maintenance is essential to ensure that the owl house remains a safe and comfortable habitat for its inhabitants. Here are some important steps to follow when maintaining the owl house:
-
Regular Cleaning: Schedule regular cleanings of the owl house to remove any debris, old nesting materials, or droppings. Use a gentle brush or scraper to clean the interior surfaces, taking care not to disturb any existing nests or eggs.
-
Monitoring the Inhabitants: Keep an eye on the owl house to monitor the activity of its inhabitants. This can provide valuable insights into the health and behavior of the owls, allowing you to intervene if necessary.
-
Repairing Damage: Inspect the owl house for any signs of damage, such as loose panels, cracks, or leaks. Repair any damage promptly to maintain the structural integrity of the house and protect the owls from the elements.
-
Replacing Nesting Materials: If the nesting materials inside the owl house become soiled or worn out, consider replacing them with fresh, clean materials. This will provide a comfortable and hygienic environment for the owls to raise their young.
-
Preventing Predators: Take measures to deter potential predators from accessing the owl house. This may include installing predator guards on nearby trees or poles, or using motion-activated lights to discourage nocturnal predators.
-
Seasonal Inspections: Conduct seasonal inspections of the owl house to ensure that it remains secure and well-maintained. Check for any signs of wear and tear, and make any necessary repairs or adjustments.
By following these maintenance practices, you can ensure that the owl house continues to provide a safe and inviting home for the owls in your area. Regular upkeep will help to support the local owl population and provide you with the opportunity to observe these fascinating birds in their natural habitat.