
Home>Create & Decorate>DIY & Crafts>DIY Pergola: How To Build An Attached Structure To Your House
DIY & Crafts
DIY Pergola: How To Build An Attached Structure To Your House
Published: April 13, 2024

Senior Editor in Create & Decorate, Kathryn combines traditional craftsmanship with contemporary trends. Her background in textile design and commitment to sustainable crafts inspire both content and community.
Learn how to build a DIY pergola attached to your house with our step-by-step guide. Perfect for DIY & Crafts enthusiasts.
(Many of the links in this article redirect to a specific reviewed product. Your purchase of these products through affiliate links helps to generate commission for Twigandthistle.com, at no extra cost. Learn more)
Introduction
So, you've been dreaming of a cozy outdoor space where you can relax, entertain, and enjoy the fresh air. A DIY pergola attached to your house might just be the perfect addition to your home. Not only does it provide a shaded area for outdoor activities, but it also adds a touch of elegance and charm to your property. In this guide, we'll walk you through the step-by-step process of building an attached pergola, from planning and designing to adding the finishing touches. Whether you're a seasoned DIY enthusiast or a beginner looking for a new project, this guide will equip you with the knowledge and confidence to create your own stunning outdoor retreat.
Planning and Designing Your Pergola
Before you start swinging hammers and driving nails, it's crucial to put some thought into the planning and design of your pergola. Here's how to get started:
-
Determine the Purpose: First, consider how you intend to use your pergola. Will it be a cozy spot for outdoor dining, a tranquil reading nook, or a space for entertaining guests? Understanding its primary function will help you make design decisions.
-
Choose a Location: Survey your outdoor space and select the ideal spot for your pergola. Consider factors such as sunlight, shade, and proximity to your house. You'll want a location that complements your home's architecture and provides the desired level of comfort.
-
Select a Design and Style: Pergolas come in various shapes and styles, from classic to modern. Decide on the architectural style that best suits your home and personal taste. Consider elements such as the roof structure, column design, and decorative details.
-
Take Measurements: Measure the chosen location carefully to determine the dimensions of your pergola. This step is crucial for creating a design that fits seamlessly into your outdoor space.
-
Create a Detailed Plan: Once you have a clear vision of your pergola, it's time to put your ideas on paper. Create a detailed plan or blueprint that includes precise measurements, materials, and a comprehensive design layout. This plan will serve as your roadmap during the construction phase.
By investing time in the planning and design phase, you'll set the stage for a successful and visually appealing pergola that enhances your outdoor living experience.
Obtaining Necessary Permits and Permissions
Before you embark on the construction of your attached pergola, it's essential to ensure that you have all the required permits and permissions in place. Here's what you need to do:
-
Research Local Regulations: Start by researching the building codes and regulations in your local area. Different regions have specific requirements for outdoor structures, including attached pergolas. Check with your local building department or municipal office to understand the rules and regulations that apply to your project.
-
Obtain Building Permits: In many cases, building a pergola attached to your house will require a building permit. This permit is a formal approval from the local authorities, ensuring that your construction plans comply with safety and zoning regulations. Submit your detailed pergola plans to the relevant department and obtain the necessary building permits before you begin construction.
-
Seek Homeowner's Association (HOA) Approval: If you live in a community governed by a homeowner's association, you may need to seek approval from the HOA before building your pergola. Review the HOA guidelines and submit your plans for review. Ensure that your proposed pergola design aligns with the association's architectural and aesthetic standards.
-
Consult with Professionals: If navigating the permit and approval process seems daunting, consider consulting with a local contractor or architect. These professionals can provide valuable insights into the permit requirements and help you prepare the necessary documentation for permit applications.
By taking the time to obtain the required permits and permissions, you'll avoid potential legal issues and ensure that your attached pergola complies with local regulations. This proactive approach sets the stage for a smooth and hassle-free construction process.
Gathering Materials and Tools
When it comes to building your attached pergola, having the right materials and tools at your disposal is essential for a successful construction process. Here's a comprehensive list of the items you'll need to gather before you begin:
Materials
- Lumber: Select high-quality, weather-resistant lumber for the structural components of your pergola. Pressure-treated wood, cedar, or redwood are popular choices due to their durability and resistance to decay.
- Fasteners: Stock up on galvanized or stainless steel screws, nails, and bolts to secure the various components of your pergola. These materials are essential for ensuring the structural integrity of your outdoor structure.
- Concrete Mix: If your pergola design includes post footings, you'll need concrete mix to secure the posts in the ground. Choose a high-quality concrete mix suitable for outdoor applications.
- Hardware: Gather the necessary hardware, including brackets, anchors, and connectors, to reinforce the joints and connections of your pergola.
- Decorative Elements: Depending on your design preferences, consider adding decorative elements such as lattice panels, trim pieces, or ornamental post caps to enhance the visual appeal of your pergola.
Tools
- Power Saw: A circular saw or miter saw will be indispensable for cutting lumber to the required dimensions with precision.
- Drill and Bits: Invest in a reliable drill and a set of drill bits to create pilot holes and drive screws during the assembly process.
- Level: Ensure that your pergola is perfectly level and plumb by using a spirit level throughout the construction process.
- Post Hole Digger: If your pergola design includes post footings, a post hole digger will be necessary for excavating the holes for the posts.
- Measuring Tape: Accurate measurements are crucial in construction, so a quality measuring tape is a must-have tool.
- Ladder: Depending on the height of your pergola, a sturdy ladder will be essential for reaching elevated areas during assembly.
By gathering the right materials and tools in advance, you'll streamline the construction process and minimize delays. Having everything on hand will allow you to focus on the task at hand and bring your DIY pergola to life with confidence and efficiency.
Preparing the Site for Construction
Before you can start building your attached pergola, it's crucial to prepare the site to ensure a solid foundation and smooth construction process. Here's a detailed breakdown of the steps involved in preparing the site for your pergola:
-
Clear the Area: Begin by clearing the designated area of any obstructions, debris, or vegetation. Remove rocks, roots, and any other obstacles that could interfere with the construction process. A clean, level surface will provide a stable foundation for your pergola.
-
Mark the Layout: Use stakes and string to mark the layout of your pergola on the ground. This will help you visualize the size and placement of the structure and ensure that it aligns with your initial design and measurements.
-
Excavate Post Footings: If your pergola design includes post footings, use a post hole digger or auger to excavate the holes for the posts. The depth and diameter of the holes should comply with local building codes and the specifications outlined in your pergola plans.
-
Assess Ground Stability: Evaluate the stability of the ground where the pergola will be installed. If the soil is soft or prone to erosion, consider reinforcing the foundation with gravel or compacted fill to provide a stable base for the structure.
-
Check for Utility Lines: Before digging or driving any stakes into the ground, contact your local utility companies to identify the location of underground utility lines. This precaution is essential for safety and to avoid damaging any existing infrastructure.
-
Prepare Drainage: Consider the drainage needs of the site to prevent water accumulation around the pergola. If necessary, make provisions for proper drainage to ensure that water flows away from the structure and surrounding areas.
-
Evaluate Sun and Shade: Take note of the sun and shade patterns in the area where your pergola will be situated. Understanding these patterns will help you determine the ideal orientation and placement of the structure to maximize comfort and usability.
By meticulously preparing the site for construction, you'll create a solid foundation for your attached pergola and set the stage for a successful and seamless building process. This proactive approach will contribute to the long-term stability and durability of your outdoor structure.
Building the Pergola Frame
Building the pergola frame is a pivotal phase in the construction process, as it forms the structural backbone of your outdoor retreat. Here's a detailed breakdown of the steps involved in constructing the pergola frame:
-
Cutting the Lumber: Begin by cutting the lumber to the precise dimensions outlined in your pergola plans. Use a power saw, such as a circular saw or miter saw, to ensure clean and accurate cuts. Pay careful attention to the angles and lengths of the components to guarantee a precise fit during assembly.
-
Assembling the Posts: Position the posts at the designated locations according to your layout markings. Use a level to ensure that the posts are plumb and securely anchored in the ground or attached to the existing structure. If your design includes post footings, fill the holes with concrete mix and allow it to cure before proceeding.
-
Installing the Beams and Rafters: Once the posts are in place, it's time to install the horizontal beams and rafters that form the framework of the pergola. Secure the beams to the posts using appropriate fasteners, ensuring that they are level and evenly spaced. Then, attach the rafters perpendicular to the beams, creating the distinctive overhead lattice pattern.
-
Reinforcing the Connections: To enhance the stability and longevity of your pergola frame, reinforce the connections between the posts, beams, and rafters. Use metal brackets, anchors, or structural screws to secure the components together, providing additional strength and resistance to external forces.
-
Adding Decorative Elements: Depending on your design preferences, consider incorporating decorative elements such as trim pieces, lattice panels, or ornamental post caps into the pergola frame. These details can elevate the visual appeal of your outdoor structure and add a touch of personalized charm.
-
Double-Checking Measurements: Throughout the assembly process, double-check the measurements and alignments of the components to ensure accuracy and consistency. Making adjustments as you progress will help avoid issues during the later stages of construction.
By following these steps and paying attention to detail during the construction of the pergola frame, you'll establish a sturdy and visually appealing framework for your outdoor oasis. This phase sets the stage for the subsequent steps in completing your attached pergola with confidence and precision.
Attaching the Pergola to Your House
Attaching the pergola to your house is a critical step that requires careful planning and precise execution to ensure a seamless integration with your existing structure. Here's a detailed guide on how to securely attach your pergola to your house:
-
Locate Attachment Points: Begin by identifying the suitable attachment points on your house where the pergola will be secured. These attachment points are typically the ledger board, which is a horizontal piece of lumber that will be fastened to the exterior wall of your house.
-
Prepare the Ledger Board: Cut the ledger board to the required length and ensure that it is level. It's crucial to use pressure-treated or rot-resistant lumber for the ledger board to withstand outdoor conditions. Additionally, the ledger board should be flashed to prevent water infiltration behind it.
-
Position and Secure the Ledger Board: With the help of a second person, position the ledger board at the desired height and alignment along the exterior wall of your house. Use a level to ensure that it is perfectly horizontal, and mark the locations for the attachment holes. Pre-drill the holes and then secure the ledger board to the house using lag screws or through-bolts, ensuring a strong and secure connection.
-
Create Water-Resistant Seal: To maintain the integrity of your house's exterior, it's essential to create a water-resistant seal between the ledger board and the house. Apply a high-quality flashing tape or membrane over the top of the ledger board, extending it onto the house's sheathing. This seal will prevent water from seeping behind the ledger and causing damage to the house's structure.
-
Install Flashing: Install metal flashing over the top of the ledger board and under the siding of the house. The flashing will further protect the attachment point from water intrusion, ensuring the long-term durability of the connection.
-
Attach the Pergola Rafters: Once the ledger board is securely in place, you can proceed with attaching the pergola rafters to it. The rafters should be positioned and secured to the ledger board according to your pergola design and layout. Use appropriate fasteners to ensure a strong and stable connection between the rafters and the ledger board.
-
Reinforce the Connection: To reinforce the attachment of the pergola to your house, consider adding additional support, such as diagonal braces or knee braces, depending on the design and size of your pergola. These reinforcements will enhance the structural integrity of the attachment and provide added stability.
By following these steps and ensuring a secure and watertight attachment, you'll successfully integrate your pergola with your house, creating a harmonious and functional outdoor living space. This phase marks a significant milestone in the construction of your attached pergola, bringing you closer to enjoying your personalized outdoor retreat.
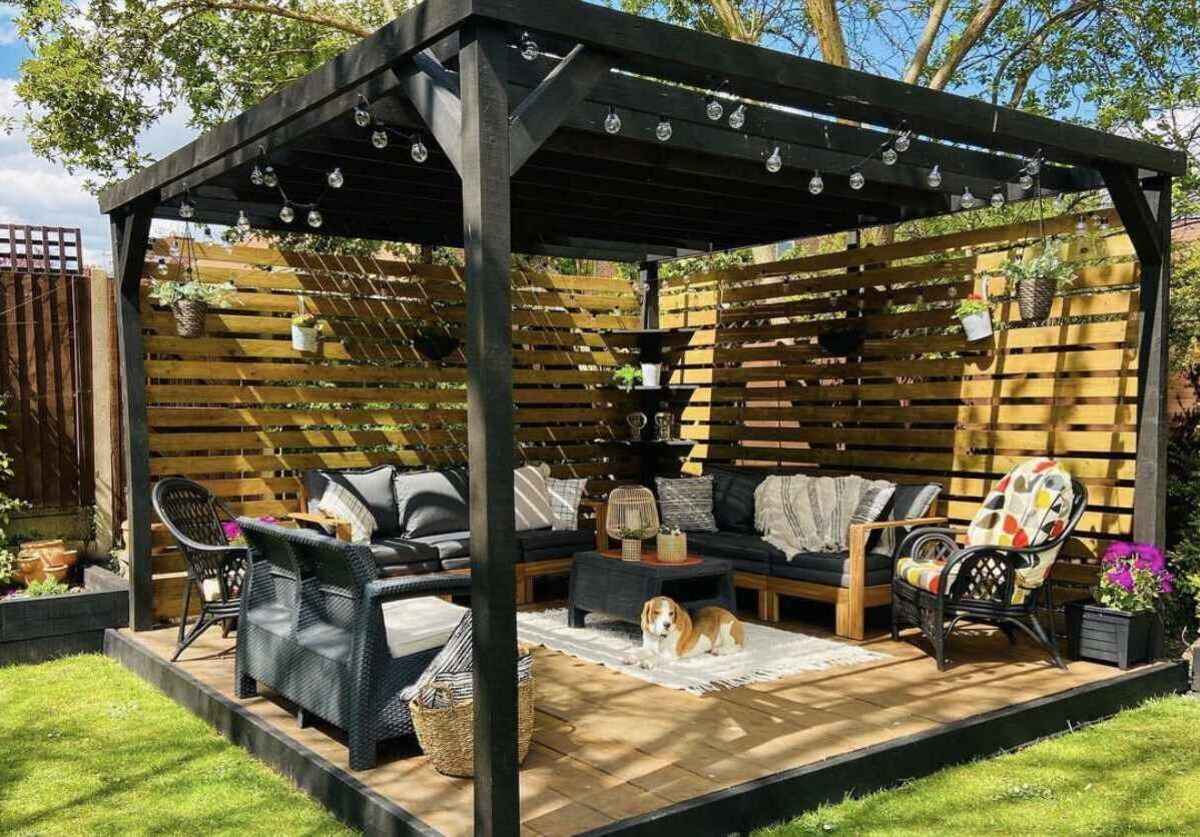
Adding Finishing Touches and Decorations
As the construction of your attached pergola nears completion, it's time to infuse personality and style into the structure by adding finishing touches and decorations. These elements will not only enhance the visual appeal of your outdoor space but also contribute to the overall ambiance and functionality of the pergola. Here's a comprehensive guide on how to add the perfect finishing touches and decorations to your DIY pergola:
1. Install Shade Elements
Consider incorporating shade elements such as retractable canopies, fabric sails, or louvered panels to provide adjustable shade and protection from the elements. These additions can enhance the versatility of your pergola, allowing you to adapt to changing weather conditions and create a comfortable outdoor environment year-round.
2. Introduce Greenery
Incorporating greenery into your pergola design can soften the structure's appearance and create a seamless transition between the outdoor and indoor spaces. Consider adding climbing plants, such as vines or flowering creepers, to grow along the pergola's posts and rafters, adding a natural and picturesque element to the structure.
3. Lighting Design
Strategically placed lighting can transform your pergola into a captivating nighttime retreat. Explore options such as string lights, lanterns, or integrated LED fixtures to create a warm and inviting ambiance. Lighting can also extend the functionality of your pergola, allowing you to enjoy the space after sunset.
4. Furnish with Comfort
Selecting comfortable and stylish outdoor furniture is essential for creating a welcoming and functional outdoor living area. Choose weather-resistant seating, tables, and accessories that complement the design of your pergola and cater to your intended use of the space, whether it's for dining, lounging, or entertaining.
5. Personalized Decor
Add personalized decor elements such as outdoor rugs, throw pillows, and decorative accents to infuse your unique style into the pergola. Consider incorporating artwork, sculptures, or other decorative pieces that reflect your personality and create a cohesive design theme.
6. Functional Additions
Incorporate functional elements such as built-in benches, storage compartments, or outdoor kitchen features to enhance the utility of your pergola. These additions can optimize the space and cater to specific activities, making your outdoor retreat more practical and enjoyable.
7. Privacy Solutions
If privacy is a concern, explore options for integrating privacy screens, curtains, or trellises into your pergola design. These solutions can create a secluded and intimate space within your outdoor retreat, allowing you to relax and unwind in a private setting.
By carefully considering and implementing these finishing touches and decorations, you'll elevate your attached pergola from a simple structure to a captivating and functional outdoor sanctuary. These details will contribute to the overall appeal and usability of your DIY pergola, creating a space that reflects your personal style and enhances your outdoor living experience.
Maintenance and Care for Your Pergola
Once your attached pergola is complete, it's essential to prioritize its maintenance and care to ensure its longevity and continued visual appeal. Proper maintenance practices will help preserve the structural integrity of the pergola and protect it from the effects of weather and natural wear. Here's a comprehensive guide on how to maintain and care for your pergola:
Regular Cleaning
Regular cleaning is crucial to prevent the buildup of dirt, debris, and organic matter on your pergola. Use a mild detergent or specialized outdoor cleaner and a soft-bristle brush to scrub the surfaces of the pergola, including the posts, beams, and rafters. Rinse thoroughly with water to remove any residue and allow the structure to air dry. This cleaning routine will help maintain the appearance of your pergola and prevent the accumulation of grime.
Inspection and Repairs
Periodically inspect your pergola for signs of wear, damage, or structural issues. Check for loose fasteners, cracked wood, or signs of rot or decay. Address any issues promptly by tightening fasteners, replacing damaged components, or applying wood preservatives or sealants to protect the wood from moisture and decay. Regular inspections will allow you to identify and address maintenance needs before they escalate into more significant problems.
Staining or Sealing
To protect the wood from the effects of sun exposure, moisture, and temperature fluctuations, consider applying a high-quality wood stain or sealant to the surfaces of your pergola. Choose a product specifically formulated for outdoor use and follow the manufacturer's instructions for application. Staining or sealing the wood will enhance its durability and resistance to weather-related damage, prolonging the lifespan of your pergola.
Seasonal Upkeep
Adjust your maintenance routine to accommodate seasonal changes and weather conditions. In the spring, conduct a thorough cleaning and inspection of the pergola to prepare it for the warmer months. During the fall, remove any accumulated leaves, debris, or vegetation from the structure to prevent moisture retention and potential decay. Additionally, consider applying a fresh coat of stain or sealant as needed to fortify the wood before the onset of harsh weather.
Pest Control
Keep an eye out for signs of pest infestation, such as insect damage or nesting activity. Implement pest control measures as necessary to protect your pergola from wood-boring insects, termites, or other pests that can compromise its structural integrity. Consider using environmentally friendly pest deterrents or seeking professional assistance if the infestation is severe.
Landscape Maintenance
Incorporate the maintenance of your pergola into your overall landscape care routine. Trim back overhanging branches, vines, or foliage that may come into contact with the pergola. This proactive approach will prevent vegetation from causing damage to the structure and ensure that the surrounding landscape complements the visual appeal of your outdoor retreat.
By adhering to these maintenance and care practices, you'll safeguard the beauty and functionality of your attached pergola, allowing you to enjoy its benefits for years to come. Consistent upkeep and proactive maintenance will contribute to the long-term durability and aesthetic appeal of your DIY pergola, ensuring that it remains a cherished feature of your outdoor living space.